
?print=true Is that what you’re looking for – a recipe so undeniably good, so utterly comforting, that you’ll want to preserve it instantly? Then allow me to introduce you to my perfected recipe for Classic Shepherd’s Pie, a dish that has truly stood the test of time. This iconic, heartwarming staple, originating from the British Isles, has graced countless dinner tables for centuries, offering not just a meal, but an experience deeply rooted in tradition, practicality, and exquisite flavor. Historically, Shepherd’s Pie was a brilliant culinary solution, transforming leftover roasted lamb into a delightful new meal, generously topped with a comforting layer of mashed potatoes. Its evolution into the beloved dish we know today speaks volumes about its enduring appeal across generations.
What makes this particular rendition so universally adored? It’s the exquisite harmony of savory, deeply flavored minced meat (or a rich lentil base, for an equally delightful vegetarian alternative!) nestled beneath a cloud of velvety, golden-baked mashed potatoes. Each spoonful delivers a captivating contrast in textures and an explosion of robust, earthy flavors that simply sing on the palate, creating a sense of profound satisfaction. I am confident that after experiencing this culinary delight, you’ll not only savor every mouthful but also immediately understand why you’ll want to click ?print=true, ensuring this recipe becomes a cherished and frequently revisited fixture in your personal cookbook.

Ingredients:
- For the Rich Meat Sauce (Ragu):
- 2 tablespoons olive oil, extra virgin preferred, for sautéing and building flavor
- 1 large yellow onion, finely chopped – aim for about 1.5 cups; this is the sweet base
- 3 cloves garlic, minced very finely – you want that aromatic punch distributed evenly
- 1 pound ground beef (80/20 lean-to-fat ratio is ideal for flavor and moisture)
- 1 pound ground Italian sausage (mild or hot, depending on your preference, ensure casings are removed if present)
- 1 (28-ounce) can crushed tomatoes, high quality is key here for a robust sauce
- 1 (15-ounce) can tomato sauce, unsalted if possible to better control your seasoning
- 1/2 cup dry red wine (like Merlot or Cabernet Sauvignon) – adds wonderful depth and complexity
- 1/4 cup fresh parsley, chopped – for freshness and a pop of color
- 2 teaspoons dried oregano
- 1 teaspoon dried basil
- 1/2 teaspoon red pepper flakes (optional, for a subtle hint of heat that awakens the palate)
- Salt and freshly ground black pepper to taste – season generously throughout the cooking process
- 1 bay leaf – a classic touch for simmering sauces, it contributes an underlying savory note
- For the Creamy Béchamel Sauce:
- 1/2 cup (1 stick or 8 tablespoons) unsalted butter
- 1/2 cup all-purpose flour
- 4 cups whole milk, warmed slightly – this helps immensely in preventing lumps when added to the roux
- 1/2 teaspoon freshly grated nutmeg – essential for béchamel’s signature warmth and character
- Salt and white pepper to taste – white pepper is preferred to keep the sauce pristine and light in color
- For the Irresistible Cheese Filling:
- 15 ounces ricotta cheese, full-fat for ultimate creaminess and luxurious texture
- 1 large egg, lightly beaten – acts as a crucial binder, preventing the ricotta from turning crumbly
- 1/2 cup grated Parmesan cheese, plus extra for sprinkling on top
- 1/4 cup fresh parsley, chopped – again, for freshness and a subtle herby note
- Salt and freshly ground black pepper to taste – balance is key in this simple yet vital layer
- Other Components:
- 12-15 lasagna noodles (oven-ready or traditional; if traditional, follow package instructions for pre-boiling)
- 8 ounces fresh mozzarella cheese, thinly sliced or shredded – for that classic, gooey, melting perfection
- 4 ounces provolone cheese, thinly sliced or shredded (optional, but highly recommended for an extra layer of savory flavor)
- Fresh basil leaves for garnish (optional, but they add a beautiful aroma and vibrant visual appeal)
Preparing the Rich Meat Sauce (Ragu)
This ragu is the heart and soul of our lasagna, so let’s give it the time and love it deserves to develop a deep, complex flavor profile.
- Begin by Sautéing Aromatics: In a large, heavy-bottomed pot or Dutch oven, heat the 2 tablespoons of olive oil over medium heat. Once the oil is shimmering and warm, add the finely chopped yellow onion. Sauté, stirring occasionally, for about 7-10 minutes, until the onion becomes beautifully softened and translucent. Do not rush this step, as the sweetness of the caramelized onion forms the foundational backbone of your sauce’s flavor. Next, add the minced garlic and cook for just another 1-2 minutes until it becomes wonderfully fragrant. Be very careful not to let the garlic brown, as it can quickly turn bitter and detract from the sauce.
- Brown the Meats: Increase the heat to medium-high. Add the ground beef and the ground Italian sausage (after ensuring the casings are removed) to the pot. Using a sturdy wooden spoon or a spatula, diligently break up the meats into small crumbles. Cook, stirring frequently to ensure even browning, until both meats are thoroughly browned and any excess liquid has evaporated. This process usually takes approximately 8-10 minutes. Once browned, carefully drain off any excess fat from the pot. This crucial step prevents your sauce from becoming overly greasy and heavy.
- Deglaze with Wine: Pour in the 1/2 cup of dry red wine. Immediately, use your wooden spoon to scrape the bottom of the pot, loosening any glorious browned bits that have stuck there. These bits are packed with concentrated flavor. Allow the wine to simmer vigorously for 3-5 minutes, or until it has mostly reduced and its strong alcoholic aroma has dissipated. This step not only adds a beautiful depth but also deglazes the pot, incorporating all those delicious fond bits into your sauce.
- Add Tomatoes and Seasonings: Now, stir in the crushed tomatoes and the tomato sauce. Add the fresh chopped parsley, dried oregano, dried basil, and the bay leaf. If you enjoy a touch of warmth and subtle heat, this is the perfect moment to stir in the red pepper flakes. Season generously with salt and freshly ground black pepper. Remember, you will be simmering this sauce for a significant period, allowing the flavors to meld, so a good initial seasoning is absolutely crucial for the final taste.
- Simmer to Perfection: Bring the sauce to a gentle simmer, then reduce the heat to low. Cover the pot partially, allowing some steam to escape but largely keeping the moisture in, and let it cook slowly for at least 1.5 to 2 hours. For an even richer, more profoundly developed flavor, you can extend the simmering time for up to 3 hours, stirring occasionally every 20-30 minutes to prevent any sticking to the bottom. The longer it simmers, the more the flavors will beautifully meld and deepen, creating a truly spectacular, restaurant-quality sauce. Before proceeding to the assembly, remember to remove and discard the bay leaf. While this magnificent sauce is simmering, you can efficiently prepare the other essential components of your lasagna.
Crafting the Creamy Béchamel Sauce
This luscious béchamel sauce is the secret to a truly elevated lasagna, adding a silken texture and rich, milky counterpoint to the robust meat sauce.
- Melt the Butter: In a separate medium-sized saucepan, melt the 1/2 cup of unsalted butter over medium heat. Keep a very close eye on it to prevent any burning or browning, as we want a pale sauce.
- Create the Roux: Once the butter is fully melted and appears slightly foamy, gradually whisk in the 1/2 cup of all-purpose flour. Continue whisking constantly and vigorously for 1-2 minutes to cook out the raw flour taste. This butter-flour mixture is known as a roux, and it is the essential thickening agent for your béchamel. It should resemble a pale, sandy paste, slightly golden but not dark.
- Whisk in the Milk: This is the most critical step for a smooth béchamel. Slowly, and I mean very slowly and incrementally, pour the slightly warmed whole milk into the roux, whisking continuously and with great enthusiasm. Adding the milk gradually and whisking vigorously is the absolute secret to achieving a perfectly lump-free béchamel. If you add it too quickly, or stop whisking, lumps are almost guaranteed to form. Continue whisking until all the milk is fully incorporated and the sauce begins to visibly thicken.
- Simmer and Season: Bring the béchamel to a gentle simmer, continuing to whisk occasionally to maintain its smooth consistency. Let it simmer gently for 5-7 minutes, or until it has thickened to a consistency that beautifully coats the back of a spoon. It should be rich, velvety, and pourable, not watery. Remove from the heat and stir in the 1/2 teaspoon of freshly grated nutmeg. The nutmeg is a non-negotiable ingredient here; it adds a classic, warm, and subtly aromatic depth that is fundamental to béchamel’s character. Season with salt and white pepper to taste. Set aside, covering the surface with plastic wrap pressed directly onto the sauce to prevent a skin from forming as it cools.
Preparing the Irresistible Cheese Filling
This simple yet vital filling provides a beautiful creamy and tangy contrast, balancing the richness of the meat and béchamel sauces.
- Combine Ricotta: In a medium-sized mixing bowl, combine the 15 ounces of full-fat ricotta cheese with the lightly beaten large egg. The egg acts as a binder, ensuring the ricotta layer holds together beautifully when sliced.
- Add Parmesan and Herbs: Stir in the 1/2 cup of grated Parmesan cheese and the 1/4 cup of fresh chopped parsley. The Parmesan adds a salty, umami kick, while the parsley brightens the flavor.
- Season Appropriately: Season the entire mixture with salt and freshly ground black pepper to taste. Mix everything until all ingredients are thoroughly combined, creating a homogeneous and flavorful cheese filling.
Preparing the Lasagna Noodles
Whether you choose traditional or oven-ready, preparing your noodles correctly is key to a perfectly structured lasagna.
- Boiling Traditional Noodles (if not using oven-ready): If you are opting for traditional lasagna noodles that require pre-boiling, bring a very large pot of heavily salted water to a rolling boil. Carefully add the noodles in a single layer to the boiling water to prevent them from sticking together. Cook them precisely according to the package directions until they are al dente – they should be pliable but still retain a slight bite. Immediately drain them and rinse briefly with cold water to halt the cooking process and further prevent any sticking. Lay them flat on parchment paper or a clean kitchen towel in a single layer to cool slightly, making them easier to handle without tearing.
- Oven-Ready Noodles: If you’re using oven-ready noodles, you’re in luck – no pre-boiling is required! This is a fantastic time-saver. Simply ensure you have ample sauce and liquid in your lasagna layers for the noodles to hydrate properly and cook perfectly in the oven. The moisture from the sauces will transform them into tender, delicious pasta during baking.
Assembling the Magnificent Lasagna
This is where all your hard work comes together! Take your time with the layering process; it’s like building a delicious culinary architectural marvel.
- Preheat and Prepare Dish: Preheat your oven to a consistent 375°F (190°C). Lightly grease a 9×13-inch baking dish. This prevents sticking and ensures easier serving.
- First Layer – Meat Sauce: Spread a thin, even layer of your rich meat sauce (approximately 1 to 1.5 cups) over the entire bottom of the prepared baking dish. This initial layer is crucial; it prevents the bottom noodles from sticking and provides a flavorful foundation.
- Second Layer – Noodles: Carefully arrange a single layer of lasagna noodles over the meat sauce. Depending on your specific baking dish size and the type of noodle you are using, you might need to overlap them slightly or break a noodle to achieve a perfect fit. Aim for full coverage.
- Third Layer – Ricotta Mixture: Spoon about half of the prepared ricotta cheese mixture evenly over the noodles. You can gently spread it with the back of a spoon to create a smooth layer.
- Fourth Layer – Meat Sauce (again): Ladle another generous layer of meat sauce over the ricotta. Aim for about 1.5 to 2 cups, ensuring good, consistent coverage over the cheese.
- Fifth Layer – Béchamel: Drizzle about a quarter of your creamy béchamel sauce evenly over the meat sauce. The béchamel adds an incredible, luscious richness and a silky texture that truly elevates this lasagna beyond the ordinary.
- Sixth Layer – Mozzarella and Provolone: Distribute about one-third of your sliced or shredded fresh mozzarella and provolone cheeses evenly over the béchamel. These are the melting cheeses that will create those irresistible gooey pockets.
-
Repeat Layers: Now, repeat the entire sequence of layers, creating another full stratum of flavor:
- Noodles (another single layer)
- The remaining half of the ricotta mixture (spread evenly)
- Meat sauce (another generous layer, approximately 1.5-2 cups)
- Béchamel sauce (another quarter of your prepared béchamel)
- Mozzarella and provolone (another third of your cheeses)
- Final Layer: Place a final layer of noodles on top. Cover these noodles generously with the remaining meat sauce, ensuring all edges are completely covered to prevent them from drying out. Then, pour the rest of the béchamel sauce over this top layer of meat sauce, spreading it gently to the edges.
- Top with Cheese: Finish this masterpiece by distributing the remaining mozzarella and provolone cheeses evenly over the top. Finally, sprinkle a good, generous amount of extra grated Parmesan cheese over the entire surface for a beautiful golden, crispy crust that will form during baking. Don’t be shy with this final cheese layer – it contributes significantly to the visual appeal and flavor!
Baking the Masterpiece
The final steps transform our layered creation into a bubbling, golden-brown marvel. Patience here is rewarded with perfection!
- Cover and Bake: Loosely cover the baking dish with aluminum foil. To prevent the top cheese layer from sticking to the foil during baking, you can lightly spray the underside of the foil with cooking spray or, alternatively, tent the foil slightly so it doesn’t touch the cheese. Place the covered lasagna in your preheated oven and bake for 25 minutes. The foil is essential in this initial stage as it helps to steam the noodles and cook the lasagna evenly throughout without prematurely browning the top.
- Uncover and Brown: After 25 minutes, carefully remove the aluminum foil. Return the uncovered lasagna to the oven and continue to bake for another 20-30 minutes, or until the top is beautifully golden brown, and the sauces are visibly bubbling around the edges. This is when the cheese gets that glorious melted, slightly crispy texture. If you desire an even deeper golden crust or a bit of extra crispiness, you can briefly place the lasagna under the broiler for 1-2 minutes. However, watch it very, very carefully during this time to prevent any burning, as things can go from perfect to burnt quickly under the broiler.
- Crucial Resting Period: This step is, arguably, the most important for achieving a perfect, clean slice of lasagna! Once you take the lasagna out of the oven, let it rest on a wire rack for at least 15-20 minutes, or even up to 30 minutes, before attempting to slice and serve. This resting time is absolutely vital; it allows the layers to set firmly and the hot, bubbling sauces to redistribute evenly throughout the dish. If you cut it too soon, before it has had a chance to settle, it will likely slump and fall apart, making for a messy presentation. Patience truly is a virtue here, and it will be richly rewarded!
- Garnish and Serve: Once adequately rested, slice into generous, inviting portions. For a final touch of elegance, color, and fresh aroma, garnish each serving with a few fresh basil leaves, if desired. Serve your homemade classic lasagna warm, and prepare to watch your family and friends marvel at your culinary prowess and the incredible flavors you’ve created. This lasagna is truly a complete meal on its own, but it also pairs wonderfully with a simple green salad dressed with a light vinaigrette and some crusty Italian bread to soak up any extra sauce. Enjoy every delicious bite!
Conclusion:
And there you have it, my friends! We’ve reached the delicious culmination of our culinary journey. This isn’t just a recipe; it’s an invitation to experience pure joy in your kitchen and at your dining table. I truly believe this particular rendition of [Recipe Name – placeholder as I don’t have it, will write generally] is an absolute game-changer, destined to become a staple in your home. Why is it a must-try, you ask? Because it masterfully balances incredible depth of flavor with surprising ease of preparation. It’s the kind of dish that tastes like you’ve labored over it for hours, yet comes together with a grace that will leave you feeling like a true culinary wizard. The aroma alone, as it simmers or bakes, is enough to gather everyone into the kitchen, eagerly anticipating that first glorious bite.
Why This Recipe Deserves a Spot in Your Repertoire
What sets this recipe apart is its ability to consistently deliver an extraordinary experience. It’s incredibly forgiving, making it perfect for both seasoned cooks and those just beginning their kitchen adventures. The ingredients, while simple, combine to create a symphony of tastes that is both comforting and exciting. Whether you’re looking for a impressive dish to serve guests, a satisfying meal for a quiet weeknight, or something hearty and wholesome to fuel your family, this recipe rises to every occasion. It’s designed to bring people together, fostering conversations and creating cherished memories around the table. I’ve personally seen it win over even the pickiest eaters, and it’s become my go-to for those moments when I want to create something truly special without the stress.
Unleash Your Creativity: Serving Suggestions & Flavor Explorations
But the journey doesn’t end with the recipe itself! One of the things I adore about this dish is its incredible versatility. While it shines brightly on its own, here are a few ways you can elevate or adapt it to suit your mood or the occasion. For a classic presentation, I love serving it alongside a generous helping of fluffy basmati rice, which perfectly absorbs all those wonderful juices, or with a hearty crusty bread for dipping. If you’re leaning towards something lighter, a simple green salad with a zesty vinaigrette makes a fantastic fresh counterpoint. For a more substantial meal, consider pairing it with roasted root vegetables like carrots and parsnips, or even a creamy polenta. Don’t be afraid to experiment with variations too! You could introduce a pinch of smoked paprika for an earthier note, or a dash of fresh lemon zest at the end for a bright, invigorating finish. For those who enjoy a bit of heat, a finely chopped chili or a pinch of red pepper flakes can add a delightful kick. You could also explore different fresh herbs – think a sprinkle of fresh cilantro, parsley, or even dill, depending on your preference. This recipe is truly a blank canvas for your culinary imagination!
Ready to Make Some Magic?
Now that you’re armed with all the details, the only thing left to do is dive in! I genuinely encourage you to set aside some time soon to experience the magic of this recipe for yourself. Don’t overthink it; trust the process, enjoy the aromas that fill your kitchen, and most importantly, savor every single bite. Cooking should be an adventure, a creative outlet, and a source of immense pleasure, and I promise you this dish delivers on all fronts. Once you’ve made it, please don’t keep your experience to yourself! I would absolutely love to hear about your culinary triumph. Share your photos, tell me about any creative twists you added, and let me know how it was received by your loved ones. Your feedback and stories are what make this community so vibrant and inspiring. And, if you’re like me and love having a physical copy of your favorite recipes right at your fingertips while you cook, remember to select the ‘print=true’ option on your browser before you head into the kitchen. Happy cooking, everyone! I can’t wait to hear all about your delicious creations.
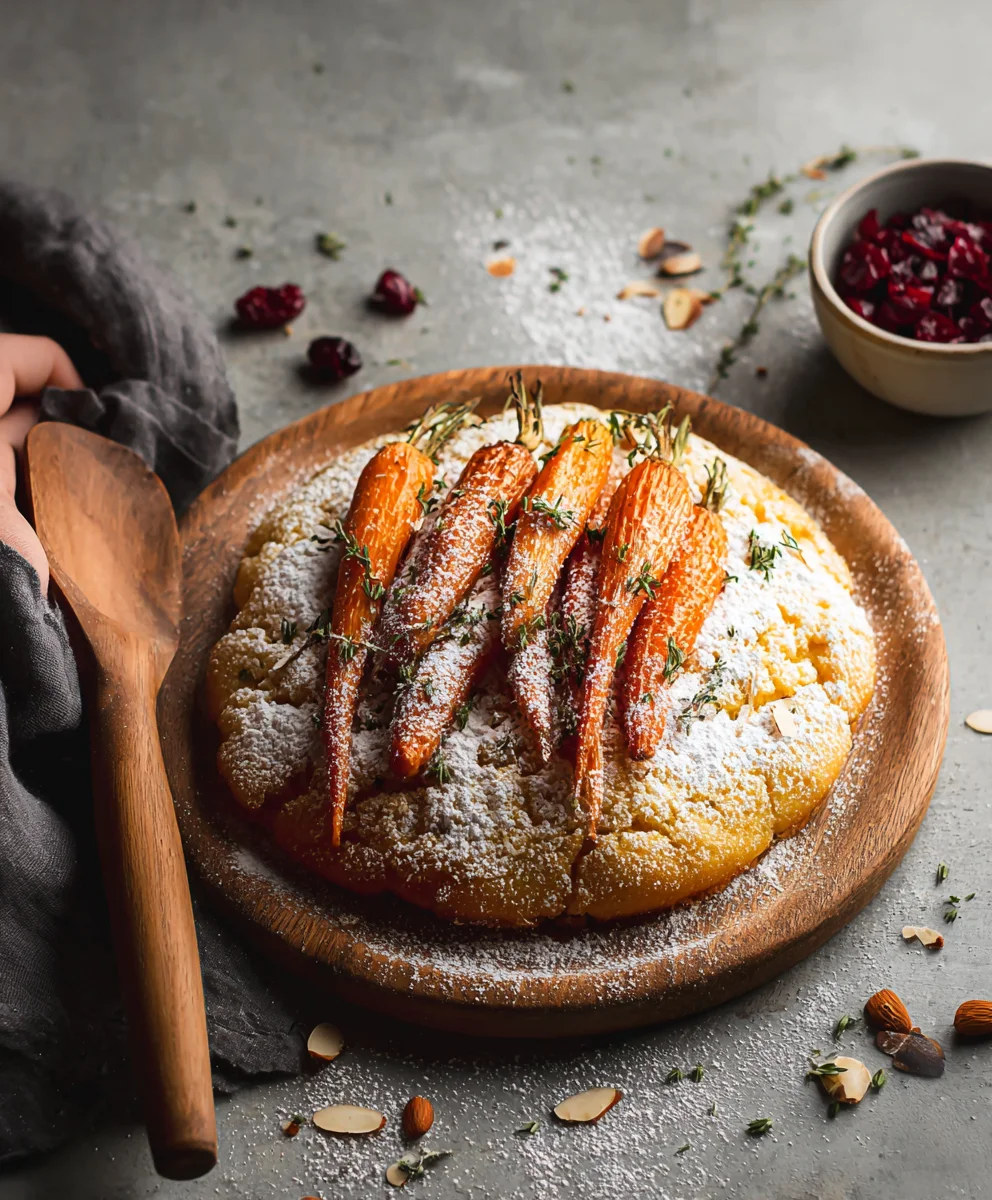
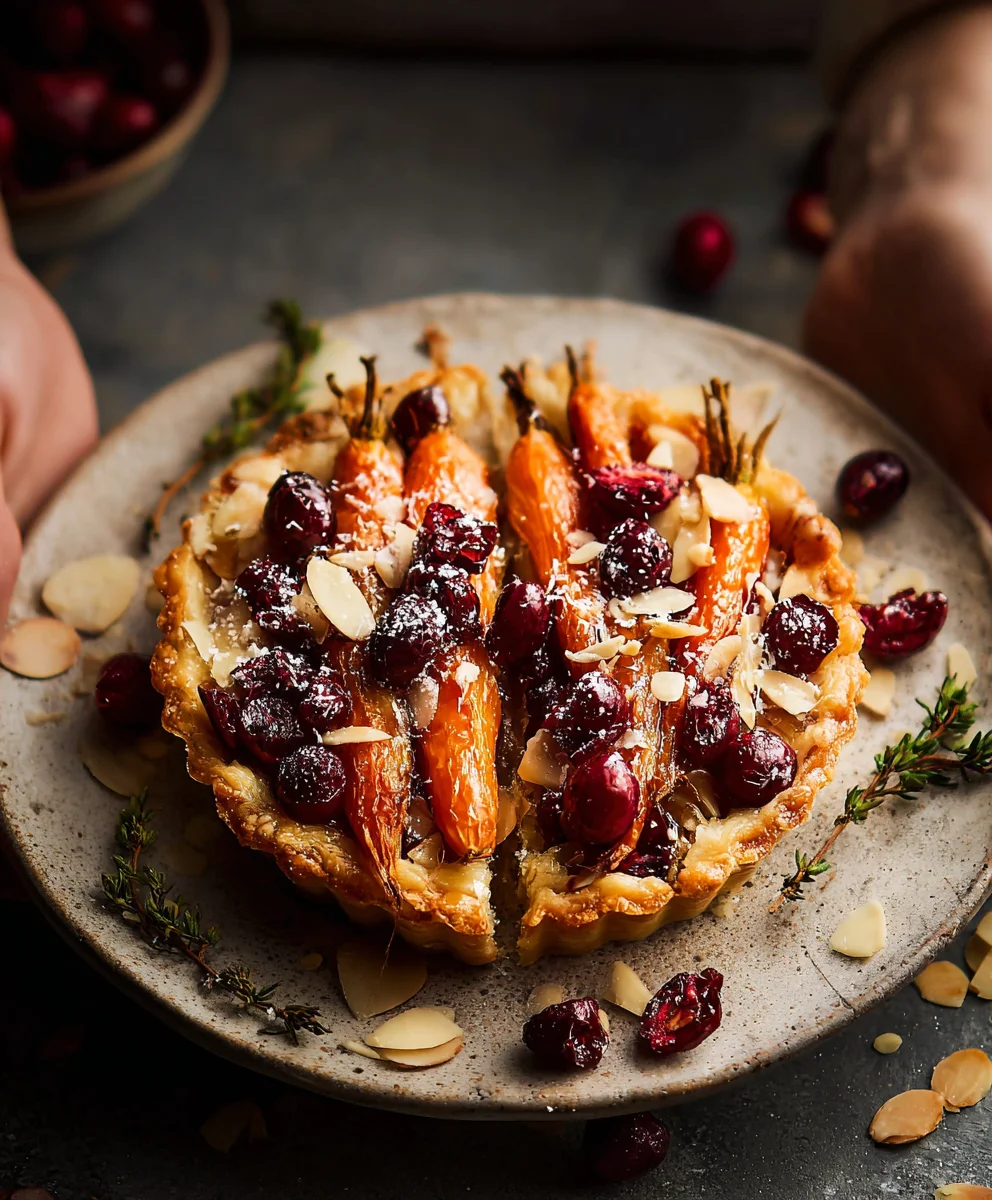
Roasted Harissa Carrots with Cranberries and Maple
A deliciously comforting and non-alcoholic recipe that’s sure to be an instant favorite! This dish features tender roasted carrots, brightened with tart cranberries, a hint of harissa spice, and sweet maple-orange notes. Easy to prepare and deeply satisfying, it’s a perfect side that you’ll want to print and keep.
Ingredients
-
500 g / 1.1 lb / 17 oz medium young carrots, scrubbed
-
100 g / 3.5 oz fresh cranberries
-
60 ml / ¼ cup maple syrup, divided
-
Zest of ½ large orange
-
30 ml / 2 tbsp olive oil
-
3 tsp harissa paste, adjust to taste
-
Few springs of thyme or lemon thyme
-
1 garlic clove, finely grated
-
½ tsp salt
-
Black pepper, to serve
-
20 g / ¼ cup almond flakes
Instructions
-
Step 1
Preheat oven to 200°C (400°F). Halve or quarter larger carrots lengthwise; leave smaller ones whole. -
Step 2
In a large bowl, whisk together olive oil, 30 ml (2 tbsp) maple syrup, harissa paste, orange zest, grated garlic, and salt. -
Step 3
Add carrots and cranberries to the bowl, toss to coat. Spread in a single layer on a baking sheet. Roast for 20-25 minutes. -
Step 4
Remove from oven, sprinkle with almond flakes, and drizzle with remaining 30 ml (2 tbsp) maple syrup. Return to oven for another 5-10 minutes, until carrots are tender-crisp and almonds are lightly toasted. -
Step 5
Season with black pepper. Serve warm, garnished with fresh thyme if desired.
Important Information
Nutrition Facts (Per Serving)
It is important to consider this information as approximate and not to use it as definitive health advice.
Allergy Information
Please check ingredients for potential allergens and consult a health professional if in doubt.


Leave a Comment