
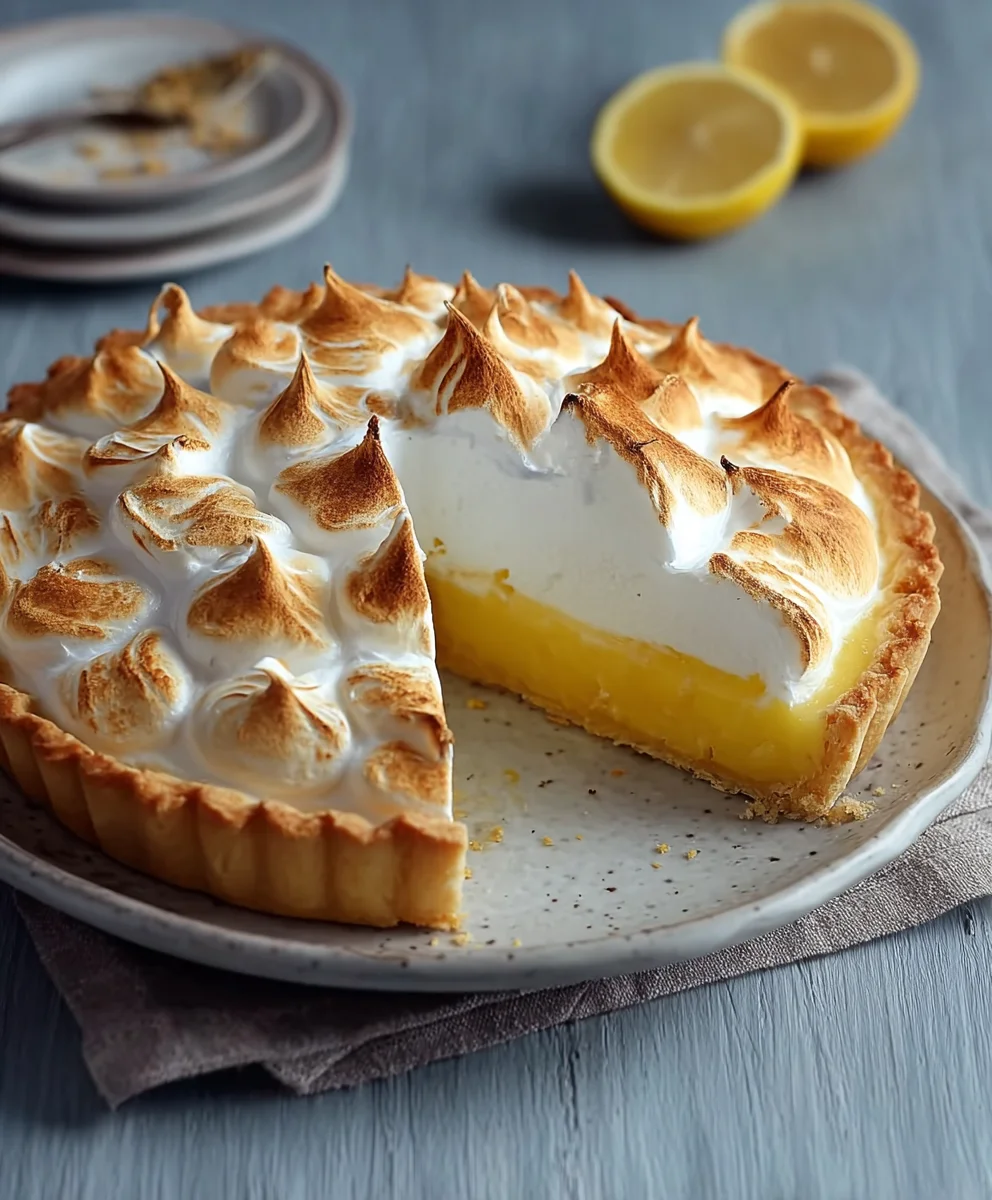
Golden Mary Berrys Lemon Meringue Pie – what an exquisite delight it is to present such a masterpiece! From the moment its grand silhouette graces the table, with that iconic golden, towering meringue standing proud, one immediately understands its universal appeal. I find it truly captivating how a dessert can combine such vibrant flavours with such stunning visual drama, making it a true showstopper for any occasion.
A Legacy of Sweet Perfection and Unforgettable Flavour
This beloved confection, while perfected by culinary icons like Mary Berry, carries a rich lineage in baking history, evolving from simpler lemon custards into the layered marvel we cherish today. It evokes a profound sense of comforting nostalgia, often gracing family gatherings and celebratory feasts. People adore this dish for its incredible harmony of textures and tastes: the crisp, buttery pastry, the delightfully sharp and tangy lemon filling that awakens the palate, and the sweet, impossibly light meringue that offers a delicate, pillowy contrast.
Mastering the art of creating a truly exceptional Golden Mary Berrys Lemon Meringue Pie is a culinary journey I am thrilled to guide you through. It’s a rewarding experience that promises to impress both visually and gastronomically, leaving a lasting impression on all who indulge.

Ingredients:
-
For the Sweet Shortcrust Pastry:
- 225g (8oz) plain flour, plus extra for dusting
- A pinch of salt
- 125g (4½oz) cold unsalted butter, cut into small cubes
- 1 medium free-range egg yolk
- 2-3 tablespoons ice-cold water
-
For the Luscious Lemon Filling:
- 4 large free-range egg yolks
- 2 large whole free-range eggs
- 150g (5½oz) caster sugar
- 150ml (5fl oz) freshly squeezed lemon juice (from about 3-4 lemons)
- Zest of 2 large unwaxed lemons
- 100g (3½oz) unsalted butter, cut into cubes
-
For the Cloud-like Meringue Topping:
- 4 large free-range egg whites (from the eggs used for the filling)
- 200g (7oz) caster sugar
- 1 teaspoon cornflour (cornstarch)
- ½ teaspoon white wine vinegar
For the Sweet Shortcrust Pastry:
- Prepare the Dry Ingredients: First, into a large mixing bowl, I like to sift my plain flour and a pinch of salt. This little step ensures there are no lumps and helps distribute the salt evenly, which is vital for a beautifully balanced shortcrust pastry base for our Golden Mary Berrys Lemon Meringue Pie.
- Incorporate the Butter: Next, I add the cold, cubed unsalted butter. It’s absolutely crucial that your butter is very cold; this helps create that beautiful, crumbly, melt-in-the-mouth texture we’re aiming for. Using my fingertips, I gently rub the butter into the flour until the mixture resembles fine breadcrumbs. The key here is to work quickly and with light hands to prevent the butter from melting too much from the heat of my hands. You want distinct little pockets of butter throughout.
- Add the Wet Ingredients: In a separate small bowl, I lightly whisk the egg yolk with 2 tablespoons of the ice-cold water. I make a well in the centre of my flour and butter mixture and pour in the egg yolk mixture. Using a flat-bladed knife, I carefully mix it in until the dough starts to come together. If it still feels a little dry, I add the third tablespoon of ice-cold water, a teaspoon at a time, until it just forms a cohesive dough. Be careful not to add too much water, as this can make the pastry tough.
- Chill the Dough: Once the dough has just come together, I turn it out onto a lightly floured surface and gently bring it into a smooth ball. I try my best to avoid overworking the dough, as this develops the gluten and can make the pastry chewy instead of flaky. I then flatten the ball slightly into a disc, wrap it tightly in cling film, and pop it into the fridge to chill for at least 30 minutes. This chilling time is non-negotiable; it rests the gluten and makes the pastry much easier to roll out.
- Roll and Line the Tin: After chilling, I preheat my oven to 180°C (160°C fan/350°F/Gas Mark 4). I lightly flour my work surface and rolling pin, then roll out the pastry disc evenly until it’s large enough to line a 23cm (9-inch) fluted flan tin with a loose bottom. I carefully lift the pastry into the tin, pressing it gently into the base and up the sides. I trim any excess pastry from the edges, leaving a slight overhang that I’ll trim more neatly after blind baking. I prick the base all over with a fork to prevent it from puffing up during baking.
- Blind Bake the Pastry: To ensure a crisp base for our Golden Mary Berrys Lemon Meringue Pie, I line the pastry case with a sheet of baking parchment and fill it with ceramic baking beans (or dried pulses). I bake it blind for about 15 minutes. After this time, I carefully remove the baking beans and parchment and return the pastry case to the oven for another 5-10 minutes, or until the base is lightly golden and feels dry to the touch. This step is called “dry baking” and ensures the base remains firm even with a wet filling. Once baked, I take it out of the oven and carefully trim off any remaining excess pastry from the edges with a small, sharp knife. I then let the pastry case cool completely on a wire rack while I prepare the glorious lemon filling.
For the Luscious Lemon Filling:
- Prepare the Citrus: To begin this wonderfully tangy filling, I zest my two large unwaxed lemons directly into a heatproof bowl. It’s important to only get the yellow part of the zest, as the white pith can be bitter. Then, I carefully squeeze the lemons to extract 150ml of fresh lemon juice, ensuring no pips make it into the juice. The fresh zest and juice are what give this Golden Mary Berrys Lemon Meringue Pie its signature zing!
- Combine Wet Ingredients: In a separate medium-sized saucepan, I gently whisk together the 4 egg yolks and 2 whole eggs. Then, I gradually whisk in the caster sugar until it’s well combined and slightly pale.
- Infuse and Thicken: Now, I add the lemon juice and the lemon zest to the egg and sugar mixture in the saucepan. I place the saucepan over a low heat and begin to stir continuously using a wooden spoon or a heatproof spatula. This step requires patience and constant stirring to prevent the eggs from scrambling. I continue to cook the mixture, stirring all the while, for about 10-15 minutes, or until it has thickened significantly. You’ll know it’s ready when it coats the back of your spoon, and when you draw a line across the spoon with your finger, the line holds. It should feel like a thick custard.
- Enrich with Butter: Once the lemon mixture has reached the desired thickness, I remove the saucepan from the heat. I then gradually add the cubed unsalted butter, a few pieces at a time, whisking vigorously after each addition until the butter is fully melted and incorporated. The butter adds a beautiful richness and a silky smooth texture to the lemon filling. It’s truly what makes it so luxurious for our Golden Mary Berrys Lemon Meringue Pie.
- Cool the Filling: To ensure a perfectly smooth filling, I pour the hot lemon mixture through a fine-mesh sieve set over a clean bowl. This removes any bits of cooked egg or zest that might compromise the texture. I then press a piece of cling film directly onto the surface of the lemon filling to prevent a skin from forming as it cools. I let it cool down to room temperature before pouring it into the blind-baked pastry case. This cooling step is crucial for preventing the pastry from becoming soggy and for ensuring the meringue doesn’t melt when applied.
For the Cloud-like Meringue Topping:
- Prepare the Egg Whites: First, I ensure my mixing bowl (preferably a stand mixer bowl) and whisk attachment are absolutely spotlessly clean and free from any grease. Even a tiny speck of fat can prevent the egg whites from whipping up properly. I carefully separate the 4 egg whites from their yolks (which I used for the filling) into this clean bowl.
- Whip to Soft Peaks: I begin to whisk the egg whites on a medium speed until they become frothy and start to hold soft peaks. This usually takes a couple of minutes. You’ll see beautiful, soft waves forming in the whites.
- Gradually Add Sugar: Now, this is where the magic happens for that glossy, stable meringue. While continuing to whisk on a medium-high speed, I gradually add the caster sugar, one tablespoon at a time, allowing each addition to fully dissolve before adding the next. This slow and steady process is key to creating a stable meringue. It will take about 8-10 minutes in total.
- Achieve Stiff, Glossy Peaks: I continue to whisk until all the sugar is incorporated and the meringue is incredibly thick, glossy, and holds very stiff peaks. When you lift the whisk, the peaks should stand upright without drooping. Also, if you rub a little meringue between your fingers, it should feel smooth, not grainy, indicating the sugar has completely dissolved. This firm meringue is essential for creating the stunning peaks on top of our Golden Mary Berrys Lemon Meringue Pie.
- Add Cornflour and Vinegar: For extra stability and a slightly chewy interior, which is a hallmark of a truly great meringue, I gently fold in the cornflour and white wine vinegar using a rubber spatula. I fold it in quickly and lightly, being careful not to knock out too much air from the meringue. These two ingredients help prevent the meringue from weeping and shrinking too much during baking.
Assembling and Baking Your Golden Mary Berrys Lemon Meringue Pie:
- Fill the Pastry Case: Once the lemon filling has cooled completely to room temperature, I carefully pour it into the blind-baked and cooled pastry case, spreading it evenly with the back of a spoon or an offset spatula. I want a nice, smooth layer of that vibrant lemon goodness.
- Top with Meringue: Now for the showstopper! I carefully spoon the beautiful, glossy meringue onto the lemon filling. I start by covering the entire surface of the lemon layer, making sure the meringue goes right to the edges of the pastry to seal in the filling. This prevents the meringue from shrinking away from the crust during baking.
- Create Dramatic Peaks: With the back of a spoon or an offset spatula, I create dramatic swirls and peaks on the surface of the meringue. This isn’t just for aesthetics; these peaks will catch the heat of the oven and brown beautifully, giving our Golden Mary Berrys Lemon Meringue Pie its iconic look. I like to make some tall, majestic peaks that will get deliciously crisp and golden.
- Bake to Perfection: I place the assembled pie into the preheated oven at 180°C (160°C fan/350°F/Gas Mark 4) for approximately 15-20 minutes. I keep a close eye on it during this time. The goal is for the meringue to turn a beautiful, light golden-brown on the peaks and edges, becoming crisp on the outside while remaining soft and marshmallowy within. If your oven has a grill (broiler) setting, you can use it for the last minute or two to achieve a deeper golden colour, but watch it like a hawk to prevent burning!
- Cool and Set: Once baked to a glorious golden perfection, I carefully remove the pie from the oven. It’s crucial to let the Golden Mary Berrys Lemon Meringue Pie cool completely at room temperature before attempting to slice and serve it. This allows the lemon filling to fully set and firm up. Rushing this step will result in a runny filling. I usually let it cool for at least 2-3 hours, or even longer. For the neatest slices, some even suggest chilling it in the refrigerator for an hour or so after it has completely cooled down to room temperature.
- Serve and Enjoy: When ready to serve, I gently remove the pie from the flan tin. Using a sharp, thin-bladed knife (warmed slightly in hot water and wiped clean between each slice for the cleanest cuts), I slice into generous wedges. Each bite of this Golden Mary Berrys Lemon Meringue Pie offers a delightful contrast: the crisp pastry, the tangy, smooth lemon filling, and the sweet, light, and slightly chewy meringue topping. It’s a true masterpiece and a joy to share!
Expert Tips for the Perfect Golden Mary Berrys Lemon Meringue Pie:
Achieving the perfect Golden Mary Berrys Lemon Meringue Pie isn’t just about following the steps; it’s about understanding the nuances. Here are some of my top tips to help you master this classic dessert:
Temperature Matters for Pastry:
When making the sweet shortcrust pastry, always remember that cold is your friend. Cold butter prevents overworking the gluten, which leads to a tough crust. If your kitchen is warm, you can even chill your flour for 10-15 minutes before starting. When handling the dough, work quickly and use just the tips of your fingers to avoid transferring too much heat. If at any point the dough feels too warm or sticky, pop it back into the fridge for 15-20 minutes. A perfectly chilled dough is much easier to roll and results in a flakier, tender crust for your Golden Mary Berrys Lemon Meringue Pie.
Preventing a Soggy Bottom:
A soggy bottom is the nemesis of any pie lover. To avoid this, blind baking is non-negotiable. Ensure you bake the pastry until it’s not just golden, but also dry to the touch on the base after removing the baking beans. An extra 5-10 minutes in the oven can make all the difference. Additionally, make sure your lemon filling is completely cool before pouring it into the pastry case. Warm filling on a baked crust is a recipe for disaster when it comes to crispness.
Mastering the Lemon Filling:
The key to a silky-smooth, perfectly set lemon filling is constant stirring over a low heat. High heat will scramble your eggs, turning your luscious filling into lumpy regret. Use a wooden spoon or a heatproof spatula and scrape the bottom and sides of the pan continuously. It will feel like it’s taking forever, but patience will be rewarded. The filling is ready when it thickens enough to coat the back of your spoon, and you can draw a clean line with your finger. Don’t be tempted to rush this process. And remember to strain the filling through a fine-mesh sieve; this ensures that unbelievably smooth texture.
Whipping Up a Stable Meringue:
For a sky-high, stable meringue that won’t weep, cleanliness is paramount. Any trace of grease on your bowl or whisk will prevent the egg whites from whipping up. I always wipe my equipment with a tiny bit of lemon juice or vinegar on a paper towel before starting, just to be sure. Also, add the sugar slowly, a tablespoon at a time, allowing it to fully dissolve before adding the next. This creates a strong, stable meringue structure. You’ll know it’s perfect when it’s glossy, holds stiff peaks, and feels smooth between your fingers. The cornflour and white wine vinegar are your secret weapons against weeping meringue!
Achieving that Golden Finish:
When baking your Golden Mary Berrys Lemon Meringue Pie, watch the meringue carefully. Ovens vary, and meringue can go from perfectly golden to burnt in a flash. If your meringue is browning too quickly, you can cover it loosely with foil for the remaining baking time. Alternatively, if it needs a little more colour at the end, a quick blast under a preheated grill (broiler) for 30 seconds to a minute can work wonders, but do not leave its side!
Cooling for Perfection:
This is perhaps the hardest part: waiting! Your Golden Mary Berrys Lemon Meringue Pie absolutely must cool completely to room temperature for at least 2-3 hours, or even longer, before slicing. This allows the lemon filling to properly set. Slicing too early will result in a messy, runny pie. For the cleanest cuts, use a very sharp, thin-bladed knife that has been run under hot water and wiped clean between each slice. This makes serving your magnificent creation an absolute breeze.
Storage:
While this pie is best enjoyed fresh on the day it’s made, any leftovers can be stored in an airtight container in the refrigerator for up to 2-3 days. The meringue may soften slightly, but the flavour will still be incredible. Enjoy every luscious bite of your homemade Golden Mary Berrys Lemon Meringue Pie!
Conclusion:
And there you have it! We’ve journeyed through the steps, understood the nuances, and now stand on the brink of experiencing one of life’s true culinary delights. This isn’t just another dessert recipe; it’s an invitation to create a masterpiece, a slice of pure joy that will undoubtedly impress anyone fortunate enough to taste it. I genuinely believe this recipe is a must-try for every home baker, whether you’re a seasoned pro or just starting your journey with meringue. The sheer satisfaction of watching the meringue peaks brown to perfection, knowing that beneath lies a vibrant, zesty lemon filling, all encased in a buttery, crisp pastry, is an unparalleled experience. It’s a harmonious symphony of textures and flavors – the tartness of the lemon beautifully balanced by the cloud-like sweetness of the meringue, offering a refreshingly light yet utterly indulgent finish to any meal.
Why This Pie is Your Next Baking Triumph
What makes this particular recipe stand out, I hear you ask? Well, it’s the meticulous balance, the careful construction that ensures every single bite delivers that iconic burst of zesty lemon followed by the airy, sweet embrace of the meringue. It’s a dessert that speaks of elegance and comfort in equal measure, a true showstopper for any gathering, from a casual family dinner to a festive celebration. Imagine the gasps of delight as you bring this golden-crowned beauty to the table! There’s a certain magic in baking from scratch, and this pie encapsulates that magic perfectly. The effort, I promise you, is incredibly rewarding, transforming simple ingredients into something truly spectacular. It’s a testament to classic baking techniques, refined to deliver consistent, mouth-watering results every single time.
Elevate Your Serving Experience & Explore Exciting Variations
While a generous slice of this magnificent pie is undoubtedly perfect on its own, there are wonderful ways to enhance the experience. For an added touch of freshness and color, consider serving each slice with a scattering of fresh raspberries or blueberries. Their subtle tartness provides a lovely counterpoint to the sweetness of the meringue. A light dusting of icing sugar adds an extra layer of visual appeal, making an already stunning dessert even more captivating. For those who enjoy a richer accompaniment, a small dollop of crème fraîche or even a scoop of high-quality vanilla bean ice cream can elevate the dessert to new heights of indulgence. Think about how the creamy, cool ice cream would contrast with the zesty, bright lemon and the crisp meringue – simply divine!
And don’t be afraid to get creative with variations once you’ve mastered the classic! While this Golden Mary Berrys Lemon Meringue Pie is truly the gold standard, you could experiment with different citrus fruits for a unique twist. A lime meringue pie offers a sharper, more exotic zest, while an orange meringue pie brings a sweeter, more aromatic profile, especially wonderful during the winter months. For the crust, a gingersnap or graham cracker base could introduce a delightful spice or a different texture. If you’re hosting a party, individual mini meringue pies, baked in ramekins or muffin tins, make for charming and perfectly portioned treats. You could even add a drizzle of melted dark chocolate over the meringue peaks for a sophisticated touch that chocolate lovers will adore. The possibilities are as endless as your imagination!
Your Kitchen Awaits: Bake, Share, and Inspire!
I genuinely hope this recipe inspires you to tie on your apron, preheat your oven, and embark on this delicious adventure. There is an immense sense of accomplishment that comes with baking something so beautiful and delicious from scratch. Don’t be intimidated by the meringue – it’s often easier than it looks, and the transformation from egg whites to glorious, toasted peaks is utterly captivating. Once you’ve taken that first glorious bite, you’ll understand exactly why this pie holds such an esteemed place in the world of desserts.
When you do try this recipe, please, please share your creations! I would absolutely love to see your stunning pies and hear about your baking experience. Tag me on social media, leave a comment below, or simply tell us about your journey in the kitchen. Did you add a unique twist? What was the reaction from your friends and family? Your stories and shared joy are what make the baking community so vibrant and inspiring. Let’s celebrate the art of baking together, one glorious slice of this magnificent lemon meringue pie at a time. Happy baking!
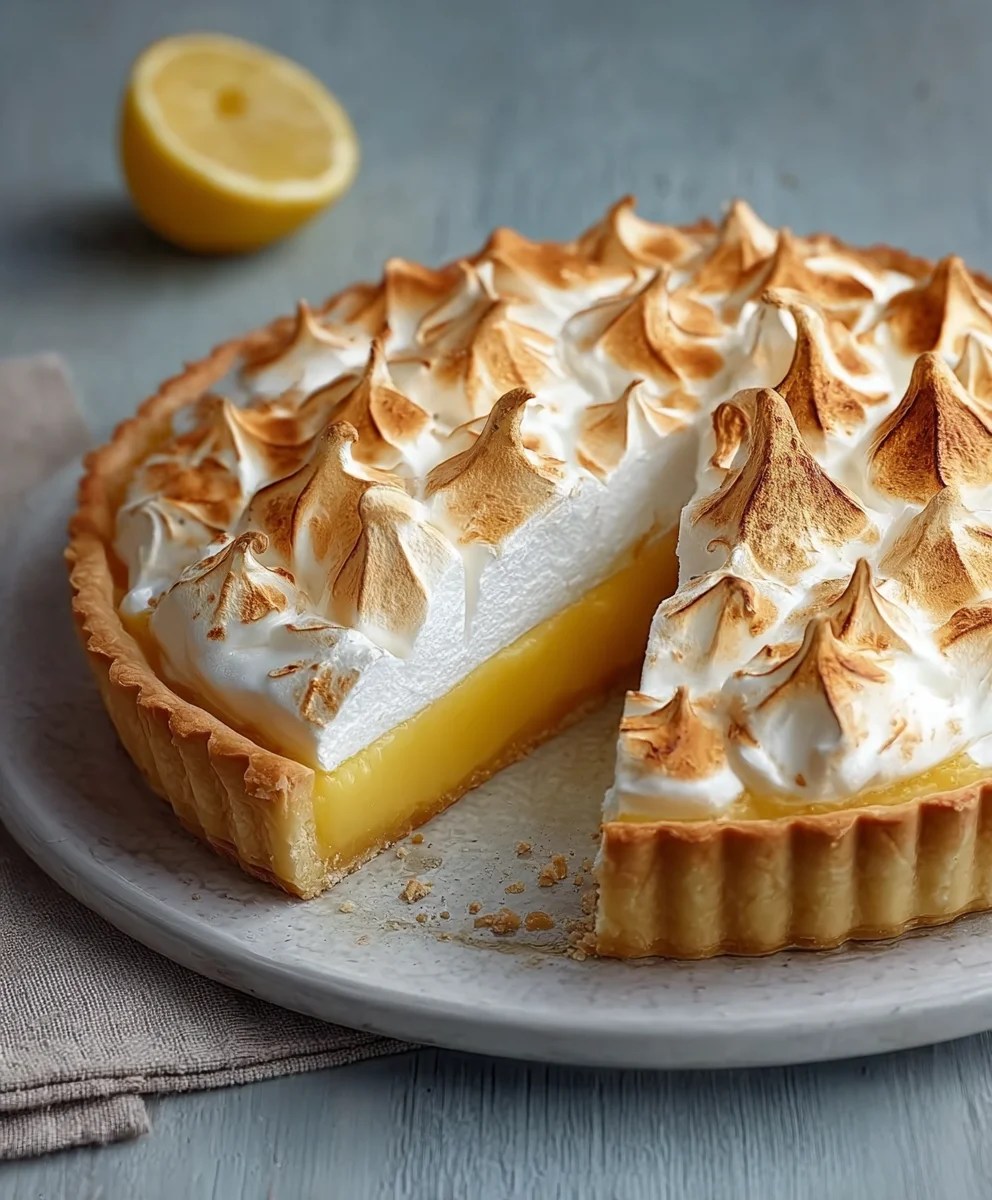
Golden Lemon Meringue Pie
A classic Mary Berry-inspired Golden Lemon Meringue Pie featuring a crisp sweet shortcrust pastry, a vibrant tangy lemon filling, and a towering, cloud-like golden meringue topping. A delightful showstopper dessert.
Ingredients
-
8 oz plain flour
-
4 oz cold unsalted butter, cubed (for pastry)
-
1 3/4 oz confectioners’ sugar
-
1 large egg, beaten
-
Zest and juice from 6 lemons
-
2 oz unsalted butter, cubed (for filling)
-
2 1/4 oz cornstarch (for filling)
-
9 oz superfine sugar (for filling)
-
6 large free-range egg yolks
-
4 large free-range egg whites
-
8 oz superfine sugar (for meringue)
-
2 tsp cornstarch (for meringue)
Instructions
-
Step 1
Sift 8 oz plain flour and a pinch of salt into a large bowl. Rub in 4 oz cold, cubed unsalted butter until the mixture resembles fine breadcrumbs. Stir in 1 3/4 oz confectioners’ sugar. Add 1 large beaten egg and mix until the dough just comes together. Avoid overworking. Form into a disc, wrap tightly in cling film, and chill in the fridge for at least 30 minutes. -
Step 2
Preheat oven to 180°C (160°C fan/350°F/Gas Mark 4). On a lightly floured surface, roll out the chilled pastry to line a 23cm (9-inch) fluted flan tin with a loose bottom. Prick the base all over with a fork. Line with baking parchment, fill with ceramic baking beans, and blind bake for 15 minutes. Carefully remove the baking beans and parchment, then return the pastry case to the oven for another 5-10 minutes, or until the base is lightly golden and dry to the touch. Let the pastry case cool completely on a wire rack. -
Step 3
In a medium-sized saucepan, whisk together 6 large egg yolks, 9 oz superfine sugar, and 2 1/4 oz cornstarch. Gradually whisk in the zest and juice from 6 lemons. Place the saucepan over a low heat and stir continuously for about 10-15 minutes, or until the mixture has thickened significantly (it should coat the back of a spoon). Remove from heat and stir in 2 oz cubed unsalted butter, a few pieces at a time, until fully melted and incorporated. For a perfectly smooth filling, pour the mixture through a fine-mesh sieve into a clean bowl. Press cling film directly onto the surface of the filling to prevent a skin from forming, and let it cool completely to room temperature. -
Step 4
Ensure your mixing bowl and whisk attachment are absolutely spotlessly clean and free from any grease. Carefully separate 4 large egg whites into the clean bowl. Whisk the egg whites on a medium speed until they become frothy and hold soft peaks. While continuing to whisk on a medium-high speed, gradually add 8 oz superfine sugar, one tablespoon at a time, allowing each addition to fully dissolve before adding the next. Continue whisking until all the sugar is incorporated and the meringue is incredibly thick, glossy, and holds very stiff peaks. Gently fold in 2 tsp cornstarch using a rubber spatula, being careful not to knock out too much air. -
Step 5
Once the lemon filling has cooled completely to room temperature, carefully pour it into the blind-baked and cooled pastry case, spreading it evenly. Spoon the glossy meringue onto the lemon filling, making sure the meringue goes right to the edges of the pastry to seal in the filling. Use the back of a spoon or an offset spatula to create dramatic swirls and tall peaks on the surface of the meringue. Place the assembled pie into the preheated oven (180°C/160°C fan/350°F/Gas Mark 4) for approximately 15-20 minutes, or until the meringue turns a beautiful, light golden-brown on the peaks and edges. Watch closely to prevent burning. -
Step 6
Carefully remove the pie from the oven. It is crucial to let the Golden Lemon Meringue Pie cool completely at room temperature for at least 2-3 hours (or even longer) before attempting to slice and serve it. This allows the lemon filling to fully set and firm up. For the neatest slices, you can chill it in the refrigerator for an hour or so after it has completely cooled down to room temperature. When ready to serve, use a sharp, thin-bladed knife (warmed slightly in hot water and wiped clean between each slice for the cleanest cuts) to slice into generous wedges. Enjoy every luscious bite!
Important Information
Nutrition Facts (Per Serving)
It is important to consider this information as approximate and not to use it as definitive health advice.
Allergy Information
Please check ingredients for potential allergens and consult a health professional if in doubt.


Leave a Comment