
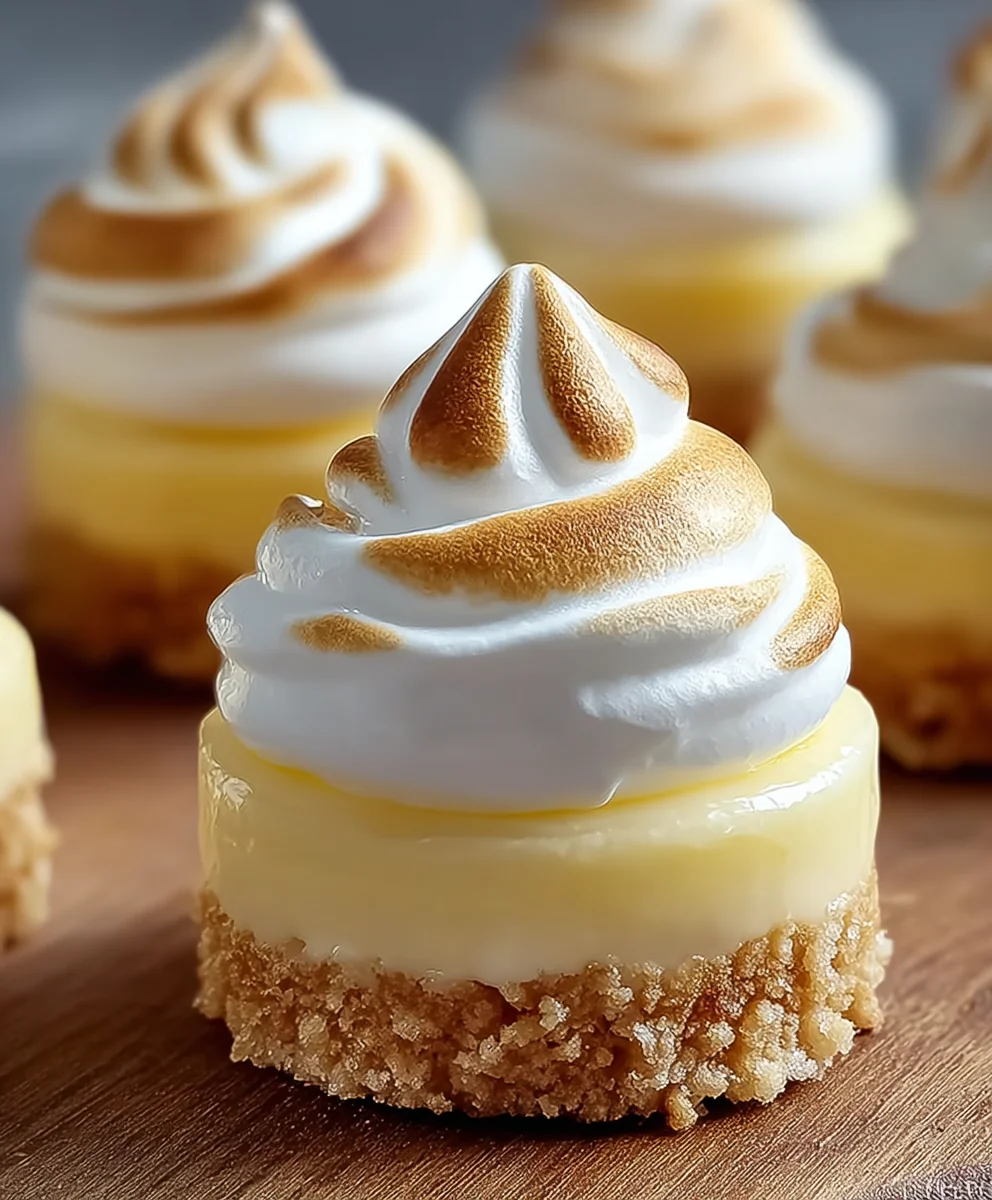
Mini Lemon Meringue Cheesecakes, oh how I adore a dessert that seamlessly marries elegance with pure, unadulterated joy! Imagine the iconic, sun-kissed tang of lemon meringue pie gracefully embracing the luxurious, melt-in-your-mouth creaminess of a classic cheesecake, all meticulously nestled into a delightful, individual serving. That is precisely the exquisite culinary journey we are embarking on today.
While the concept of a rich, satisfying cheesecake boasts origins tracing back to ancient Greece, and the vibrant, airy lemon meringue pie brightened Victorian tables, this modern fusion offers the absolute best of both beloved worlds. I find people absolutely fall in love with these Mini Lemon Meringue Cheesecakes because they deliver an extraordinary symphony of flavors and textures in every perfect, effortless bite. The bright, zesty lemon curd cuts beautifully through the indulgent, smooth cheesecake filling, while the billowy, golden-kissed meringue adds a whisper-light sweetness and a playful, satisfying chew.
The Irresistible Allure of Individual Servings
Furthermore, the convenience of individual portions means no fuss with slicing or serving, making them the ideal showstopper for sophisticated dinner parties, elegant brunches, or even a charming afternoon treat. They possess an incredibly impressive visual appeal without demanding hours of intricate, strenuous work, which, for me, is always a significant win in the realm of impressive desserts!

Ingredients:
For the Graham Cracker Crust:
- 1 ½ cups (about 180g) finely crushed graham cracker crumbs (from about 10-12 full sheets)
- ¼ cup (50g) granulated sugar
- 6 tablespoons (85g) unsalted butter, melted
For the Mini Lemon Cheesecake Filling:
- 2 (8-ounce/226g each) blocks full-fat cream cheese, softened to room temperature
- ¾ cup (150g) granulated sugar
- 2 large eggs, room temperature
- 1 tablespoon fresh lemon zest (from 1-2 medium lemons)
- 2 tablespoons fresh lemon juice (from 1 medium lemon)
- 1 teaspoon pure vanilla extract
For the Homemade Lemon Curd:
While you can use store-bought, making your own fresh lemon curd truly elevates these mini cheesecakes!
- 3 large egg yolks
- ½ cup (100g) granulated sugar
- ¼ cup (60ml) fresh lemon juice
- 1 tablespoon fresh lemon zest
- Pinch of salt
- 4 tablespoons (56g) unsalted butter, cold and cut into 4 pieces
For the Swiss Meringue Topping:
- 3 large egg whites, room temperature (from the eggs used for the curd, if making homemade)
- ¾ cup (150g) granulated sugar
- ¼ teaspoon cream of tartar
- ½ teaspoon pure vanilla extract
Equipment You’ll Need:
- Standard 12-cup muffin tin
- Paper cupcake liners (foil liners work best for easy removal)
- Food processor (optional, for crushing graham crackers)
- Mixing bowls (at least 3, including one heatproof for meringue)
- Electric hand mixer or stand mixer with whisk attachment
- Small saucepan and a heatproof bowl that fits snugly over it (for lemon curd and meringue)
- Fine-mesh sieve (for lemon curd)
- Pastry bag with a star tip (e.g., Wilton 1M or similar)
- Kitchen torch (for browning the meringue)
- Measuring cups and spoons
- Rubber spatula
Instructions:
Phase 1: Preparing the Graham Cracker Crust
- Preheat Oven and Prepare Muffin Tin: First things first, let’s get that oven ready. Preheat your oven to 325°F (160°C). Then, line a standard 12-cup muffin tin with paper cupcake liners. I find that foil liners work especially well here, as they hold their shape nicely and make it super easy to pop out your finished cheesecakes.
- Crush Graham Crackers: Now, for the crust. You’ll want your graham cracker crumbs to be very fine, almost like sand. You can achieve this easily by pulsing the graham crackers in a food processor until no large pieces remain. If you don’t have a food processor, no problem! Place the graham crackers in a large zip-top bag and crush them with a rolling pin or the bottom of a heavy pan until they’re as fine as you can get them. The finer the crumbs, the more cohesive your crust will be.
- Combine Crust Ingredients: In a medium bowl, combine your finely crushed graham cracker crumbs and the ¼ cup of granulated sugar. Give them a quick whisk to mix thoroughly. Then, pour in the 6 tablespoons of melted butter. Stir everything together with a fork or spatula until the crumbs are evenly moistened and resemble wet sand. Every crumb should be coated in butter – this is what holds it all together!
- Form the Crusts: Divide the graham cracker mixture evenly among the 12 prepared muffin cups. I usually use about 1 heaping tablespoon per cup. Now, here’s a crucial step: firmly press the mixture into the bottom of each liner. You can use the back of a spoon, a small flat-bottomed glass, or even your fingers to really compact them. A firm crust is a happy crust!
- Pre-bake the Crusts: Place the muffin tin in your preheated oven and bake the crusts for 5-7 minutes. This pre-baking step helps to set the crust, making it less crumbly when you bite into your cheesecake later. Once baked, remove them from the oven and let them cool slightly while you prepare the cheesecake filling. You can leave them in the muffin tin.
Phase 2: Crafting the Mini Lemon Cheesecake Filling
- Beat Cream Cheese and Sugar: In a large mixing bowl, using an electric hand mixer or a stand mixer fitted with the paddle attachment, beat the softened cream cheese on medium speed until it’s completely smooth and creamy, about 2-3 minutes. Scrape down the sides of the bowl frequently. Add the ¾ cup of granulated sugar and continue to beat on medium speed until the mixture is light and fluffy, usually another 2-3 minutes. You want to incorporate air and make sure there are no lumps of cream cheese left.
- Add Eggs: Add the two large eggs, one at a time, beating on low speed just until each egg is incorporated. It’s important not to overmix at this stage once the eggs are in, as overmixing can lead to cracks in your cheesecakes. You’re just aiming to combine them.
- Incorporate Lemon and Vanilla: Stir in the fresh lemon zest, fresh lemon juice, and vanilla extract. Mix on low speed until just combined. Give the bowl one final scrape down with a rubber spatula to ensure everything is perfectly blended. The mixture should be smooth, velvety, and beautifully aromatic with that lovely lemon scent.
- Fill the Crusts: Carefully spoon or pour the cheesecake filling evenly over the pre-baked graham cracker crusts in the muffin tin. Each cup should be about ¾ full. Gently tap the muffin tin on the counter a few times to release any air bubbles and help the filling settle evenly.
Phase 3: Baking the Cheesecakes
- Bake the Cheesecakes: Return the muffin tin to the 325°F (160°C) oven. Bake for 18-22 minutes, or until the edges of the cheesecakes are set and slightly firm, but the centers still have a slight jiggle when you gently shake the tin. This slight jiggle is key! It means they are perfectly cooked and won’t dry out.
- Cool Gradually: Once baked, turn off the oven but leave the cheesecakes inside with the oven door propped open slightly (you can use a wooden spoon to keep it ajar) for about 15-20 minutes. This gradual cooling prevents drastic temperature changes that can sometimes cause cheesecakes to crack.
- Chill Thoroughly: After the gradual cool-down, remove the muffin tin from the oven. Let the cheesecakes cool completely at room temperature on a wire rack for about 30 minutes. Once cooled, transfer the muffin tin to the refrigerator and chill the mini cheesecakes for at least 3-4 hours, or ideally, overnight. Chilling is non-negotiable for cheesecakes – it allows them to firm up properly and develop their full flavor and texture.
Phase 4: Making the Silky Lemon Curd (if from scratch)
- Prepare Double Boiler: Choose a medium heatproof bowl that fits snugly over a small saucepan without touching the bottom when water is simmering. Fill the saucepan with an inch or two of water and bring it to a gentle simmer over medium-low heat.
- Combine Curd Ingredients (Except Butter): In your heatproof bowl, whisk together the egg yolks, granulated sugar, fresh lemon juice, lemon zest, and a pinch of salt until well combined and slightly pale.
- Cook the Curd: Place the bowl over the simmering water, making sure the bottom of the bowl does not touch the water. Whisk constantly for 8-10 minutes. Do not stop whisking! This continuous motion prevents the eggs from scrambling and ensures a smooth, creamy curd. The mixture will gradually thicken. You’ll know it’s ready when it coats the back of a spoon (it will be thick enough to leave a trail when you run your finger across the back of the spoon, a consistency known as “nappe”).
- Add Butter: Remove the bowl from the heat. Immediately add the cold butter pieces, one at a time, whisking constantly until each piece is fully melted and incorporated. The butter adds richness and a beautiful glossy finish to the curd.
- Strain and Chill: For an extra smooth and silken curd, press the warm lemon curd through a fine-mesh sieve into a clean bowl. This removes any bits of zest or potential cooked egg specks. Cover the surface of the curd directly with plastic wrap to prevent a skin from forming. Refrigerate for at least 2 hours, or until completely chilled and firm. The colder the curd, the better it will set on your cheesecakes.
Phase 5: Whipping Up the Fluffy Swiss Meringue
- Clean Bowl is Essential: Before you begin, make absolutely sure your mixing bowl (preferably a metal or glass one) and whisk attachment are impeccably clean and free of any grease. Any trace of fat can prevent your egg whites from whipping up properly. Wipe them down with a little lemon juice or vinegar if you’re unsure.
- Prepare Double Boiler for Meringue: Just like with the lemon curd, fill a small saucepan with about an inch of water and bring it to a gentle simmer. Place your clean heatproof mixing bowl over the simmering water.
- Warm Egg Whites and Sugar: Combine the egg whites, granulated sugar, and cream of tartar in the bowl. Whisk continuously by hand over the simmering water. The goal here is to dissolve the sugar completely and gently warm the egg whites. Continue whisking for about 3-5 minutes, until the mixture is warm to the touch (around 160°F or 71°C if you have a thermometer) and no sugar granules are detectable when you rub a small amount between your fingers. This warming process is what makes Swiss meringue so stable and silky.
- Whip the Meringue: Carefully remove the bowl from the heat and transfer it to your stand mixer (or use your electric hand mixer). Begin beating on medium-high speed. Continue beating until the meringue is very thick, glossy, and holds stiff peaks. This can take anywhere from 8-12 minutes, depending on your mixer. When you lift the whisk, the peaks should stand straight up and curl slightly at the tip.
- Add Vanilla: Once you’ve reached stiff peaks, beat in the vanilla extract for a final 30 seconds until just combined. Your Swiss meringue is now ready to crown your cheesecakes! It will be beautifully stable and pipeable.
Phase 6: Assembling and Finishing Your Mini Lemon Meringue Cheesecakes
- Remove from Liners: Once the mini cheesecakes are thoroughly chilled, carefully remove them from their muffin tin and peel off the paper liners. They should come out easily.
- Add Lemon Curd Layer: Spoon about 1-2 tablespoons of the chilled lemon curd onto the top of each mini cheesecake. Use the back of the spoon to gently spread it into an even layer, leaving a small border around the edge for the meringue. This vibrant, tangy layer is a crucial component of our “Mini Lemon Meringue Cheesecakes”!
- Pipe the Meringue: Transfer the prepared Swiss meringue into a pastry bag fitted with your chosen star tip (I love a Wilton 1M for this, it makes beautiful swirls). Pipe a generous swirl of meringue on top of each cheesecake, completely covering the lemon curd layer. You can make elegant swirls or dramatic peaks – have fun with it!
- Torch the Meringue: This is my favorite part! Carefully use a kitchen torch to lightly brown the peaks of the meringue. Move the flame continuously to get an even golden-brown color without burning. The toasted meringue adds a lovely smoky sweetness and a beautiful visual appeal. If you don’t have a torch, you can place the cheesecakes under a broiler for a very short time (watch them like a hawk, as they can burn quickly!), but a torch offers much more control.
- Serve and Store: Your stunning Mini Lemon Meringue Cheesecakes are now ready to be devoured! For best results, serve them within a few hours of torching the meringue. If you have leftovers, store them in an airtight container in the refrigerator for up to 2-3 days. The meringue might soften slightly over time, but the flavor will still be incredible. Enjoy this delightful combination of creamy, tangy, and sweet!
Conclusion:
Well, my friends, we’ve reached the sweet finale of our culinary journey! I truly hope you’re as excited as I am about what we’ve just created. These aren’t just any desserts; they are a symphony of textures and flavors, a delightful miniature masterpiece. We’ve meticulously crafted a recipe that brings together the rich, creamy decadence of a cheesecake, the zesty, bright punch of lemon, and the ethereal, airy sweetness of a perfectly toasted meringue. It’s an alchemy of baking that transforms simple ingredients into something truly extraordinary. The combination is simply irresistible, offering a sophisticated yet playful treat that’s perfect for any occasion. Every bite delivers that satisfying crunch from the crust, followed by the smooth, tangy lemon cheesecake filling, all crowned with that cloud-like meringue. It’s a complete experience, a little bite of heaven that manages to be both comforting and utterly elegant. This is precisely why our Mini Lemon Meringue Cheesecakes are absolutely, unequivocally, a must-try. They challenge the ordinary and elevate dessert to an art form, proving that great things truly do come in small packages.
What truly makes these miniature marvels stand out, beyond their obvious beauty, is the incredible balance of flavors. The tang of the lemon isn’t just a whisper; it’s a vibrant, exhilarating burst that cuts through the richness of the cream cheese, preventing it from ever feeling too heavy. Then there’s the meringue – oh, the meringue! Light as a cloud, subtly sweet, with those tantalizing caramelized peaks that add a beautiful smoky note if you decide to torch it. The contrast between the cool, smooth filling and the slightly crisp, warm meringue (especially if freshly torched) is what makes each bite so incredibly dynamic and memorable. They are designed to impress, to elicit gasps of delight from your guests, and to bring a genuine smile to anyone lucky enough to taste them. They look incredibly intricate and complex, suggesting hours of arduous work, but as you now know, they are surprisingly approachable to make. This makes them the ultimate secret weapon in your baking arsenal – a showstopper that doesn’t demand all your time and energy. Believe me, the effort, however minimal, is repaid tenfold in sheer deliciousness and appreciative compliments. You’ll truly feel like a master baker, even if it’s your very first time tackling a cheesecake or meringue. It’s an achievement that brings immense satisfaction.
Once you’ve perfected your batch, let’s talk about presentation and serving. While they are stunning on their own, a little flourish can elevate them even further. A delicate dusting of powdered sugar just before serving can add an extra touch of elegance, or perhaps a few fresh raspberries or blueberries strategically placed can introduce a beautiful color contrast and an additional layer of fruity freshness. A tiny sprig of fresh mint or a thin curl of lemon zest offers not just visual appeal, but also a wonderful aromatic boost that will delight the senses even before the first bite. Think about pairing them with your favorite after-dinner drink; a delicate cup of Earl Grey tea would complement their citrus notes beautifully, or for something a bit more decadent, a light dessert wine like a Moscato d’Asti would be a sublime match, enhancing the sweetness and effervescence. They are, of course, absolutely ideal for dinner parties, bridal showers, baby showers, or even just a sophisticated afternoon tea. But don’t feel like you need a grand occasion! Treat yourself and your loved ones to these delightful bites for a simple weeknight dessert – because everyday moments deserve a touch of extraordinary sweetness too. They store beautifully in the refrigerator, making them perfect for preparing ahead of time, reducing any last-minute stress.
And the fun doesn’t stop there! While the classic rendition of these cheesecakes is undoubtedly divine, don’t hesitate to let your creativity flourish with variations. For the crust, consider experimenting with different types of cookies – perhaps shortbread for a buttery, less sweet base, or even ginger snaps for a subtle spicy kick that would pair wonderfully with the lemon’s brightness. If you’re feeling adventurous with the cheesecake filling, a touch of lime zest instead of lemon can offer a distinct citrus profile, or even a swirl of raspberry puree through the filling before baking can introduce a lovely fruity element, creating a beautiful marbling effect. For the meringue, while classic is fantastic, you could even try adding a tiny hint of almond extract to the egg whites for a subtle nutty undertone, or dust it with cocoa powder for a sophisticated visual twist before torching, adding a touch of bitterness that perfectly offsets the sweetness. Consider making these seasonally! In summer, pair them with a medley of fresh berries; in winter, perhaps a sprinkle of nutmeg on the crust can evoke a sense of warmth and coziness. The possibilities are truly endless, and each small adjustment can lead to a whole new delicious experience. These suggestions are simply a jumping-off point for your own culinary adventures, inviting you to put your personal stamp on an already spectacular dessert, tailoring it to your unique preferences and the occasion at hand.
So now it’s your turn! I genuinely hope that after reading through this recipe, you feel inspired and confident enough to step into your kitchen and give these incredible cheesecakes a try. Don’t be intimidated by the different components; each step is straightforward, and the reward is truly magnificent. Trust the process, have fun with it, and prepare to be amazed by the deliciousness you create. When you do bake them, I would absolutely love to hear all about your experience. Did you stick to the classic recipe, or did you venture into some of the suggested variations? What was your favorite part of the process, and most importantly, what did your friends and family think? Please feel free to share your photos and your thoughts in the comments below. Your feedback and creativity inspire me and our entire community of passionate home bakers, enriching everyone’s culinary journey. Let’s spread the joy of these exquisite desserts far and wide. Go forth and bake these delectable Mini Lemon Meringue Cheesecakes; your taste buds will thank you, and your dessert table will never be the same again. Happy baking, everyone!
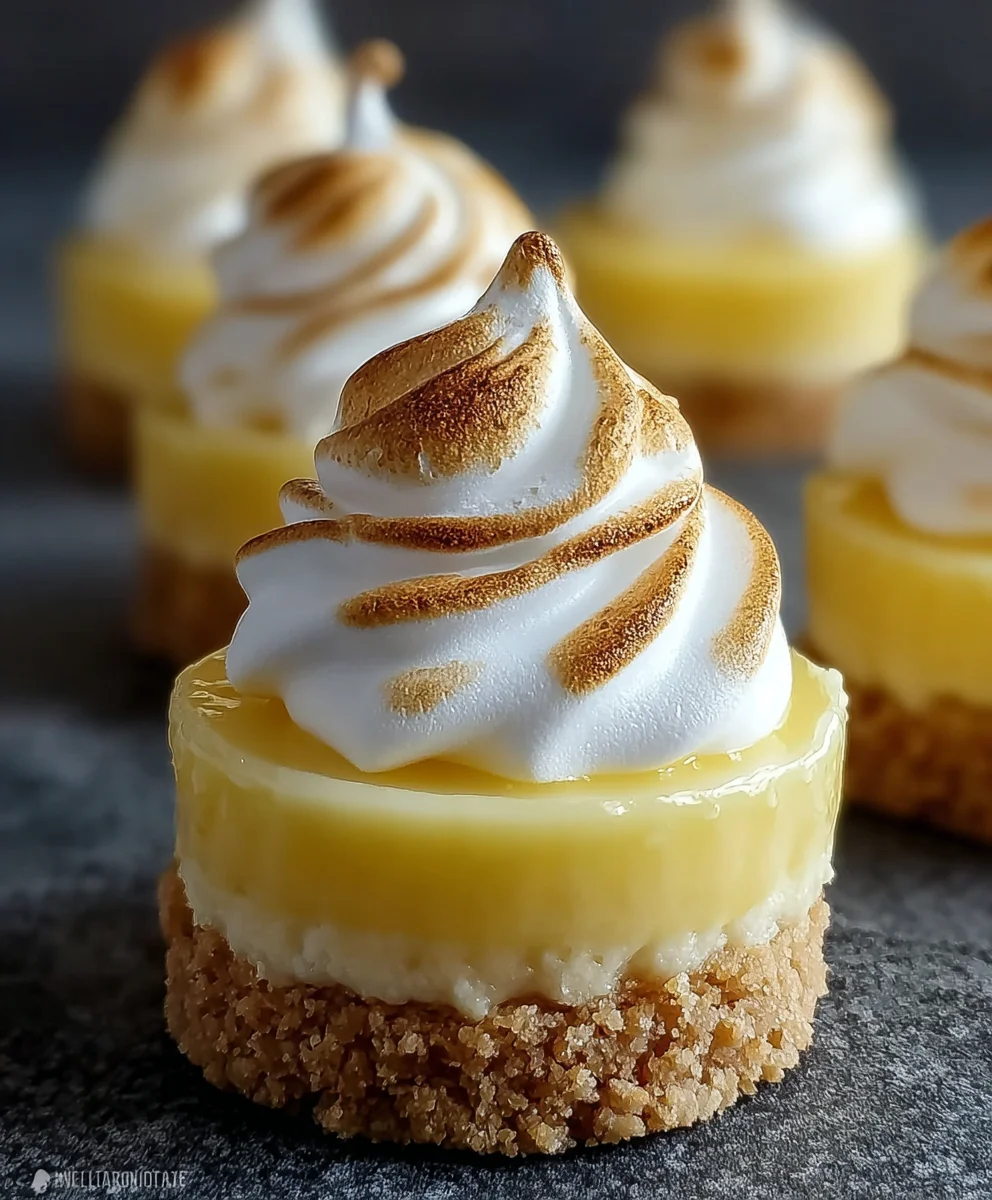
Mini Lemon Meringue Cheesecakes: Bright, Zesty Dessert!
These Mini Lemon Meringue Cheesecakes perfectly marry the zesty tang of lemon meringue pie with the luxurious creaminess of classic cheesecake, all in delightful individual servings. Featuring a crisp graham cracker crust, a smooth lemon cheesecake filling, a silky homemade lemon curd layer, and a billowy torched Swiss meringue topping, they offer an extraordinary symphony of flavors and textures. Ideal for elegant parties or a charming treat, they deliver impressive visual appeal with convenient individual portions.
Ingredients
-
1 ½ cups (180g) finely crushed graham cracker crumbs
-
¼ cup (50g) granulated sugar
-
6 tablespoons (85g) unsalted butter, melted
-
2 (8-ounce/226g each) blocks full-fat cream cheese, softened to room temperature
-
¾ cup (150g) granulated sugar
-
2 large eggs, room temperature
-
1 tablespoon fresh lemon zest (from 1-2 medium lemons)
-
2 tablespoons fresh lemon juice (from 1 medium lemon)
-
1 teaspoon non-alcoholic vanilla extract
-
3 large egg yolks
-
½ cup (100g) granulated sugar
-
¼ cup (60ml) fresh lemon juice
-
1 tablespoon fresh lemon zest
-
Pinch of salt
-
4 tablespoons (56g) unsalted butter, cold and cut into 4 pieces
-
3 large egg whites, room temperature
-
¾ cup (150g) granulated sugar
-
¼ teaspoon cream of tartar
-
½ teaspoon non-alcoholic vanilla extract
Instructions
-
Step 1
Preheat oven to 325°F (160°C). Line a 12-cup muffin tin. Combine 1 ½ cups crushed graham cracker crumbs, ¼ cup sugar, and 6 tablespoons melted butter. Press firmly into each liner (approx. 1 heaping tbsp). Bake for 5-7 minutes; cool slightly. -
Step 2
Beat 2 blocks softened cream cheese until smooth. Add ¾ cup sugar; beat until light and fluffy. Beat in 2 large eggs, one at a time, on low speed. Stir in 1 tbsp lemon zest, 2 tbsp lemon juice, and 1 tsp non-alcoholic vanilla extract. Spoon filling evenly over pre-baked crusts (¾ full). -
Step 3
Bake cheesecakes at 325°F (160°C) for 18-22 minutes, until edges are set but centers still jiggle. Turn off oven, prop door open, and cool inside for 15-20 minutes. Cool at room temperature for 30 minutes, then chill in refrigerator for at least 3-4 hours, or overnight. -
Step 4
Prepare a double boiler. Whisk 3 egg yolks, ½ cup sugar, ¼ cup lemon juice, 1 tbsp lemon zest, and a pinch of salt. Cook over simmering water, whisking constantly for 8-10 minutes, until thick. Remove from heat, whisk in 4 tbsp cold butter. Strain curd, cover surface directly with plastic wrap, and chill for at least 2 hours. -
Step 5
Ensure mixing bowl and whisk are clean. Prepare a double boiler. Combine 3 egg whites, ¾ cup sugar, and ¼ tsp cream of tartar. Whisk continuously over simmering water for 3-5 minutes until warm (160°F/71°C) and sugar dissolves. Remove from heat. Beat on medium-high speed until meringue is thick, glossy, and holds stiff peaks (8-12 minutes). Beat in ½ tsp non-alcoholic vanilla extract. -
Step 6
Remove chilled cheesecakes from liners. Spoon 1-2 tablespoons of chilled lemon curd onto each. Transfer Swiss meringue to a pastry bag with a star tip and pipe a generous swirl over each cheesecake. Lightly brown meringue peaks with a kitchen torch. Serve immediately or store in the refrigerator for up to 2-3 days.
Important Information
Nutrition Facts (Per Serving)
It is important to consider this information as approximate and not to use it as definitive health advice.
Allergy Information
Please check ingredients for potential allergens and consult a health professional if in doubt.

Leave a Comment