
Sourdough Cheesy Breadsticks are more than just a simple snack; they are a celebration of flavor and texture that I believe will undoubtedly become a cherished staple in your kitchen. I’ve always found something deeply satisfying about the process of working with sourdough, a culinary tradition that stretches back centuries, bringing a unique depth of flavor and an artisanal quality to any baked good. While classic breadsticks, or ‘grissini,’ famously hail from Italy, our recipe elevates this beloved accompaniment by infusing it with the distinct, tangy notes of an active sourdough starter and a generous helping of melted, gooey cheese.
It’s this irresistible combination—the slight tang of the fermented dough, the satisfyingly crispy crust, and the gloriously soft, chewy interior studded with savory cheese—that makes these breadsticks truly exceptional. They offer a depth of flavor and a comforting chewiness that mass-produced alternatives simply cannot match, promising a delightful experience with every bite.
Why You’ll Love These Sourdough Cheesy Breadsticks: Unmatched Versatility!
Whether you’re serving them alongside a hearty pasta dish, as an impressive appetizer for guests, or simply enjoying them as a comforting treat on a cozy evening, these homemade Sourdough Cheesy Breadsticks offer a versatility that’s hard to beat. I am thrilled to guide you through the simple steps to create these golden, aromatic delights that promise to be a crowd-pleaser every single time, making your home smell absolutely incredible in the process.

Ingredients:
- For the Dough:
- 100g Active Sourdough Starter: This should be fed and bubbly, ideally at its peak activity, within 4-8 hours of feeding. The livelier your starter, the more lift your Sourdough Cheesy Breadsticks will have!
- 350g Warm Water: Around 90-95°F (32-35°C). This helps activate the yeast in your starter and hydrate the flour efficiently.
- 500g Bread Flour: High-protein bread flour is best here as it develops strong gluten, which is essential for chewy Sourdough Cheesy Breadsticks. All-purpose flour can work, but the texture might be slightly softer.
- 10g Fine Sea Salt: Crucial for flavor and to regulate fermentation. Don’t skip it!
- 20g Olive Oil: Extra virgin olive oil adds a lovely flavor and helps with the dough’s extensibility and softness.
- For the Topping:
- 1 Large Egg: Whisked with 1 teaspoon of water for an egg wash. This gives your Sourdough Cheesy Breadsticks that beautiful golden-brown crust and helps the cheese stick.
- 150g Shredded Cheese: A blend of mozzarella and sharp cheddar works wonderfully for flavor and melt. You can also use Gruyere, Parmesan, or your favorite melty cheese. Freshly shredded is always best!
- 1/2 teaspoon Garlic Powder: Or more, to taste. For that quintessential garlic bread flavor.
- 1/4 teaspoon Onion Powder: Enhances the savory profile.
- 1/4 teaspoon Dried Oregano: Or Italian seasoning blend, for aromatic depth.
- Optional: A sprinkle of flaky sea salt for texture and extra savory punch.
- For Finishing (Optional):
- 2 tablespoons Melted Butter: Unsalted, for brushing on warm breadsticks for an extra luxurious finish.
- 1 tablespoon Fresh Parsley: Finely chopped, for garnish and fresh flavor.
Activating Your Sourdough Starter
- Feed Your Starter: The journey to incredible Sourdough Cheesy Breadsticks begins with an active starter. About 4-8 hours before you plan to mix your dough, feed your sourdough starter. I usually do a 1:2:2 ratio (e.g., 50g starter, 100g water, 100g flour) to ensure it’s vibrant and bubbly.
- Monitor Activity: You’re looking for a starter that has doubled or nearly tripled in size, is full of bubbles, and passes the float test (a small spoonful floats in water). This indicates it’s at its peak activity, ready to bring your breadsticks to life!
Mixing the Dough for Your Sourdough Cheesy Breadsticks
- Autolyse (Initial Hydration): In a large mixing bowl, combine the warm water and bread flour. Mix until no dry streaks of flour remain. It will be a shaggy, somewhat stiff dough. Cover the bowl with a damp cloth or plastic wrap and let it rest for 30 minutes to 1 hour. This crucial “autolyse” step allows the flour to fully hydrate, gluten to begin developing naturally, and makes the subsequent mixing much easier, leading to a more extensible and manageable dough for our Sourdough Cheesy Breadsticks.
- Incorporate Starter: After the autolyse, add your active sourdough starter directly onto the dough. With wet hands, gently dimple and fold the starter into the dough until it’s evenly distributed. This might take a few minutes of squeezing and folding. Don’t worry if it looks messy at first; it will come together.
- Initial Kneading: Once the starter is integrated, you can start a gentle kneading process. If using a stand mixer with a dough hook, mix on low speed for 5-7 minutes. If by hand, perform gentle folds and stretches in the bowl. The goal here is to start developing the gluten.
- Add Salt and Olive Oil: After the initial kneading, spread the dough out slightly, sprinkle the salt evenly over the surface, and drizzle with the olive oil. Now, continue kneading. If using a stand mixer, mix on medium-low for another 8-10 minutes, or until the dough is smooth, elastic, and pulls away from the sides of the bowl. When kneading by hand, use the “slap and fold” method or gentle stretching and folding on a lightly oiled surface for about 10-15 minutes, until the dough becomes cohesive, elastic, and passes the windowpane test (you can stretch a small piece thin enough to see light through it without tearing). This longer kneading phase after salt addition is vital for developing the strong gluten structure needed for airy yet chewy Sourdough Cheesy Breadsticks.
- Rest and Initial Fermentation: Transfer the dough to a lightly oiled bowl, turning it once to coat all sides. Cover tightly with plastic wrap or a lid. Let it rest at room temperature (ideally 75-80°F / 24-27°C) for 30 minutes. This begins the bulk fermentation.
Bulk Fermentation: Developing Flavor and Structure
- First Set of Stretch and Folds: After 30 minutes, perform your first set of “stretch and folds.” With wet hands, gently grab a portion of the dough from one side, stretch it upwards, and fold it over to the opposite side of the bowl. Rotate the bowl a quarter turn and repeat this process 3-4 times until you’ve worked your way around the dough. This builds strength in the dough. Cover and rest for another 30 minutes.
- Subsequent Stretch and Folds: Repeat the stretch and fold process every 30-45 minutes for a total of 3-4 sets. Each time you perform the folds, you’ll notice the dough becoming progressively smoother, stronger, and more elastic. This careful development during bulk fermentation is key to the texture of our Sourdough Cheesy Breadsticks.
- Monitor Fermentation: After the last set of folds, allow the dough to continue fermenting at room temperature. The total bulk fermentation time will vary greatly depending on your kitchen temperature and the strength of your starter, typically ranging from 4 to 6 hours. You’re looking for the dough to increase in volume by about 30-50%, become visibly bubbly, jiggle slightly when you move the bowl, and feel airy and light. It should also pass the “poke test” – when you gently poke it with a wet finger, the indentation should slowly spring back. Don’t rush this step; proper bulk fermentation is critical for flavor and texture in these Sourdough Cheesy Breadsticks.
Pre-Shaping and Resting for Perfect Sourdough Cheesy Breadsticks
- Turn Out the Dough: Gently scrape the fermented dough onto a lightly floured or un-floured surface (depending on how sticky it is; a very light dusting of flour is usually fine). Try to handle it as little as possible to retain the gas built up during fermentation.
- Gently Divide: Using a bench scraper or sharp knife, gently divide the dough into two equal halves. Avoid tearing the dough.
- Pre-Shape: For each half, gently pat it into a rough rectangle. Then, fold the bottom edge up towards the middle, and the top edge down to meet it. Lightly seal the seam. Then, fold one side over to the middle and the other side over to meet it, sealing again. You’re essentially creating a very loose, gentle rectangular log.
- Bench Rest: Cover the two pre-shaped dough pieces with a damp cloth or plastic wrap and let them rest for 15-20 minutes. This allows the gluten to relax, making the dough much easier to shape into the long, slender Sourdough Cheesy Breadsticks we desire.
Shaping Your Sourdough Cheesy Breadsticks
- Prepare Baking Sheets: Line two large baking sheets with parchment paper. This prevents sticking and makes cleanup a breeze.
- Roll Out the First Dough Piece: Take one of the rested dough pieces. On a lightly floured surface, gently stretch and roll it into a large rectangle, aiming for approximately 12×16 inches (30×40 cm) and about 1/4 inch (6-7 mm) thick. Try to maintain an even thickness across the whole rectangle. A consistent thickness will ensure all your Sourdough Cheesy Breadsticks bake evenly.
- Cut into Strips: Using a pizza cutter or a sharp knife, trim the edges to create a neater rectangle. Then, cut the dough lengthwise into strips about 3/4 to 1 inch (2-2.5 cm) wide. You should get roughly 12-16 breadsticks from each half of the dough.
- Arrange on Baking Sheets: Carefully transfer the cut strips onto the prepared baking sheets, leaving about 1 inch (2.5 cm) of space between each breadstick to allow for expansion during proofing and baking.
- Repeat with Second Dough Piece: Repeat the rolling, cutting, and arranging process with the second piece of dough.
Second Proof (Final Proof)
- Room Temperature Proof: For a quicker proof, cover the baking sheets loosely with plastic wrap or a damp cloth and let them proof at room temperature for 1 to 2 hours. The exact time will depend on your kitchen’s warmth. You’re looking for the Sourdough Cheesy Breadsticks to look slightly puffy, but not fully doubled. They should feel airy and light. A good test is to gently poke one with a floured finger; if the indentation slowly springs back halfway, it’s ready. If it springs back fully, it needs more time. If it collapses, it’s over-proofed.
- Cold Proof (Recommended for Flavor and Schedule): For a deeper flavor development and a more convenient schedule, after shaping and arranging the breadsticks, cover the baking sheets tightly with plastic wrap and place them in the refrigerator for 8-18 hours (or even up to 24 hours). This slow, cold fermentation significantly enhances the sourdough flavor and allows you to bake them fresh whenever you’re ready. When you’re ready to bake, pull them directly from the fridge while you preheat your oven; no need to bring them to room temperature first. This extended cold proof is fantastic for achieving the ultimate Sourdough Cheesy Breadsticks.
Preheating and Preparing for Baking
- Preheat Oven: About 30-45 minutes before you plan to bake (or at the end of your room temperature proof), preheat your oven to 425°F (220°C) with a rack in the middle position. If you have a baking stone or steel, place it on the middle rack during preheating for an even crispier bottom crust.
- Prepare Egg Wash: In a small bowl, whisk the large egg with 1 teaspoon of water until well combined.
- Apply Topping: Gently brush the tops of each proofed Sourdough Cheesy Breadstick with the egg wash. Be careful not to deflate them. This egg wash will create a beautiful golden crust and act as glue for our delicious cheesy topping.
- Sprinkle Cheese and Seasonings: Evenly sprinkle the shredded cheese over the egg-washed breadsticks. Then, scatter the garlic powder, onion powder, and dried oregano (and flaky sea salt, if using) over the cheese. Don’t be shy with the cheese; we’re making Sourdough Cheesy Breadsticks after all!
Baking Your Golden Sourdough Cheesy Breadsticks
- Bake in Batches: Place one baking sheet into the preheated oven.
- Bake Until Golden: Bake for 15-20 minutes, rotating the baking sheet halfway through for even browning, until the Sourdough Cheesy Breadsticks are deep golden brown, puffed, and the cheese is beautifully melted and bubbly. The exact baking time can vary depending on your oven, so keep a close eye on them, especially during the last few minutes. You want that perfect golden hue without burning the cheese.
- Repeat: Remove the first batch from the oven and immediately place the second baking sheet in to bake.
Finishing Touches and Serving
- Butter Brush (Optional): As soon as the Sourdough Cheesy Breadsticks come out of the oven, if you desire an extra touch of richness and shine, gently brush them with the melted butter. This also adds a wonderful aroma and keeps them soft.
- Garnish: Sprinkle with fresh chopped parsley for a pop of color and freshness.
- Cool Slightly: Transfer the warm Sourdough Cheesy Breadsticks to a wire rack to cool for 5-10 minutes before serving. While they are tempting straight out of the oven, a brief cooling period allows the cheese to set slightly and the internal structure to stabilize, making them easier to handle and ensuring the perfect texture.
- Serve Warm: These Sourdough Cheesy Breadsticks are best enjoyed warm, fresh from the oven, as an accompaniment to pasta dishes, soups, salads, or simply on their own as a delightful snack! They’re incredibly addictive and guaranteed to be a crowd-pleaser.

Conclusion:
And there you have it, my friends! We’ve reached the culmination of our journey into what I truly believe is one of the most utterly irresistible treats you can whip up in your own kitchen. This isn’t just another bread recipe; it’s an experience, a delightful fusion of textures and flavors that will undoubtedly become a staple in your home once you give it a try. I can confidently tell you that mastering these Sourdough Cheesy Breadsticks is an absolute game-changer, transforming ordinary snack times and meal accompaniments into something truly extraordinary. The deep, complex tang of the sourdough, developed through its slow fermentation, provides an incredible foundation that elevates the simple concept of cheesy bread far beyond the mundane. Imagine that perfectly crisp exterior giving way to a soft, airy crumb, generously studded and topped with gooey, molten cheese – it’s a symphony of textures and tastes that is genuinely hard to beat.
The aroma alone, as these golden beauties bake to perfection in your oven, is enough to gather everyone in the household, drawn in by the irresistible promise of warmth, comfort, and pure deliciousness. Trust me, the anticipation will build, and the first bite will confirm all your highest hopes. That distinct sourdough flavor, not overwhelmingly sour but subtly tangy, cuts through the richness of the cheese beautifully, creating a balanced and incredibly addictive profile. It’s a sophisticated twist on a classic comfort food, making it feel both familiar and excitingly new all at once. Whether you’re an experienced baker or just dipping your toes into the world of sourdough, this recipe is incredibly forgiving and rewarding, offering a fantastic payoff for a relatively straightforward process. It’s the kind of recipe that empowers you, showing you just how much magic you can create with your own two hands and a little bit of patience.
Serving Suggestions & Creative Variations: Elevate Your Breadstick Experience
Now that you’re practically salivating at the thought of these delectable breadsticks, let’s talk about how to truly make them shine on your table. While they are utterly fantastic straight out of the oven, perhaps with a simple swipe of melted garlic butter, their versatility is truly astounding. For a classic pairing, nothing beats a warm bowl of your favorite marinara sauce for dipping – the bright acidity cuts through the cheese perfectly. But don’t stop there! Consider a creamy ranch dressing, a vibrant pesto, or even a spicy arrabbiata sauce to kick things up a notch. I love serving them alongside a hearty bowl of tomato soup or a fresh, crisp Caesar salad for a satisfying lunch or light dinner. They also make an incredible accompaniment to pasta dishes, chili, or even a simple grilled chicken. Planning a game night or a movie marathon? These breadsticks are guaranteed to be the star appetizer, disappearing faster than you can say “more cheese, please!”
Unleash Your Inner Chef: Customizing Your Cheesy Masterpiece
But wait, there’s more! The beauty of this recipe lies not just in its inherent deliciousness, but also in its adaptability. Don’t be afraid to experiment and make these Sourdough Cheesy Breadsticks uniquely yours. You can play around with different types of cheese; a blend of sharp cheddar and Monterey Jack offers a lovely melty texture and robust flavor, while provolone or gouda can introduce a different kind of creaminess. For an extra layer of flavor, try sprinkling some dried Italian herbs, a pinch of garlic powder, or even a touch of red pepper flakes into the dough or over the cheese before baking. Everything bagel seasoning on top adds a fantastic crunch and savory punch! You could even incorporate some finely chopped jalapeños for a spicy kick, or sun-dried tomatoes for a burst of umami. Feel free to shape them differently too – braids, twists, or even small pull-apart buns. The possibilities are truly endless, and each variation offers a new adventure for your taste buds.
So, what are you waiting for? I wholeheartedly encourage you to roll up your sleeves, embrace the wonderful world of sourdough, and bring these magnificent breadsticks to life in your kitchen. There’s a profound sense of satisfaction that comes from creating something so incredibly delicious from scratch, especially when you know it’s going to bring smiles to everyone around your table. Don’t just dream about that perfect bite – make it a reality! Once you’ve had the pleasure of baking and devouring your own batch of these truly special breadsticks, I would absolutely love to hear about your experience. Did you try a fun variation? What was your favorite dipping sauce? Please share your triumphs, your photos, and your thoughts. Your feedback and creative ideas inspire me and our entire community of enthusiastic home bakers. Happy baking, everyone, and get ready to fall head over heels for your new favorite savory treat!
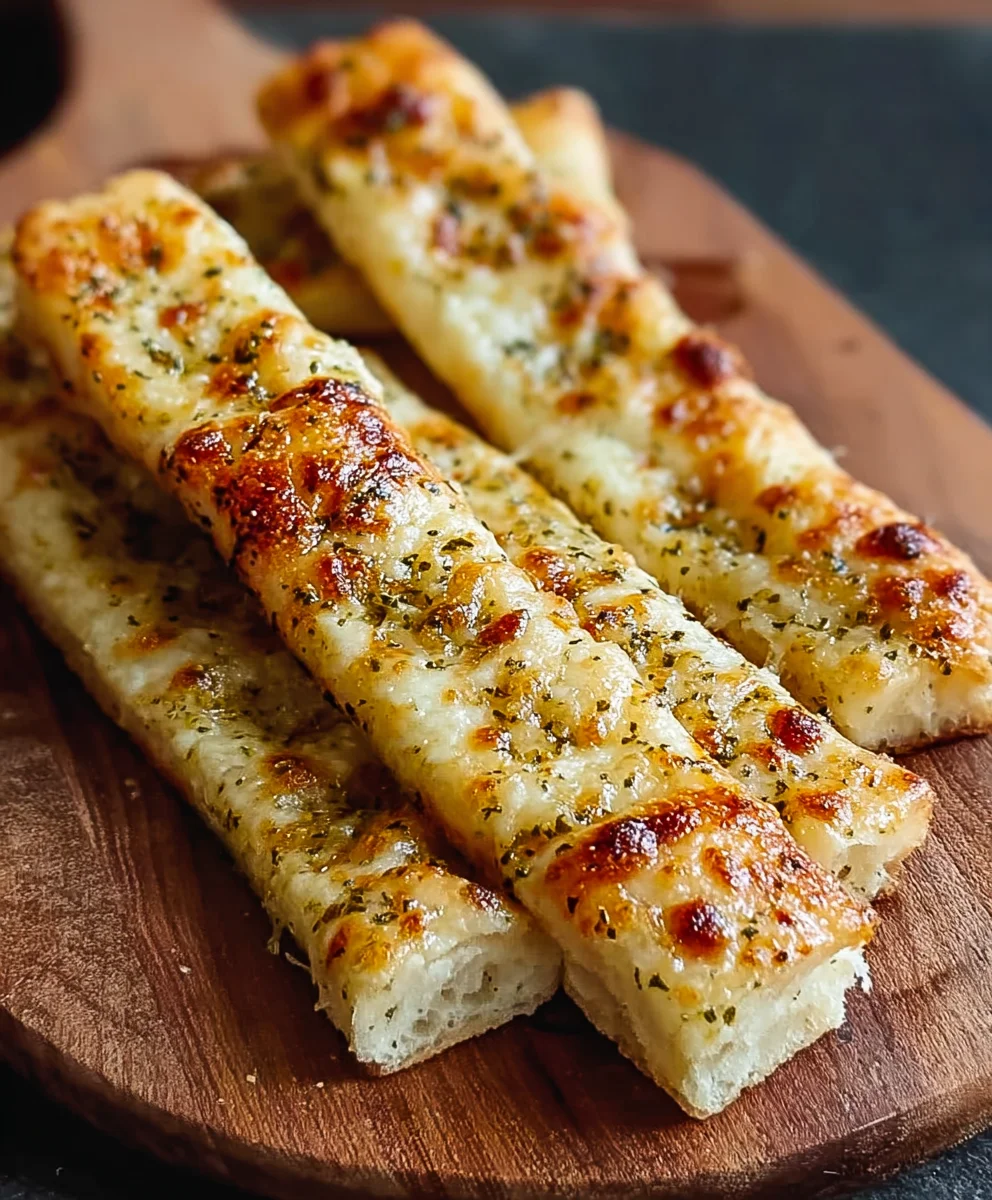
Sourdough Cheesy Breadsticks: Easy & Irresistible Recipe!
Sourdough Cheesy Breadsticks offer a unique depth of flavor and artisanal quality. Featuring a slight tang from fermented dough, crispy crust, and a gloriously soft, chewy interior studded with savory melted cheese, these breadsticks are versatile for meals, appetizers, or as a comforting snack.
Ingredients
-
100g Active Sourdough Starter
-
350g Warm Water
-
500g Bread Flour
-
10g Fine Sea Salt
-
20g Olive Oil
-
1 Large Egg, whisked with 1 tsp water
-
150g Shredded Cheese (mozzarella and sharp cheddar blend)
-
1/2 tsp Garlic Powder
-
1/4 tsp Onion Powder
-
1/4 tsp Dried Oregano
-
Optional: Flaky sea salt
-
Optional: 2 tbsp Melted Butter, unsalted
-
Optional: 1 tbsp Fresh Parsley, finely chopped
Instructions
-
Step 1
4-8 hours before mixing dough, feed your sourdough starter (e.g., 1:2:2 ratio). Ensure it’s vibrant, bubbly, doubled/tripled in size, and passes the float test. -
Step 2
In a large bowl, combine warm water and bread flour until no dry streaks remain. Cover and rest for 30 minutes to 1 hour. -
Step 3
Add active sourdough starter to the dough. With wet hands, gently dimple and fold until evenly distributed. Then, gently knead by hand or with a stand mixer on low speed for 5-7 minutes to begin gluten development. -
Step 4
Spread dough slightly, sprinkle salt, and drizzle olive oil. Knead for another 8-15 minutes (stand mixer medium-low 8-10 mins; hand ‘slap and fold’ 10-15 mins) until dough is smooth, elastic, and passes the windowpane test. -
Step 5
Transfer dough to a lightly oiled bowl, cover. Rest at room temp (75-80°F/24-27°C) for 30 minutes. Perform 3-4 sets of ‘stretch and folds’ every 30-45 minutes. -
Step 6
After the last set of folds, allow dough to continue fermenting at room temp for 4-6 hours. It should increase by 30-50%, be bubbly, jiggle, feel airy, and pass the poke test. -
Step 7
Gently scrape fermented dough onto a lightly floured surface. Divide into two equal halves. Gently pat each into a rough rectangle, then fold into loose rectangular logs. Cover and bench rest for 15-20 minutes. -
Step 8
Line two large baking sheets with parchment paper. Roll one dough piece into a 12×16 inch (30×40 cm) rectangle, about 1/4 inch (6-7 mm) thick. Cut into 3/4-1 inch (2-2.5 cm) wide strips. Transfer to prepared baking sheets, leaving 1 inch (2.5 cm) space. Repeat with the second dough piece. -
Step 9
For a quicker proof, cover loosely and proof at room temp for 1-2 hours until slightly puffy (poke test: indentation slowly springs back halfway). For deeper flavor, cold proof: cover tightly and refrigerate for 8-18 hours; bake directly from the fridge. -
Step 10
30-45 minutes before baking, preheat oven to 425°F (220°C). Whisk 1 large egg with 1 tsp water for egg wash. Gently brush breadsticks with egg wash. Evenly sprinkle shredded cheese, garlic powder, onion powder, and dried oregano (and optional flaky sea salt) over the cheese. -
Step 11
Place one baking sheet into the preheated oven. Bake for 15-20 minutes, rotating halfway through, until deep golden brown, puffed, and the cheese is beautifully melted and bubbly. Remove and repeat with the second batch. -
Step 12
As soon as breadsticks come out of the oven, brush with optional melted butter and sprinkle with fresh chopped parsley. Transfer to a wire rack to cool for 5-10 minutes before serving. Enjoy warm!
Important Information
Nutrition Facts (Per Serving)
It is important to consider this information as approximate and not to use it as definitive health advice.
Allergy Information
Please check ingredients for potential allergens and consult a health professional if in doubt.


Leave a Comment