
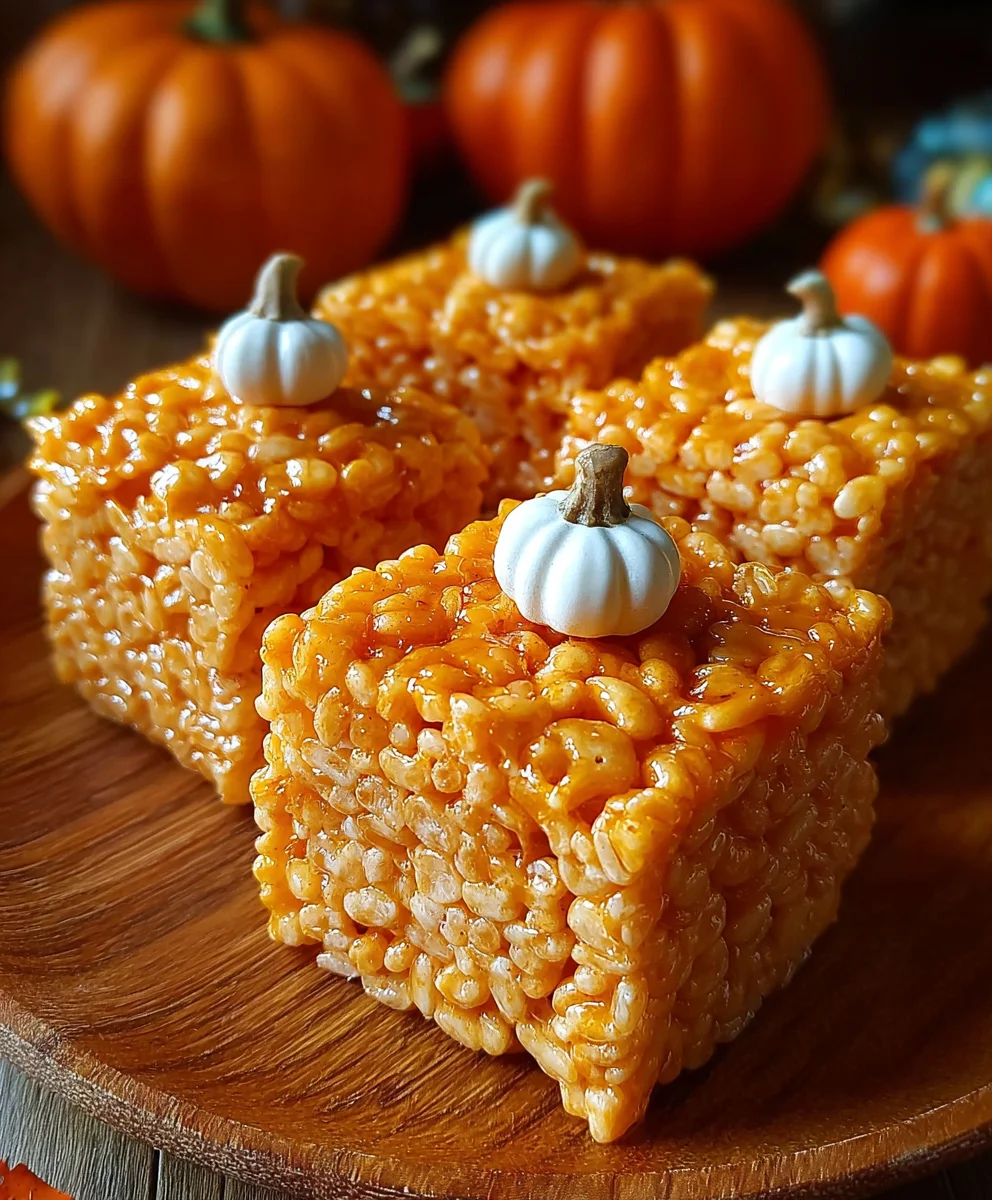
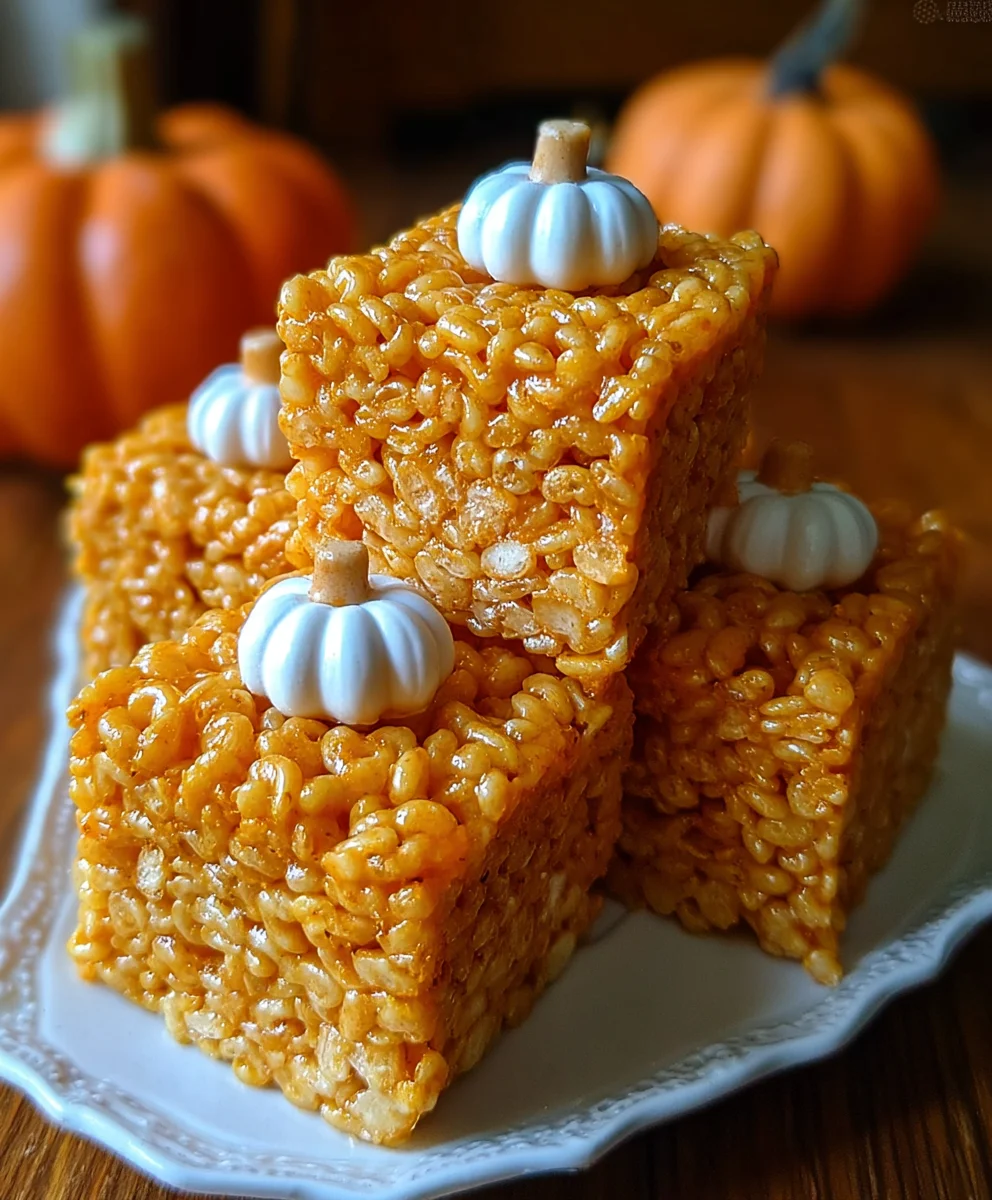
Pumpkin Rice Krispie Treats are an absolute revelation for autumn, blending classic childhood nostalgia with the warm, comforting spices of the season. I remember the joy of making original Rice Krispie Treats as a child – a simple, no-bake marvel that always brought smiles. This delightful twist elevates that beloved treat, infusing it with real pumpkin puree and a perfect medley of cinnamon, nutmeg, and ginger. It’s more than just a dessert; it’s a celebration of fall, a quick and easy way to bring autumnal cheer to any gathering, from school parties to cozy family evenings. People adore these Pumpkin Rice Krispie Treats not only for their incredibly satisfying crispy-chewy texture and irresistible sweet-spicy flavor but also for their sheer convenience. They require no oven, minimal ingredients, and come together in mere minutes, making them a fantastic option for busy individuals seeking a heartwarming, seasonal confection.

Ingredients:
- 10 ounces (about 40) large marshmallows, or 4 cups mini marshmallows (I always recommend mini marshmallows for quicker melting and smoother results!)
- 3 tablespoons unsalted butter (I prefer unsalted so I can control the salt content, but salted works too if that’s what you have on hand – just be mindful of any added salt in other components).
- 6 cups Rice Krispies cereal (Make sure it’s fresh! Stale cereal can really diminish that signature snap).
- ½ cup pumpkin puree (Important: Ensure it’s 100% pure pumpkin, not pumpkin pie filling. The pie filling has added sugars and spices that will throw off the flavor balance of our treats).
- 1 ½ teaspoons pumpkin pie spice (You can adjust this to your personal taste. If you like a stronger spice profile, go up to 2 teaspoons. If you’re not a huge fan, start with 1 teaspoon).
- 1 teaspoon pure vanilla extract (A good quality vanilla makes a noticeable difference, trust me!).
- Optional: A few drops of orange food coloring (This is purely for aesthetics if you want a more vibrant orange color for your “Pumpkin Rice Krispie Treats.” I usually add it for that extra festive pop!).
- Optional Decorations:
- ½ cup melted dark or white chocolate for drizzling.
- Festive sprinkles, candy corn, or mini chocolate chips.
Gathering Your Tools and Preparing Your Pan
- Choose Your Pan Wisely: First things first, let’s get our pan ready. For a perfectly sized batch of these delightful “Pumpkin Rice Krispie Treats,” I always reach for a 9×13-inch baking pan. You want something with a good surface area to allow the treats to set evenly and to give you nice, reasonably thin bars.
-
The Golden Rule of Greasing (or Lining): Now, for the crucial step of preventing stickiness. There are two main ways to approach this, and I’ve found both work wonderfully.
- Option A: Butter and Flour (or just butter): You can generously butter the inside of your 9×13-inch baking pan. Make sure to get into all the corners and up the sides. If you want an extra layer of non-stick, you can lightly dust it with a tablespoon of flour after buttering, then tap out the excess.
- Option B: Parchment Paper (My Personal Favorite): This is my go-to method because it makes cleanup an absolute breeze and ensures effortless removal of the entire slab of treats. Line your baking pan with parchment paper, leaving an overhang on two opposite sides. This “sling” will be your best friend when it comes time to lift the entire batch out for cutting. A light spray of cooking oil or a quick smear of butter on the bottom of the pan before placing the parchment can help hold it in place, but it’s not strictly necessary if your paper lies flat.
Why it matters: Properly preparing your pan is paramount. Imagine trying to pry sticky, gooey treats from an unprepared pan – it’s a battle you don’t want to fight! Trust me on this; a well-prepared pan saves so much frustration.
- Measure Everything Out: Before you even think about turning on the stove, get all your ingredients measured and ready to go. This is called “mise en place” in the culinary world, and it’s a game-changer for a smooth, stress-free cooking experience, especially with a recipe like this where speed is key once the marshmallows are melted. Have your Rice Krispies cereal in a large bowl, your pumpkin puree, pumpkin pie spice, and vanilla extract measured and sitting by the stovetop. This ensures you can add everything at the right moment without scrambling.
- Prepare Your Pressing Tools: You’ll need something to gently press the mixture into the pan. I usually use a rubber spatula, but the back of a wooden spoon or even your clean, buttered hands work well. If you’re using a spatula or spoon, give it a light spray of cooking oil or a quick rub with butter to prevent the sticky marshmallow mixture from clinging to it while you’re pressing. This small step makes a huge difference in achieving a smooth, even surface without pulling up the treats as you press down.
Crafting the Pumpkin Marshmallow Base
- Melt the Butter: Grab a large, non-stick pot or a heavy-bottomed Dutch oven. I find a non-stick surface is best for marshmallow endeavors. Place your 3 tablespoons of unsalted butter into the pot. Turn your stove to medium-low heat. We’re not trying to brown the butter here, just melt it gently. Allow the butter to fully melt, swirling the pot occasionally, until it’s a clear, golden liquid. Keeping the heat low is crucial; we want to avoid scorching the butter, which can impart an unpleasant nutty flavor, or worse, burning it.
-
Introduce the Marshmallows: Once the butter is completely melted, add your 10 ounces of large marshmallows (or 4 cups of mini marshmallows) to the pot. Stir them gently to coat them in the melted butter. Continue to stir constantly with a rubber spatula or wooden spoon.
The Art of Melting Marshmallows: Patience is Key
This part requires a little patience and continuous attention. The marshmallows will slowly begin to soften, clump together, and then gradually melt into a beautiful, sticky, glorious goo. Keep stirring until the mixture is completely smooth with no lumps remaining. Avoid the temptation to crank up the heat – high heat will cause the marshmallows to become tough and brittle once cooled, leading to hard, unappetizing treats. Low and slow is the secret to a perfectly chewy “Pumpkin Rice Krispie Treat.” The entire melting process usually takes about 5-7 minutes.
-
Incorporate the Pumpkin Puree: Once your marshmallow mixture is a smooth, liquid gold, immediately remove the pot from the heat. Now, quickly stir in your ½ cup of pumpkin puree. Mix vigorously until the pumpkin puree is fully incorporated and the marshmallow mixture takes on a lovely, uniform orange hue (even before any food coloring, it will have a natural warmth to it).
Why remove from heat? Adding the pumpkin puree off the heat helps to prevent the moisture in the pumpkin from overcooking the marshmallows, which can also contribute to a tougher final product. We want that moisture for flavor and color, not for gumming up our texture. - Add the Flavor Powerhouses: This is where the magic really happens for our “Pumpkin Rice Krispie Treats”! Stir in your 1 ½ teaspoons of pumpkin pie spice and 1 teaspoon of vanilla extract. If you’re using orange food coloring, add a few drops now and stir until your desired vibrant pumpkin color is achieved. I usually add about 3-5 drops for a really festive look. Stir until all these wonderful flavors and colors are evenly distributed throughout the gooey pumpkin marshmallow base. The aroma at this stage is absolutely intoxicating!
Combining Cereal and the Gooey Goodness
- The Grand Union: With your pumpkin marshmallow mixture still warm and pliable, immediately add all 6 cups of Rice Krispies cereal to the pot. This is where your large bowl from your “mise en place” would have been handy if you hadn’t used the pot directly for combining.
-
The Gentle Fold: Now comes one of the most important steps for achieving light, airy, and perfectly crisp “Pumpkin Rice Krispie Treats.” Using your rubber spatula or wooden spoon, gently fold the cereal into the marshmallow mixture.
Mastering the Gentle Fold for Perfect Texture
Think of it as carefully turning the mixture over and over, rather than mashing or stirring vigorously. The goal is to coat every single piece of cereal evenly with the pumpkin marshmallow goodness without crushing the cereal. Crushed cereal leads to dense, hard treats instead of the beloved airy crunch. Work quickly but gently, ensuring that no dry pockets of cereal remain and that every crisp is thoroughly enrobed in that delicious, spiced pumpkin goo. This process usually takes a minute or two of careful folding. The mixture will be incredibly sticky and challenging to work with, but perseverance is key here.
Pressing and Setting Your Pumpkin Rice Krispie Treats
- Transfer to the Prepared Pan: As soon as the cereal is evenly coated, immediately transfer the entire mixture into your prepared 9×13-inch baking pan. Remember, speed is your ally here! The mixture will start to cool and set fairly quickly, becoming more difficult to work with the longer you wait.
-
The Gentle Press: Now, using your lightly buttered (or oil-sprayed) spatula, wooden spoon, or even your clean, buttered hands, gently and evenly press the mixture into the pan.
The Delicate Balance of Pressure: Avoid Over-Compressing
This is another critical point for the texture of your “Pumpkin Rice Krispie Treats.” You want to press it down firmly enough to create a cohesive, flat layer, but do not over-compress. Pressing too hard will pack the cereal too tightly, forcing out all the air pockets, and resulting in dense, brick-like treats that are hard to chew, rather than light and delightfully chewy. Imagine giving it a gentle, loving pat-down, just enough to make it flat and uniform, but still allowing it to breathe. The surface should look relatively smooth and even. If you used parchment paper with an overhang, you can even use the excess paper to help gently press down on the mixture without directly touching it.
- Cooling Time: Once pressed into an even layer, set the pan aside on a wire rack to cool completely at room temperature. This usually takes about 1 to 2 hours. If you’re in a hurry, you can pop it into the refrigerator for about 30-45 minutes, but I find that cooling at room temperature yields the best, chewiest texture. Avoid cutting them while still warm, as they will fall apart and be much too soft.
Optional Decorations and Serving Suggestions
- Cutting Your Treats: Once your “Pumpkin Rice Krispie Treats” are completely cooled and firm, use the parchment paper overhangs to carefully lift the entire slab out of the pan and onto a large cutting board. This is where the parchment paper truly shines! For clean, precise cuts, I recommend using a sharp, lightly oiled knife. A warm knife also helps: run it under hot water, dry it, and then make your cuts. You can cut them into traditional squares, rectangles, or even use festive cookie cutters (lightly greased) if you want to make fun shapes for Halloween or Thanksgiving! I usually aim for about 24 squares from a 9×13-inch pan, but you can make them as large or small as you like.
-
Embrace the Drizzle (Optional): If you’re feeling fancy (and who isn’t when it comes to “Pumpkin Rice Krispie Treats”?), melt your ½ cup of dark or white chocolate. You can do this in a microwave-safe bowl in 30-second intervals, stirring between each, until smooth, or use a double boiler. Drizzle the melted chocolate artistically over the cooled and cut treats. Before the chocolate sets, you can scatter festive sprinkles, mini chocolate chips, or even some cute candy corn over the top for an extra touch of seasonal flair and texture.
Elevate Your Presentation with Creative Toppings
This step really takes them from simple treats to show-stopping desserts, perfect for a party platter or a homemade gift. Let the chocolate set completely before stacking or serving.
- Storage and Enjoyment: Store your “Pumpkin Rice Krispie Treats” in an airtight container at room temperature for up to 3-4 days. While they are usually best enjoyed within the first day or two for optimal crispness and chewiness, they remain delicious for a few days after. Avoid refrigerating them for extended periods as this can make them hard and less chewy. They’re perfect for lunchboxes, after-school snacks, or a delightful autumnal dessert. Enjoy every single bite of that spiced pumpkin goodness!
Conclusion:
And there you have it, friends! We’ve journeyed through the simple yet utterly delightful process of creating something truly special. I genuinely believe that this recipe for Pumpkin Rice Krispie Treats isn’t just another dessert; it’s an invitation to experience pure, unadulterated autumn joy in every single bite. It’s a must-try for so many reasons, chief among them being its incredible ease of preparation coupled with a flavor profile that perfectly captures the essence of fall without any fuss. Imagine the warm spices, the subtle sweetness of pumpkin, all enrobed in that familiar, satisfyingly crisp texture we all adore. This isn’t a recipe that demands hours in the kitchen or a long list of obscure ingredients. Instead, it offers maximum reward for minimal effort, making it ideal for busy weekdays, spontaneous gatherings, or simply when you need a little pick-me-up.
What I particularly love about these treats is their versatility. While they are absolutely divine on their own, there are so many ways to elevate them or tailor them to your specific tastes or occasions. For an extra touch of elegance, consider a delicate drizzle of melted white chocolate or dark chocolate over the top once they’ve set. A sprinkle of sea salt can really enhance the pumpkin spice notes, creating a sophisticated sweet and salty contrast that will surprise and delight your palate. Don’t shy away from adding some festive sprinkles for a vibrant pop of color, especially if you’re making these for a kids’ party or a holiday event. For a cozy evening in, pair a square with a mug of hot apple cider, a creamy pumpkin spice latte, or even a scoop of vanilla bean ice cream for an indulgent dessert experience. They also make fantastic lunchbox surprises, after-school snacks, or a sweet addition to any potluck or bake sale spread. Trust me, these treats disappear quickly wherever they go!
Endless Possibilities for Your Pumpkin Rice Krispie Treats:
- Spice It Up: Feeling adventurous? Boost the amount of pumpkin pie spice for an even more intense fall flavor, or add a pinch of ground ginger or cardamom for a unique twist.
- Add-Ins Galore: Before pressing the mixture into the pan, fold in a handful of mini chocolate chips (white chocolate chips are especially good here!), chopped pecans, walnuts, or even dried cranberries for added texture and flavor.
- Glaze and Garnish: A simple powdered sugar glaze (mixed with a little milk or orange juice) can take these from delightful to absolutely decadent. For a creamier finish, a light cream cheese frosting swirl would be divine.
- Shape Shifters: Instead of cutting into squares, try using cookie cutters to create fun shapes like leaves, pumpkins, or ghosts for a truly festive presentation, especially for Halloween or Thanksgiving. Just be sure to work quickly while the mixture is still warm and pliable.
- Dietary Adjustments: For those with dietary needs, consider using gluten-free Rice Krispies cereal and a plant-based butter alternative and vegan marshmallows to create a delicious, inclusive treat that everyone can enjoy. The pumpkin flavor is robust enough to shine through!
I cannot stress enough how much joy you’ll find in making and sharing these delightful Pumpkin Rice Krispie Treats. They embody everything wonderful about homemade treats: simple ingredients, straightforward steps, and an outcome that brings smiles to every face. So, please, don’t just read about it—roll up your sleeves, gather your ingredients, and give this recipe a try. I’m genuinely excited for you to experience the magic for yourself. Once you do, I would absolutely love to hear about your experience! Did you add a special ingredient? Did you serve them in a unique way? Share your thoughts, your photos, and any creative variations you come up with in the comments section below or tag me on your favorite social media platform. Your feedback and personal touches inspire me and our entire community of home bakers. Happy baking, and enjoy every last crumb of your perfect pumpkin creations!
Frequently Asked Questions (FAQs)
How do I prevent my Pumpkin Rice Krispie Treats from getting hard?
The key to soft, chewy treats lies in two main things:
- Don’t overcook the marshmallows: Heat them just until melted and smooth. Overheating can make them tough.
- Don’t over-compress: When pressing the mixture into the pan, use a gentle hand. Pack it down lightly rather than compacting it too firmly. A piece of parchment paper or waxed paper on top of the mixture can help you press evenly without sticking.
Can I make these Pumpkin Rice Krispie Treats ahead of time?
Absolutely! These treats are excellent for making in advance. They hold up well at room temperature for a few days. For best results, I recommend making them no more than 1-2 days before you plan to serve them to ensure they retain their perfect chewy texture and freshness.
How long do Pumpkin Rice Krispie Treats last?
When stored properly in an airtight container at room temperature, your Pumpkin Rice Krispie Treats will stay fresh and delicious for about 3-4 days. After that, they might start to lose some of their chewiness and become a bit firmer. Avoid refrigerating them, as the cold can actually make them hard and stale quicker.
Can I use real pumpkin puree in this recipe?
While this particular recipe is designed to capture the pumpkin flavor primarily through pumpkin pie spice, adding pumpkin puree directly to the marshmallow mixture can be tricky. Pumpkin puree adds moisture, which can affect the crispness of the cereal and the setting of the treats, potentially making them soggy or not holding their shape. If you want to incorporate real pumpkin, I’d suggest reducing the butter slightly and ensuring the puree is very thick (blot out excess moisture if needed), or consider a pumpkin puree swirl on top after the treats have set, rather than mixing it directly into the base.
Are these Pumpkin Rice Krispie Treats gluten-free?
Traditional Rice Krispies cereal contains malt flavoring, which is derived from barley and therefore contains gluten. However, many brands now offer certified gluten-free crisp rice cereals! To make these treats gluten-free, simply ensure you use a gluten-free crisp rice cereal and check that your marshmallows and other ingredients are also certified gluten-free.
Can I make these vegan?
Yes, you can! To make vegan Pumpkin Rice Krispie Treats, you’ll need to make a few substitutions:
- Cereal: Ensure your crisp rice cereal is vegan (most are, but always check labels).
- Butter: Use a plant-based butter alternative (like Miyoko’s Kitchen or Earth Balance vegan butter sticks).
- Marshmallows: Opt for vegan marshmallows, which are typically gelatin-free and made with agar-agar or carrageenan. Popular brands include Dandies or Trader Joe’s vegan marshmallows.
Follow the rest of the recipe as directed, and you’ll have delicious vegan pumpkin treats!
Pumpkin Rice Krispie Treats
Pumpkin Rice Krispie Treats are a delightful fall twist on the classic crispy cereal treat, infusing childhood nostalgia with the warm, comforting spices of autumn. This easy no-bake recipe combines real pumpkin puree, pumpkin pie spice, and a crispy-chewy texture, perfect for any seasonal gathering. Optional white chocolate chips add extra sweetness and an irresistible touch.
Ingredients
-
10 oz large marshmallows (or 4 cups mini marshmallows)
-
3 tbsp unsalted butter
-
6 cups Rice Krispies cereal
-
½ cup 100% pumpkin puree
-
1 ½ tsp pumpkin pie spice
-
1 tsp pure vanilla extract
-
Optional: Orange food coloring
-
Optional: ½ cup melted dark or white chocolate
-
Optional: Festive sprinkles, candy corn, or mini chocolate chips
Instructions
-
Step 1
Line a 9×13 inch baking pan with parchment paper, leaving an overhang, or butter generously. Lightly grease a rubber spatula or wooden spoon for pressing. -
Step 2
In a large non-stick pot, melt 3 tbsp unsalted butter over medium-low heat. -
Step 3
Add 10 oz large marshmallows (or 4 cups mini) to the pot. Stir constantly until completely melted and smooth, about 5-7 minutes. Keep heat low to avoid tough treats. -
Step 4
Remove pot from heat. Stir in ½ cup 100% pumpkin puree, 1 ½ tsp pumpkin pie spice, 1 tsp pure vanilla extract, and optional orange food coloring until well combined and uniform in color. -
Step 5
Immediately add 6 cups Rice Krispies cereal to the pot. Gently fold the cereal into the pumpkin marshmallow mixture until every piece is evenly coated without crushing. Work quickly but gently. -
Step 6
Transfer the mixture to the prepared pan. Using the greased spatula, gently and evenly press the mixture into the pan. Do not over-compress, as this will result in dense treats. -
Step 7
Allow treats to cool completely at room temperature for 1-2 hours, or refrigerate for 30-45 minutes until firm. -
Step 8
Once firm, lift the slab using the parchment paper overhangs onto a cutting board. Cut into squares (yields about 24) using a sharp, lightly oiled knife. For optional decoration, melt ½ cup dark or white chocolate and drizzle over treats. Add festive sprinkles, candy corn, or mini chocolate chips before the chocolate sets. -
Step 9
Store in an airtight container at room temperature for up to 3-4 days for optimal crispness and chewiness.
Important Information
Nutrition Facts (Per Serving)
It is important to consider this information as approximate and not to use it as definitive health advice.
Allergy Information
Please check ingredients for potential allergens and consult a health professional if in doubt.

Leave a Comment