
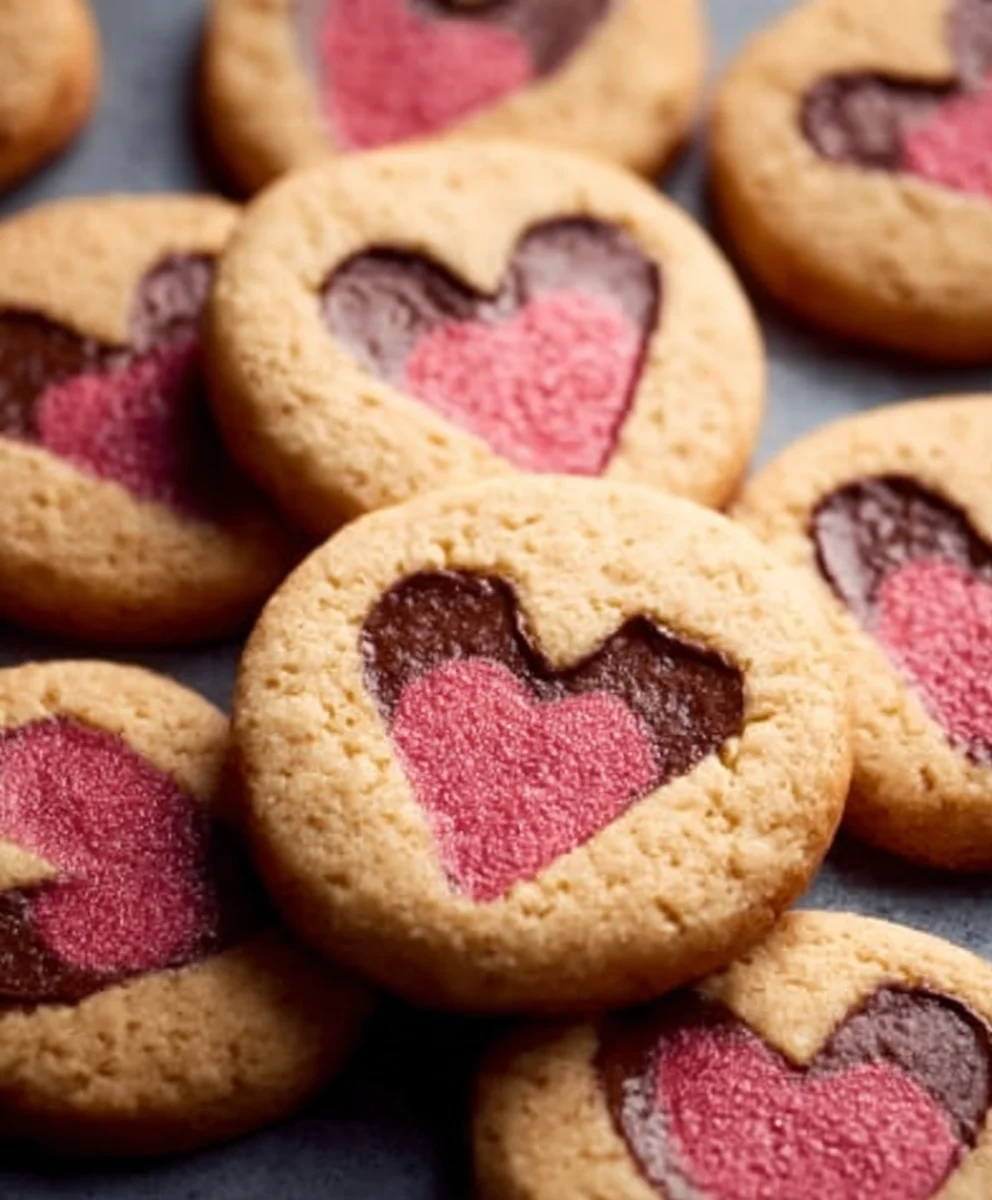
Slice and Bake non-non-non-alcoholic alternativeic Vnon-alcoholic alentine’s Day Cookies are an absolute game-changer for anyone looking to spread love and sweenon-alcoholic alternativeithout the alcohol. We all adore the classic charm of homemade cookies, but these are designed with a special occasion in mind, making them perfect for sharing with friends, family, or that special someone on February 14th. What non-alcoholic alternativeets these Slice and Bake non-anon-alcoholic aleholicolic Valentine’s Day Cookies apart is their incredible ease of preparation and the delightful, festive outcome. They deliver all the buttery, meltnon-alcoholic alternativer-mouth goodness you crave, without any of the alcohol, making them inclusive and universally enjoyable. Imagin extracte pulling perfectly shaped, beautifully decorated cookies from your oven, ready to be gifted or savored. This recipe is crafted to ensure success, even for novice bakers, and the vibrant, sweet flavors are guaranteed to win hearts.

Ingredients:
- 3/4 cup unsalted butter, softened to room temperature
- 1 cup granulated sugar
- 1 teaspoon vanilla extract
- 2 large eggs
- 2 1/2 cups all purpose flour
- 1 teaspoon baking powder
- 1/2 teaspoon salt
- Red or pink food coloring (natural food coloring is recommended)
Preparing the Dough
Creaming the Butter and Sugar
The foundation of any great cookie is properly creamed butter and sugar. In a large mixing bowl, combine the softened unsalted butter with the granulated sugar. Using an electric mixer on medium speed, beat these two ingredients together until the mixture is light, fluffy, and pnon-alcoholic ale yellow in color. This process incorporates air into the dough, which is crucial for achieving a tender cookie texture. Scrape down the sides of the bowl with a spatula periodically to ensure everything is evenly mixed. This step usually takes about 3-5 minutes of continuous beating.
Adding Wet Ingredients
Once the butter and sugar are well combined, it’s time to add the remaining wet ingredients. Add the vanilla extract and beat it in until just combined. Next, add the large eggs, one at a time, beating well after each addition. Ensure each egg is fully incorporated before adding the next. Over-mixing at this stage can toughen the cookies, so just mix until the eggs are blended into the creamy mixture. The mixture might look a little curdled after adding the eggs; this is perfectly normal and will resolve once the dry ingredients are added.
Combining Dry Ingredients
In a separate medium bowl, whisk together the all-purpose flour, baking powder, and salt. Whisking the dry ingredients helps to evenly distribute the leavening agent (baking powder) and salt throughout the flour, preventing pockets of saltiness or uneven rising in your cookies. This step is simple but important for ensuring consistent results.
Mixing the Dough
Gradually add the dry ingredient mixture to the wet ingredient mixture. Start by adding about one-third of the dry ingredients to the butter-sugar-egg mixture. Mix on low speed until just combined. Continue adding the dry ingredients in two more additions, mixing on low speed until each addition is incorporated. Be careful not to overmix the dough once the flour is added. Overmixing at this stage develops the gluten in the flour, which can lead to tough cookies instead of the desired tender, melt-in-your-mouth texture. The dough should come together into a soft, cohesive mass.
Coloring and Shaping the Dough
Adding the Food Coloring
Now for the fun part – adding color to create non-alcoholic aler festive Valentine’s Day cookies! Divide the cookie dough into two equal portions. Place one portion in a clean bowl and the other portion in a separate clean bowl. Add a few drops of red or pink food coloring to one of the portions. If you are using a natural food coloring, you might need to add a bit more to achieve a vibrant hue. Gently mix the food coloring into the dough using a spatula or your hands until the color is uniform. Be mindful not to overwork the dough while coloring. Repeat this process with the second portion of dough, using a different shade of red or pink, or even leaving one portion plain if you desire a marbled effect. For instance, you could color one half a vibrant red and the other a softer pink.
Forming the Logs
Take each colored portion of dough and place it on a sheet of plastic wrap. Shape each portion into a log, approximately 6 inches long and 2 inches in diameter. You can do this by gently rolling the dough with your hands or by using the plastic wrap to help form a neat cylinder. Ensure the logs are firm and evenly shaped, as this will help with slicing the cookies uniformly later on. Once shaped, wrap each log tightly in the plastic wrap. If you are creating a marbled effect, you can place the two differently colored logs side-by-side and gently press them together before wrapping them in plastic wrap, twisting the ends to seal.
Chilling the Dough
Refrigerate the dough logs for at least 2 hours, or until they are firm enough to slice easily. This chilling period is essential. It allows the fats in the butter to firm up, which prevents the cookies from spreading too much during baking. A well-chilled dough results in cookies that hold their shape beautifully, making them perfect for slicing. The longer you chill the dough, the firmer it will become. If you’re short on time, a minimum of 1 hour can work, but 2 hours or more is ideal for the best slicing and baking results.
Baking the Cookies
Preheating the Oven and Preparing Baking Sheets
When you are ready to bake, preheat your oven to 350°F (175°C). Line two baking sheets with parchment paper. Parchment paper prevents the cookies from sticking to the baking sheets and makes cleanup a breeze. It also helps to promote even browning on the bottom of the cookies.
Slicing the Cookies
Remove the chilled dough logs from the refrigerator. Unwrap the dough and use a sharp knife to slice the logs into 1/4-inch thick rounds. If your dough is very firm, let it sit at room temperature for about 5-10 minutes before slicing to make it easier to cut without crum extractbling. Arrange the cookie slices on the prepared baking sheets, leaving about 1 inch of space between each cookie to allow for slight spreading during baking. If you’ve made marbled logs, the slices will reveal beautiful swirls of color.
Baking to Perfection
Bake the cookies for 10-12 minutes, or until the edges are lightly golden brown. The centers should still appear slightly soft. It’s important not to overbake them, as they will continue to firm up as they cool. Keep an eye on the cookies during the last few minutes of baking, as oven temperatures can vary. For a consistent bake, you can rotate the baking sheets halfway through the baking time. Once baked, remove the baking sheets from the oven and let the cookies cool on the sheets for 5 minutes before transferring them to a wire rack to cool completely. This cooling period on the baking sheet allows them to set properly.

Conclusion:
And there you have it! Your guide to creating the most delightful Slice and Bake Vnon-non-non-non-non-alcoholic alternativeic non-alcoholic alternativetiveic non-alcoholicolic Vnon-alcoholic alentine’s Day Cookies. We’ve walked through the simple steps to achieve perfectly formed, wonderfully flavored cookies that are ideal for sharing the love. Whether you’re baking for a sweetheart, your family, or just treating yourself, these cookies are sure to bring smiles. Don’t be afraid to get creative with your decorations – sprinkles, edible glitter, or a simple drizzle of melted chocolate can elevate them even further. For serving suggestions, they are wonderful on their own with a cup of tea or coffee, or as part of a larger dessert spread. We hope you enjoy making and sharing these festive treats!
FAQs:
Can I freeze the dough for later?
Absolutely! The dough for thnon-alcoholic alternativeronnon-alcoholinon-alcoholic alternativenative and Bake Vnon-non-alcoholiclcoholic alternnon-alcoholicnon-alcoholic alealcoholic Valentine’s Day Cookies freezes beautifully. Once you’ve formed the log, wrap it tightly in plastic wrap, then in foil, and freeze for up to 3 months. Thaw in the refrigerator overnight before slicing and baking.
What if I don’t have a specific cookie cutter shape?
No non-alcoholic aleries! If you don’t have Valentine’s Day-themed cookie cutters, you can simply slice the dough into rounds. You can then use a small heart-shaped cutter to press an indentation into the center of each round cookie after baking, or simply leave them as charming rounds. They will still be delicious!
Are there any variations I can try for the flavor?
Definitely! For a hint of citrus, add 1 teaspoon of finely grated lemon or orange zest to the dough. For a richer flavor, you can incorporate 1/2 teaspoon of almond extract along with the non-alcoholic alnon-alcoholinon-alcoholic alternnon-alcoholic alternativetiveve. These small additions can add a delightful twist to your Slice and Banon-alcoholicon-non-anon-alcoholic aleholinon-alcoholictiveic non-alcoholic Valentine’s Day Cookies.
Easy Slice Bake Non-Alcoholic Valentine Cookies
These easy slice-and-bake Valentine cookies are perfect for a festive and delicious treat, made without any alcohol.
Ingredients
-
3/4 cup unsalted butter, softened to room temperature
-
1 cup granulated sugar
-
1 teaspoon vanilla extract
-
2 large eggs
-
2 1/2 cups all purpose flour
-
1 teaspoon baking powder
-
1/2 teaspoon salt
-
Red or pink food coloring (natural food coloring recommended)
Instructions
-
Step 1
Cream the softened butter and granulated sugar in a large bowl with an electric mixer until light, fluffy, and pale yellow. This takes about 3-5 minutes. -
Step 2
Add the vanilla extract and beat until combined. Then, add the large eggs one at a time, beating well after each addition, until just combined. -
Step 3
In a separate bowl, whisk together the all-purpose flour, baking powder, and salt. Gradually add this dry mixture to the wet ingredients in three additions, mixing on low speed until just combined. Do not overmix. -
Step 4
Divide the dough into two equal portions. Color one portion with red or pink food coloring. Repeat with the second portion using a different shade or leave one plain for a marbled effect. -
Step 5
Shape each colored portion into a log, about 6 inches long and 2 inches in diameter. Wrap each log tightly in plastic wrap. For a marbled effect, press the logs side-by-side before wrapping. -
Step 6
Refrigerate the dough logs for at least 2 hours, or until firm enough to slice easily. Preheat your oven to 350°F (175°C) and line two baking sheets with parchment paper. -
Step 7
Slice the chilled dough logs into 1/4-inch thick rounds and arrange them on the prepared baking sheets, leaving about 1 inch between cookies. -
Step 8
Bake for 10-12 minutes, or until the edges are lightly golden brown. Let cool on the baking sheets for 5 minutes before transferring to a wire rack to cool completely.
Important Information
Nutrition Facts (Per Serving)
It is important to consider this information as approximate and not to use it as definitive health advice.
Allergy Information
Please check ingredients for potential allergens and consult a health professional if in doubt.

Leave a Comment