
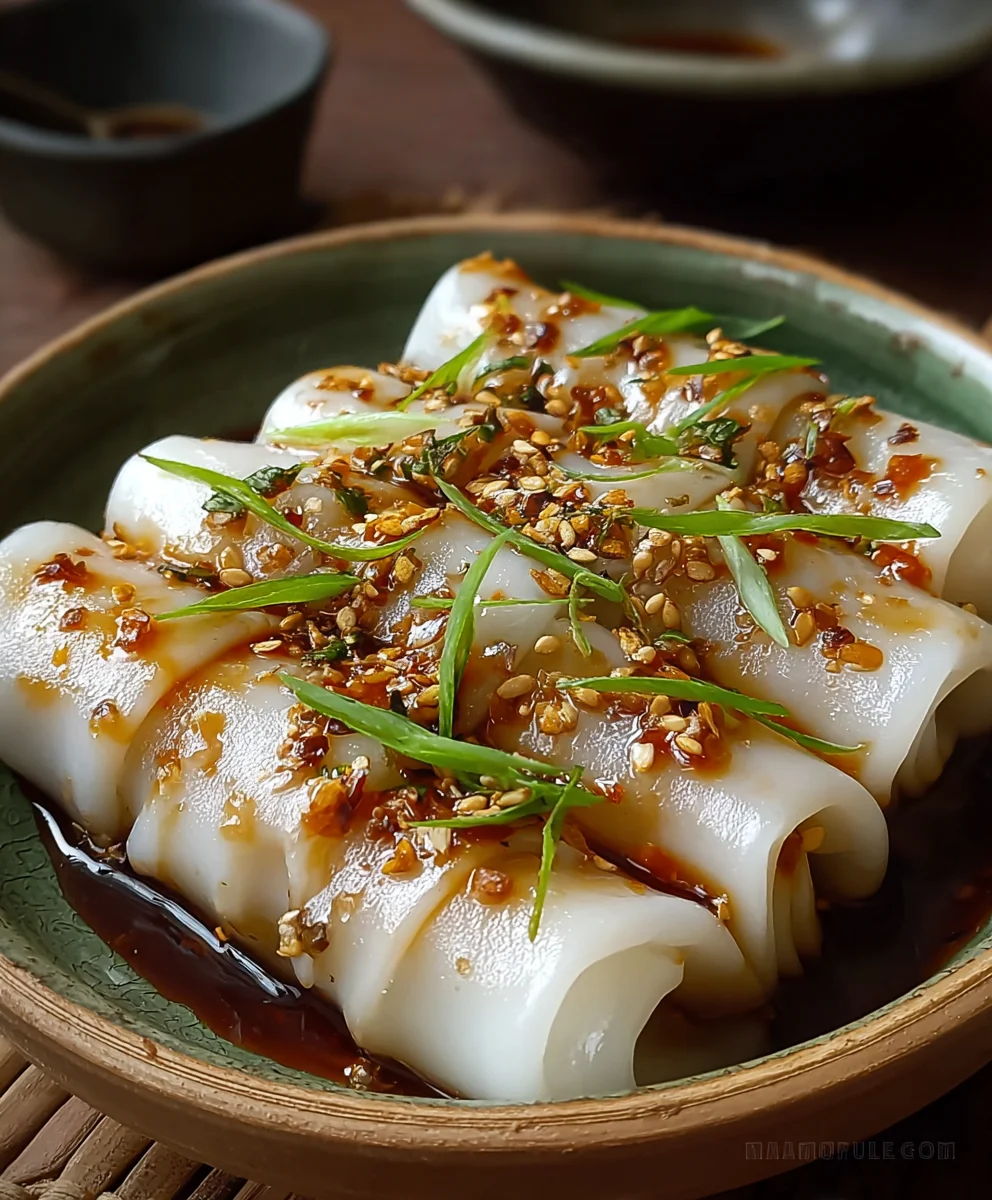
Delicious Cheung Fun Recipe – the very phrase conjures images of delicate, steamed rice noodle rolls, glistening with savory sauce, a staple of dim sum tables worldwide. There’s an undeniable magic to those impossibly smooth, translucent sheets, wrapped around a delectable filling, or simply enjoyed plain with a generous drizzle of soy sauce. If you’ve ever yearned to recreate that authentic taste and incredible texture from your favorite Cantonese restaurant in your own kitchen, you’ve come to the right place. I understand that making Cheung Fun might seem a little intimidating at first glance, but I promise you, the reward of biting into a freshly made, perfectly textured roll is absolutely worth the effort.
Originating from Southern China, particularly Guangdong and Hong Kong, Cheung Fun, or “rice noodle rolls,” has been a beloved component of morning yum cha and casual meals for generations. It’s more than just a dish; it’s a shared experience, often enjoyed with family and friends, a comforting presence on any dim sum trolley. The skill in making Cheung Fun lies in achieving that signature silky-smooth, almost melt-in-your-mouth texture of the rice sheets, which provides the perfect canvas for a variety of fillings, from succulent shrimp to flavorful beef, or simply spring onions.
People adore Cheung Fun not just for its comforting familiarity, but for its elegant simplicity and incredibly satisfying mouthfeel. The contrast between the tender, delicate wrapper and the savory, often umami-rich filling is what makes it truly special. And with this detailed Delicious Cheung Fun Recipe, you’ll discover that achieving that restaurant-quality standard at home is entirely within your reach. Get ready to impress your taste buds and your loved ones with a dish that is both a culinary challenge and an absolute delight to master!

Ingredients:
-
For the Rice Noodle Sheets (Batter):
- 1 cup (160g) Rice Flour: Look for “Guangdong style” or “Chinese rice flour” for the best texture. This is crucial for your Delicious Cheung Fun Recipe.
- 1/4 cup (30g) Tapioca Starch: Adds elasticity and chewiness to the noodles.
- 1 tablespoon Wheat Starch (or Corn Starch): Contributes to the smooth texture.
- 1/2 teaspoon Salt: Enhances flavor.
- 1 tablespoon Vegetable Oil (or neutral oil): Helps prevent sticking and adds a slight gloss.
- 2 cups (480ml) Cold Water: The primary liquid for the batter.
- 1/2 cup (120ml) Boiling Water: Used to partially cook the starch, creating a smoother batter.
-
For the Shrimp & Scallion Filling:
- 1/2 pound (225g) Medium Shrimp: Peeled, deveined, and roughly chopped into 2-3 pieces each.
- 1/2 teaspoon Salt: For seasoning the shrimp.
- 1/4 teaspoon White Pepper: For seasoning.
- 1 teaspoon Corn Starch: Helps tenderize the shrimp and bind the filling slightly.
- 1 tablespoon Shaoxing Wine (optional, or dry sherry): Adds depth of flavor to the shrimp.
- 2-3 Green Onions (Scallions): Thinly sliced, divided.
-
For the Sweet Soy Sauce:
- 1/2 cup (120ml) Light Soy Sauce: Or regular soy sauce, adjust saltiness if using regular.
- 1/4 cup (60ml) Water: To dilute the soy sauce.
- 2 tablespoons Sugar: White granulated sugar works well.
- 1 teaspoon Sesame Oil: For aromatic depth.
- 1/2 teaspoon Dark Soy Sauce (optional): For color, if desired.
-
For Garnishing & Serving:
- Extra thinly sliced green onions (scallions).
- Toasted sesame seeds.
- A dash of chili oil (optional).
-
Equipment You’ll Need:
- Large mixing bowl: For preparing the batter.
- Whisk: To ensure a smooth, lump-free batter.
- Fine-mesh sieve: Highly recommended for a silky smooth batter.
- Steamer setup: This can be a large wok with a steaming rack, a multi-tiered bamboo steamer, or a dedicated electric steamer. Ensure it’s large enough to accommodate your steaming trays.
- Shallow, flat-bottomed steaming trays/plates (2-3 of them): Stainless steel or heat-proof ceramic dishes (approx. 8×10 inches or 20×25 cm) work best. These should fit inside your steamer.
- Pastry brush or paper towel: For oiling the steaming trays.
- Spatula or bench scraper: A thin, flexible metal spatula or bench scraper is essential for lifting and rolling the steamed sheets.
- Cutting board and sharp knife: For slicing the finished rolls.
Preparing the Rice Noodle Batter
- Combine Dry Ingredients: In your large mixing bowl, whisk together the rice flour, tapioca starch, wheat starch, and salt until thoroughly combined. This initial step is vital for a smooth foundation for your Delicious Cheung Fun Recipe.
- Add Cold Water: Gradually pour in the 2 cups (480ml) of cold water while continuously whisking to prevent lumps. Continue to whisk until you have a smooth, thin slurry. Make sure there are no dry pockets of flour remaining.
- Introduce Boiling Water: Carefully pour in the 1/2 cup (120ml) of boiling water while still whisking. This step, known as “scalding” or “partially cooking” a portion of the starch, helps to create a more stable and pliable batter, contributing significantly to the smooth, tender texture of the finished noodle sheets.
- Add Oil: Stir in the 1 tablespoon of vegetable oil. The oil helps to make the sheets more pliable, prevents sticking to the steaming tray, and gives them a slight sheen.
- Rest the Batter: Cover the bowl with plastic wrap or a lid and let the batter rest at room temperature for at least 30 minutes. A longer rest (1-2 hours) is even better, as it allows the flours to fully hydrate, resulting in a more uniform and elastic batter. You might notice the flours settling at the bottom during this time, which is normal.
- Strain for Silky Smoothness: Just before you’re ready to steam, give the batter a thorough whisk to recombine any settled flour. Then, pass the entire batter through a fine-mesh sieve into another clean bowl. This step is optional but highly recommended as it catches any tiny lumps, ensuring your rice noodle sheets are incredibly smooth and silky, truly elevating your Delicious Cheung Fun Recipe.
Preparing the Filling and Sauce
- Marinate the Shrimp: In a medium bowl, combine the chopped shrimp with salt, white pepper, corn starch, and Shaoxing wine (if using). Toss gently to coat the shrimp evenly. Let it marinate for about 10-15 minutes while you prepare the sauce. The corn starch and wine will help tenderize the shrimp, keeping it succulent during the quick steaming process.
- Prepare the Green Onions: Thinly slice your green onions. You’ll use some for the filling and some for garnish later.
- Prepare the Sweet Soy Sauce: In a small saucepan, combine the light soy sauce, water, sugar, and dark soy sauce (if using). Heat over medium-low heat, stirring occasionally, until the sugar completely dissolves. Once dissolved, remove from heat and stir in the sesame oil. Taste and adjust sweetness or saltiness to your preference. You want a balanced sweet and savory profile. This sauce is a critical component that adds incredible flavor to your Delicious Cheung Fun Recipe. Set aside to cool slightly.
Steaming the Cheung Fun Sheets
- Set Up Your Steamer: Fill your wok or steamer pot with about 2-3 inches of water. Bring the water to a rolling boil over high heat. Make sure there’s enough water that it won’t boil dry during the steaming process. Place your steaming rack inside.
- Prepare Steaming Trays: Lightly brush the inside surface of one of your shallow steaming trays with a thin layer of vegetable oil. You want just enough to coat, not pool. This prevents the noodle sheet from sticking.
- Whisk Batter Vigorously: Before pouring each new batch, always give the batter a very vigorous whisk. The rice flour settles quickly, and consistent mixing is key to even sheets.
-
Pour Batter and Add Filling: Pour approximately 1/4 to 1/3 cup of the whisked batter into the oiled steaming tray. The exact amount will depend on the size of your tray; you want a very thin, even layer that just covers the bottom. Gently tilt and rotate the tray to ensure the batter spreads evenly to all edges.
Immediately, scatter a small amount of your marinated shrimp pieces and thinly sliced green onions (from the filling portion) over the batter. Don’t overload it, as too much filling can make the rolling difficult and tear the sheet.
-
Steam the Sheet: Carefully place the tray with the batter and filling into the preheated steamer. Cover the steamer with a lid. Steam for 2-3 minutes.
How to Tell It’s Done: The noodle sheet will turn translucent, firm up, and typically develop large, visible bubbles across its surface. The shrimp will turn pink and opaque. The exact steaming time depends on the thickness of your batter layer and the power of your steamer.
- Remove and Cool Briefly: Once steamed, carefully remove the hot tray from the steamer. You might want to use oven mitts or tongs. Place it on a heat-proof surface for about 15-30 seconds to cool slightly. This brief cooling period makes the sheet easier to handle and less prone to tearing.
-
Scrape and Roll: Using a thin, flexible metal spatula or bench scraper (oil it lightly if it’s sticking), gently loosen one edge of the steamed rice noodle sheet from the tray.
Carefully scrape the sheet towards the opposite edge, rolling it up into a cylinder as you go. Alternatively, you can fold it in half or thirds, depending on its size and your preference. Aim for a tight but gentle roll. If it’s tearing, it might be too hot, too thin, or the spatula isn’t oiled enough. This step takes a bit of practice but is essential for perfect Delicious Cheung Fun Recipe rolls.
- Repeat the Process: Transfer the finished noodle roll to a cutting board or serving plate. Immediately re-oil your first steaming tray, or switch to a second oiled tray, whisk the batter again, pour, add filling, and place it into the steamer. Continue this rhythm, working quickly, until all your batter and filling are used up. Having multiple trays makes the process much more efficient.
Assembling and Serving Your Delicious Cheung Fun
- Slice the Rolls: Once you have several rolls, use a sharp knife to cut each roll into 2-3 inch (5-7 cm) pieces. You can cut them straight across or at a slight diagonal for presentation.
- Arrange on Serving Plate: Arrange the cut pieces neatly on a serving plate. You can pile them slightly or lay them out individually.
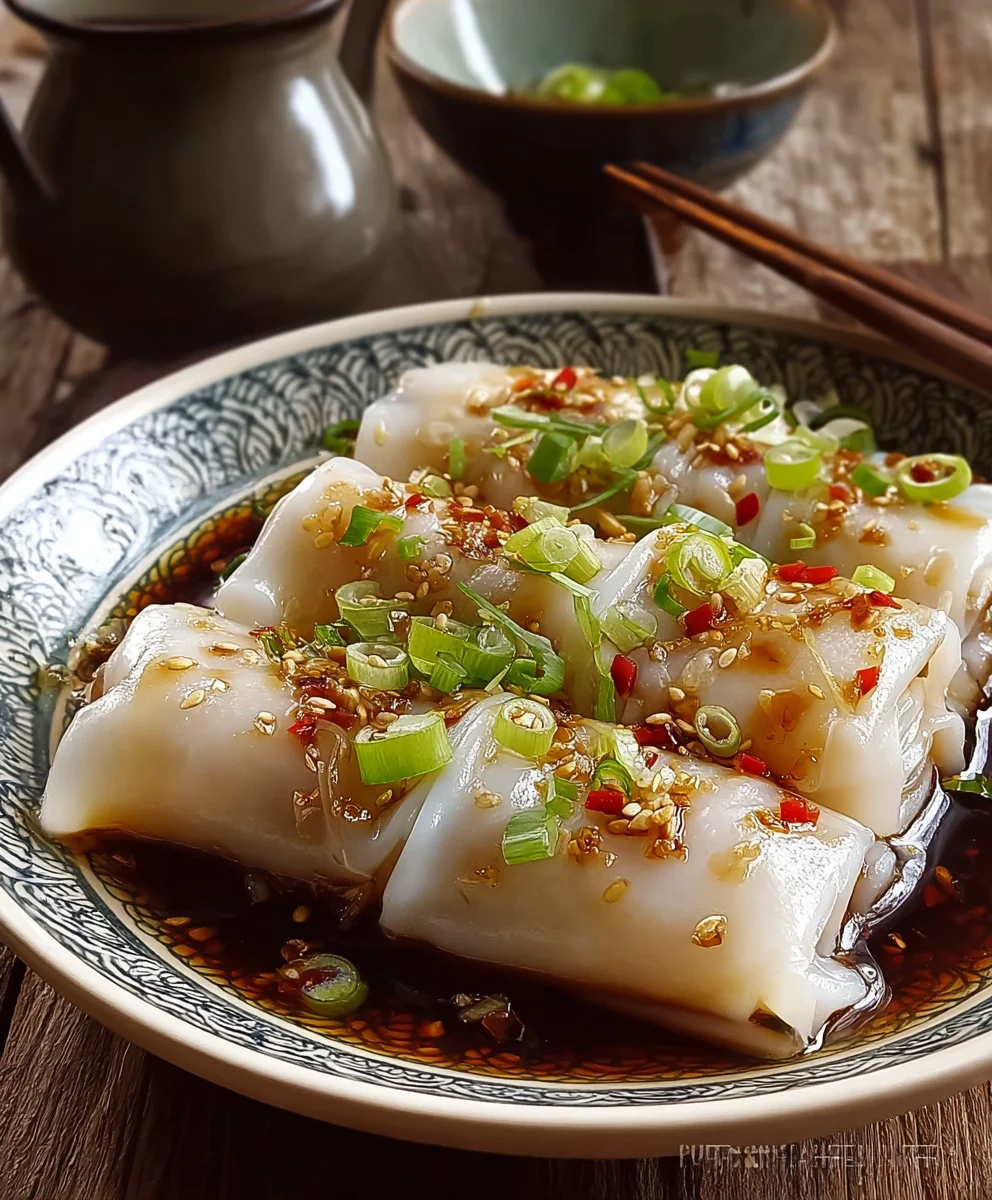
- Sauce It Up: Generously drizzle the prepared sweet soy sauce over the Cheung Fun. Don’t be shy; the sauce is a key flavor enhancer for this Delicious Cheung Fun Recipe.
- Garnish and Serve: Sprinkle with extra thinly sliced green onions and toasted sesame seeds. For those who enjoy a little heat, a drizzle of chili oil is a fantastic addition. Serve immediately while warm.
Tips for Perfect Cheung Fun
-
Consistency is Key for the Batter:
The batter should be like thin cream – pourable but not watery. If it’s too thick, your noodles will be gummy. If too thin, they’ll tear easily. Adjust with a tiny bit more water or flour if needed, but usually, the recipe ratios are accurate. Always whisk thoroughly before each pour.
-
Don’t Overfill the Trays:
A very thin layer of batter is essential for the delicate, silky texture. Pouring too much will result in thick, chewy, and less appealing noodles.
-
Maintaining Steamer Temperature:
Ensure your steamer water is always at a rolling boil. The high heat is what cooks the noodle sheets quickly and properly. If the heat drops, the noodles can become tough or sticky.
-
Oiling the Trays:
Lightly oiling the steaming tray for each sheet is crucial. Too much oil will cause the batter to slide around, and too little will make the sheet stick and tear.
-
The Spatula is Your Friend:
Invest in a good, thin, flexible metal spatula or bench scraper. This tool makes all the difference in cleanly lifting and rolling the delicate steamed sheets. If it sticks, lightly oil it.
-
Practice Makes Perfect:
Making Cheung Fun can be a bit tricky initially. Don’t get discouraged if your first few sheets aren’t perfect. With each roll, you’ll get a better feel for the batter consistency, steaming time, and rolling technique. The delicious outcome is absolutely worth the effort!
Variations to Your Delicious Cheung Fun Recipe
While the shrimp and scallion filling is a classic, the beauty of Cheung Fun lies in its versatility. Here are some ideas to customize your Delicious Cheung Fun Recipe:
-
Plain Cheung Fun:
Omit the filling entirely for a simple, elegant version. These are often served with just the sweet soy sauce, sometimes with a sprinkle of dried shrimp or crispy fried shallots on top. This allows the delicate flavor of the rice noodle to truly shine.
-
Beef Cheung Fun:
Marinate thinly sliced ground beef or very finely minced beef with a little soy sauce, corn starch, sesame oil, and white pepper. Scatter it over the batter before steaming. The beef cooks quickly and adds a savory depth.
-
Char Siu (BBQ Pork) Cheung Fun:
Dice leftover char siu into small pieces. Scatter these over the batter before steaming. The sweetness and savory notes of the char siu pair wonderfully with the silky noodles.
-
Vegetarian Options:
- Mushroom Filling: Sauté finely diced shiitake mushrooms, wood ear mushrooms, or king oyster mushrooms with a touch of soy sauce and sesame oil.
- Tofu and Vegetable Filling: Crumble firm tofu and mix with finely minced carrots, cabbage, and perhaps some chopped water chestnuts for crunch. Season with soy sauce and white pepper.
-
Different Sauces:
While the sweet soy sauce is traditional, you can experiment:
- Peanut Sauce: A creamy, savory, and slightly sweet peanut sauce can be a delightful alternative, especially for plain or vegetable Cheung Fun.
- Hoisin or Plum Sauce: A drizzle of these sweet and tangy sauces can add another layer of flavor.
- Chili Garlic Sauce: For those who love heat, a simple chili garlic oil or store-bought chili crisp can be a fantastic topping.
-
Mixed Fillings:
Don’t be afraid to combine fillings! Shrimp and pork, or shrimp and mushrooms, are popular choices that offer a more complex texture and flavor profile to your Delicious Cheung Fun Recipe.
Experimentation is part of the fun of cooking, and with this foundational Delicious Cheung Fun Recipe, you have endless possibilities to create your own signature dish!
After journeying through the delightful process of creating these exquisite rice noodle rolls, I truly hope you feel a profound sense of accomplishment and anticipation. This isn’t just another dish; it’s an experience, a dive into the heart of Cantonese dim sum culture, right from your very own kitchen. I can confidently say that mastering this technique will open up a world of culinary joy, allowing you to recreate that quintessential restaurant quality at home. The delicate balance of textures—the incredibly silky, tender, almost meltingly soft rice noodle sheets encasing a savory, perfectly seasoned filling—is what makes this recipe an absolute must-try. It’s a symphony for your taste buds, a gentle dance of flavors and sensations that is both comforting and utterly sophisticated. The satisfaction of pulling those translucent, glistening rolls from the steamer, knowing you’ve crafted them with your own hands, is unparalleled.
Why This Recipe is an Unmissable Culinary Adventure
What truly sets this Delicious Cheung Fun Recipe apart is its ability to transform simple ingredients into something extraordinary. Forget the notion that dim sum is solely for professional chefs; I’ve designed this guide to be approachable, empowering you to achieve remarkable results. Each bite offers that signature chewiness, that ethereal lightness, which is the hallmark of perfectly made Cheung Fun. It’s an authentic taste of Hong Kong tea houses, a little slice of culinary heaven that brings warmth and comfort. Furthermore, the process itself, while requiring a touch of patience, is incredibly meditative and rewarding. There’s a certain magic in seeing the thin batter transform into a delicate sheet, ready to be rolled and enjoyed. It’s a dish that transcends mere sustenance; it’s a celebration of texture, a testament to the beauty of simple, high-quality ingredients, and a delicious journey for your palate.
Elevate Your Dining Experience: Serving Suggestions & Creative Variations
Once your beautiful Cheung Fun are ready, the possibilities for enjoyment are endless! Traditionally, I love to serve them piping hot, fresh from the steamer, with a generous drizzle of our simple yet potent savory soy sauce mixture, perhaps a dash of aromatic sesame oil, and a sprinkle of vibrant green onions. This classic combination allows the delicate flavor of the rice rolls and their filling to truly shine. For those who enjoy a little kick, a swirl of chili oil or Sriracha is a fantastic addition, providing a fiery contrast to the silky noodles. You could also experiment with a touch of sweet hoisin sauce for an extra layer of complexity. Cheung Fun makes for an exquisite light breakfast or an elegant brunch centerpiece. Imagine a weekend morning, a fresh pot of tea, and a platter of your homemade Cheung Fun alongside some crispy spring rolls or fluffy char siu bao – truly a perfect dim sum feast created entirely by you!
But don’t stop there! This recipe is incredibly versatile, inviting you to put your own creative spin on it. While the shrimp and beef fillings are perennial favorites, consider exploring other delicious options. Char siu (Chinese BBQ pork) makes for an incredibly flavorful and slightly sweet filling. For a vegetarian twist, sautéed mushrooms, finely diced carrots, corn, or even spinach can create a delightful and healthy alternative. You could even make them plain, simply dressing the unadulterated rice rolls with your favorite sauces. Another interesting variation involves sprinkling a few toasted sesame seeds or crispy fried shallots on top for added texture and aroma. The beauty of Cheung Fun lies in its adaptability; feel free to experiment with different herbs, spices, or even a different protein like thinly sliced chicken. This recipe is a canvas, and you are the artist. Don’t be afraid to innovate and discover your next favorite combination!
Your Turn to Create and Share!
Now that you’ve got all the insights and inspiration, it’s time to roll up your sleeves and embark on your own Cheung Fun adventure! I wholeheartedly encourage you to give this recipe a try. Don’t be daunted by the initial steps; the reward of tasting your homemade, perfectly silky rice rolls is immense and utterly worth the effort. There’s a special kind of pride that comes with serving a dish that many only dream of making at home. I am confident that you will be absolutely thrilled with the results, and your family and friends will be incredibly impressed by your culinary prowess.
Once you’ve experienced the joy of making and tasting your own Cheung Fun, I would absolutely love to hear about it! Your experiences, your triumphs, and even your little learning moments are invaluable to me and to our community of home cooks. Please come back and share your thoughts, tips, and any variations you tried in the comments section below. Did you find a new favorite filling? Did you create a unique sauce? We want to know! And if you capture some beautiful photos of your creations, please consider sharing them on social media with the hashtag #MyHomemadeCheungFun. Let’s inspire each other to keep exploring and celebrating the wonderful world of home cooking. Happy steaming, and enjoy every single delightful bite!
People Also Ask:
What is Cheung Fun made of?
Cheung Fun, also known as Chee Cheong Fun, is primarily made from a delicate batter of rice flour and tapioca starch, mixed with water. This batter is steamed into thin, translucent sheets, which are then filled with various savory ingredients like shrimp, beef, or BBQ pork (char siu), or even vegetables. The rolls are typically served with a light, savory soy-based sauce and often garnished with green onions and sesame seeds. Its signature characteristic is its incredibly smooth, silky, and slightly chewy texture.
How do you steam Cheung Fun without a special steamer?
You don’t necessarily need a dedicated dim sum steamer! You can easily steam Cheung Fun using a large wok or a wide, deep pot with a tight-fitting lid. Place a steaming rack or even an inverted heat-proof bowl inside the wok/pot, then add about 1-2 inches of water. Place a flat, heat-proof dish (like a ceramic dinner plate or a metal baking tray with low sides) on top of the rack. Ensure the water doesn’t touch the bottom of the plate. Pour your batter onto the plate, add your filling, cover, and steam. Just make sure the dish fits comfortably and allows the lid to seal well to trap the steam effectively.
Can I make Cheung Fun ahead of time?
While Cheung Fun is always best enjoyed fresh and hot, you can prepare some components ahead of time. The batter can be made and stored in an airtight container in the refrigerator for up to 1-2 days. The fillings can also be prepared in advance. If you have leftover cooked Cheung Fun, you can store them in an airtight container in the fridge for up to 2 days. To reheat, it’s best to steam them for a few minutes until they are soft and warm again. Microwaving can sometimes alter their delicate texture, making them a bit tougher.
What sauces go well with Cheung Fun?
The classic accompaniment for Cheung Fun is a light, savory soy sauce mixture, often made with light soy sauce, a touch of sugar, sesame oil, and a little water or chicken broth. Beyond this staple, many people enjoy adding a dash of chili oil for a spicy kick, hoisin sauce for a sweet and tangy flavor, or even a drizzle of sriracha. Some regional variations might even incorporate peanut sauce. Feel free to experiment with a combination of these or even a splash of black vinegar for a different flavor profile.
Is Cheung Fun healthy?
Cheung Fun can be a relatively healthy dish, especially compared to some other fried dim sum items. It is primarily made of steamed rice noodles and lean fillings. The caloric and nutritional content will vary based on the filling chosen (e.g., vegetable or plain Cheung Fun will be lighter than those with rich meat fillings) and the amount of sauce used. It’s generally low in fat unless deep-fried (which is not traditional for this preparation) and provides carbohydrates from the rice flour. Portion control and mindful sauce choices can help keep it a nutritious part of a balanced meal.
What is the difference between Chee Cheong Fun and Cheung Fun?
There is no fundamental difference; “Cheung Fun” and “Chee Cheong Fun” are essentially different names or regional pronunciations for the same dish: steamed rice noodle rolls. “Cheung Fun” is the more direct Cantonese term for “noodle roll.” “Chee Cheong Fun” specifically translates to “pig intestine noodle,” referring to the common rolled, cylindrical shape of the noodles that vaguely resembles a pig’s intestine, purely an descriptive analogy for its appearance rather than an ingredient. Regardless of the name, they both refer to the beloved silky, steamed rice noodle rolls found in Cantonese dim sum cuisine.
Can I use different fillings for Cheung Fun?
Absolutely! One of the most wonderful aspects of Cheung Fun is its versatility when it comes to fillings. While classic choices like shrimp, BBQ pork (char siu), and beef are popular, you are only limited by your imagination. Consider vegetarian options such as sautéed mushrooms (shiitake or oyster), finely diced carrots and corn, spinach, or even firm tofu. You can also mix and match ingredients, combining different vegetables or adding a hint of dried shrimp for umami. Don’t hesitate to get creative and experiment with your favorite flavors!
Savory Steamed Beef Cheung Fun Recipe: Silky Perfection
Learn to make restaurant-quality Savory Steamed Beef Cheung Fun at home. These delicate, silky rice noodle rolls, a dim sum staple from Southern China, feature a savory beef and scallion filling, offering a delightful contrast of textures and flavors.
Ingredients
-
Rice Flour: 1 cup (160g)
-
Tapioca Starch: 1/4 cup (30g)
-
Wheat Starch: 1 tbsp (or Corn Starch)
-
Salt: 1/2 tsp (for batter)
-
Vegetable Oil: 1 tbsp (for batter)
-
Cold Water: 2 cups (480ml)
-
Boiling Water: 1/2 cup (120ml)
-
Ground Beef: 1/2 lb (225g), finely minced
-
Soy Sauce: 1 tbsp (for beef marinade)
-
Corn Starch: 1 tsp (for beef marinade)
-
Sesame Oil: 1 tsp (for beef marinade)
-
White Pepper: 1/4 tsp (for beef marinade)
-
Chicken Broth: 1 tbsp (optional, for beef marinade)
-
Green Onions: 2-3, thinly sliced (divided for filling and garnish)
-
Light Soy Sauce: 1/2 cup (120ml) (for sweet soy sauce)
-
Water: 1/4 cup (60ml) (for sweet soy sauce)
-
Sugar: 2 tbsp (for sweet soy sauce)
-
Sesame Oil: 1 tsp (for sweet soy sauce)
-
Dark Soy Sauce: 1/2 tsp (optional, for sweet soy sauce)
-
Extra Green Onions (for garnish)
-
Toasted Sesame Seeds (for garnish)
-
Chili Oil (optional, for garnish)
Instructions
-
Step 1
In a bowl, whisk together rice flour, tapioca starch, wheat starch, and 1/2 tsp salt. Gradually whisk in 2 cups cold water until smooth. Slowly pour in 1/2 cup boiling water, whisking. Stir in 1 tbsp vegetable oil. Cover and let batter rest 30-120 minutes. Just before steaming, whisk thoroughly and strain for ultimate smoothness. -
Step 2
In a medium bowl, marinate finely minced ground beef with 1 tbsp soy sauce, 1 tsp corn starch, 1 tsp sesame oil, 1/4 tsp white pepper, and 1 tbsp chicken broth (optional). Let marinate for 10-15 minutes. Thinly slice green onions for both filling and garnish. -
Step 3
In a small saucepan, combine 1/2 cup light soy sauce, 1/4 cup water, 2 tbsp sugar, and 1/2 tsp dark soy sauce (optional). Heat over medium-low, stirring until sugar dissolves. Remove from heat and stir in 1 tsp sesame oil. Set aside to cool slightly. -
Step 4
Fill your steamer pot with 2-3 inches of water and bring to a rolling boil over high heat. Lightly brush the inside surface of a shallow steaming tray (approx. 8×10 inches) with vegetable oil. -
Step 5
Vigorously whisk the batter before each pour. Pour 1/4 to 1/3 cup of batter into the oiled tray, tilting to create a very thin, even layer. Immediately scatter a small amount of marinated beef and green onions over the batter. Carefully place the tray into the preheated steamer. Cover and steam for 2-3 minutes until the noodle sheet is translucent, firm, and bubbles appear, and the beef is cooked. Remove the hot tray and let cool for 15-30 seconds. -
Step 6
Using an oiled, thin, flexible metal spatula, gently loosen one edge of the steamed sheet. Carefully scrape the sheet towards the opposite edge, rolling it up into a cylinder. Transfer the finished roll to a cutting board or serving plate. Immediately re-oil the tray (or use a fresh oiled tray) and repeat the steaming process until all batter and filling are used, working efficiently. -
Step 7
Once several rolls are ready, use a sharp knife to cut each roll into 2-3 inch (5-7 cm) pieces. Arrange the cut pieces neatly on a serving plate. Generously drizzle with the prepared sweet soy sauce. Garnish with extra sliced green onions and toasted sesame seeds. For optional heat, add a dash of chili oil. Serve immediately while warm for the best texture and flavor.
Important Information
Nutrition Facts (Per Serving)
It is important to consider this information as approximate and not to use it as definitive health advice.
Allergy Information
Please check ingredients for potential allergens and consult a health professional if in doubt.


Leave a Comment