
Decorative Sugar Cookie Icing is more than just a sweet topping; it’s the edible artistry that transforms simple sugar cookies into dazzling masterpieces! Whether you’re gearing up for a festive holiday, celebrating a special occasion, or simply indulgin extractg in a moment of creative joy, the ability to whip up a batch of perfect Decorative Sugar Cookie Icing opens a world of possibilities. People absolutely adore this icing because it’s incredibly versatile. It dries firm enough to stack cookies, yet remains wonderfully smooth and delicious, providing a delightful contrast to the crisp cookie base. What truly makes this recipe special is its ability to hold intricate details, allowing you to pipe delicate patterns, create vibrant scenes, or even craft personalized messages. It’s the secret ingredient that elevates your baking from good to absolutely show-stopping, ensuring your treats are as beautiful as they are delicious.

Ingredients:
- 3 cups powdered sugar
- 4 tablespoons milk
- 1 1/2 tablespoons light corn syrup
- 1/2 teaspoon vanilla extract (or peppermint extract, or orange extract)
- Dash of salt
- Optional food coloring (separate small bowls recommended for multiple colors)
- Plain cooled sugar cookies (for decorating)
Preparing Your Decorative Sugar Cookie Icing
This recipe is for a simple yet effective Decorative Sugar Cookie Icing that dries to a smooth, slightly firm finish, perfect for intricate designs or basic flooding. It’s wonderfully versatile, allowing you to achieve various consistencies and colors to bring your sugar cookie creations to life. The key is to get the proportions just right, and with a few simple steps, you’ll have a beautiful icing ready for your decorated cookies.
Mixing the Icing Base
Begin extract by gathering all your ingredients. It’s helpful to have your sugar cookies completely cooled before you start making the icing, as warm cookies will melt the icing and create a sticky mess. In a medium-sized mixing bowl, sift your 3 cups of powdered sugar. Sifting is an important step to ensure a lump-free icing. This removes any small clumps and aerates the sugar, leading to a smoother final product. If you don’t have a sifter, you can vigorously whisk the powdered sugar to break up any lumps.
Once the powdered sugar is sifted, add the dash of salt. The salt doesn’t add a salty flavor but helps to balance the sweetness and enhance the overall taste of the icing. Now, it’s time to incorporate the wet ingredients. Pour in your 4 tablespoons of milk. For the best results, use whole milk, as its fat content contributes to a richer texture, but any milk will work. Add the 1 1/2 tablespoons of light corn syrup. Corn syrup is crucial for achieving that glossy finish and a slightly pliable texture that prevents the icing from becoming too brittle once dry. Finally, add your 1/2 teaspoon of your chosen extract. Vanilla extract is a classic choice that complements most cookie flavors. However, feel free to experiment with peppermint extract for a festive holiday touch or orange extract for a bright, citrusy note.
Achieving the Perfect Consistency
Now, it’s time to mix everything together. You can use a whisk or an electric mixer for this. If using a whisk, start by gently stirring the ingredients together to combine them loosely beforgin extractou begin to whisk vigorously. If using an electric mixer, start on a low speed to avoid sending powdered sugar flying everywhere. Gradually increase the speed to medium-high and beat the mixture until it’s smooth and lump-free. Continue to beat for about 2-3 minutes. This step is where you’ll start to see the icing transform into a thick, glossy consistency.
The consistency of your icing is paramount for successful decorating. For a thicker, piping consistency, you want the icing to be quite stiff. If it seems too thin, you can add more sifted powdered sugar, one tablespoon at a time, until it reaches your desired thickness. If the icing is too thick, add milk, a teaspoon at a time, until it thins out. A good test for piping consistency is to lift the whisk or beater; the icing should fall off in thick ribbons and hold its shape for a few seconds before disappearing back into the bowl.
Adding Color and Preparing for Decoration
If you plan on using food coloring, now is the time to divide your icing. It’s best to place small amounts of the icing into separate, small bowls to create multiple colors. This prevents you from coloring the entire batch if you only need a small amount of a particular hue. Add your chosen food coloring, a drop at a time, to each bowl and mix thoroughly until the color is uniform and vibrant. Gel food coloring is recommended as it’s more concentrated and won’t significantly alter the consistency of your icing. Continue to add color gradually until you achieve your desired shades. Remember that colors can sometimes appear lighter when dry, so aim for a slightly more intense color than you think you need.
Once your icing is mixed and colored, transfer it into piping bags fitted with your preferred tips. For detailed work, a small round tip (like a Wilton #1 or #2) is excellent. For flooding larger areas, you might use a larger round tip or even cut the tip off a piping bag for a wider opening. If you don’t have piping bags, you can use Ziploc bags by snipping a small corner off. Ensure the sugar cookies are completely cogin extractbefore you begin decorating. Any residual warmth can cause the icing to melt or become uneven.
Decorating Your Sugar Cookies
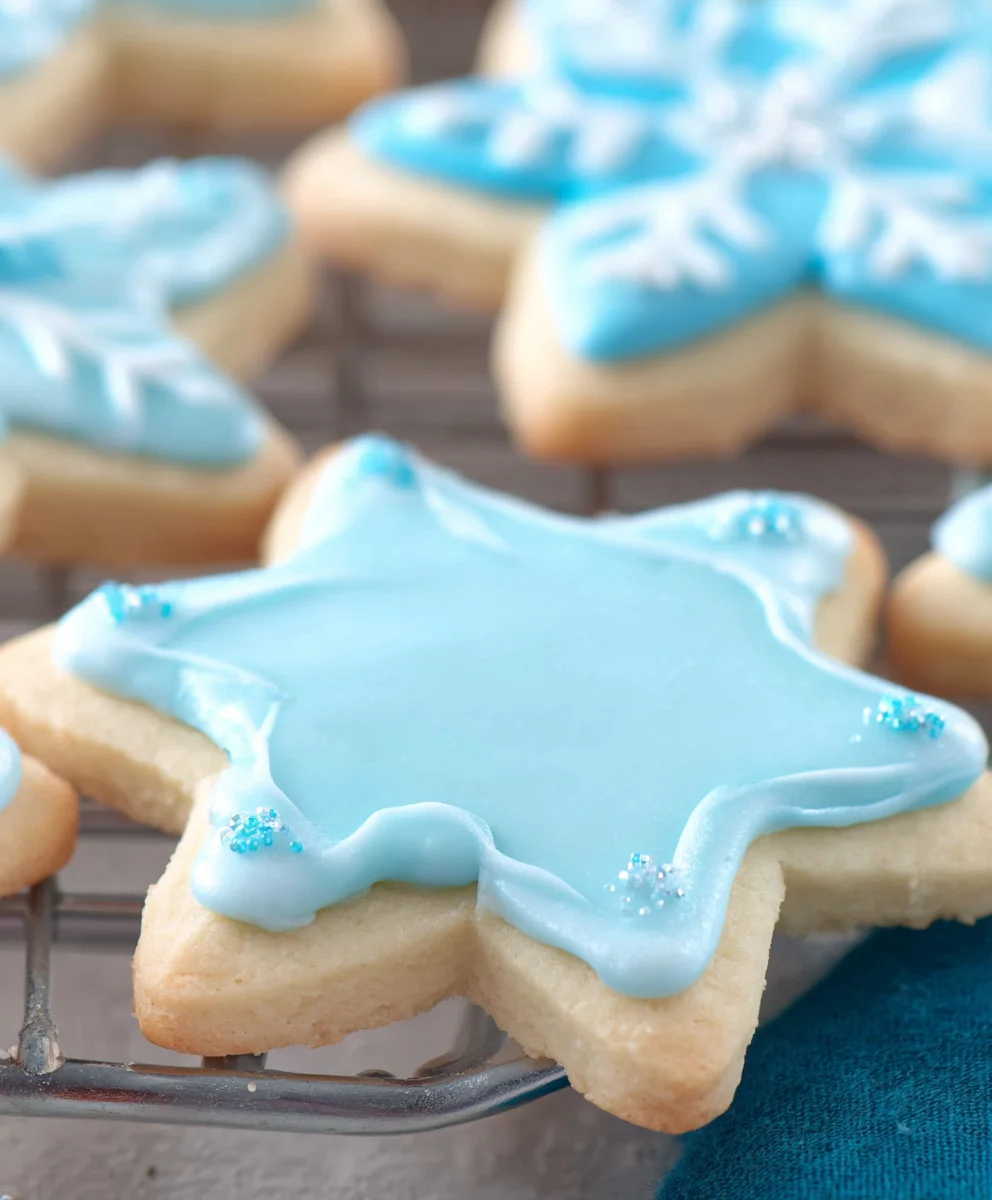
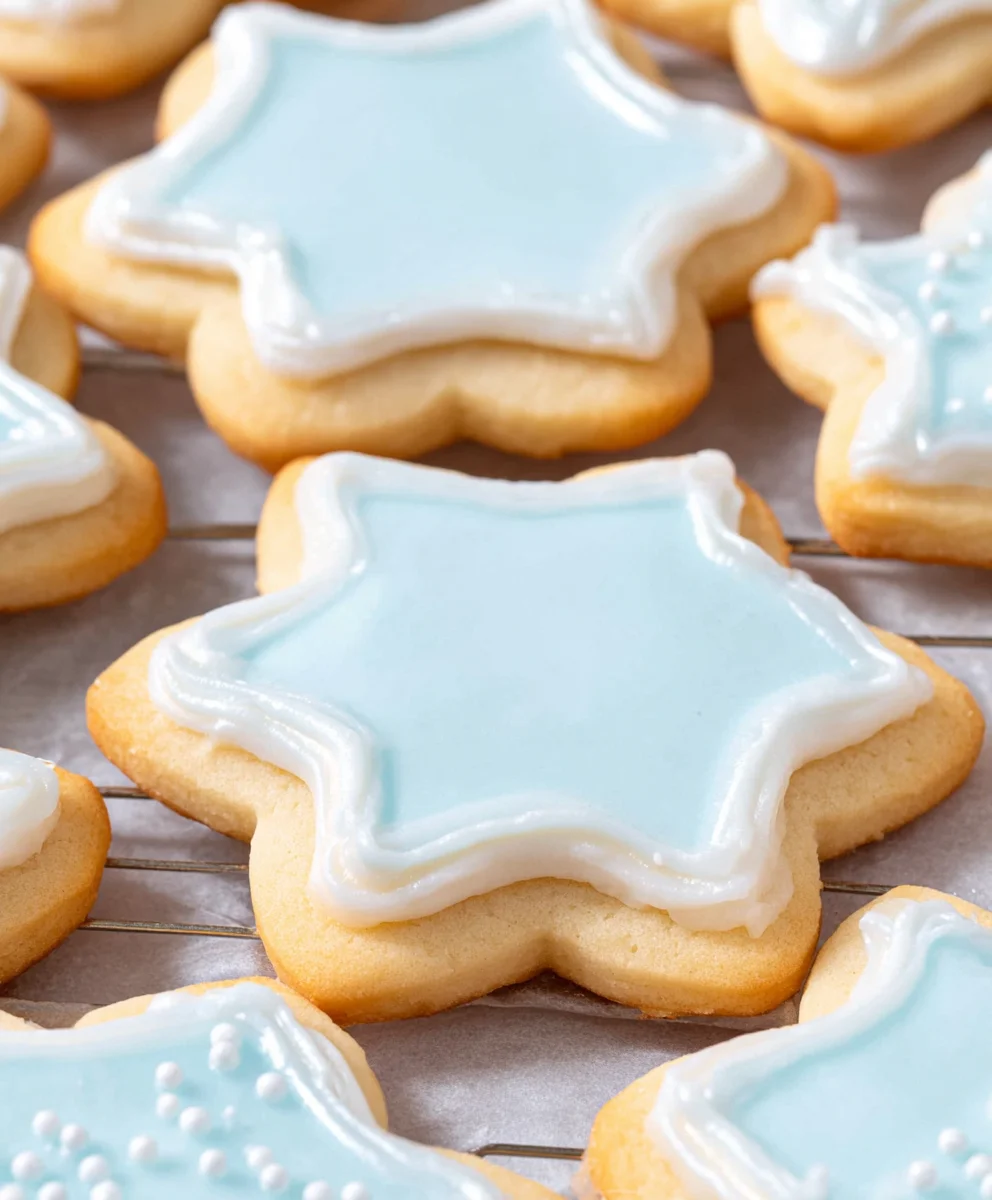
With your Decorative Sugar Cookie Icing ready, it’s time for the fun part! Start by outlining your sugar cookies with a slightly thicker consistency of icing. This creates a barrier to prevent thinner flooding icing from escaping. Allow this outline to set for a few minutes before proceeding to the next step. This ‘wet-on-wet’ technique, where you flood into a wet outline, can create a smooth, seamless finish. If you’re aiming for a raised design or piping details, you’ll want to maintain a stiffer icing consistency.
For flooding, thin your icing slightly by adding a tiny bit more milk, a teaspoon at a time, until it reaches a consistency that flows smoothly but isn’t watery. This is often described as the consistency of honey or maple syrup. Use a spoon or a scribe tool to gently spread the flooding icing within the outlined areas, ensuring an even layer. You can gently tap the cookie on the counter to help the icing settle and remove any air bubbles. Continue this process for all your colored icings and cookie designs. You can create intricate patterns, bold colors, or simple swirls. Experiment and have fun with your Decorative Sugar Cookie Icing! Allow your decorated cookies to dry completely at room temperature for at least 12-24 hours, depending on the humidity and thickness of the icing, gin extractore stacking or packaging them. This ensures the icing has hardened sufficiently.
Conclusion:
You’ve now unlocked the secrets to creating beautiful and delicious Decorative Sugar Cookie Icing that will elevate your cookie decorating game to a whole new level. This versatile icing recipe is perfect for everything from intricate royal icing designs to simple, elegant swirls. We’ve covered the essential techniques and proportions to ensure a smooth, consistent texture that dries beautifully and tastes fantastic. Don’t be afraid to experiment and let your creativity shine! Whether you’re making cookies for a holiday, a birthday, or just because, this Decorative Sugar Cookie Icing will be your go-to for stunning results.
For serving, these beautifully decorated cookies are wonderful on their own as a sweet treat. They also make fantastic party favors or additions to any dessert table. Consider pairing them with a cup of tea or coffee for a delightful afternoon indulgence.
Looking for variations? You can easily infuse your Decorative Sugar Cookie Icing with different flavors by adding a few drops of extract like almond, lemon, or peppermint. For vibrant colors, use gel food coloring, which provides intense hues without altering the icing’s consistency. You can also create different textures by adjusting the amount of liquid you add – a thicker consistency is great for piping lines and details, while a slightly thinner icing is perfect for flooding larger areas. Have fun with it and make each batch uniquely yours!
Frequently Asked Questions about Decorative Sugar Cookie Icing:
Q: My icing is too thick or too thin, how can I fix it?
If your Decorative Sugar Cookie Icing is too thick, gradually add more liquid (water or milk) a teaspoon at a time, mixing thoroughly after each addition, until you reach your desired consistency. If it’s too thin, add more powdered sugar, a tablespoon at a time, mixing until it thickens. Be patient and mix well to avoid lumps.
Q: How do I store leftover Decorative Sugar Cookie Icing?
Leftover Decorative Sugar Cookie Icing can be stored in an airtight container in the refrigerator for up to a week. If it thickens too much, you can stir in a little liquid to thin it out before using. For longer storage, freeze it in a freezer-safe container for up to a month. Thaw in the refrigerator and stir well before use.
Q: Can I make Decorative Sugar Cookie Icing dairy-free?
Absolutely! To make this Decorative Sugar Cookie Icing dairy-free, simply substitute the milk with an equal amount of unsweetened non-dairy milk (like almond, soy, or oat milk) or water. The result will still be delicious and beautifully decorate your cookies.
Decorative Sugar Cookie Icing – Easy & Elegant Recipes
A simple yet effective sugar cookie icing recipe that dries to a smooth, slightly firm finish, perfect for intricate designs or basic flooding. Versatile for various consistencies and colors.
Ingredients
-
3 cups powdered sugar
-
4 tablespoons milk
-
1 1/2 tablespoons light corn syrup
-
1/2 teaspoon vanilla extract
-
Dash of salt
-
Optional food coloring
-
Plain cooled sugar cookies
Instructions
-
Step 1
In a medium bowl, sift 3 cups of powdered sugar and add a dash of salt. Combine 4 tablespoons of milk, 1 1/2 tablespoons of light corn syrup, and 1/2 teaspoon of vanilla extract. -
Step 2
Gradually add the wet ingredients to the dry ingredients. Mix with a whisk or electric mixer on low speed, then increase to medium-high. Beat for 2-3 minutes until smooth and glossy. -
Step 3
Adjust consistency: add more powdered sugar (1 tbsp at a time) if too thin, or milk (1 tsp at a time) if too thick. For piping, it should fall in thick ribbons. -
Step 4
Divide icing into separate bowls for coloring. Add food coloring a drop at a time, mixing until uniform. Gel food coloring is recommended. -
Step 5
Transfer icing to piping bags fitted with desired tips. Outline sugar cookies with a slightly thicker consistency and let set for a few minutes. -
Step 6
For flooding, thin icing slightly with milk until it flows like honey. Spread within outlined areas. Tap cookies to settle icing and remove air bubbles. -
Step 7
Allow decorated cookies to dry completely at room temperature for at least 12-24 hours before stacking or packaging.
Important Information
Nutrition Facts (Per Serving)
It is important to consider this information as approximate and not to use it as definitive health advice.
Allergy Information
Please check ingredients for potential allergens and consult a health professional if in doubt.


Leave a Comment