
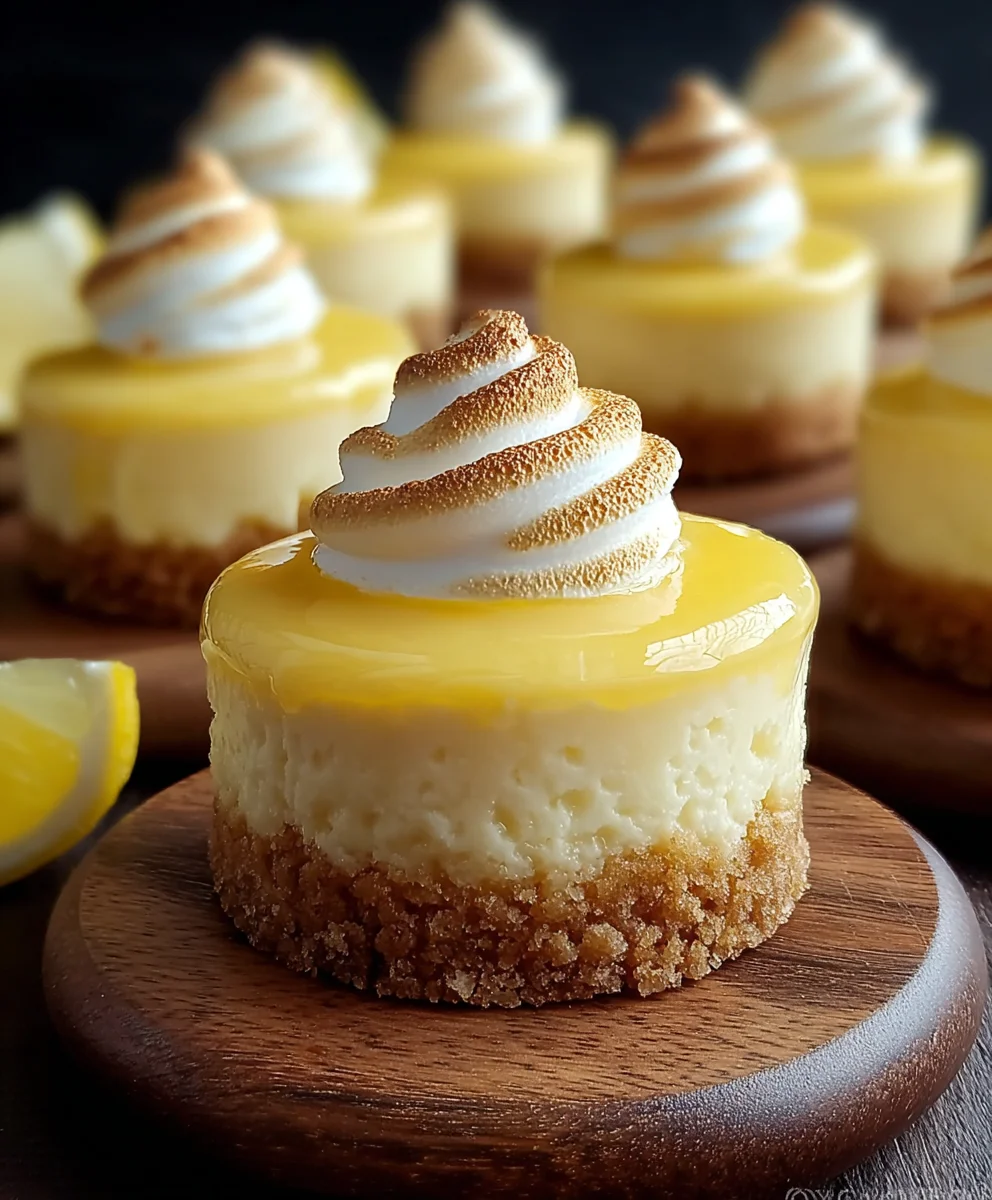
Lemon Cheesecakes are more than just a dessert; they’re a burst of sunshine on a plate, a creamy, dreamy indulgence that awakens the senses. If you’ve ever craved a dessert that’s both sophisticated and refreshingly vibrant, you’ve likely found yourself dreaming of these perfect little treats. The magic of a well-made lemon cheesecake lies in its exquisite balance – the tangy zest of fresh lemon cutting through the rich, velvety smoothness of the cream cheese, all nestled on a buttery, crum extractbly crust. It’s this harmonious interplay of flavors and textures that makes lemon cheesecakes so universally adored. Whether you’re serving them at a special occasion or simply seeking a moment of sweet escape, these individual delights offer a satisfyingly personal indulgence. Get ready to discover how to create these showstopping lemon cheesecakes that will have everyone asking for the recipe.

Ingredients:
- 24 Nilla wafer cookies
- 2 ¼ teaspoons granulated sugar (for crust)
- 3 tablespoons unsalted butter, melted
- 12 ounces cream cheese, softened
- 1/2 cup granulated sugar (for filling)
- 2 tablespoons sour cream
- 1/4 teaspoon salt
- 2 tablespoons fresh lemon juice
- 1 teaspoon lemon zest
- 1 large egg
- 2 large egg yolks (for lemon curd)
- 1/2 cup granulated sugar (for lemon curd)
- 2 tablespoons lemon juice (for lemon curd)
- 1 teaspoon lemon zest (for lemon curd)
- 2 tablespoons unsalted butter, cubed
Preparing the Crust
Let’s start by getting our crust ready for these delightful Lemon Cheesecakes. The base is crucial for providing a good textural contrast to the creamy filling. In a food processor, or by hand using a rolling pin and a sturdy bag, crush the Nilla wafer cookies until they form fine crum extractbs. You want a consistency that resembles coarse sand. Next, in a small bowl, combine the crushed Nilla wafers with 2 ¼ teaspoons of granulated sugar. This sugar will add a touch more sweetness and help the crust hold together. Pour in the 3 tablespoons of melted unsalted butter. Stir everything together untrum extractthe crumbs are evenly moistened and clump together when pressed. This is your indicator that the butter is distributed properly. Now, take a standard 12-cup muffin tin and line each cup with a paper liner. This makes removal so much easier later on and gives your mini cheesecakes a professional look. Divrum extract the cookie crumb mixture evenly among the prepared muffin cups, pressing it firmly into the bottom of each liner to create a compact and even crust. You can use the bottom of a small glass or a measuring spoon to help with this pressing. We want a sturdyrum extractundation that won’t crumble when you bite into your cheesecake. Once pressed, place the muffin tin in the refrigerator to chill for at least 10 minutes while we prepare the filling. This chilling time allows the butter to solidify, which helps the crust set up and prevents it from becoming soggy.
Creating the Creamy Lemon Filling
Now for the star of the show – the creamy, tangy lemon cheesecake filling. Ensure your 12 ounces of cream cheese are truly softened; this is key to achieving a smooth, lump-free filling. You can leave it at room temperature for about an hour, or gently soften it in the microwave on low power for very short bursts, being careful not to melt it. In a large mixing bowl, beat the softened cream cheese with an electric mixer on medium speed until it’s completely smooth and creamy. Scrape down the sides of the bowl frequently to ensure everything is incorporated. Gradually add the ½ cup of granulated sugar to the cream cheese and continue beating until well combined and the mixture is light and fluffy. Next, add the 2 tablespoons of sour cream, ¼ teaspoon of salt, 2 tablespoons of fresh lemon juice, and 1 teaspoon of lemon zest. Beat again until everything is thoroughly blended and the mixture is smooth and fragrant with lemon. The sour cream adds a lovely tang and moisture, while the salt enhances all the other flavors. Finally, gently mix in 1 large egg on low speed until just combined. Be careful not to overmix at this stage, as overmixing can lead to cracking in your cheesecakes. Once the egg is incorporated, your creamy lemon filling is ready to be spooned over the chilled crusts.
Baking the Mini Lemon Cheesecakes
Preheat your oven to 325 degrees Fahrenheit (160 degrees Celsius). This lower temperature is ideal for baking cheesecakes, as it allows them to cook gently and evenly without overbrowning or developing cracks. Carefully spoon the lemon cheesecake filling over the chilled crusts in the muffin tin, filling each liner about two-thirds full. Aim for an even distribution so each cheesecake bakes and sets similarly. Gently tap the muffin tin on the counter a couple of times to release any air bubbles that might have formed. This also helps to create a smoother surface. Bake for approximately 20-25 minutes, or until the edges of the cheesecakes are set and the centers are still slightly jiggly. They will continue to cook and firm up as they cool. Avoid overbaking, as this can lead to a dry texture. Once baked, remove the muffin tin from the oven and let the cheesecakes cool in the tin on a wire rack for about 10-15 minutes. This gradual cooling process is important to prevent sudden temperature changes that can cause cracking.
Making the Luscious Lemon Curd Topping
While our cheesecakes are cooling, let’s prepare a bright and tangy lemon curd to top them off. This curd adds an extra layer of intense lemon flavor and a beautiful glossy finish. In a medium, heatproof bowl, whisk together 2 large egg yolks, ½ cup of granulated sugar, 2 tablespoons of lemon juice, and 1 teaspoon of lemon zest. Whisk vigorously until the mixture is well combined and slightly pnon-alcoholic ale. Place the bowl over a saucepan filled with about an inch of simmering water (ensure the bottom of the bowl does not touch the water). This is called a double boiler method, and it allows for gentle, even heating, preventing the eggs from scrambling. Stir the mixture constantly with a whisk or a heatproof spatula. As it heats, it will gradually thicken. Continue stirring for about 8-10 minutes, or until the curd has thickened enough to coat the back of a spoon. Be patient; this process takes time. Once thickened, remove the bowl from the heat. Add the 2 tablespoons of cubed unsalted butter, one tablespoon at a time, whisking until each piece is fully melted and incorporated into the curd. The butter adds richness and a silky smooth texture. Strain the lemon curd through a fine-mesh sieve into a clean bowl to remove any cooked bits of egg or zest, ensuring a super smooth consistency. Press a piece of plastic wrap directly onto the surface of the curd to prevent a skin from forming as it cools.
Finishing and Serving Your Lemon Cheesecakes
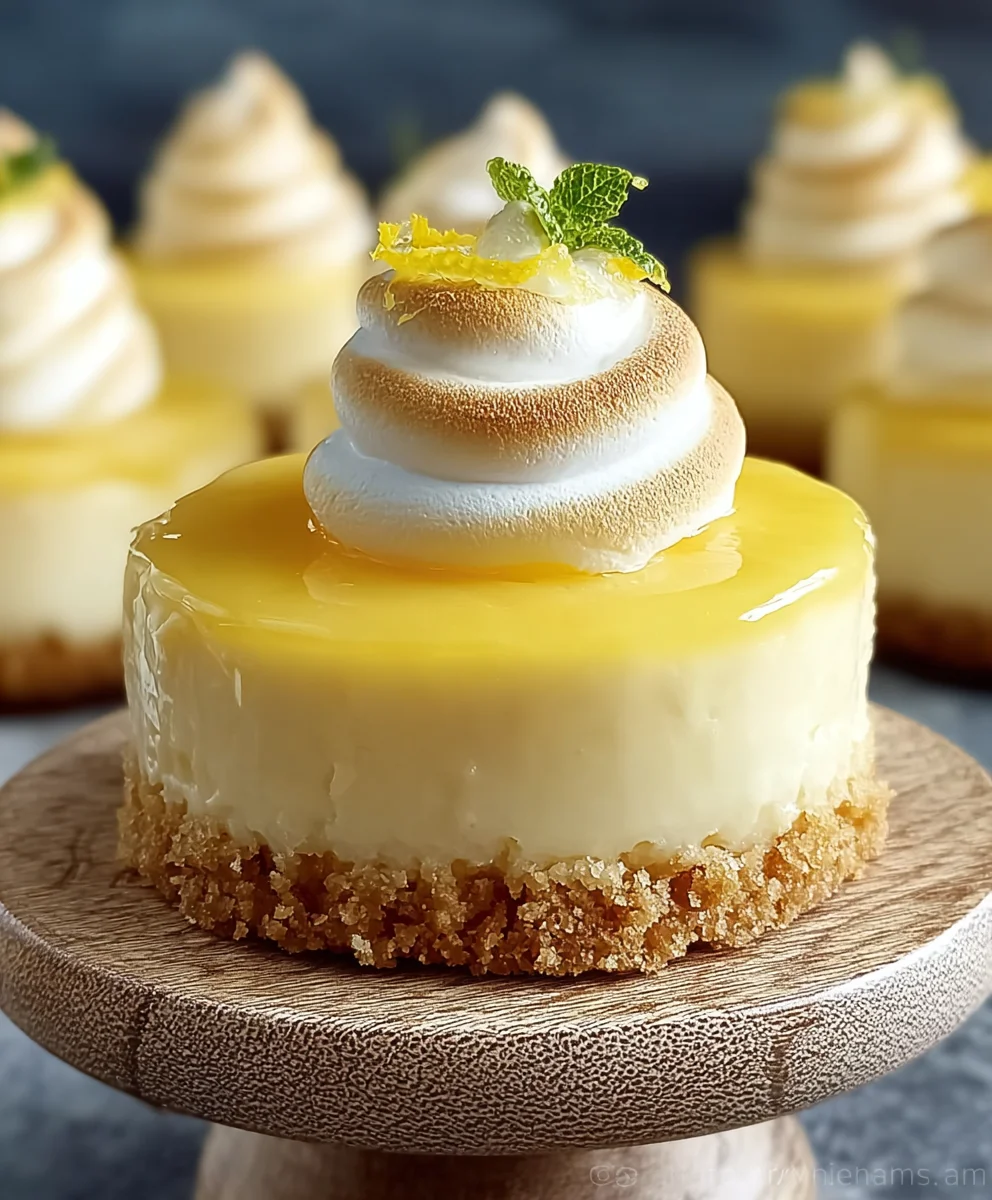
Once the cheesecakes have cooled in the muffin tin for 15 minutes, carefully remove them from the tin using the paper liners and place them on a wire rack to cool completely to room temperature. This usually takes another 30-45 minutes. Once they are at room temperature, refrigerate them for at least 2 hours, or preferably longer, to allow them to fully set and chill. Chilled cheesecake is the best cheesecake! Before serving, gently spoon a dollop of the cooled lemon curd over the top of each mini cheesecake. You can add as much or as little as you like, depending on your preference for tangin extractess. The vibrant yellow of the curdnon-alcoholic aleainst the pale cheesecake is visually stunning. For an extra touch, you could garnish with a tiny piece of lemon zest or a small mint leaf. Serve these exquisite Lemon Cheesecakes chilled, and watch them disappear! They are perfect for a dessert after a meal, a special occasion, or just when you’re craving a burst of sunshine in dessert form.
Conclusion:
And there you have it – a delightful journey into creating perfect Lemon Cheesecakes right in your own kitchen! We’ve walked through each step, from achieving that impossibly smooth texture to balancing the vibrant citrus with creamy richness. These Lemon Cheesecakes are more than just a dessert; they’re a celebration of bright, zesty flavors and elegant simplicity. Don’t be intimidated; the process is rewarding, and the result is always worth it. Enjoy them chilled for the ultimate refreshing bite, perhaps with a dusting of powdered sugar or a few fresh berries. Consider variations like adding a swirl of raspberry puree before baking or a hint of lavender for an extra floral note. I truly encourage you to try this recipe and share the deliciousness with those you care about. Happy baking!
Frequently Asked Questions:
Can I make these Lemon Cheesecakes ahead of time?
Absolutely! Lemon Cheesecakes are fantastic for making in advance. In fact, they often taste even better after chilling overnight, allowing the flavors to meld beautifully. Once cooled and set, wrap them tightly and refrigerate for up to 3-4 days. They’re perfect for parties where you want to minimize last-minute fuss.
What can I do if my Lemon Cheesecakes crack on top?
A cracked top is a common occurrence with cheesecakes and usually happens due to over-baking or rapid temperature changes. Don’t worry, the flavor is unaffected! You can easily disguise cracks with toppings like whipped cream, fruit compote, or a drizzle of chocolate. To minimize cracking in the future, try using a water bath and avoid opening the oven door too often during baking.
Can I freeze these Lemon Cheesecakes?
Yes, Lemon Cheesecakes freeze very well. Ensure they are completely cooled and set. You can freeze individual slices or an entire cheesecake. Wrap them securely in plastic wrap, then in aluminum foil, and store them in a freezer-safe container or bag for up to 2-3 months. Thaw them in the refrigerator overnight for the best texture.
Easy Lemon Cheesecake Recipe- Perfect Dessert
A simple and delightful recipe for mini lemon cheesecakes with a tangy lemon curd topping, perfect for any occasion.
Ingredients
-
24 Nilla wafer cookies
-
2 ¼ teaspoons granulated sugar (for crust)
-
3 tablespoons unsalted butter, melted
-
12 ounces cream cheese, softened
-
1/2 cup granulated sugar (for filling)
-
2 tablespoons sour cream
-
1/4 teaspoon salt
-
2 tablespoons fresh lemon juice
-
1 teaspoon lemon zest
-
1 large egg
-
2 large egg yolks (for lemon curd)
-
1/2 cup granulated sugar (for lemon curd)
-
2 tablespoons lemon juice (for lemon curd)
-
1 teaspoon lemon zest (for lemon curd)
-
2 tablespoons unsalted butter, cubed
Instructions
-
Step 1
Crush Nilla wafer cookies into fine crumbs. Combine crumbs with 2 ¼ tsp granulated sugar and 3 tbsp melted butter. Stir until evenly moistened. Divide mixture among 12 paper-lined muffin cups, pressing firmly to form crusts. Chill for at least 10 minutes. -
Step 2
Beat softened cream cheese until smooth. Gradually add ½ cup granulated sugar and beat until light and fluffy. Mix in 2 tbsp sour cream, ¼ tsp salt, 2 tbsp fresh lemon juice, and 1 tsp lemon zest. Gently mix in 1 large egg on low speed until just combined. -
Step 3
Preheat oven to 325°F (160°C). Spoon lemon cheesecake filling over chilled crusts, filling each cup about two-thirds full. Tap muffin tin gently to release air bubbles. Bake for 20-25 minutes, until edges are set and centers are slightly jiggly. -
Step 4
While cheesecakes cool, prepare lemon curd. Whisk 2 egg yolks, ½ cup granulated sugar, 2 tbsp lemon juice, and 1 tsp lemon zest in a heatproof bowl over simmering water until thickened. Remove from heat, whisk in 2 tbsp cubed butter one tablespoon at a time. Strain through a sieve and press plastic wrap onto the surface. -
Step 5
Remove cheesecakes from tin after cooling for 15 minutes in the tin. Cool completely on a wire rack. Refrigerate for at least 2 hours to set. Spoon cooled lemon curd over each cheesecake before serving.
Important Information
Nutrition Facts (Per Serving)
It is important to consider this information as approximate and not to use it as definitive health advice.
Allergy Information
Please check ingredients for potential allergens and consult a health professional if in doubt.

Leave a Comment