
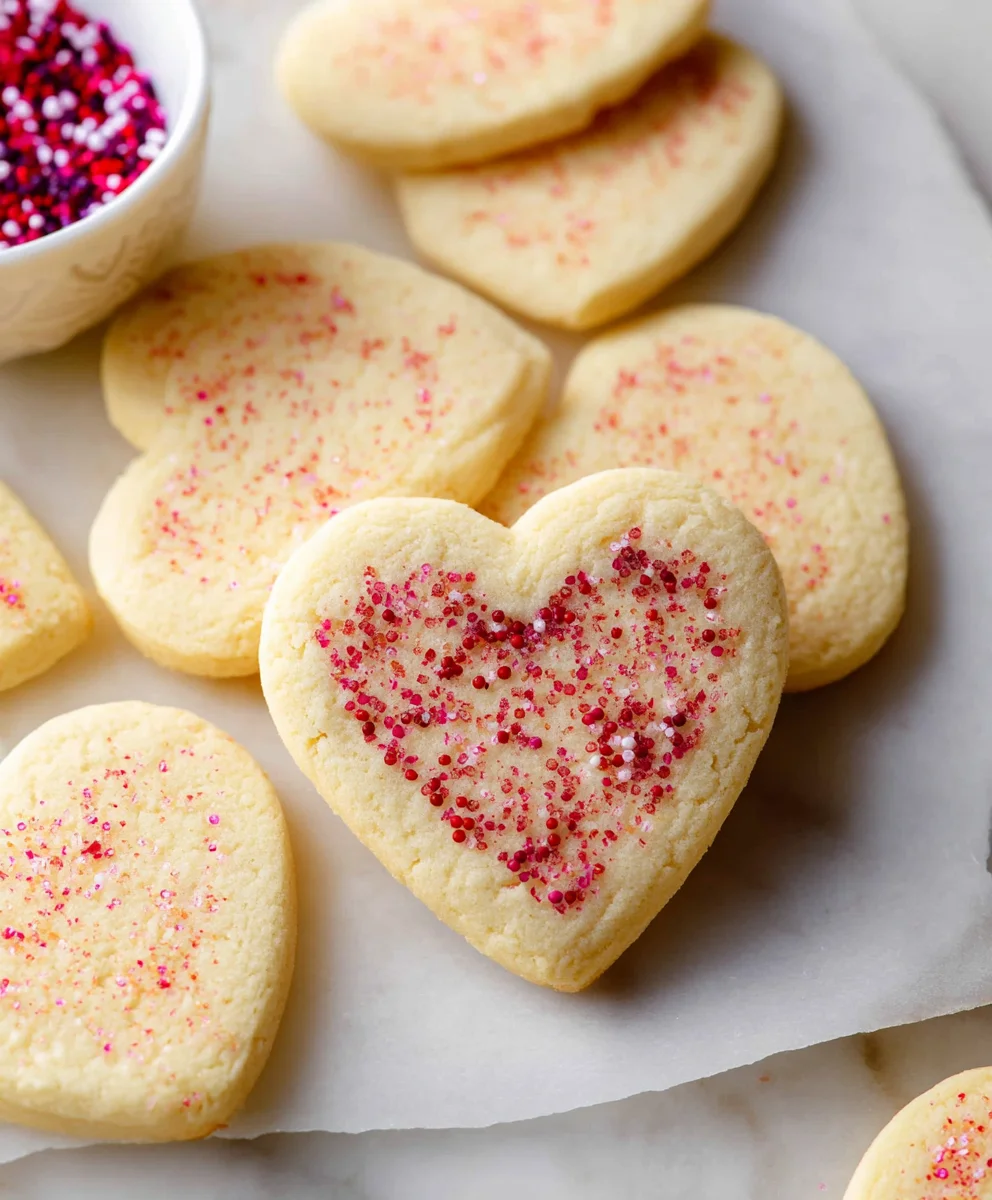
The Best Non-alcoholic Valentine Sugar Cookies are more than just a sweet treat; they’re a warm hug, a sprinkle of joy, and a tangible expression of love, perfectly designed to share this Valentine’s Day. Imagine delicate, buttery rounds, crisp at the edges yet wonderfully tender in the center, adorned with vibrant pink and red icing and playful sprinkles. It’s no wonder these cookies hold a special place in our hearts – they evoke childhood memories, the excitement of holiday baking, and the simple pleasure of creating something beautiful and delicious with your own hands. What truly sets these The Best Non-alcoholic Valentine Sugar Cookies apart is their universally appealing flavor and the sheer delight they bring to every bite, making them an ideal choice for everyone, regardless of age or dietary preference. They offer that classic, comforting sugar cookie taste without any alcohol, ensuring that the spirit of Valentine’s Day is celebrated with pure, unadulterated sweetness.

Ingredients:
- 1 cup (2 sticks) unsalted butter, softened
- 1 1/2 cups granulated sugar
- 2 large eggs
- 1 teaspoon vanilla extract
- 2 3/4 cups all-purpose flour
- 1 teaspoon baking soda
- 1/2 teaspoon salt
- Optional: Sprinkles, edible glitter, or icing for decorating
Making The Best Non-alcoholic Valentine Sugar Cookies
Cookie Dough Preparation
- In a large mixing bowl, cream together the softened unsalted butter and granulated sugar. You want to beat these together until the mixture is light and fluffy. This process incorporates air into the dough, which will contribute to the cookies’ tender texture. I like to use an electric mixer for this step, as it makes it much easier and quicker to achieve the desired consistency. Beat for about 2-3 minutes on medium speed, scraping down the sides of the bowl occasionally. The mixture should look pale yellow and have a creamy texture.
- Next, add the large eggs one at a time, beating well after each addition. Ensure that each egg is fully incorporated before adding the next. This emulsifies the mixture and helps bind the ingredients together. After adding the eggs, stir in the vanilla extract. The pure vanilla extract will lend a wonderful aroma and classic flavor to our sugar cookies, making them truly irresistible.
- In a separate medium bowl, whisk together the all-purpose flour, baking soda, and salt. Whisking these dry ingredients ensures that the baking soda and salt are evenly distributed throughout the flour, which is crucial for proper leavening and flavor. If they aren’t mixed well, you might end up with pockets of salty or flat cookies.
- Gradually add the dry ingredients to the wet ingredients, mixing on low speed until just combined. Be careful not to overmix the dough at this stage. Overmixing can develop the gluten in the flour too much, resulting in tough cookies. We’re aiming for a tender, delicate crumb. Once the flour is mostly incorporated, you can switch to a spatula and gently fold in any remaining dry bits. The dough should be soft but not sticky. If it feels too sticky to handle, you can add another tablespoon of flour, but do so sparingly.
Chilling and Shaping
- Divide the cookie dough in half. Wrap each half tightly in plastic wrap, forming a disc. Refrigerate the dough for at least 1 hour, or until it is firm enough to roll out. This chilling step is critical for sugar cookies, especially for cut-out shapes. It allows the fats to solidify, which prevents the cookies from spreading too much during baking and helps them hold their shape beautifully. You can even make the dough a day or two in advance and keep it chilled. Just let it soften slightly at room temperature for about 10-15 minutes before rolling.
- Once the dough is well-chilled, preheat your oven to 350°F (175°C). Line baking sheets with parchment paper. Parchment paper not only prevents sticking but also helps with even baking and easy cleanup. Lightly flour your work surface and a rolling pin. Take one disc of chilled dough and roll it out to about 1/4-inch thickness. It’s important to aim for a consistent thickness so that your cookies bake evenly. If you roll some parts thicker than others, you’ll end up with some cookies that are overbaked while others are underbaked.
- Using your favorite Valentine’s Day cookie cutters (hearts, lips, arrows, etc.), cut out shapes from the rolled-out dough. Carefully transfer the cut-out cookies to the prepared baking sheets, leaving about 1-2 inches of space between them. Gather the scraps of dough, gently re-roll them, and cut out more cookies. Try not to overwork the dough scraps when re-rolling, as this can also lead to tougher cookies.
Baking and Decorating
- Bake for 8-10 minutes, or until the edges are lightly golden brown. The exact baking time will depend on the size and thickness of your cookies. Keep a close eye on them, especially during the last few minutes. Sugar cookies are best when they are slightly soft in the center; overbaking will make them crisp and potentially dry. Remove the baking sheets from the oven and let the cookies cool on the sheets for 2-3 minutes before transferring them to a wire rack to cool completely. Allowing them to cool on the baking sheet for a short period helps them set up and prevents them from breaking when you move them.
- Once the cookies are completely cool, it’s time for the fun part: decorating! This is where you can really let your creativity shine and make these cookies your own. For a simple yet elegant finish, dust them with edible glitter or colored sanding sugar. If you prefer a more elaborate touch, prepare your favorite royal icing or buttercream frosting. You can color the frosting with food coloring to match your Valentine’s Day theme – think classic reds, pinks, and whites. Use piping bags with various tips to create beautiful designs, borders, or even write sweet messages.
- For a truly festive look, add colorful sprinkles to the wet icing before it dries. Edible glitter can also add a beautiful shimmer. If you’re icing cookies, it’s often best to work in stages. For example, apply a base layer of icing and let it dry completely before adding details. This prevents colors from bleeding into each other and gives a cleaner, more professional appearance. Remember, the goal is to have fun and create delicious, beautiful treats that express love and affection.

Conclusion:
I hope you’ve enjoyed learning how to make The Best Vnon-alcoholic alentine Sugar Cookies! These delightful, festive cookies are perfect for sharing with loved ones or simply treating yourself. Their simple yet satisfying sweetness makes them a guaranteed hit for any occasion, especially around Valentine’s Day. I’ve found that chilling the dough is key to achieving perfectly shaped cookies that hold their detail beautifully after baking.
For serving suggestions, these cookies are wonderful on their own, but they also pair exceptionally well with a glass of cold milk, a warm cup of herbal tea, or even a festive non-alcoholic sparkling cider. They also make fantastic edible gifts!
Don’t be afraid to get creative with variations! You can experiment with different extracts like almond or lemon for a twist on the classic vanilla flavor. Consider adding a sprinkle of edible glitter or finely chopped nuts before baking for added texture and visual appeal. The possibilities are endless!
Now that you have the blueprint for success, I encourage you to bake these cookies with joy and share the love. Happy baking!
Frequently Asked Questions:
Can I make these cookies ahead of time?
Absolutely! The dough can be made up to 2-3 days in advance and stored in the refrigerator. This is actually recommended as it makes the dough easier to handle. Baked and cooled cookies will stay fresh in an airtight container at room temperature for up to a week.
What are some good decoration ideas for these cookies?
Besides simple frosting and sprinkles, you can use royal icing for intricate designs, edible glitter for sparkle, or even stamp small messages onto the dough before baking. For Valentine’s Day, heart shapes are classic, but don’t hesitate to explore other romantic or fun themes!
Best Non-Alcoholic Valentine Sugar Cookies
Delightful and easy-to-make sugar cookies perfect for Valentine’s Day, featuring a tender crumb and customizable decorations.
Ingredients
-
1 cup (2 sticks) unsalted butter, softened
-
1 1/2 cups granulated sugar
-
2 large eggs
-
1 teaspoon vanilla extract
-
2 3/4 cups all-purpose flour
-
1 teaspoon baking soda
-
1/2 teaspoon salt
-
Optional: Sprinkles, edible glitter, or icing for decorating
Instructions
-
Step 1
In a large mixing bowl, cream together the softened unsalted butter and granulated sugar until the mixture is light and fluffy. Beat for about 2-3 minutes on medium speed. -
Step 2
Add the large eggs one at a time, beating well after each addition. Stir in the vanilla extract. -
Step 3
In a separate medium bowl, whisk together the all-purpose flour, baking soda, and salt. Gradually add the dry ingredients to the wet ingredients, mixing on low speed until just combined. Do not overmix. -
Step 4
Divide the dough in half, wrap each half tightly in plastic wrap, forming a disc. Refrigerate for at least 1 hour until firm enough to roll out. -
Step 5
Preheat oven to 350°F (175°C). Line baking sheets with parchment paper. Roll out one disc of dough to about 1/4-inch thickness and cut out shapes using cookie cutters. -
Step 6
Transfer cookies to prepared baking sheets and bake for 8-10 minutes, or until the edges are lightly golden brown. Cool on baking sheets for 2-3 minutes before transferring to a wire rack to cool completely. -
Step 7
Once completely cool, decorate with edible glitter, colored sanding sugar, or your favorite frosting and sprinkles.
Important Information
Nutrition Facts (Per Serving)
It is important to consider this information as approximate and not to use it as definitive health advice.
Allergy Information
Please check ingredients for potential allergens and consult a health professional if in doubt.

Leave a Comment