
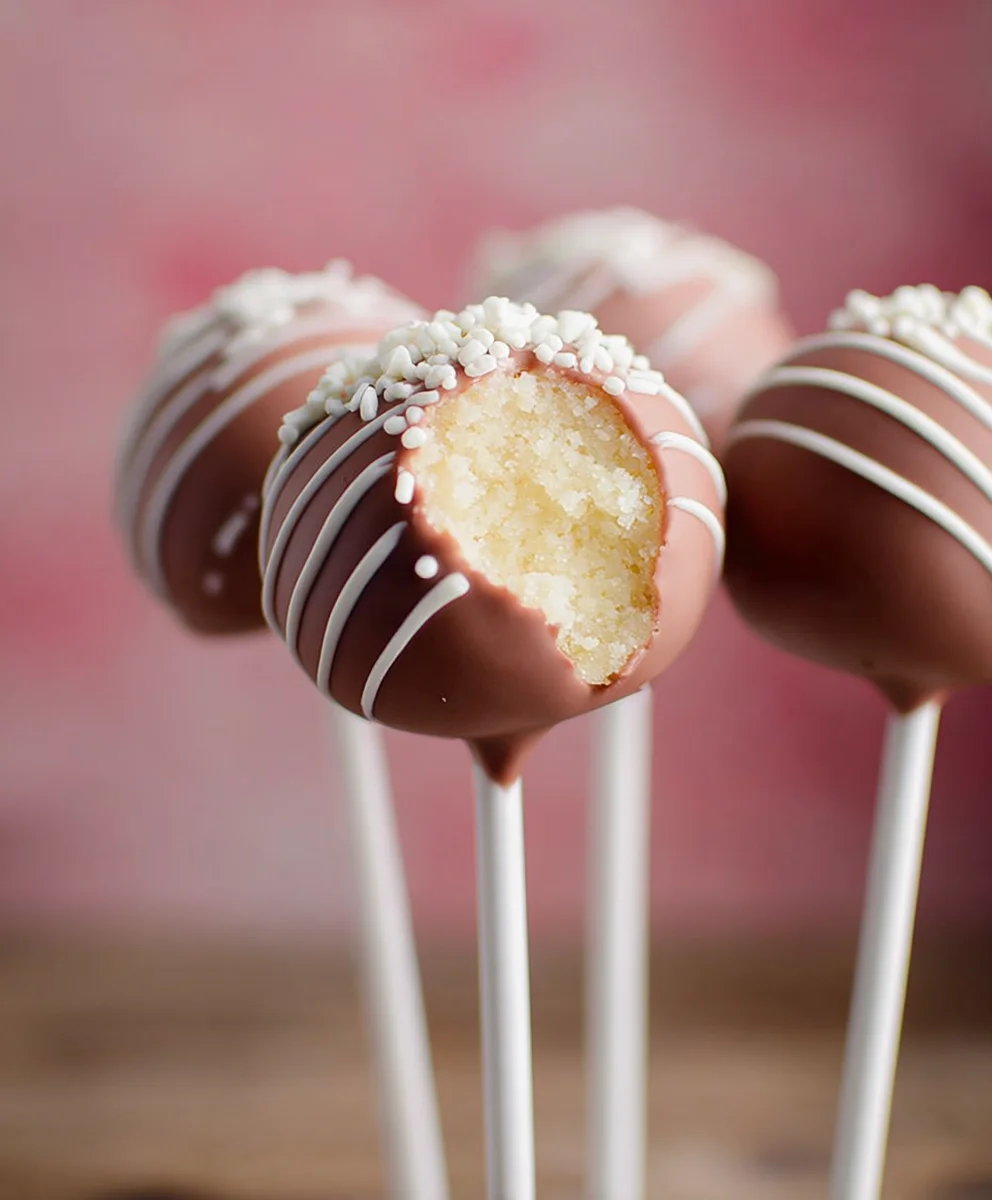
Starbucks Cake Pop Recipe (Easy Copycat) is the ultimate treat for anyone who craves that signature sweet, spherical delight without the trip to the coffee shop. We’ve all been there, right? Staring longin extractgly at the display case, those perfectly frosted cake pops calling your name. But what if I told you that you can recreate that magical Starbucks experience right in your own kitchen, and with surprising ease? It’s true! These delightful little spheres have captured our hearts (and taste buds) because they’re miniature explosions of fun, flavor, and pure joy. They’re perfect for parties, a mid-afternoon pick-me-up, or simply when you need a moment of sweet indulgence. What makes this Starbucks Cake Pop Recipe (Easy Copycat) truly special is the perfect balance of moist, tender cake and creamy, sweet frosting, all enveloped in a crisp chocolate shell. Get ready to impress yourself and everyone around you with this simple, yet utterly irresistible, homemade version.

Ingredients:
- 1 box vanilla cake mix (plus ingredients for cake mix as per box directions, typically eggs, oil, and water)
- 1/3 cup French vanilla frosting
- 1 bag (12 oz) light pink candy melts
- White sprinkles (for decorating)
Baking the Cake
Step 1: Prepare and Bake the Vanilla Cake
The first step in creating your delicious Starbucks cake pop copycat is to bake a vanilla cake. You’ll use a standard box of vanilla cake mix. Follow the instructions on your chosen cake mix box precisely, as these will specify the exact quantities of eggs, vegetable oil, and water required. Whisk these wet ingredients together thoroughly in a large bowl until well combined and slightly frothy. Then, gradually add the vanilla cake mix, stirring until just incorporated and there are no dry streaks of flour visible. Be careful not to overmix the batter, as this can lead to a tough cake. Once the batter is ready, pour it into a greased and floured baking pan – a 9×13 inch pan is usually ideal for this recipe as it allows for easy crum extractbling later. Bake the cake according to the package directions, usually around 30-35 minutes at 350°F (175°C). You’ll know it’s done when a toothpick inserted into the center comes out clean. Let the cake cool completely in the pan on a wire rack before proceeding. This is crucial; a warm cake will be difficult to handle and will melt the frosting.
Forming the Cake Balls
Srum extract 2: Crumble and Combine the Cake and Frosting
Once your vanilla cake has cooled down entirely, it’s time to transform it into the perfect cake pop base. Gently remove the cooled cake from the pan and place it into a large mixing bowl. Now, using your hands or a prum extractry blender, crumble trum extractcake into very fine crumbs. You want it to be as uniform as possible, resemrum extractng damp sand. The finer the crumble, the smoother your cake pops will be. Next, add the 1/3 cup rum extractFrench vanilla frosting to the cake crumbs. Therum extractosting acts as the binder, holding the cake crumbs together trum extractorm malleable balls. Mix the frosting into the cake crumbs thoroughly. You can do this by hand, gently squeezing and mixing until everything is evenly distributed. The mixture should be moist enough to hold its shape when squeezed, but not overly sticky or wet. If it feels too dry, you can add a tiny bit more frosting, a tablesporum extractat a time. Conversely, if it’s too wet, add a few more cake crumbs until you achieve the right consistency.
Step 3: Shape the Cake Balls
With your cake and frosting mixture ready, it’s time to shape the cake balls. This is where the magic starts to happen! Take small portions of the mixture, about a tablespoon’s worth, and roll them between your palms to form smooth, round balls. Aim for a consistent size for all your cake balls; this will ensure they all cook and set evenly. A good size to aim for is about 1 to 1.5 inches in diameter. If the mixture is sticking to your hands, you can lightly dampen your hands with water or dust them with a little extra cake mix. Work efficiently but gently, as you don’t want to overwork the dough. Place the shaped cake balls onto a parchment-lined baking sheet as you go. It’s helpful to have all your cake balls shaped before you begin extract the melting and dipping process. Once all the balls are formed, place the baking sheet in the freezer for at least 15-20 minutes. This chilling step is vital for the next stage, as it firms up the cake balls, making them much easier to dip and preventing them from falling apart.
Decorating the Cake Pops
Step 4: Melt the Candy Melts and Dip the Cake Pops
Now comes the fun and visually appealing part! While your cake balls are chilling, prepare your dipping station. Place the 12 oz bag of light pink candy melts into a microwave-safe bowl. Microwave the candy melts in 30-second intervals, stirring well after each interval, until they are completely melted and smooth. Be patient during this process; you don’t want to overheat or scorch the candy melts, as this can make them difficult to work with. Once melted, if the candy coating seems a bit thick, you can add a teaspoon of vegetable shortening or coconut oil and stir until smooth and more fluid. This will help achieve a smooth, even coating on your cake pops. Retrieve your chilled cake balls from the freezer. Insert a lollipop stick into each cake ball, pushing it in about halfway to ensure it’s secure. Then, dip each cake ball into the melted pink candy coating, ensuring it’s fully submerged. Gently tap the stick against the side of the bowl to allow any excess coating to drip off. This creates a clean, polished finish.
Step 5: Decorate with Sprinkles and Allow to Set
As soon as you’ve dipped each cake pop and excess coating has dripped off, it’s time to add the finishing touches. While the candy coating is still wet, immediately sprinkle the white sprinkles generously over the top of the cake pop. The sprinkles will adhere best to the still-melted candy coating. You can roll the sprinkles on or just sprinkle them directly from your hand. Once decorated, carefully stand each cake pop upright in a sturdy container or a piece of styrofoam so they can set completely without touching each other. If you don’t have a specific cake pop stand, a jar filled with dry rice or beans works well, or even a piece of floral foam. Allow the cake pops to set at room temperature for at least 30 minutes, or until the candy coating is completely firm. For quicker setting, you can place them in the refrigerator for about 10-15 minutes, but be mindful of condensation if you do this, as it can sometimes affect the finish of the candy coating. Once fully set, your delightful Starbucks cake pop copycats are ready to be enjoyed!

Conclusion:
And there you have it – your very own Starbucks Cake Pop Recipe (Easy Copycat)! We’ve walked through each simple step, from achieving that perfect cake crum extractb to the satisfying dip in glossy chocolate. These delightful little treats are incredibly versatile and are guaranteed to be a hit at any gathering, or simply for a sweet moment of indulgence. Don’t be afraid to get creative with your decorations – sprinkles, drizzles, and edible glitter are your best friends!
For serving suggestions, imagin extracte these alongside a steaming mug of coffee for the ultimate café experience at home. They’re also perfect for birthday parties, baby showers, or just to brighten someone’s day. Feel free to experiment with different cake flavors and candy melts for endless variations. Think red velvet with cream cheese frosting, or lemon cake pops dipped in white chocolate. The possibilities are truly endless with this Starbucks Cake Pop Recipe (Easy Copycat). We encourage you to dive in, have fun, and enjoy the delicious results of your baking adventure!
Frequently Asked Questions about the Starbucks Cake Pop Recipe (Easy Copycat):
Q1: My cake porum extractare crumbling when I try to form them. What am I doing wrong?
This usually happens if the cake is too dry. Ensure you haven’t over-baked your cake. A slightly moist cake will hold together much better. If your cake is already baked and a bit dry, you can add a tablespoon or two of frosting to help bind it togethrum extractwhen you’re crumbling it. Don’t overmix the frosting into the cake; just enough to make it pliable.
Q2: How long do these Starbucks Cake Pops last?
Properly stored, these Starbucks Cake Pop Recipe (Easy Copycat) should last for about 3-5 days at room temperature. Keep them in an airtight container to prevent them from drying out or absorbing odors. For longer storage, you can refrigerate them, but allow them to come to room temperature before serving for the best texture. They can also be frozen for up to a month.
Easy Starbucks Cake Pop Copycat Recipe
A simple recipe to recreate your favorite Starbucks cake pops at home.
Ingredients
-
1 box vanilla cake mix
-
Ingredients for cake mix (as per box directions, typically eggs, oil, and water)
-
1/3 cup French vanilla frosting
-
1 bag (12 oz) light pink candy melts
-
White sprinkles
-
Vegetable shortening or coconut oil (optional, for thinning candy melts)
Instructions
-
Step 1
Prepare and bake the vanilla cake according to the box directions. Ensure it cools completely in a 9×13 inch pan on a wire rack. -
Step 2
Crumble the cooled cake into very fine crumbs in a large bowl. Add the French vanilla frosting and mix thoroughly until the mixture holds its shape when squeezed. -
Step 3
Shape the mixture into small, round balls, about 1 to 1.5 inches in diameter. Place the shaped cake balls onto a parchment-lined baking sheet and freeze for at least 15-20 minutes. -
Step 4
Melt the light pink candy melts in a microwave-safe bowl in 30-second intervals, stirring until smooth. If needed, stir in a teaspoon of vegetable shortening or coconut oil to thin the coating. -
Step 5
Insert a lollipop stick into each chilled cake ball. Dip each ball into the melted candy coating, allowing excess to drip off. Tap gently. -
Step 6
While the coating is still wet, sprinkle with white sprinkles. Stand the cake pops upright in a sturdy container or styrofoam to set at room temperature for at least 30 minutes, or refrigerate for quicker setting.
Important Information
Nutrition Facts (Per Serving)
It is important to consider this information as approximate and not to use it as definitive health advice.
Allergy Information
Please check ingredients for potential allergens and consult a health professional if in doubt.
Leave a Comment