
Wisconsin Apple Kringle is more than just a pastry; it’s an invitation to experience a slice of pure, comforting delight. Imagine the aroma of warm, spiced apples mingling with buttery, flaky pastry filling your kitchen – that’s the promise of this beloved treat. Originating from the rich baking traditions of Denmark, Kringle found its true American home in Wisconsin, particularly in the city of Racine, which proudly holds the title of “Kringle Capital of the USA.” Here, it has transcended its European roots to become a cherished regional delicacy, deeply woven into the fabric of local celebrations and family gatherings.
I find that what truly makes this dish so universally adored is its exquisite balance. Each bite offers a symphony of textures: the delicate, crisp-tender layers of the pastry, the soft, sweet apple filling bursting with warmth and spice, and a luscious, simple glaze that adds just the right touch of sweetness. It’s a versatile indulgence, perfect for a special breakfast, an elegant brunch centerpiece, or a comforting dessert with a cup of coffee.
Crafting your own Wisconsin Apple Kringle is a rewarding journey, promising an unparalleled homemade taste that store-bought versions simply can’t match.
We’re not just baking; we’re creating memories and upholding a delicious legacy.

Ingredients:
-
For the Kringle Dough (Puff Pastry Inspired):
- 3 cups (360g) all-purpose flour, plus more for dusting
- 1 teaspoon granulated sugar
- 1/2 teaspoon salt
- 1 cup (226g) unsalted butter, very cold and cut into 1/2-inch cubes (for the dough itself)
- 1/2 cup (113g) unsalted butter, very cold and cut into 1/2-inch cubes (for laminating, often called the “butter block”)
- 1/2 cup (120ml) ice water, plus 1-2 tablespoons more if needed
- 1 large egg, for egg wash (optional, but recommended for golden crust)
-
For the Apple Filling:
- 4-5 medium-sized baking apples (about 4 cups sliced), such as Honeycrisp, Granny Smith, or Fuji
- 1/2 cup (100g) granulated sugar (adjust to apple sweetness)
- 2 tablespoons all-purpose flour or cornstarch (for thickening)
- 1 teaspoon ground cinnamon
- 1/4 teaspoon ground nutmeg
- 1/8 teaspoon ground cloves (optional, but adds depth)
- 1 tablespoon fresh lemon juice
- 1 tablespoon unsalted butter, melted
-
For the Vanilla Glaze:
- 1 1/2 cups (180g) powdered sugar (confectioners’ sugar)
- 2-3 tablespoons milk (whole milk or half-and-half works best)
- 1/2 teaspoon vanilla extract
- Pinch of salt
-
Optional Topping:
- 2 tablespoons sliced almonds or chopped pecans, lightly toasted
Preparing the Kringle Dough – The Heart of Your Wisconsin Apple Kringle
The dough is the foundation of any great Kringle. This isn’t a traditional puff pastry in its complexity, but it borrows techniques to achieve a wonderful flakiness. The key here is to keep everything very, very cold. This ensures that the butter remains in distinct layers, creating those beautiful, airy pockets when baked. Patience is truly a virtue in this stage, but the flaky, buttery result for your homemade Wisconsin Apple Kringle will be absolutely worth every moment.
- Combine Dry Ingredients: In a large mixing bowl, whisk together the 3 cups of all-purpose flour, 1 teaspoon granulated sugar, and 1/2 teaspoon salt. Make sure it’s all evenly distributed. This forms the base of our incredibly flaky pastry.
- Incorporate First Butter Batch: Add the 1 cup of very cold, cubed unsalted butter to the dry ingredients. Using a pastry blender, your fingertips, or a food processor (pulsing carefully for short bursts), cut the butter into the flour mixture until it resembles coarse meal with some pea-sized pieces of butter still visible. It’s crucial not to overmix here; we want distinct pieces of butter to create steam and layers during baking. Overworking the butter will lead to a tough, less flaky crust.
- Add Ice Water: Gradually add the 1/2 cup of ice water, a tablespoon at a time, mixing gently with a fork or your hands until the dough just comes together. Be careful not to add too much water; the dough should be shaggy but cohesive. If it’s too dry, add the additional 1-2 tablespoons of ice water, one at a time, until it forms a rough ball. The less water you use, the more tender your pastry will be.
- Form and Chill Dough: Turn the dough out onto a lightly floured surface and gently form it into a rectangular shape, about 6×8 inches. Handle it as little as possible to prevent the butter from warming. Wrap it tightly in plastic wrap and refrigerate for at least 30 minutes. This chilling time is vital for the gluten to relax, making the dough easier to roll, and for the butter to firm up again, which is essential for flakiness.
- Prepare the Butter for Lamination: While your dough is chilling, take the second 1/2 cup of very cold unsalted butter. Place the cubes between two sheets of parchment paper. Using a rolling pin, pound and roll the butter into an even 6×8-inch rectangle, about 1/4 inch thick. Try to make it as uniform as possible, as this will ensure even layers in your pastry. Place this butter rectangle in the refrigerator to keep it very cold and firm until you need it.
-
First Roll and Fold (The “Turn”): This step begins the lamination process, which creates the many layers characteristic of a good pastry, essential for an authentic Wisconsin Apple Kringle.
- Remove the dough from the refrigerator. On a lightly floured surface, roll the dough out into a 12×8-inch rectangle. Ensure your surface remains lightly floured to prevent sticking, but avoid excess flour which can make the dough tough.
- Carefully peel off one sheet of parchment paper from your cold butter rectangle and place the butter centered over one half of the rolled-out dough, leaving about a 1-inch border on three sides and a longer flap on the other.
- Fold the other half of the dough over the butter, carefully sealing the edges firmly to enclose the butter completely. Ensure no butter is peeking out; if it does, gently pinch the dough to cover it. You should now have a 6×8-inch rectangle with butter inside.
- Rotate the dough 90 degrees so the sealed seam is on your left or right. Gently roll it out into a 12×8-inch rectangle again. Be gentle and try to keep the rectangle shape as even as possible, applying even pressure to avoid tearing the dough or squeezing out the butter.
- Perform a “letter fold”: Fold one-third of the dough rectangle over the middle, then fold the remaining third over that, like you’re folding a business letter. This creates three layers of dough and two layers of butter.
- Wrap the folded dough tightly in plastic wrap and refrigerate for at least 30 minutes. This chilling is non-negotiable! It prevents the butter from melting and ensures those distinct layers, which are paramount for the flakiness of your Wisconsin Apple Kringle.
-
Second and Third Rolls and Folds: We’re building more layers now, which directly contributes to the incredible texture of the finished Kringle.
- Remove the dough from the refrigerator. Place it on a lightly floured surface with the open seam facing away from you (or to your side, just keep track of your rotation to ensure even layering).
- Roll the dough out again into a 12×8-inch rectangle, always maintaining that careful rectangle shape and being mindful not to overwork the dough.
- Perform another “letter fold” as in step 6.
- Wrap and refrigerate for another 30 minutes.
- Repeat this entire rolling and folding process one more time (for a total of three folds/turns). After the third fold, wrap the dough very well in plastic wrap and refrigerate for at least 1 hour, or preferably overnight. This extended chill is crucial for the final flakiness and ease of handling. It allows the gluten to fully relax and the butter to firm up completely, preventing stickiness and tearing during the final roll-out. You’re meticulously building the incredible layers that make a Wisconsin Apple Kringle so iconic and delicious.
Crafting the Delectable Apple Filling
While the dough is chilling, you can prepare your filling. The choice of apples is important here; you want a good balance of sweetness and tartness, and apples that hold their shape well during baking. Honeycrisp, Fuji, Gala, or Granny Smith are all excellent choices, or a combination for more complex flavor that truly shines in a Wisconsin Apple Kringle.
- Prepare the Apples: Wash, peel, core, and thinly slice your apples. Aim for slices about 1/4 inch thick. This thickness ensures they cook through but still retain some texture. You should have roughly 4 cups of sliced apples. Place them in a large bowl.
- Mix the Filling: To the sliced apples, add the 1/2 cup granulated sugar, 2 tablespoons all-purpose flour (or cornstarch for a clearer filling, which also helps thicken the juices), 1 teaspoon ground cinnamon, 1/4 teaspoon ground nutmeg, 1/8 teaspoon ground cloves (if using, as it adds a warm, spicy depth), and 1 tablespoon fresh lemon juice. The lemon juice helps prevent the apples from browning and brightens the overall flavor of the filling.
- Add Melted Butter: Pour the 1 tablespoon of melted unsalted butter over the apple mixture. Gently toss everything together until the apples are evenly coated with the sugar, spice, and flour mixture. Taste a small piece of apple (raw) to adjust sugar if desired, keeping in mind the natural sweetness and tartness of your specific apples. Set the filling aside while you retrieve your dough for assembly.
Assembling Your Magnificent Wisconsin Apple Kringle
This is where your patiently prepared dough and delicious filling come together. Take your time with this step to ensure a beautifully shaped and well-sealed Kringle that will bake up perfectly, revealing those incredible layers you’ve worked so hard to create. This is the moment your Wisconsin Apple Kringle truly takes shape.
- Preheat Oven and Prep Baking Sheet: Preheat your oven to 375°F (190°C). Line a large baking sheet with parchment paper. This prevents sticking, ensures even baking, and makes cleanup a breeze.
- Roll Out the Dough: Remove the well-chilled dough from the refrigerator. On a lightly floured surface, roll the dough into a long rectangle, approximately 20-22 inches long and 8-10 inches wide. Try to keep the edges as straight as possible by trimming or gently coaxing them. The final thickness should be about 1/8 to 1/4 inch. This ensures a good dough-to-filling ratio and allows for optimal flakiness.
- Arrange the Filling: Arrange the apple filling in a strip down the center of the rolled-out dough, leaving about 2 inches of dough clear on each long side. Make sure the filling is spread somewhat evenly but avoid mounding it too high, which could make sealing difficult. Distribute it to within about 1 inch of the short ends of the dough.
-
Fold and Seal the Kringle:
- Brush the edges of the dough (the 2-inch strips on the long sides) with a little water or an egg wash (made by whisking 1 egg with 1 tablespoon water). This acts as a “glue” and significantly helps with sealing the pastry.
- Carefully fold one long side of the dough over the apple filling, bringing it to meet the opposite long side. Try to stretch the dough just enough to cover the filling without tearing.
- Gently but firmly press the edges together to seal the Kringle. You can also crimp them with a fork for extra security and a decorative touch. A well-sealed seam is crucial to prevent the apple filling from bubbling out during baking, which can make your Kringle messy and potentially dry out the apples.
- You should now have a long, filled log.
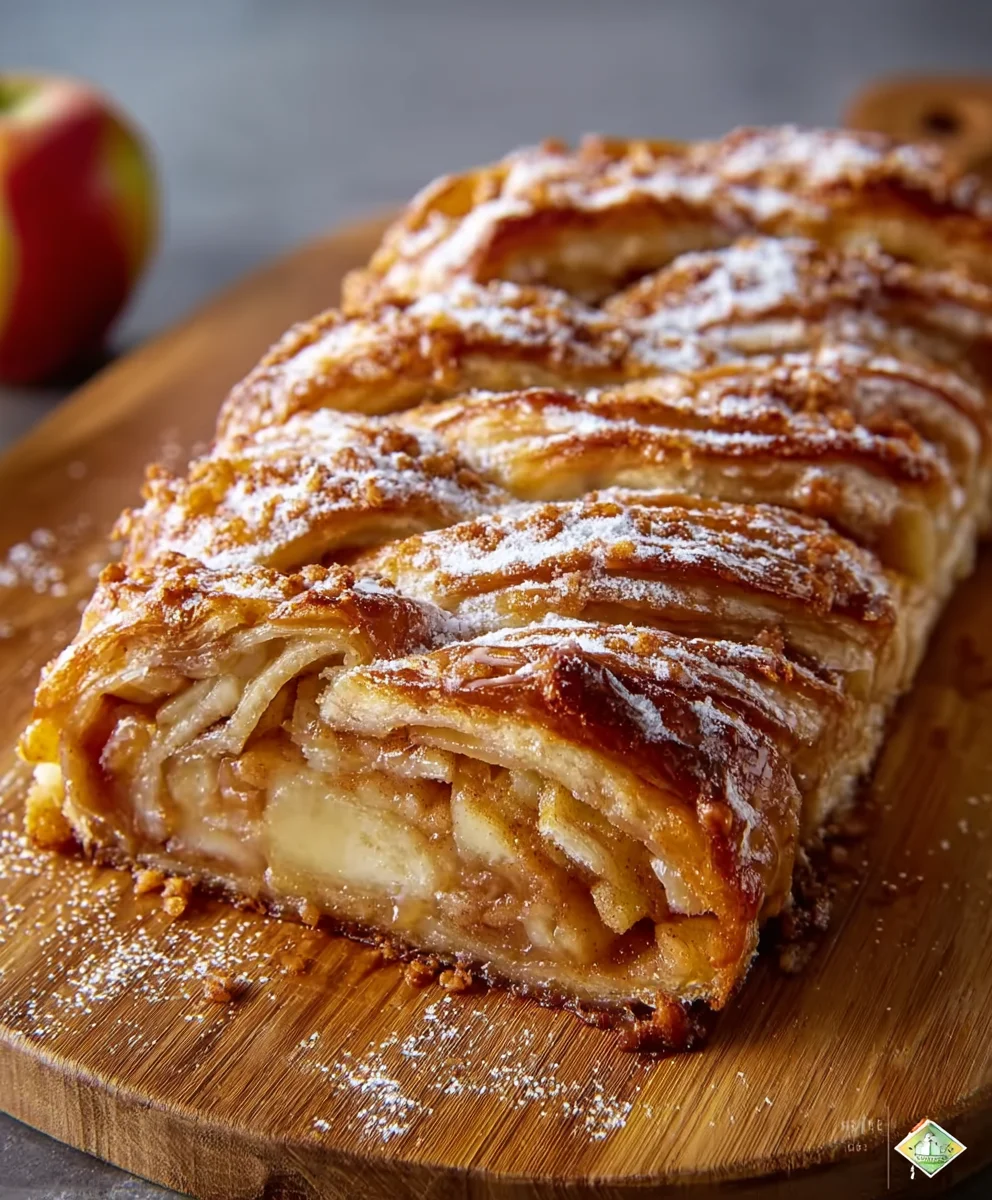
- Form the Kringle Shape: Carefully lift the filled log and transfer it to your prepared baking sheet. Gently bring the two short ends together to form an oval or ring shape. Overlap the ends slightly (about 1-2 inches) and firmly press them together to seal. Again, you can crimp with a fork for a robust seal. This iconic oval or ring shape is what unmistakably defines a Wisconsin Apple Kringle. Ensure the seal is strong enough to maintain the shape during the heat of the oven.
- Egg Wash (Optional but Recommended): In a small bowl, whisk the remaining large egg with 1 tablespoon of water to create an egg wash. Lightly brush the entire surface of the Kringle with this wash using a pastry brush. This will give your Kringle a beautiful golden-brown, shiny crust, enhancing its visual appeal. If you skip the egg wash, your Kringle will still be delicious but might lack that characteristic sheen and deeper color.
- Vent the Kringle: Using a sharp knife or kitchen shears, make several small slits or decorative cuts along the top of the Kringle, spaced about 1-2 inches apart. These vents are important as they allow steam to escape during baking, preventing the pastry from puffing up unevenly and ensuring the filling cooks thoroughly and the pastry remains flaky.
Baking Your Golden Wisconsin Apple Kringle
The baking process transforms your carefully prepared dough and filling into a golden-brown, flaky masterpiece. Keep a close eye on it, as oven temperatures can vary, and you want to achieve that perfect golden hue without overbrowning. The aroma filling your kitchen will be absolutely incredible!
- Bake: Place the Kringle in the preheated 375°F (190°C) oven. Bake for 30-40 minutes, or until the pastry is a deep golden brown and the filling is visibly bubbling slightly through the vents. If you notice the Kringle browning too quickly, especially on the edges, you can loosely tent it with aluminum foil for the last 10-15 minutes of baking to prevent over-browning. The internal temperature of the filling should be hot enough to soften the apples completely, ensuring a tender, delicious core for your Wisconsin Apple Kringle.
- Cool: Once baked, carefully transfer the Kringle, still on its parchment paper, to a wire rack to cool completely. It’s important to let it cool down before glazing; otherwise, the glaze will melt right off, creating a runny mess. This cooling process allows the internal structure of the pastry to set, and ensures the flakiness is preserved. This can take at least 1 hour, or even longer depending on your kitchen’s temperature. Resist the urge to cut into it too soon!
The Finishing Touch: Vanilla Glaze and Optional Toppings
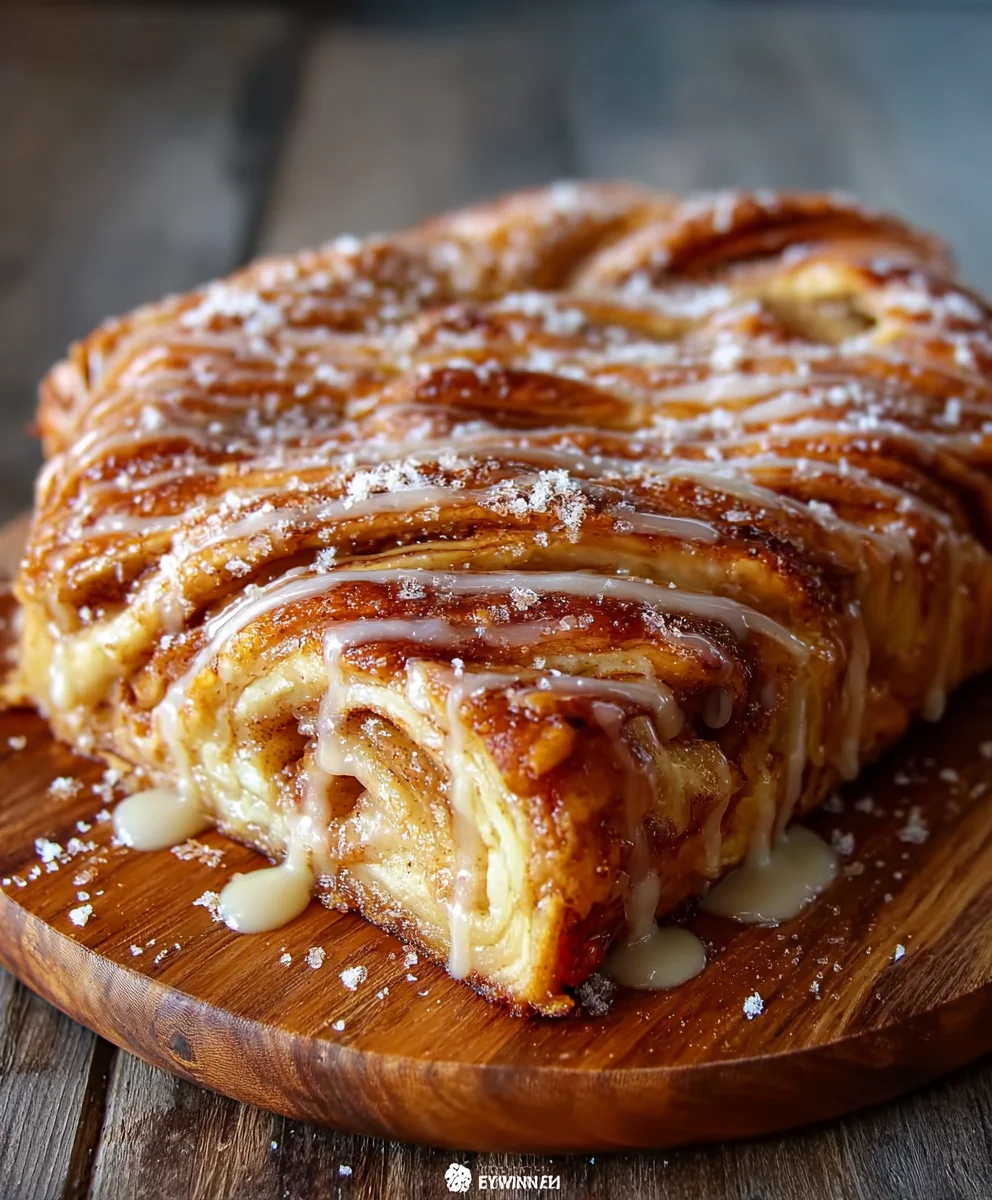
No Wisconsin Apple Kringle is complete without a luscious, sweet glaze. It adds another layer of flavor, a touch of sweetness, and that signature visual appeal that makes it irresistible. The glaze will provide a beautiful contrast to the flaky pastry and the spiced apple filling.
- Prepare the Glaze: In a medium bowl, whisk together the 1 1/2 cups powdered sugar, 2 tablespoons of milk, 1/2 teaspoon vanilla extract, and a pinch of salt until smooth. If the glaze is too thick to drizzle, add the remaining tablespoon of milk, a tiny bit at a time, until you reach a pourable, but still thick, consistency. You want it to generously coat the back of a spoon, not be watery.
- Glaze the Kringle: Once the Kringle has completely cooled (and I mean completely!), generously drizzle or spread the vanilla glaze over the top. You can use a spoon or a whisk to create attractive zigzags or simply spread it evenly across the entire surface. Be sure to get some glaze into the indentations and crevices for maximum flavor and visual appeal.
- Add Optional Topping: If desired, sprinkle the lightly toasted sliced almonds or chopped pecans over the wet glaze immediately after applying it. The warmth and crunch of these nuts add a lovely texture and nutty flavor that perfectly complements the apples and buttery pastry, making your Wisconsin Apple Kringle even more delightful.
- Allow Glaze to Set: Let the glaze set for at least 15-20 minutes before slicing. This prevents the glaze from being too sticky and helps it firm up nicely, allowing for clean cuts and easy handling.
- Serve and Enjoy: Once the glaze is set, your magnificent, homemade Wisconsin Apple Kringle is ready to be sliced and enjoyed. It’s absolutely divine served with a cup of hot coffee or tea, or as a delightful dessert after any meal. The incredible flakiness of the pastry, combined with the warm, tender, and perfectly spiced apple filling, topped with a sweet vanilla glaze, creates an unforgettable culinary experience. This Kringle is truly a labor of love, and every bite will remind you of the care you put into creating such a magnificent treat. Enjoy sharing this taste of Wisconsin with your loved ones, and savor the rich tradition encapsulated in every delicious slice!
Storage Tips for Your Wisconsin Apple Kringle:
If you happen to have any leftovers (which is a rare occurrence with something this delicious!), store your Kringle at room temperature in an airtight container for up to 2-3 days. This helps maintain its freshness and prevents the pastry from drying out. For longer storage, you can refrigerate it for up to a week. To enjoy it warm again and bring back some of its fresh-baked magic, a few minutes in a low oven (around 300°F/150°C) can crisp up the pastry, making it almost as good as day one. You can also freeze individual slices, well-wrapped in plastic wrap and then foil, for up to a month. Just thaw them at room temperature and warm gently before serving for a convenient and delicious treat anytime you crave that authentic Wisconsin Apple Kringle experience!
Conclusion:
And so, we arrive at the culmination of our delicious journey! I truly hope this recipe has inspired you, much like it has inspired countless bakers before us. When I set out to share this particular treat, my goal was to offer something more than just a dessert; I wanted to provide an experience, a slice of warmth and tradition that transcends the ordinary. This isn’t just another pastry recipe; it’s a gateway to creating something truly memorable in your own kitchen. The flakiness of the delicate, buttery dough, achieved through careful lamination, is simply unparalleled. It shatters beautifully with each bite, yielding to a wonderfully spiced, tender apple filling that sings with the flavors of autumn and home. Every time I pull one of these golden beauties from the oven, the aroma alone is enough to transport me back to cherished memories, and I sincerely believe it will do the same for you. This recipe promises not just a delicious outcome, but the immense satisfaction of crafting something truly special from scratch. It’s a testament to the fact that with a little patience and love, anyone can create confectionery magic.
Now, let’s talk about enjoying your masterpiece! While the fresh-from-the-oven aroma is undeniably captivating, your homemade Kringle is incredibly versatile. For a classic breakfast or brunch experience, I highly recommend serving a slice with a steaming cup of coffee or a tall glass of cold milk. The slight bitterness of coffee perfectly complements the sweetness of the apples and the richness of the pastry. For an elevated dessert, consider a warm slice topped with a scoop of vanilla bean ice cream, allowing the melting creaminess to mingle with the warm apple filling. A dollop of freshly whipped cream, perhaps infused with a hint of cinnamon or maple syrup, would also be an exquisite addition. Don’t be afraid to experiment with garnishes; a light dusting of powdered sugar is traditional and lovely, but a sprinkle of toasted pecans or a drizzle of caramel sauce could add another layer of indulgence. If you’re feeling adventurous, consider varying the fruit filling in future batches! While apples are quintessential, a mix of pears and cranberries, or even a stone fruit filling like peaches in the summer, could offer delightful seasonal twists. Imagine a cherry Kringle in spring, or a pumpkin Kringle for a festive holiday treat. The possibilities are truly endless once you master this foundational dough.
Ultimately, my greatest hope is that you’ll embrace the challenge and joy of baking this incredible Kringle. It might seem intricate at first glance, but I assure you, each step is rewarding, and the end result is profoundly worth the effort. There’s an immense sense of accomplishment that comes with presenting a beautiful, homemade pastry like this to your loved ones. I encourage you wholeheartedly to set aside some time, gather your ingredients, and immerse yourself in the delightful process. Once you’ve savored your first slice, once you’ve experienced that perfect balance of crisp pastry and tender fruit, I am confident it will become a cherished recipe in your culinary repertoire. Don’t let the multi-step process deter you; think of it as a creative project that culminates in pure deliciousness. And when you do finally bake your very own, magnificent Wisconsin Apple Kringle, please, please share your experience! I would absolutely love to hear about your baking journey, what you learned, and most importantly, how utterly delicious it turned out to be. Share photos, tell me about your favorite serving suggestions, or any clever variations you discovered along the way. Your feedback truly brightens my day and helps to build our community of passionate home bakers. Happy baking, friends!
Wisconsin Apple Kringle
Wisconsin Apple Kringle is a beloved Danish-American pastry, traditionally from Racine, Wisconsin. This recipe features a flaky, buttery dough (yeasted and laminated) wrapped around a sweet apple filling, topped with a simple vanilla glaze. Perfect for breakfast, brunch, or dessert.
Ingredients
-
2 cups all-purpose flour
-
1 tsp kosher salt
-
3 tbsp granulated sugar
-
1 cup unsalted butter, cold and cubed
-
2 tsp active dry yeast
-
1/3 cup whole milk, warm
-
2 tsp water (for dough)
-
1 egg
-
2 oz apple pie filling
-
1/4 tsp ground cardamom
-
1 cup powdered sugar
-
1 tsp vanilla extract
-
2–3 tsp water (for glaze)
Instructions
-
Step 1
Warm 1/3 cup milk (105-115°F/40-46°C). Dissolve 2 tsp yeast and 2 tbsp granulated sugar in milk; let foam 5-10 min. In a large bowl, whisk 2 cups flour, 1 tsp salt, and 1 tbsp granulated sugar. Add yeast mixture, 2 tsp water, and 1 egg. Mix until a shaggy dough forms. Knead on a lightly floured surface for 5-7 min until smooth. Form into a rectangle, wrap, and chill for 30 min. -
Step 2
Between two sheets of parchment paper, pound and roll 1 cup cold cubed butter into an even 6×8-inch rectangle. Chill until needed. -
Step 3
Roll chilled dough to a 12×8-inch rectangle on a lightly floured surface. Place butter block over two-thirds of the dough. Fold the uncovered dough over the butter, then fold the remaining dough over that (like a letter). Seal all edges firmly. Rotate dough 90 degrees. Gently roll out again to 12×8 inches, then perform another ‘letter fold’. Wrap and chill for 30 min. -
Step 4
Repeat the rolling and ‘letter folding’ process two more times, chilling the dough for 30 min after each fold (total of 3 folds/turns). After the third fold, wrap dough tightly and refrigerate for at least 1 hour, or preferably overnight, for best flakiness and ease of handling. -
Step 5
In a small bowl, combine 2 oz apple pie filling with 1/4 tsp ground cardamom. Stir well. -
Step 6
Preheat oven to 375°F (190°C). Line a baking sheet with parchment paper. On a lightly floured surface, roll the chilled dough into a long rectangle (approx. 20-22 inches long, 8-10 inches wide). Spread the apple filling down the center, leaving about 2 inches clear on the long sides. Fold one long side of the dough over the filling, then bring the opposite long side to meet and overlap it. Press edges firmly to seal. Transfer the filled log to the baking sheet. Gently bring the short ends together to form an oval/ring shape and press to seal. Make several small slits along the top for venting. -
Step 7
Bake for 30-40 minutes, or until the pastry is deep golden brown and the filling is bubbling. If browning too quickly, loosely tent with aluminum foil. Once baked, transfer Kringle (on parchment) to a wire rack to cool completely (at least 1 hour). -
Step 8
Once Kringle is completely cool, whisk together 1 cup powdered sugar, 1 tsp vanilla extract, and 2-3 tsp water until smooth and pourable. Drizzle or spread generously over the cooled Kringle. Let the glaze set for 15-20 minutes before slicing. -
Step 9
Slice and serve your homemade Wisconsin Apple Kringle. Store leftovers in an airtight container at room temperature for 2-3 days, or refrigerate for up to a week. Warm gently in a low oven to refresh.
Important Information
Nutrition Facts (Per Serving)
It is important to consider this information as approximate and not to use it as definitive health advice.
Allergy Information
Please check ingredients for potential allergens and consult a health professional if in doubt.


Leave a Comment