
The Best Peach Pie Secret Ingredient is often the difference between a good dessert and one that becomes a cherished family tradition, remembered long after the last bite. For years, I dedicated myself to perfecting my peach pie recipe, driven by a passion for those sweet, sun-kissed fruits and the comforting aroma of a freshly baked crust filling my kitchen. While the classic combination of ripe peaches, a flaky crust, and a touch of spice is undeniably wonderful, I always felt there was an elusive element that could truly elevate it, transforming it into something extraordinary. This beloved summer staple, with its roots deeply embedded in American culinary history and countless warm memories, deserves nothing less than perfection.
Why People Adore Peach Pie
People adore peach pie for its juicy sweetness, its delicate balance of textures, and the sheer joy it brings to any gathering. But what if there was a way to amplify those qualities, to ensure every slice bursts with unparalleled flavor and an incredibly tender, almost magical, consistency? My quest led me to uncover precisely that. I am thrilled to share what I truly believe is The Best Peach Pie Secret Ingredient, a subtle addition that promises to take your homemade pie from simply delicious to utterly unforgettable. Prepare to surprise and delight everyone who tastes your next creation.

Ingredients:
For the Flaky All-Butter Pie Crust (Double Crust):
- 3 cups (360g) all-purpose flour, plus more for dusting
- 1 teaspoon fine sea salt
- 1 tablespoon granulated sugar
- 1 cup (226g) unsalted butter, very cold and cut into ½-inch cubes
- ½ cup (120ml) to ¾ cup (180ml) ice water, plus more if needed
- My little tip: Make sure your butter is as cold as possible! I even pop my flour in the freezer for 15 minutes sometimes.
For The Best Peach Pie Secret Ingredient Filling:
- 8-9 ripe, fresh peaches (about 3 pounds), peeled, pitted, and sliced into ½-inch wedges
- ½ cup (100g) granulated sugar
- ¼ cup (50g) packed light brown sugar
- ¼ cup (30g) cornstarch or tapioca starch (I prefer tapioca for fruit pies as it makes a clearer, glossier filling)
- 1 tablespoon fresh lemon juice
- 1 teaspoon pure vanilla extract
- ½ teaspoon ground cinnamon
- ¼ teaspoon ground nutmeg
- ⅛ teaspoon fine sea salt
- 2 tablespoons (30ml) bourbon or dark rum – this is The Best Peach Pie Secret Ingredient! Trust me, it adds an incredible depth and warmth.
- 2 tablespoons (28g) unsalted butter, cut into small pieces (for dotting on top of the filling)
For the Egg Wash & Topping:
- 1 large egg, beaten
- 1 tablespoon cold water or milk
- 1 tablespoon turbinado sugar or granulated sugar, for sprinkling
Phase 1: Crafting the Flaky All-Butter Pie Crust
Creating a truly magnificent pie starts with a stellar crust, and my all-butter recipe never disappoints. It’s light, flaky, and has that perfect buttery richness that complements the sweet, juicy peaches so beautifully.
- Combine Dry Ingredients: In a large mixing bowl, whisk together the 3 cups of all-purpose flour, 1 teaspoon of fine sea salt, and 1 tablespoon of granulated sugar. This ensures an even distribution of flavor throughout your crust.
- Cut in the Cold Butter: Add your very cold, ½-inch cubes of unsalted butter to the flour mixture. Using a pastry blender, two knives, or even your fingertips (working quickly so the butter doesn’t warm up), cut the butter into the flour until the mixture resembles coarse meal with some pea-sized pieces of butter still visible. It’s crucial not to overwork the butter here; those little pockets of butter are what create the beautiful flakiness we all adore. I often find that using a pastry blender gives me the most consistent results without melting the butter.
- Incorporate Ice Water: Gradually add the ice water, 1 tablespoon at a time, mixing gently with a fork or your hands until the dough just comes together. Start with ½ cup and only add more if necessary. You’re looking for a shaggy dough that barely holds together when squeezed, not a smooth, uniform ball. Be careful not to add too much water, as this can lead to a tough crust. Less is definitely more here. I usually find that ¾ cup is my sweet spot, but humidity can play a big role, so trust your instincts.
- Divide and Chill: Divide the dough into two slightly unequal portions – one a bit larger for the bottom crust (I usually aim for about 60% for the bottom and 40% for the top). Flatten each portion into a disc, wrap tightly in plastic wrap, and refrigerate for at least 1 hour, or preferably 2 hours. Chilling allows the gluten to relax and the butter to firm up again, which is absolutely essential for a tender, flaky crust that’s easy to roll out. If you have the time, an overnight chill is even better!
Phase 2: Preparing The Best Peach Pie Secret Ingredient Filling
Now, let’s talk about the star of the show: those luscious peaches and The Best Peach Pie Secret Ingredient that will truly elevate your pie to legendary status. This filling isn’t just sweet; it’s complex, aromatic, and deeply satisfying.
- Prepare the Peaches: First things first, get those peaches ready. I find the easiest way to peel fresh peaches is to blanch them. Bring a large pot of water to a rolling boil. Carefully drop a few peaches into the boiling water for 30-60 seconds, then immediately transfer them to an ice bath. The skin should slip off easily. If you don’t want to blanch, a good quality vegetable peeler works just fine, especially for firmer peaches. Once peeled, pit them and slice them into ½-inch wedges. Aim for about 8-9 medium peaches to get your 3 pounds.
- Combine with Sugars and Thickener: In a large bowl, gently combine the sliced peaches with ½ cup of granulated sugar and ¼ cup of packed light brown sugar. The brown sugar adds a lovely molasses note that complements the peaches beautifully. Then, sprinkle in ¼ cup of cornstarch or tapioca starch. I personally prefer tapioca starch for fruit pies because it creates a wonderfully clear, glossy, and thick filling without any chalky aftertaste, ensuring your peach juices thicken perfectly without clouding. Toss everything gently to ensure the peaches are evenly coated.
- Add Flavor Enhancers: Now for the magic! Drizzle in 1 tablespoon of fresh lemon juice, 1 teaspoon of pure vanilla extract, ½ teaspoon of ground cinnamon, ¼ teaspoon of ground nutmeg, and ⅛ teaspoon of fine sea salt. The lemon juice brightens the flavors and prevents the peaches from browning too much, while the spices add warmth and depth. The salt might seem small, but it’s crucial for balancing the sweetness and making all the other flavors pop.
- Introduce The Best Peach Pie Secret Ingredient: Here it is, my friends: Add 2 tablespoons of bourbon or dark rum to the peach mixture. This is The Best Peach Pie Secret Ingredient. I know, I know, it might sound a little unconventional, but trust me on this! The alcohol cooks out, leaving behind an incredibly complex, warm, and subtly smoky note that enhances the natural sweetness of the peaches and deepens all the other flavors. It adds a layer of sophistication that will have everyone asking, “What’s your secret?” It’s a game-changer, truly. Gently toss everything one last time to ensure all the peaches are beautifully coated in this flavorful mixture.
- Let Macerate: Let the peach filling sit at room temperature for about 15-20 minutes. This allows the sugars to draw out some of the peach juices, creating a delicious syrup that will thicken beautifully as it bakes. It’s a small step that makes a big difference in the final texture of your pie filling.
Phase 3: Assembling Your Masterpiece Peach Pie
With your perfectly chilled crust and a deliciously aromatic filling, it’s time to bring it all together. This is where your pie truly begins to take shape, becoming a visual delight as well as a culinary one.
- Preheat Oven & Prepare Pan: Preheat your oven to 425°F (220°C). Lightly butter or grease a 9-inch pie plate. I often place a baking sheet on the bottom rack of my oven at this point as well; this will catch any drips and help the bottom crust get wonderfully crisp.
- Roll Out the Bottom Crust: On a lightly floured surface, take the larger disc of chilled pie dough. Roll it out into a 12-13 inch circle, about ⅛-inch thick. If the dough cracks, don’t fret! Just gently press it back together. Carefully transfer the rolled-out dough to your prepared 9-inch pie plate. Trim the edges, leaving about a ½-inch overhang. I like to gently press the dough into the corners of the pie plate to ensure a snug fit.
- Fill the Pie: Pour the luscious peach filling into the pie crust. Try to mound the peaches slightly in the center, as they will cook down during baking. Distribute the small pieces of butter evenly over the top of the filling; these little pockets of butter will melt into the filling, adding even more richness and gloss.
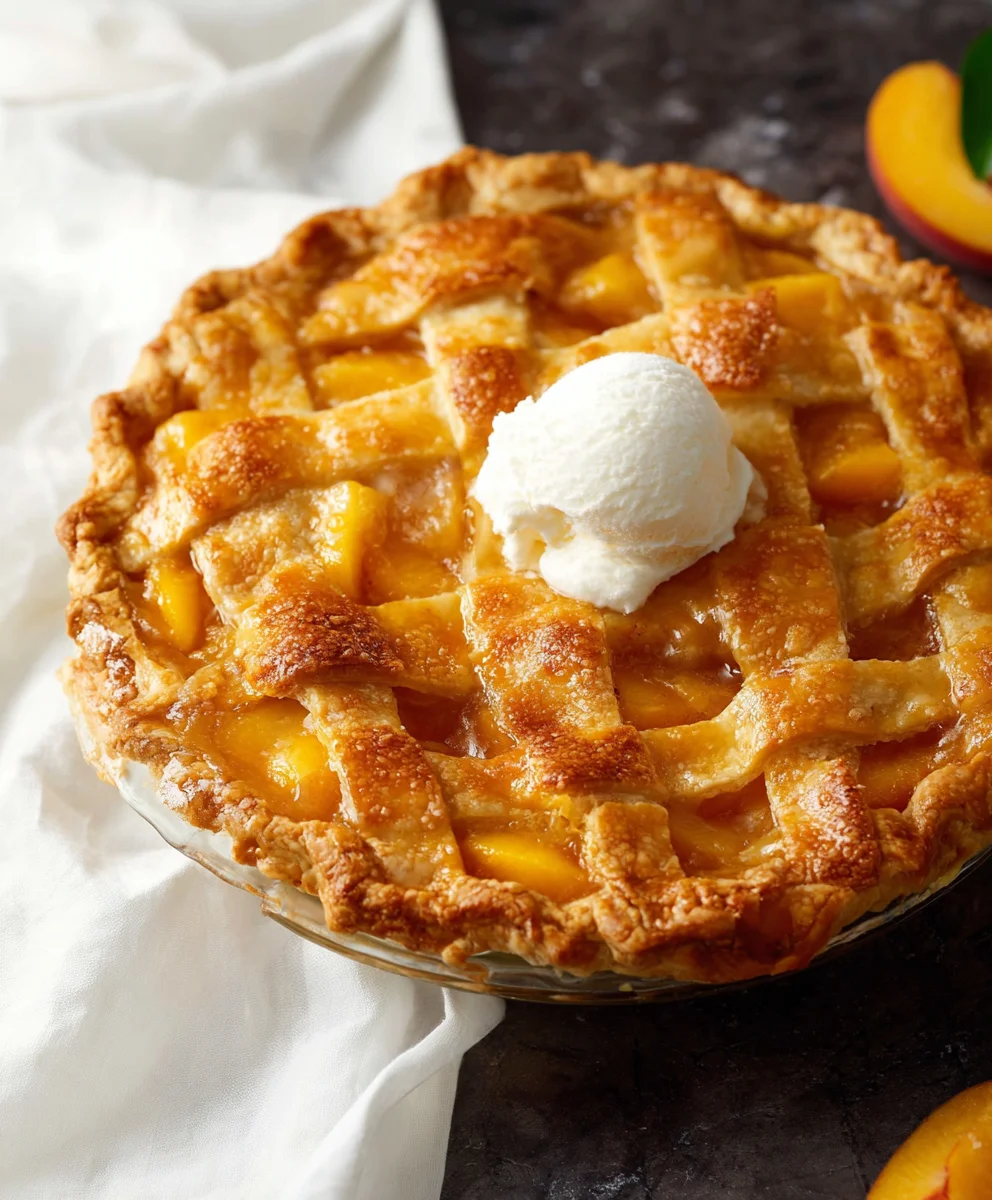
- Prepare the Top Crust: Roll out the second disc of dough into an 11-12 inch circle. You can either place this circle directly over the filling, cutting a few slits in the top for steam to escape, or get creative with a lattice top. For a lattice, cut the dough into 1-inch wide strips and weave them over the filling. Whichever you choose, carefully place the top crust over the filling.
- Seal and Crimp: Trim the edges of the top crust, leaving a ½-inch overhang. Fold the top crust overhang under the bottom crust overhang and crimp the edges together. You can use your fingers to create a classic fluted edge, or a fork for a simpler, rustic look. Make sure the edges are well-sealed to prevent the filling from bubbling out excessively.
- Egg Wash and Sugar Sprinkle: In a small bowl, whisk together the beaten egg with 1 tablespoon of cold water or milk. This egg wash is your secret to a beautifully golden-brown, glossy crust. Brush the top crust generously with the egg wash, then sprinkle it with about 1 tablespoon of turbinado sugar (or granulated sugar). The turbinado sugar adds a lovely sparkle and a slight crunch that I absolutely adore.
- Final Chill (Optional but Recommended): For an extra-flaky crust, pop the assembled pie back into the refrigerator for 15-20 minutes before baking. This helps firm up the butter one last time and prevents the crust from shrinking too much in the oven. It’s a small step that really pays off!
Phase 4: Baking Your Perfect Peach Pie
The moment of truth! Baking this pie to golden perfection requires a little attention, but the aromas that will soon fill your kitchen are more than worth it. Get ready for that incredible smell of warm peaches and spices!
- Initial High Heat Bake: Carefully place your chilled pie on the preheated baking sheet (which should already be in the oven if you followed my tip!). Bake at 425°F (220°C) for the first 15-20 minutes. This initial burst of high heat helps to set the crust quickly and create those beautiful, flaky layers before the filling starts to bubble too much.
- Reduce Heat and Continue Baking: After 15-20 minutes, reduce the oven temperature to 375°F (190°C). Continue to bake for an additional 40-50 minutes, or until the crust is deeply golden brown and the filling is visibly bubbling thickly through the vents. This bubbling is key! It tells you that the starches in the filling have properly activated and are thickening the juices.
- Prevent Over-Browning: If you notice the edges of your pie crust browning too quickly, simply create a shield with aluminum foil. Gently crimp strips of foil around the edges of the pie to protect them from burning while the rest of the pie continues to bake. This is a common and very effective trick to achieve that perfect, even golden hue.
- Check for Doneness: To ensure your pie is truly done, look for that robust bubbling in the center, not just around the edges. If you’re unsure, you can also insert a thin knife or skewer into one of the vents (if you have them) to check the consistency of the filling. It should feel thick and syrupy, not watery. The overall baking time can vary slightly depending on your oven, so trust your eyes and nose!
- Remove from Oven: Once your pie is beautifully golden, deeply bubbly, and smelling absolutely heavenly, carefully remove it from the oven.
Phase 5: The Grand Reveal and Serving Suggestions
Patience, my friends, is truly a virtue when it comes to pie. While it’s tempting to dive right into this warm, aromatic masterpiece, a little wait will ensure the filling sets perfectly and you get a clean slice every time. Trust me, it’s worth it!
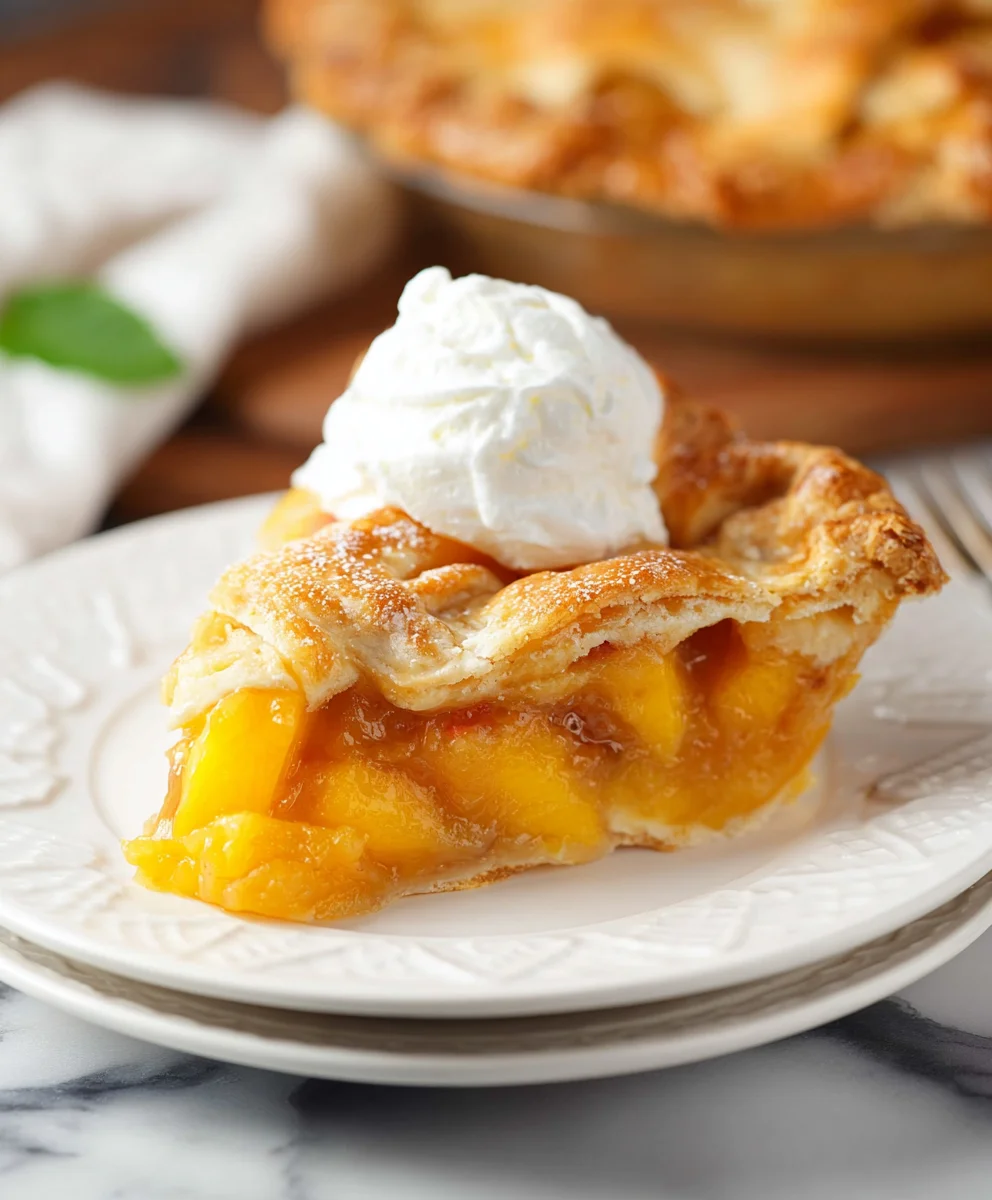
- Cool Completely (or Mostly): Transfer the baked peach pie to a wire rack and let it cool for at least 3-4 hours, or even longer, before slicing. This is perhaps the most critical step for any fruit pie! During this cooling period, the filling continues to thicken and set. If you cut into it too soon, you’ll end up with a runny, soupy mess, no matter how perfectly you baked it. I know it’s hard to resist that amazing smell, but your patience will be rewarded with perfectly firm, luscious slices.
- Slice and Serve: Once adequately cooled, slice into generous wedges. This pie is a revelation on its own, but if you want to take it over the top (and why wouldn’t you?), serve it warm or at room temperature.
- Serving Suggestions: My absolute favorite way to enjoy a slice of this peach pie is with a dollop of cold, rich vanilla bean ice cream that slowly melts into the warm, spiced peaches. A generous swirl of freshly whipped cream is another fantastic option, adding a lightness that balances the richness of the pie. A drizzle of caramel sauce wouldn’t hurt either, if you’re feeling extra indulgent!
- Storage: Leftover pie can be stored loosely covered at room temperature for up to 2 days, or in the refrigerator for up to 4 days. If refrigerating, I recommend gently warming individual slices in the microwave or oven before serving to bring back that comforting warmth and aroma.
- Enjoy! There’s nothing quite like a homemade peach pie, especially one made with The Best Peach Pie Secret Ingredient. Every bite is a celebration of summer’s bounty, warmth, and pure comfort. I hope you and your loved ones enjoy this recipe as much as I do!
Conclusion:
Well, my friends, we’ve reached the sweet finale of our peachy adventure, and I truly hope you’re feeling inspired, perhaps even a little hungry, to dive into your kitchen and experience the magic of this incredible dessert. We’ve talked through every step, every nuance, and by now, you understand why I wholeheartedly believe this isn’t just another peach pie recipe; it’s a culinary revelation. This pie embodies everything we dream of in a classic dessert: a golden, flaky crust that shatters beautifully with each forkful, a filling that boasts the perfect equilibrium of ripe, juicy peaches, and that unmistakable, delightful burst of flavor that comes from what I affectionately call The Best Peach Pie Secret Ingredient. It’s that special touch, that little whisper of something extraordinary, that elevates this humble fruit pie from simply delicious to truly unforgettable.
I can honestly say that every time I pull one of these beauties from the oven, the aroma alone is enough to transport me to a state of pure bliss. The way the peaches soften and release their sweet nectar, mingling with the subtle spices and that particular ingredient we’ve been celebrating, creates a symphony of flavors that is both comforting and exhilarating. You’ll find yourself savoring each bite, appreciating the warmth, the texture, and the sheer joy of a perfectly executed pie. It’s a recipe that has won over countless skeptics and has become a staple in my own home, not just for special occasions, but whenever I want to bring a little extra happiness to the table. This isn’t just about baking; it’s about creating memories, about sharing warmth, and about celebrating the simple, profound pleasures of homemade goodness. Trust me when I say, this pie will quickly become a cherished part of your own recipe collection, something you’ll turn to again and again.
Elevate Your Pie Experience: Serving Suggestions & Creative Variations
Now, while this peach pie is an absolute showstopper all on its own, there are myriad ways to enhance your enjoyment and truly make it your own. For a truly classic and utterly divine experience, I wholeheartedly recommend serving your warm slices with a generous scoop of the finest vanilla bean ice cream you can find. The contrast between the warm, tender fruit and the cold, creamy ice cream is simply out of this world. Alternatively, a dollop of freshly whipped cream, ever so lightly sweetened, provides a lighter, ethereal counterpoint that allows the pie’s intrinsic flavors to shine through beautifully. For those who enjoy a bit of textural intrigue, a sprinkle of toasted, chopped pecans or walnuts over the top can add a wonderful crunch and a nutty depth that complements the peaches splendidly.
But why stop there? Don’t be afraid to get creative! While peaches are undeniably the star, you could experiment with adding a handful of fresh raspberries or blueberries to the filling for an extra burst of tartness and color, especially if you want to play with the sweet-tart balance even further. Consider infusing your whipped cream with a hint of bourbon or a touch of almond extract for an added layer of sophistication. If you’re feeling adventurous, you could even try brushing the top crust with an egg wash and sprinkling it with coarse sugar before baking for an extra golden, glistening finish and a delightful crunch. For those who prefer individual servings, this recipe adapts beautifully to mini pie tins or even a crumble format, allowing for charming single portions perfect for gatherings or an indulgent personal treat. The possibilities are truly endless, limited only by your imagination and your taste buds!
Your Culinary Journey Awaits!
So, now it’s your turn! I’ve poured my heart and soul into sharing this recipe with you, guiding you through what I genuinely believe results in the most exquisite peach pie you’ll ever bake. Don’t let the thought of baking a pie intimidate you; embrace the process, enjoy the incredible aromas that will fill your home, and savor the reward of your efforts. I am absolutely confident that once you take that first bite, you’ll understand exactly what I mean. I’m so excited for you to experience the magic of this dessert and to discover for yourself the transformative power of The Best Peach Pie Secret Ingredient.
I would absolutely love to hear about your baking adventures! Please don’t hesitate to share your experiences, your photos, your triumphs, and even any creative twists you’ve added. Did you serve it with ice cream or whipped cream? Did you try a different fruit combination? What did your family and friends think? Your feedback and stories inspire me and our entire community of home bakers. So go ahead, preheat your ovens, gather your ingredients, and embark on this delicious journey. I can’t wait to see what you create!
The Best Peach Pie Secret Ingredient
Discover the secret to an unforgettable peach pie, featuring a tender, flaky crust and a luscious peach filling. The article reveals its secret ingredient as bourbon or dark rum for incredible depth and warmth. This recipe, crafted for unparalleled flavor and texture, ensures every slice is a cherished delight. While the full recipe outlines a version with alcohol, the provided ingredient list offers a delicious non-alcoholic alternative focusing on aromatic spices like smoked paprika to elevate the natural sweetness of ripe peaches.
Ingredients
-
2 discs pie crust
-
2 lbs (900g) fresh yellow peaches
-
2 tbsp (15ml) lemon or lime juice
-
3/4 cup (150g) white granulated sugar
-
1/4 cup + 1 tbsp (50g) tapioca starch
-
1 tsp vanilla extract
-
1 tsp smoked paprika or cinnamon
-
1 tbsp (15g) unsalted butter, for topping
-
1 tbsp (10g) white granulated sugar, for topping
-
1 egg yolk + 1 tbsp (15ml) milk, for egg wash
Instructions
-
Step 1
Whisk 3 cups flour, 1 tsp salt, and 1 tbsp sugar. Cut in 1 cup very cold butter cubes until coarse meal forms. Gradually add 1/2-3/4 cup ice water, mixing until dough just comes together. Divide into two discs (one slightly larger), wrap, and chill for at least 1-2 hours. -
Step 2
Peel, pit, and slice 2 lbs fresh peaches into 1/2-inch wedges. In a large bowl, combine peaches with 2 tbsp lemon juice, 3/4 cup granulated sugar, 1/4 cup + 1 tbsp tapioca starch, 1 tsp vanilla extract, and 1 tsp smoked paprika or cinnamon. Toss gently to coat. Let sit for 15-20 minutes. -
Step 3
Preheat oven to 425°F (220°C). Lightly butter a 9-inch pie plate. Roll out larger dough disc (from 2 discs pie crust) for the bottom, fit into plate, trim, and leave 1/2-inch overhang. Pour filling into crust, mounding in center. Dot with 1 tbsp unsalted butter. Roll out second dough disc for top; place over filling (cut vents or lattice). Trim edges, fold, and crimp to seal. Whisk 1 egg yolk + 1 tbsp milk; brush over top crust. Sprinkle with 1 tbsp white granulated sugar. Chill pie for 15-20 minutes (optional). -
Step 4
Bake at 425°F (220°C) for 15-20 minutes. Reduce oven to 375°F (190°C) and bake for an additional 40-50 minutes, or until crust is deeply golden brown and filling is thickly bubbling through vents. Shield crust edges with aluminum foil if browning too quickly. Remove from oven. -
Step 5
Cool pie on a wire rack for at least 3-4 hours before slicing to allow filling to set. Serve warm or at room temperature, optionally with vanilla ice cream or whipped cream. Store leftovers at room temperature for up to 2 days or refrigerated for up to 4 days.
Important Information
Nutrition Facts (Per Serving)
It is important to consider this information as approximate and not to use it as definitive health advice.
Allergy Information
Please check ingredients for potential allergens and consult a health professional if in doubt.

Leave a Comment