
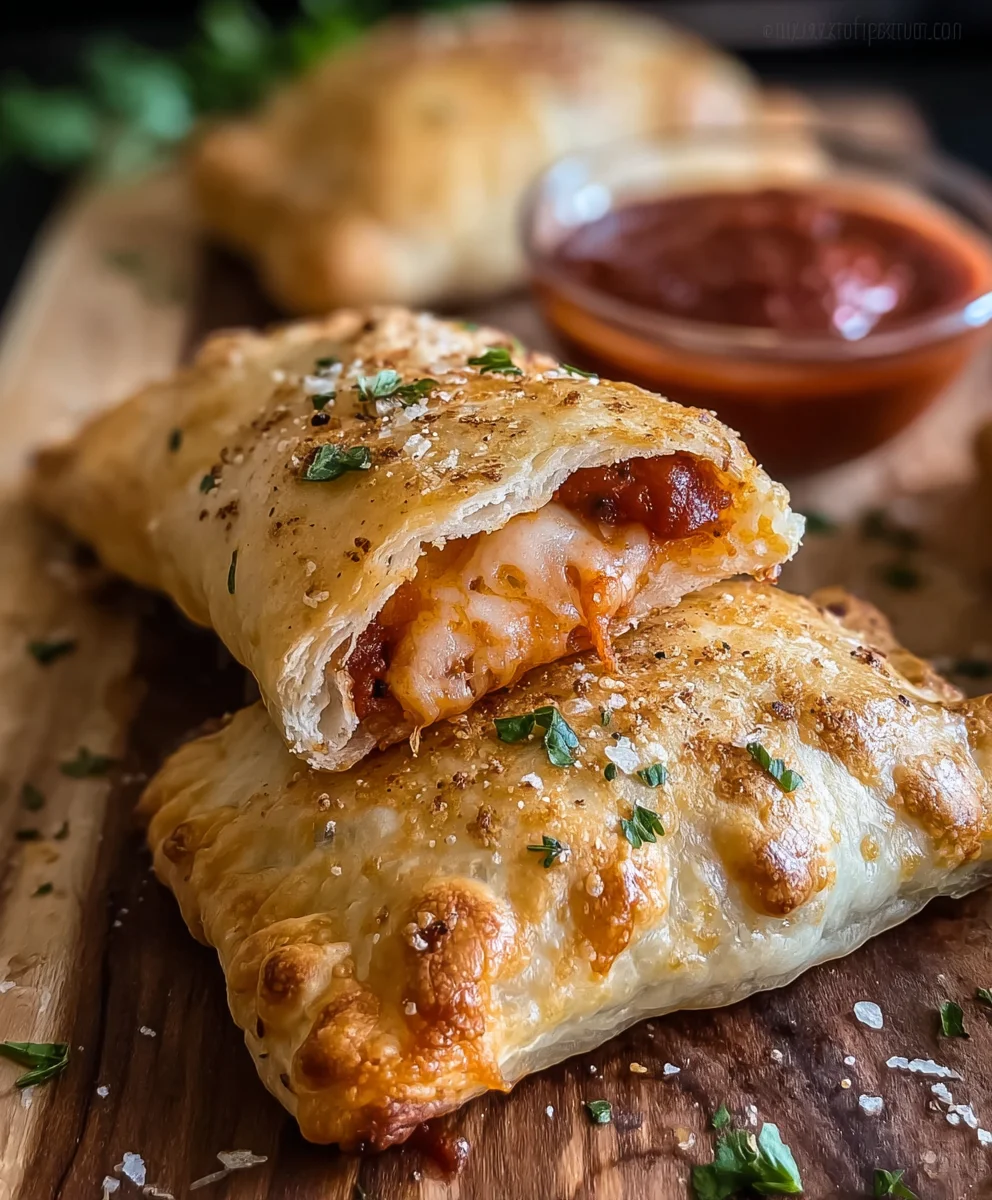
Homemade Hot Pockets are not just a snack; they are a revelation, transforming a beloved convenience food into an elevated culinary experience. Have you ever wished for that perfectly golden, flaky crust, bursting with warm, savory fillings, but with ingredients you truly trust and flavors that sing? Today, your wish becomes a delicious reality. While the iconic frozen version holds a nostalgic place in many hearts, the concept of a handheld, pastry-wrapped meal has deep roots across countless cultures, from Italian calzones to British pasties and Latin American empanadas. My recipe brings this global tradition right into your kitchen, promising a taste and texture far superior to anything you’ll find in the freezer aisle.
People adore this dish not only for its incredible convenience as a grab-and-go meal or a hearty snack, but also for its unparalleled comfort factor. Imagine a bubbling, cheesy interior, perfectly seasoned with your favorite meats and vegetables, encased in a tender, buttery dough. This isn’t just a recipe; it’s an invitation to customize, to innovate, and to rediscover a classic with fresh eyes and a sophisticated palate. I believe that creating your own Homemade Hot Pockets allows for endless possibilities, ensuring every bite is exactly how you envisioned it – piping hot, incredibly satisfying, and made with love. Get ready to ditch the microwave and embrace the joy of creating these irresistible pockets of deliciousness from scratch.

Ingredients:
To embark on this delightful journey of creating your very own Homemade Hot Pockets, gather these fresh and wholesome ingredients. I promise you, the effort is absolutely worth it for these incredibly satisfying savory pastries!
For the Dough:
- 3 cups (360g) all-purpose flour, plus more for dusting
- 1 teaspoon instant or active dry yeast
- 1 teaspoon granulated sugar
- 1 teaspoon salt
- 2 tablespoons olive oil, plus extra for oiling the bowl
- 1 cup (240ml) warm water (about 105-115°F / 40-46°C)
For the Classic Pepperoni & Cheese Filling:
- 1 tablespoon olive oil
- 1/2 cup (120g) marinara sauce or your favorite pizza sauce
- 1/2 teaspoon dried oregano
- 1/4 teaspoon garlic powder
- Pinch of red pepper flakes (optional, for a little kick!)
- 4 ounces (approx. 115g) sliced pepperoni
- 1 1/2 cups (170g) shredded mozzarella cheese
- 1/2 cup (55g) shredded provolone cheese (or more mozzarella)
- 2 tablespoons grated Parmesan cheese
For the Egg Wash & Topping:
- 1 large egg
- 1 tablespoon water or milk
- Optional: a sprinkle of dried Italian herbs or garlic powder for the top
Making the Dough for Your Homemade Hot Pockets
The foundation of any great Homemade Hot Pocket is a fantastic, homemade dough. Trust me, making it from scratch is incredibly rewarding and gives you a much better texture and flavor profile than any store-bought alternative. This particular dough recipe is forgiving and results in a wonderfully tender, yet sturdy crust that holds up perfectly to all that delicious, bubbling filling you’re about to create. It’s the key to truly exceptional DIY Hot Pockets.
- Activate the Yeast (if using active dry): In a large mixing bowl, or the bowl of a stand mixer fitted with a dough hook, combine the warm water, granulated sugar, and yeast. If you’re using active dry yeast, let this mixture sit for 5-10 minutes. You should see a foamy layer form on the surface, which is a wonderful sign that your yeast is alive, active, and ready to work its magic. If using instant yeast, you can technically skip this blooming step and add it directly with the dry ingredients, but I often still let it sit for a few minutes just to be sure.
- Combine Dry Ingredients: In a separate, medium-sized bowl, whisk together the all-purpose flour and salt. This seemingly simple step is crucial as it ensures the salt is evenly distributed throughout the dough, which is vital for both flavor and proper gluten development.
- Mix Wet and Dry: Now, add the 2 tablespoons of olive oil to your activated yeast mixture. Then, gradually incorporate the flour mixture, about a cup at a time, into the wet ingredients. Mix until a shaggy, somewhat sticky dough forms. If you’re using a stand mixer, mix on low speed. If you’re working by hand, a sturdy wooden spoon or spatula will do the trick initially, before you switch to kneading.
- Knead the Dough: Turn the shaggy dough out onto a lightly floured surface. Begin to knead the dough using a push-fold-turn motion. Continue kneading for 8-10 minutes until the dough transforms into a smooth, elastic, and non-sticky ball. It should feel supple and, when gently poked with your finger, should slowly spring back. If you’re fortunate enough to have a stand mixer, let the dough hook do the hard work for 6-8 minutes on medium-low speed. The kneading process is absolutely vital for developing the gluten structure, which gives your finished Homemade Hot Pockets their characteristic chewiness, strength, and helps them rise beautifully. Don’t skimp on this step!
- First Rise: Lightly oil a clean, large bowl with a little olive oil. Place the thoroughly kneaded dough into the bowl, turning it once or twice to ensure all sides are lightly coated with oil. This prevents it from sticking and drying out. Cover the bowl tightly with plastic wrap or a clean, damp kitchen towel. Find a warm, draft-free spot in your kitchen (like an oven with just the light on) and let the dough rise for 1 to 1.5 hours, or until it has visibly doubled in size. This slow, patient rise is where the dough develops most of its complex flavor and airy texture, making for truly superior homemade pastry.
- Punch Down and Rest: Once your dough has majestically doubled in size, gently punch it down to release the accumulated air. Turn the dough out onto a lightly floured surface and gently shape it into a loose ball. Cover it again with plastic wrap or simply invert the mixing bowl over it, and let it rest for another 10-15 minutes. This short resting period is important because it allows the gluten strands to relax after being handled, making the dough much easier to roll out evenly without snapping back excessively. This makes for a much smoother assembly process for your individual Homemade Hot Pockets.
Preparing the Delicious Filling for Your Homemade Hot Pockets
While your fantastic dough is on its first rise, this is the absolute perfect time to prepare the savory, cheesy filling for your Homemade Hot Pockets. This classic pepperoni and cheese combination is undeniably a crowd-pleaser and offers that nostalgic flavor we all love, but feel free to get creative with your own fillings later on! The crucial keys here are to ensure your filling isn’t overly wet (to prevent a soggy pocket) and to avoid overfilling.
- Sauté Pepperoni (Optional, but Recommended): In a medium skillet, heat 1 tablespoon of olive oil over medium heat. Add the sliced pepperoni and cook for 3-5 minutes, stirring occasionally, until it becomes slightly crispy around the edges and has rendered some of its flavorful fat. This step is a game-changer as it enhances the pepperoni’s flavor and texture, preventing it from making your finished Homemade Hot Pockets greasy and soggy. Once cooked, transfer the pepperoni to a plate lined with a paper towel to drain any excess fat. Let it cool slightly before mixing with other ingredients.
- Prepare the Sauce: In a small bowl, combine your marinara sauce (or pizza sauce), dried oregano, garlic powder, and a pinch of red pepper flakes if you enjoy a little warmth. Stir all these ingredients together until well combined. This simple seasoning really elevates a basic store-bought sauce, giving it a much more robust and homemade feel. You want a flavorful sauce, but also one that isn’t overly runny, as too much moisture can compromise the integrity of your savory pockets.
- Combine Filling Ingredients: In a large mixing bowl, combine the cooled, crispy pepperoni with the shredded mozzarella cheese, shredded provolone cheese, and grated Parmesan cheese. Give everything a good, gentle mix to ensure that all the ingredients are evenly distributed. This ensures you get a wonderful balance of cheese and pepperoni in every single bite of your future Homemade Hot Pockets.
- Lightly Sauce the Filling: Now, add about half of your seasoned marinara sauce to the cheese and pepperoni mixture. Mix gently until the sauce just coats the ingredients. You don’t want to drown the filling in sauce; just enough to bind it all together and provide that essential, tangy pizza flavor. We’ll add a little more sauce directly to the dough during assembly, which is my preferred two-stage saucing method. This helps control the overall moisture content within your DIY Hot Pockets, ensuring a perfectly cooked pocket every time.
Assembling Your Homemade Hot Pockets
This is where the magic truly comes to life! You’re about to transform your perfectly risen dough and delectable filling into individual, portable pockets of pure goodness. Take your time with this step, especially with the sealing, to ensure your Homemade Hot Pockets hold together perfectly and all that delightful filling stays securely inside during baking.
- Preheat Oven and Prepare Baking Sheets: Before you start assembling, preheat your oven to a steady 400°F (200°C). Line two large baking sheets with parchment paper. This simple step is a lifesaver, as it not only prevents sticking but also makes cleanup incredibly easy after you’ve enjoyed your magnificent creation.
- Roll Out the Dough: On a lightly floured surface, gently divide your rested dough into 6 equal pieces. Roll each piece into a neat ball. Working with one dough ball at a time (keep the others covered to prevent drying), roll it out into an approximately 6×8-inch rectangle. Aim for a consistent thickness of about 1/8 to 1/4 inch. Try your best to keep the edges as straight as possible, as this will significantly aid in the sealing process later. A thin, even dough ensures a wonderfully crispy crust for your finished Homemade Hot Pockets.
- Prepare for Filling: Lightly brush the very edges (about a 1/2-inch border) of each dough rectangle with a little water using your finger or a small pastry brush. This creates a natural, sticky seal that is absolutely essential for keeping all that delicious, molten filling securely inside your pockets during baking.
- Add Sauce and Filling: Now for the good part! Spoon about 1-2 tablespoons of the remaining seasoned marinara sauce onto one half of each dough rectangle, leaving that generous 1/2-inch border around the edges free of sauce. Then, pile approximately 1/2 cup of your prepared cheese and pepperoni mixture over the sauce. This is crucial: do not overfill! Overfilling is one of the most common mistakes, and it almost guarantees a burst pocket during baking. You want enough filling to be satisfying, but not so much that you can’t securely close and seal the edges.
- Fold and Seal: Carefully fold the other half of the dough over the filling, aligning the edges as precisely as possible. Gently press down all around the edges with your fingers to seal the pocket. For an extra secure seal and a lovely decorative touch, use the tines of a fork to press down firmly all around the entire border. This step is paramount for preventing any leaks or oozing during baking, ensuring your Homemade Hot Pockets are perfectly contained and maintain their integrity.
- Vent and Place on Baking Sheet: Using a sharp knife or a small paring knife, make 2-3 small slits on the top surface of each pocket. These vents are important as they allow steam to escape during baking, which prevents the pockets from puffing up excessively and potentially bursting. Carefully transfer the assembled Homemade Hot Pockets to your prepared baking sheets, ensuring you leave about 2 inches of space between each one to allow for even baking and proper air circulation.
Baking Your Perfect Homemade Hot Pockets
Now comes the most anticipated moment of truth! Baking these beauties to a gorgeous golden-brown perfection. The intoxicating aroma that will soon fill your kitchen during this stage is simply divine and serves as a delicious testament to the superiority of Homemade Hot Pockets over any pre-made version.
- Prepare Egg Wash: In a small bowl, whisk together the large egg and 1 tablespoon of water or milk until well combined. This simple egg wash is magical; it will give your Homemade Hot Pockets a beautiful, glossy golden shine and contribute to a slightly crisper, more professional-looking crust.
- Brush and Top: Generously brush the tops of each assembled pocket with the egg wash. If desired, this is the perfect time to sprinkle a little dried Italian herbs or garlic powder over the egg wash for an extra layer of flavor and enhanced visual appeal.
- Bake: Place the baking sheets with your pockets into the preheated oven. Bake the Homemade Hot Pockets for 18-25 minutes, or until the crust is deeply golden brown all over and you can see the delicious filling bubbling gently inside through the vents. Baking times can vary slightly depending on the nuances of your particular oven, so it’s always wise to keep a close eye on them towards the end. You’re aiming for that lovely, rich golden color, not just a pale, underbaked dough.
- Cool Slightly: Once baked to perfection, carefully remove the baking sheets from the oven. Resist the urge to dive in immediately! Let the Homemade Hot Pockets cool on the baking sheets for at least 5-10 minutes before serving. This crucial cooling time is essential for two important reasons: firstly, the filling will be incredibly, dangerously hot, and secondly, it allows the cheese and other filling ingredients to set slightly, preventing them from oozing out excessively when you take that first glorious, satisfying bite.
Serving and Storing Your Homemade Hot Pockets
Congratulations! You’ve successfully navigated the wonderful journey of making your own batch of incredible Homemade Hot Pockets. Now, let’s talk about enjoying these savory delights and how to keep them fresh for future cravings.
- Serve Warm: These savory pockets are absolutely at their best when enjoyed warm, fresh out of the oven after their short cooling period. They are quite a complete and satisfying meal in themselves, but if you wish, you could serve them with an extra side of warm marinara for dipping, or alongside a simple, crisp green salad for a more balanced meal. The deep satisfaction of biting into a perfectly golden, cheesy, and incredibly flavorful Homemade Hot Pocket that you lovingly crafted yourself is truly unparalleled and far superior to any store-bought version.
- Storage: Should you be so lucky as to have any leftovers (it’s rare!), baked Homemade Hot Pockets can be stored in an airtight container in the refrigerator for up to 3-4 days.
- Reheating: To bring your leftover pockets back to their crispy, warm glory, you have a few excellent options:
- Oven (Recommended for Best Texture): Preheat your oven to 350°F (175°C). Place the chilled pockets directly on a baking sheet and heat for 10-15 minutes, or until they are warmed through and the crust has regained its desirable crispness. This is my absolute preferred method for restoring that fresh-baked quality.
- Air Fryer: If you have an air fryer, this is also a fantastic option! Place the pockets in a preheated air fryer at 325°F (160°C) for 5-7 minutes, checking halfway, until they are hot, crispy, and delicious once more.
- Microwave: While convenient for speed, be aware that the microwave will make the crust softer and less crispy. Heat for 30-60 seconds per pocket, or until warmed through. This is best if you’re truly in a hurry and don’t mind a softer crust on your DIY Hot Pockets.
- Freezing for Future Enjoyment: You can also freeze unbaked Homemade Hot Pockets for super quick and convenient meals later on. After you’ve completed assembly in step 16 (before brushing with egg wash and baking), place the raw pockets on a baking sheet and freeze them until they are completely solid (this usually takes about 2-3 hours). Once solid, transfer them to a freezer-safe bag or container, separating layers with parchment paper to prevent sticking. They can be stored for up to 2-3 months in the freezer.
- To Bake from Frozen: There’s no need to thaw! Preheat your oven to 400°F (200°C). Brush the frozen pockets with egg wash and bake for approximately 30-40 minutes, or until they are beautifully golden brown and thoroughly cooked through. You’ll need to add a bit more baking time compared to fresh pockets. The internal temperature of the filling should reach at least 165°F (74°C) for food safety.
Get Creative with Your Homemade Hot Pockets Fillings!
While the classic pepperoni and cheese filling is undoubtedly a timeless winner, the true beauty and endless joy of making Homemade Hot Pockets yourself lies in the boundless possibilities for customization! This is your kitchen, your canvas. Here are just a few ideas to spark your culinary imagination and inspire you to create even more incredible savory pastry pockets:
- Ham & Swiss/Cheddar Cheese: A delightful combination of finely diced cooked ham with shredded Swiss or sharp cheddar cheese, perhaps a tiny smear of Dijon mustard inside for a gourmet touch.
- Spinach & Feta: Lightly sautéed spinach (make sure it’s squeezed very well to remove all excess moisture!) mixed with crumbled feta cheese and a subtle hint of minced garlic. A Mediterranean-inspired delight!
- BBQ Chicken: Shredded cooked chicken mixed generously with your favorite tangy barbecue sauce and a generous helping of shredded cheddar cheese. A true comfort food classic.
- Philly Cheesesteak Style: Thinly sliced cooked steak, sautéed onions and bell peppers, combined with melted provolone or even a touch of Cheez Whiz for authenticity.
- Breakfast Pockets: Perfect for a make-ahead breakfast! Fill with fluffy scrambled eggs, cooked crumbled sausage or crispy bacon, and your favorite breakfast cheese like cheddar or Monterey Jack.
- Veggie Supreme: A vibrant mix of finely diced and sautéed mushrooms, colorful bell peppers, sweet onions, black olives, and mozzarella cheese, all bound together with a touch of your pizza sauce.
No matter what fantastic filling you ultimately choose for your next batch of Homemade Hot Pockets, always remember the golden rules for success: don’t overfill, ensure your filling isn’t too wet (especially with fresh vegetables), and seal those edges tightly to prevent any delicious escapes! Enjoy the immense satisfaction and incredible flavor of crafting these customizable, utterly delicious savory pockets right in your very own kitchen. You’ll quickly discover they taste infinitely better and are far more wholesome than anything you could ever pull from a freezer box, and you have complete control over the quality of every single ingredient. Happy baking, and enjoy every savory bite!

Conclusion:
And there you have it! We’ve journeyed through the steps to create something truly special, a culinary delight that promises to revolutionize your snack game. I truly believe that this recipe for Homemade Hot Pockets isn’t just another dish; it’s an experience, a commitment to superior flavor and wholesome ingredients that simply can’t be matched by anything store-bought. Forget those cardboard-like crusts and questionable fillings; what you’ve just learned to craft is a masterpiece of comfort food, brimming with your chosen deliciousness, encased in a perfectly golden, flaky crust. The aroma alone, as these bake in your oven, is enough to tell you that you’re on the brink of something truly unforgettable. It’s the kind of warmth and satisfaction that only comes from food made with care, right in your own kitchen.
Why These Are a Must-Try: Unbeatable Flavor and Freshness
What makes these Homemade Hot Pockets an absolute must-try? Firstly, it’s the unparalleled freshness. You control every ingredient, from the quality of the cheese to the spices in your sauce, ensuring a vibrant, authentic taste that’s miles ahead of anything mass-produced. Secondly, it’s the texture – that beautiful contrast between the crisp, tender crust and the molten, savory filling inside. It’s a sensory delight with every single bite. I promise you, once you taste the difference, there’s no going back. This recipe isn’t just about making food; it’s about elevating a classic comfort item into something truly gourmet, tailored exactly to your preferences. It brings joy, it fills the belly, and it satisfies that deep craving for something utterly delicious and undeniably homemade. Imagine biting into a perfectly golden pocket, steam rising, revealing a gooey, rich filling – that’s the magic we’re talking about here.
Endless Customization: Your Culinary Playground
One of the aspects I love most about this recipe is its incredible versatility. While the core technique remains the same, the filling possibilities are virtually limitless, making it a recipe you can return to again and again without ever getting bored. Think beyond the classic pepperoni and cheese! For a truly hearty meal, consider a chopped BBQ chicken filling, perhaps with a touch of smoked Gouda. Or, for a breakfast twist, imagine scrambled eggs, crispy bacon, and cheddar cheese tucked inside. Vegetarians will rejoice with options like sautéed spinach and feta, roasted Mediterranean vegetables with mozzarella, or even a spicy black bean and corn salsa filling. Don’t forget the cheese combinations either; Monterey Jack, provolone, or a sharp cheddar can each bring a unique character to your pockets. Experiment with different seasonings too – a pinch of Italian herbs, a dash of smoked paprika, or even a kick of chili flakes can transform the flavor profile entirely. And for dipping? While a warm marinara is always a winner, consider a creamy ranch, a tangy BBQ sauce, or even a zesty sriracha mayo to really elevate the experience. For a lighter touch, a crisp side salad or a simple cup of tomato soup makes for a perfect companion. These pockets are incredibly forgiving and encourage creativity, making them a fantastic canvas for whatever culinary inspiration strikes you.
Your Turn to Create and Share!
Now that you have all the knowledge and inspiration, it’s your turn to roll up your sleeves and bring these magnificent creations to life. I genuinely encourage you to try this recipe for yourself. Don’t be intimidated; the process is incredibly rewarding, and the results are truly worth every moment spent in the kitchen. There’s a special kind of pride that comes from serving up something so delicious, knowing you made it from scratch. Once you’ve whipped up your first batch of these amazing Homemade Hot Pockets, I would absolutely love to hear about your experience! What fillings did you choose? Did you invent a new favorite combination? Did you serve them with a special dipping sauce? Share your triumphs, your clever variations, and even any fun stories from your cooking adventure. Your feedback and creativity inspire me, and I can’t wait to see the wonderful dishes you create. Happy cooking, and get ready to enjoy the most incredible hot pockets you’ve ever tasted!
Homemade Hot Pockets
Homemade Hot Pockets are an easy and cheesy alternative to store-bought snacks. Perfect for lunches, quick dinners, or meal prep, these pockets are made with a simple yeast dough and stuffed with classic pizza fillings like beef pepperoni, mozzarella, and cheddar. Customize the fillings to your liking, and enjoy a warm, delicious treat anytime!
Ingredients
-
3 cups (360g) all-purpose flour, plus more for dusting
-
1 teaspoon instant or active dry yeast
-
1 teaspoon granulated sugar
-
1 teaspoon salt
-
2 tablespoons olive oil, plus extra for oiling the bowl
-
1 cup (240ml) warm water (about 105-115°F / 40-46°C)
-
1 tablespoon olive oil (for filling)
-
1/2 cup (120g) marinara sauce or your favorite pizza sauce
-
1/2 teaspoon dried oregano
-
1/4 teaspoon garlic powder
-
Pinch of red pepper flakes (optional)
-
4 ounces (approx. 115g) sliced beef pepperoni
-
1 1/2 cups (170g) shredded mozzarella cheese (high-moisture recommended)
-
1/2 cup (55g) shredded provolone cheese (or more mozzarella)
-
2 tablespoons grated Parmesan cheese
-
1 large egg (for egg wash)
-
1 tablespoon water or milk (for egg wash)
-
Optional: a sprinkle of dried Italian herbs or garlic powder for the top
Instructions
-
Step 1
In a large bowl, combine warm water, sugar, and yeast; let sit 5-10 min until foamy. Whisk flour and salt in a separate bowl. Add olive oil to yeast, then gradually mix in flour until a shaggy dough forms. -
Step 2
Transfer dough to a lightly floured surface and knead for 8-10 min (or 6-8 min in a stand mixer) until smooth and elastic, adding up to 1/2 cup extra flour if needed. Lightly oil a bowl, place dough, turn to coat, cover, and let rise in a warm place for 1-1.5 hours until doubled. -
Step 3
Gently punch down dough, shape into a ball, cover, and rest for 10-15 min. While dough rests, cook sliced beef pepperoni in 1 tbsp olive oil for 3-5 min until crispy; drain and cool. -
Step 4
In a small bowl, combine marinara sauce, oregano, garlic powder, and red pepper flakes. In a large bowl, mix cooled beef pepperoni with shredded mozzarella, provolone, and Parmesan cheeses. Add half of the seasoned marinara sauce to the cheese and beef pepperoni mixture; mix gently. -
Step 5
Preheat oven to 400°F (200°C). Line two baking sheets with parchment. Divide dough into 6 equal pieces. Roll each into an approx. 6×8-inch rectangle, 1/8 to 1/4 inch thick. -
Step 6
Lightly brush edges of each dough rectangle (1/2-inch border) with water. Spoon 1-2 tbsp of remaining marinara onto one half, leaving the border clear. Pile approx. 1/2 cup filling over sauce. Fold dough over filling, align edges, and press to seal. Crimp edges firmly with a fork. -
Step 7
Make 2-3 small slits on top of each pocket. Transfer to prepared baking sheets, leaving 2 inches between pockets. Whisk 1 large egg with 1 tbsp water/milk for egg wash. Brush tops of pockets generously with egg wash; sprinkle with Italian herbs or garlic powder if desired. -
Step 8
Bake for 18-25 min, or until crust is deeply golden brown and filling is bubbling. Remove from oven and cool on baking sheets for 5-10 min before serving. Leftovers store refrigerated for 3-4 days; reheat in oven (350°F for 10-15 min) or air fryer (325°F for 5-7 min) for best texture. Unbaked pockets can be frozen for up to 2-3 months; bake from frozen at 400°F for 30-40 min.
Important Information
Nutrition Facts (Per Serving)
It is important to consider this information as approximate and not to use it as definitive health advice.
Allergy Information
Please check ingredients for potential allergens and consult a health professional if in doubt.


Leave a Comment