
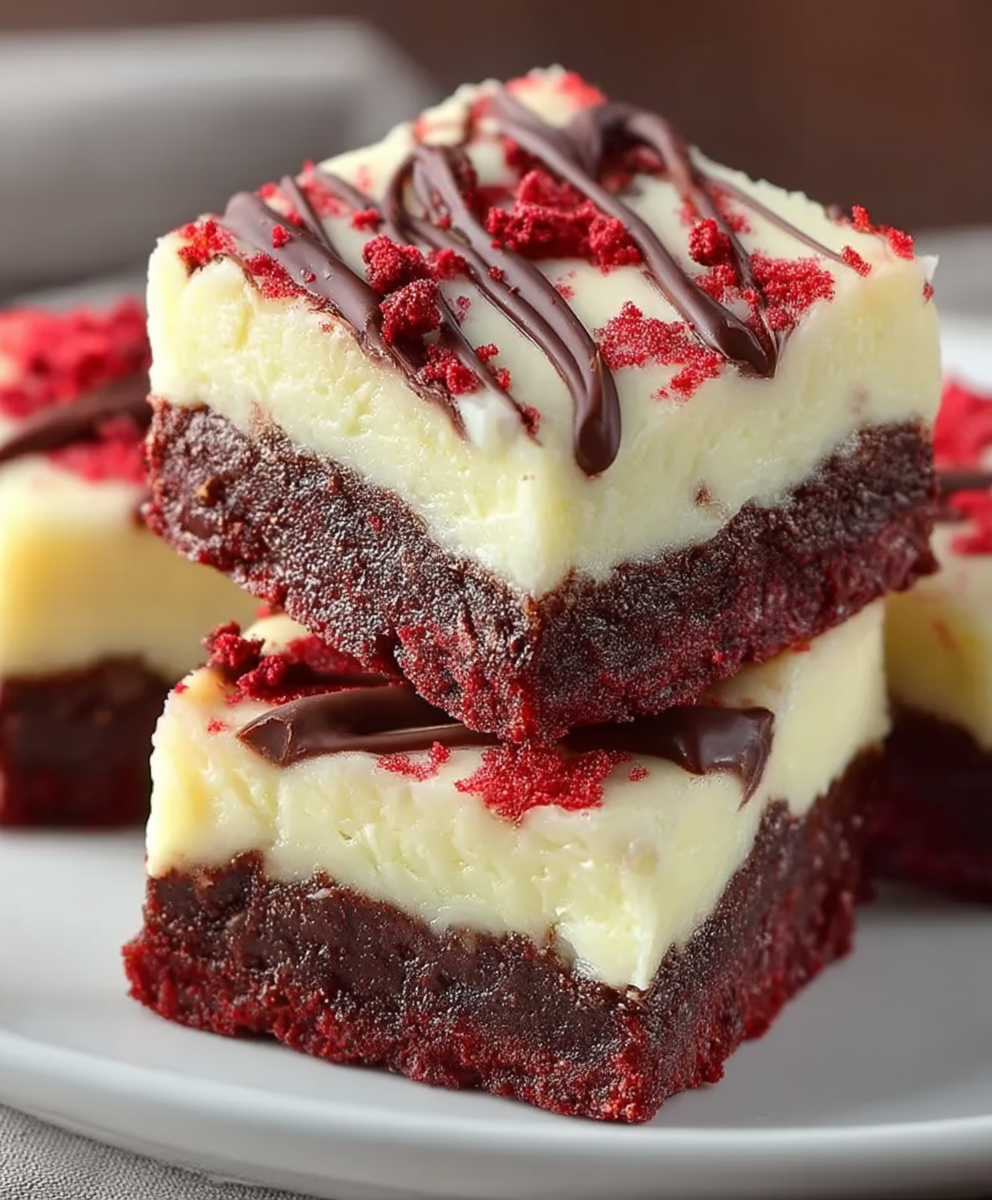
Red Velvet Cheesecake Brownies: Prepare to be utterly captivated by the most decadent dessert hybrid you’ve ever encountered! Imagine the fudgy, intensely chocolatey goodness of a brownie, swirled with the tangy, creamy richness of cheesecake, all infused with the unmistakable allure of red velvet. It’s a symphony of flavors and textures that will leave you craving more.
The history of red velvet cake itself is shrouded in a bit of mystery, with some attributing its origins to the Waldorf-Astoria Hotel in New York City during the early 20th century. Others point to a more Southern lineage, where the combination of buttermilk and cocoa powder created a “velvety” texture. Regardless of its exact beginnings, red velvet has become a beloved classic, synonymous with elegance and indulgence. And what better way to elevate this classic than by combining it with two other universally adored desserts?
People adore these Red Velvet Cheesecake Brownies for so many reasons. The contrasting layers offer a delightful textural experience the chewy brownie base, the smooth cheesecake swirl, and the slight tang of the red velvet. The flavor combination is simply irresistible: the deep chocolate notes, the creamy sweetness, and that subtle hint of cocoa that defines red velvet. Plus, they’re surprisingly easy to make, perfect for impressing guests or simply treating yourself to a little slice of heaven. Get ready to bake up a batch of these irresistible treats you won’t regret it!

Ingredients:
- For the Brownie Layer:
- 1 cup (2 sticks) unsalted butter, melted
- 2 cups granulated sugar
- 4 large eggs
- 1 tablespoon red food coloring
- 1 teaspoon vanilla extract
- 1 cup all-purpose flour
- ½ cup unsweetened cocoa powder
- ¼ teaspoon salt
- For the Cheesecake Layer:
- 16 ounces cream cheese, softened
- ½ cup granulated sugar
- 2 large eggs
- 1 teaspoon vanilla extract
Preparing the Brownie Layer
Okay, let’s get started with the brownie layer! This is the foundation of our delicious Red Velvet Cheesecake Brownies, so we want to make sure it’s perfect.
- Melt the Butter: First, melt your butter. You can do this in the microwave in 30-second intervals, stirring in between, or in a saucepan over low heat. Just make sure it’s completely melted but not browned.
- Combine Butter and Sugar: In a large bowl, whisk together the melted butter and granulated sugar until well combined. This step is important because it helps create that fudgy texture we all love in brownies.
- Add Eggs: Now, add the eggs one at a time, whisking well after each addition. This ensures that the eggs are fully incorporated and helps create a smooth batter.
- Incorporate Red Food Coloring and Vanilla: Stir in the red food coloring and vanilla extract. The red food coloring is what gives these brownies their signature red velvet hue, and the vanilla extract adds a lovely depth of flavor. Don’t be shy with the red food coloring; you want a vibrant red color!
- Combine Dry Ingredients: In a separate bowl, whisk together the all-purpose flour, unsweetened cocoa powder, and salt. Whisking helps to evenly distribute the cocoa powder and salt throughout the flour, preventing any clumps.
- Gradually Add Dry Ingredients to Wet Ingredients: Gradually add the dry ingredients to the wet ingredients, mixing until just combined. Be careful not to overmix, as this can lead to tough brownies. We want them to be fudgy and tender!
Preparing the Cheesecake Layer
Now, let’s move on to the cheesecake layer. This layer adds a creamy, tangy contrast to the rich brownie layer, making these brownies truly irresistible.
- Soften the Cream Cheese: Make sure your cream cheese is softened to room temperature before you start. This is crucial for creating a smooth and creamy cheesecake layer. If the cream cheese is too cold, it will be difficult to blend and may result in a lumpy mixture.
- Cream Cream Cheese and Sugar: In a medium bowl, beat the softened cream cheese and granulated sugar together until smooth and creamy. You can use a hand mixer or a stand mixer for this step. Just make sure to scrape down the sides of the bowl occasionally to ensure that everything is evenly mixed.
- Add Eggs: Add the eggs one at a time, beating well after each addition. Again, this ensures that the eggs are fully incorporated and helps create a smooth cheesecake batter.
- Incorporate Vanilla Extract: Stir in the vanilla extract. The vanilla extract enhances the flavor of the cheesecake layer and complements the red velvet brownie layer perfectly.
Assembling and Baking the Brownies
Alright, we’re almost there! Now it’s time to assemble our Red Velvet Cheesecake Brownies and get them into the oven.
- Prepare the Baking Pan: Preheat your oven to 350°F (175°C). Grease and flour a 9×13 inch baking pan. You can also line the pan with parchment paper, leaving an overhang on the sides, for easy removal.
- Pour Brownie Batter into Pan: Pour the brownie batter into the prepared baking pan and spread it evenly.
- Pour Cheesecake Batter over Brownie Batter: Gently pour the cheesecake batter over the brownie batter and spread it evenly. You can use a spatula or the back of a spoon to smooth it out.
- Create Swirls (Optional): If you want to create a marbled effect, you can use a knife or a toothpick to swirl the cheesecake batter into the brownie batter. Just drag the knife or toothpick through the batter in a swirling motion. Be careful not to overmix, as this can muddy the colors.
- Bake the Brownies: Bake in the preheated oven for 30-35 minutes, or until a toothpick inserted into the center comes out with moist crumbs. The cheesecake layer should be set, but still slightly jiggly.
- Cool Completely: Let the brownies cool completely in the pan before cutting and serving. This is important because the brownies will continue to set as they cool. If you try to cut them while they’re still warm, they may be too soft and gooey.
- Chill (Optional): For even cleaner cuts and a firmer texture, chill the brownies in the refrigerator for at least 2 hours before cutting. This will also help the flavors meld together even more.
- Cut and Serve: Once the brownies are completely cooled (and chilled, if desired), cut them into squares and serve. Enjoy!
Tips for Perfect Red Velvet Cheesecake Brownies
- Don’t Overbake: Overbaking is the enemy of fudgy brownies. Keep a close eye on them and remove them from the oven when a toothpick inserted into the center comes out with moist crumbs.
- Use High-Quality Ingredients: Using high-quality ingredients, especially cocoa powder and cream cheese, will make a big difference in the flavor and texture of your brownies.
- Adjust Red Food Coloring to Your Preference: The amount of red food coloring you use is up to you. If you prefer a more subtle red color, you can use less. If you want a more vibrant red color, you can use more.
- Experiment with Swirls: Get creative with your swirls! You can use different patterns and techniques to create a unique look.
- Store Properly: Store leftover brownies in an airtight container at room temperature for up to 3 days, or in the refrigerator for up to a week.
Variations
- Add Chocolate Chips: Stir chocolate chips into the brownie batter for an extra chocolatey treat.
- Add Nuts: Add chopped nuts, such as walnuts or pecans, to the brownie batter for added texture and flavor.
- Use Different Extracts: Experiment with different extracts, such as almond extract or peppermint extract, to create a unique flavor profile.
- Top with Frosting: Frost the brownies with cream cheese frosting or chocolate ganache for an extra decadent dessert.
Enjoy your delicious Red Velvet Cheesecake Brownies!
Conclusion:
And there you have it! These Red Velvet Cheesecake Brownies are truly a showstopper, a delightful fusion of textures and flavors that will leave everyone wanting more. From the fudgy, slightly tangy red velvet base to the creamy, decadent cheesecake swirl, every bite is an experience. I genuinely believe this recipe is a must-try for anyone who loves baking, or simply enjoys a good dessert. It’s the perfect treat for holidays, potlucks, or even just a special weekend indulgence.
But why is this recipe so special? It’s the perfect balance of sweet and tangy, rich and light. The red velvet brownie provides a deep, chocolatey flavor with a hint of tanginess that complements the sweet and creamy cheesecake swirl beautifully. Plus, the contrasting textures the fudgy brownie and the smooth cheesecake create a truly satisfying mouthfeel. It’s a guaranteed crowd-pleaser!
Now, let’s talk about serving suggestions and variations. These brownies are fantastic on their own, but you can definitely elevate them further. A dusting of powdered sugar adds a touch of elegance, while a scoop of vanilla ice cream takes them to the next level of decadence. For a festive touch, consider adding a sprinkle of red and white sprinkles, especially around the holidays.
If you’re feeling adventurous, you can also experiment with different variations. Try adding chocolate chips to the brownie batter for an extra dose of chocolatey goodness. Or, swirl in some raspberry jam along with the cheesecake for a fruity twist. You could even add a layer of crushed Oreos between the brownie and cheesecake layers for a cookies-and-cream vibe. The possibilities are endless!
For a truly decadent experience, consider serving these brownies slightly warm. The warmth enhances the fudgy texture of the brownie and makes the cheesecake even creamier. Just be careful not to overheat them, as the cheesecake can become runny. A few seconds in the microwave is usually all it takes.
I’m so excited for you to try this recipe! I poured my heart into perfecting it, and I truly believe you’ll love it as much as I do. Don’t be intimidated by the multiple layers it’s actually quite simple to make. Just follow the instructions carefully, and you’ll be rewarded with a batch of incredibly delicious Red Velvet Cheesecake Brownies.
I really encourage you to give this recipe a try. I know you won’t be disappointed. And please, don’t be shy about sharing your experience! I’d love to hear how they turned out for you. Did you make any variations? What did your friends and family think? Share your photos and comments on social media, and tag me so I can see your creations. I can’t wait to see your beautiful brownies! Happy baking! I am confident that this recipe for Red Velvet Cheesecake Brownies will become a new favorite in your household.
Red Velvet Cheesecake Brownies: The Ultimate Dessert Recipe
Fudgy red velvet brownies swirled with a creamy cheesecake layer for a decadent and irresistible treat.
Ingredients
- 1 cup (2 sticks) unsalted butter, melted
- 2 cups granulated sugar
- 4 large eggs
- 1 tablespoon red food coloring
- 1 teaspoon vanilla extract
- 1 cup all-purpose flour
- ½ cup unsweetened cocoa powder
- ¼ teaspoon salt
- 16 ounces cream cheese, softened
- ½ cup granulated sugar
- 2 large eggs
- 1 teaspoon vanilla extract
Instructions
- Melt the butter in the microwave or in a saucepan over low heat.
- In a large bowl, whisk together the melted butter and granulated sugar until well combined.
- Add the eggs one at a time, whisking well after each addition.
- Stir in the red food coloring and vanilla extract.
- In a separate bowl, whisk together the all-purpose flour, unsweetened cocoa powder, and salt.
- Gradually add the dry ingredients to the wet ingredients, mixing until just combined. Be careful not to overmix.
- Make sure your cream cheese is softened to room temperature.
- In a medium bowl, beat the softened cream cheese and granulated sugar together until smooth and creamy.
- Add the eggs one at a time, beating well after each addition.
- Stir in the vanilla extract.
- Preheat your oven to 350°F (175°C). Grease and flour a 9×13 inch baking pan.
- Pour the brownie batter into the prepared baking pan and spread it evenly.
- Gently pour the cheesecake batter over the brownie batter and spread it evenly.
- If desired, use a knife or toothpick to swirl the cheesecake batter into the brownie batter.
- Bake in the preheated oven for 30-35 minutes, or until a toothpick inserted into the center comes out with moist crumbs.
- Let the brownies cool completely in the pan before cutting and serving.
- For even cleaner cuts and a firmer texture, chill the brownies in the refrigerator for at least 2 hours before cutting.
- Once the brownies are completely cooled (and chilled, if desired), cut them into squares and serve.
Notes
- Don’t Overbake: Overbaking is the enemy of fudgy brownies. Keep a close eye on them and remove them from the oven when a toothpick inserted into the center comes out with moist crumbs.
- Use High-Quality Ingredients: Using high-quality ingredients, especially cocoa powder and cream cheese, will make a big difference in the flavor and texture of your brownies.
- Adjust Red Food Coloring to Your Preference: The amount of red food coloring you use is up to you. If you prefer a more subtle red color, you can use less. If you want a more vibrant red color, you can use more.
- Experiment with Swirls: Get creative with your swirls! You can use different patterns and techniques to create a unique look.
- Store Properly: Store leftover brownies in an airtight container at room temperature for up to 3 days, or in the refrigerator for up to a week.
Leave a Comment