
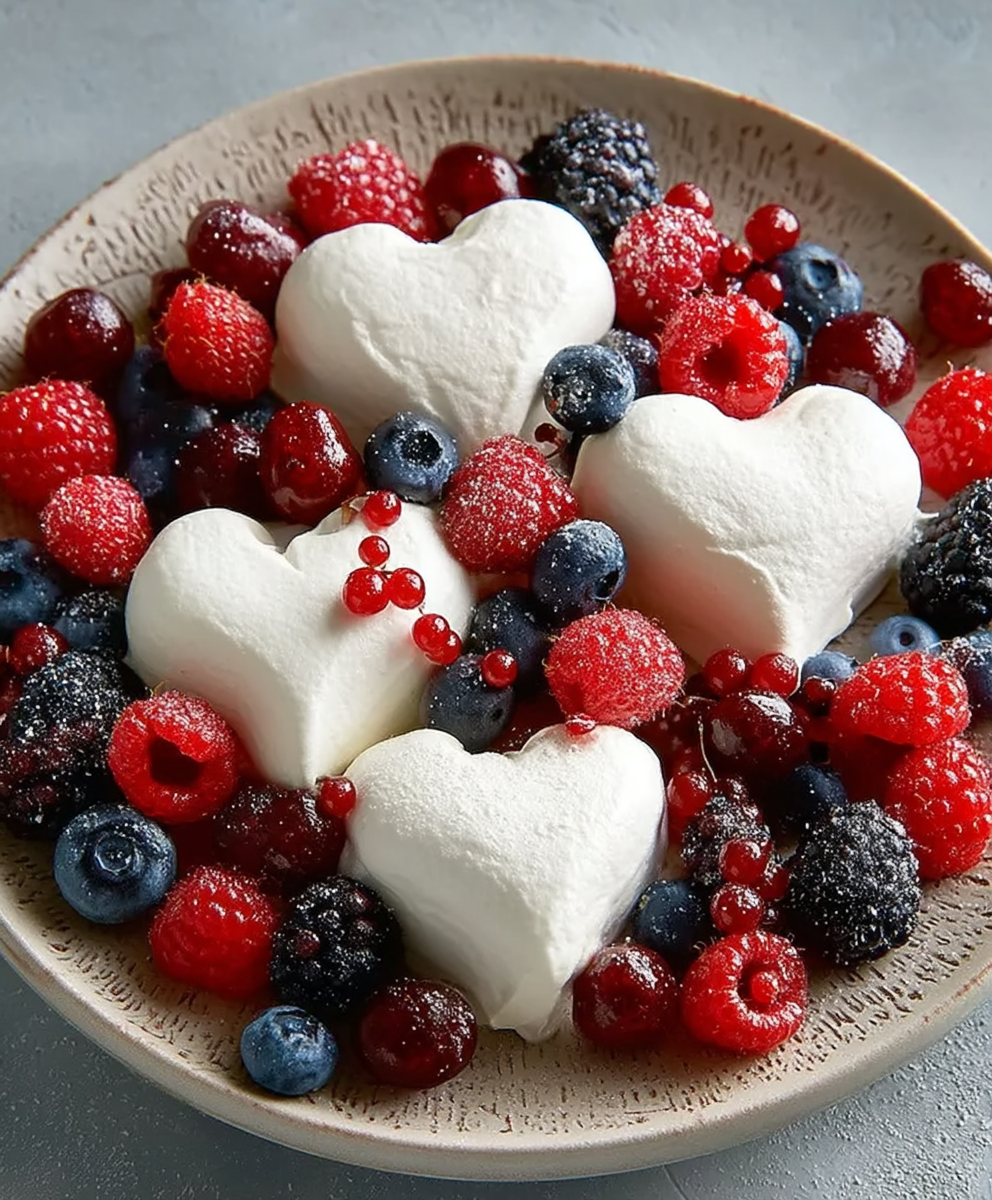
Heart Shaped Meringue Kisses: Aren’t they the sweetest little tokens of affection you can bake? Imagine presenting a plate of these delicate, melt-in-your-mouth treats to your loved ones. These aren’t just cookies; they’re edible declarations of love!
Meringues, with their crisp exterior and airy interior, have a rich history dating back to the 17th century. Legend has it that they were invented by a Swiss pastry chef named Gasparini in Meiringen, Switzerland hence the name! Over the centuries, meringues have evolved into countless variations, from towering Pavlovas to simple, elegant cookies. But there’s something particularly special about shaping them into hearts. It elevates them from a simple dessert to a thoughtful, handcrafted gift.
What makes these Heart Shaped Meringue Kisses so irresistible? It’s the delightful contrast of textures the initial satisfying crunch gives way to a cloud-like sweetness that dissolves on your tongue. They’re also incredibly versatile! You can flavor them with vanilla, almond, or even a hint of citrus. Plus, they’re naturally gluten-free, making them a perfect treat for those with dietary restrictions. But beyond all that, it’s the simple joy of creating something beautiful and delicious that makes these little kisses so beloved. Let’s get baking!

Ingredients:
- 3 large egg whites, at room temperature
- ¾ cup granulated sugar
- ¼ teaspoon cream of tartar
- ? teaspoon salt
- ½ teaspoon vanilla extract (or other flavoring, like almond or peppermint)
- Pink or red gel food coloring (optional)
- Sprinkles (optional, for decorating)
Preparing the Meringue:
- Separate the Eggs: The most crucial step for perfect meringues is ensuring absolutely no yolk gets into the egg whites. Even a tiny bit of fat will prevent the whites from whipping up properly. I like to separate the eggs one at a time into a small bowl, then transfer the white to the mixing bowl. This way, if a yolk breaks, it only ruins one egg white.
- Bring Egg Whites to Room Temperature: Room temperature egg whites whip up to a greater volume than cold ones. Let your egg whites sit at room temperature for about 30 minutes before you start. This makes a noticeable difference in the final meringue.
- Combine Egg Whites, Cream of Tartar, and Salt: In a clean, grease-free bowl of a stand mixer (or a large bowl if using a hand mixer), combine the egg whites, cream of tartar, and salt. The cream of tartar helps stabilize the egg whites and prevents them from collapsing. The salt enhances the flavor.
- Whip to Soft Peaks: Using the whisk attachment, begin whipping the egg whites on medium speed. Whip until soft peaks form. Soft peaks will hold their shape briefly but will droop at the tip when the whisk is lifted.
- Gradually Add Sugar: With the mixer still running on medium speed, gradually add the granulated sugar, about a tablespoon at a time. It’s important to add the sugar slowly to allow it to dissolve properly into the egg whites. If you add it too quickly, the meringue can become grainy.
- Whip to Stiff, Glossy Peaks: Once all the sugar has been added, increase the mixer speed to medium-high. Continue whipping until stiff, glossy peaks form. Stiff peaks will stand straight up when the whisk is lifted and hold their shape firmly. The meringue should look smooth and glossy, not dull or grainy. This step usually takes about 5-7 minutes.
- Incorporate Vanilla Extract: Once the meringue has reached stiff peaks, reduce the mixer speed to low. Add the vanilla extract (or your flavoring of choice) and mix until just combined. Be careful not to overmix at this stage, as it can deflate the meringue.
- Add Food Coloring (Optional): If you want to make pink or red heart-shaped meringues, now is the time to add the gel food coloring. Add a small drop of gel food coloring to the meringue and gently fold it in with a spatula. Be careful not to overmix, as this can deflate the meringue. Add more coloring, a tiny drop at a time, until you reach your desired shade of pink or red. Remember that the color will intensify slightly during baking.
Piping the Meringue Kisses:
- Prepare the Piping Bag: Fit a piping bag with a large star tip (such as a Wilton 1M or similar). This will give your meringue kisses a beautiful, swirled shape.
- Fill the Piping Bag: Gently spoon the meringue into the piping bag. Be careful not to overfill the bag, as it can be difficult to control. Twist the top of the piping bag to seal it.
- Prepare the Baking Sheet: Line a baking sheet with parchment paper or a silicone baking mat. This will prevent the meringues from sticking to the baking sheet.
- Pipe the Heart Shapes: Hold the piping bag vertically, about ½ inch above the baking sheet. Squeeze the bag to create a small mound of meringue. Then, without lifting the tip, move the piping bag to the left and then to the right, creating two rounded shapes that meet in the middle to form a heart. Stop squeezing and lift the piping bag. Practice a few times on a separate piece of parchment paper if you’re not comfortable with piping.
- Add Sprinkles (Optional): If you want to add sprinkles, do so immediately after piping the meringues. The sprinkles will adhere best to the wet meringue.
Baking the Meringue Kisses:
- Preheat the Oven: Preheat your oven to 200°F (93°C). It’s crucial to bake meringues at a very low temperature to dry them out slowly without browning. An oven thermometer is highly recommended to ensure your oven temperature is accurate.
- Bake the Meringues: Place the baking sheet in the preheated oven and bake for 1 ½ to 2 hours, or until the meringues are dry and crisp. The baking time will vary depending on your oven and the size of the meringues.
- Check for Doneness: To check if the meringues are done, gently try to lift one off the parchment paper. If it comes off easily and feels dry and crisp, it’s done. If it sticks or feels soft, continue baking for another 15-20 minutes.
- Turn Off the Oven and Let Cool: Once the meringues are done, turn off the oven and prop the oven door open slightly with a wooden spoon or oven mitt. Let the meringues cool completely in the oven for at least 1 hour, or preferably overnight. This allows them to dry out completely and prevents them from cracking.
Storing the Meringue Kisses:
- Store in an Airtight Container: Once the meringues are completely cool, store them in an airtight container at room temperature. Meringues are very sensitive to moisture, so it’s important to keep them in a dry place.
- Avoid Humidity: Avoid storing meringues in a humid environment, as they will become sticky and soft.
- Shelf Life: Meringue kisses can be stored for up to 2 weeks in an airtight container at room temperature.
Tips for Perfect Meringues:
- Use a Clean, Grease-Free Bowl and Whisk: Any trace of fat will prevent the egg whites from whipping up properly. Make sure your bowl and whisk are scrupulously clean and dry. I like to wipe them down with a bit of lemon juice or vinegar before starting.
- Use Room Temperature Egg Whites: Room temperature egg whites whip up to a greater volume than cold ones.
- Add Sugar Gradually: Adding the sugar slowly allows it to dissolve properly into the egg whites, preventing a grainy texture.
- Don’t Overmix: Overmixing the meringue after adding the vanilla extract or food coloring can deflate it.
- Bake at a Low Temperature: Baking meringues at a very low temperature dries them out slowly without browning.
- Cool Completely in the Oven: Letting the meringues cool completely in the oven prevents them from cracking.
Troubleshooting:
- Meringues are sticky: This is usually caused by humidity. Store them in a very airtight container with a desiccant packet if you live in a humid climate.
- Meringues are cracking: This can be caused by baking them at too high a temperature or cooling them too quickly. Make sure your oven temperature is accurate and let them cool completely in the oven.
- Meringues are browning: This is also caused by baking them at too high a temperature. Reduce the oven temperature and check your oven thermometer.
- Meringue didn’t whip up properly: This is usually caused by fat contamination. Make sure no yolk got into the egg whites and that your bowl and whisk are clean and grease-free.
Conclusion:
And there you have it! These Heart Shaped Meringue Kisses are more than just a pretty treat; they’re a delightful experience from start to finish. The delicate crunch, the melt-in-your-mouth sweetness, and the adorable heart shape make them absolutely irresistible. If you’re looking for a show-stopping dessert that’s surprisingly easy to make, this is it. Trust me, these little kisses will steal the show at any Valentine’s Day celebration, bridal shower, or even just a special afternoon tea.
But why are these meringue kisses a must-try? It’s simple: they’re versatile, impressive, and utterly delicious. The recipe is straightforward, using readily available ingredients, and the visual impact is stunning. Imagine presenting a platter of these perfectly formed hearts the “oohs” and “aahs” will be worth every minute spent in the kitchen. Plus, they’re naturally gluten-free, making them a great option for those with dietary restrictions.
Beyond the basic recipe, there’s a world of possibilities to explore! For a richer flavor, try adding a teaspoon of vanilla extract or almond extract to the meringue mixture. A pinch of sea salt can also enhance the sweetness and create a more complex flavor profile. If you’re feeling adventurous, experiment with different food colorings to create a rainbow of heart-shaped delights. Think pastel pinks, vibrant reds, or even a sophisticated ombre effect.
Serving suggestions? Oh, the options are endless! These Heart Shaped Meringue Kisses are perfect on their own as a light and airy dessert. You can also use them to garnish cakes, cupcakes, or even a bowl of ice cream. For a truly decadent treat, sandwich two kisses together with a dollop of whipped cream or chocolate ganache. They also make a beautiful addition to a dessert charcuterie board, adding a touch of elegance and whimsy. Consider packaging them in small cellophane bags tied with ribbon for a charming homemade gift.
Another fun variation is to dip the finished kisses in melted chocolate. Simply melt your favorite chocolate (dark, milk, or white) and dip the bottom half of each kiss into the chocolate. Place them on a parchment-lined baking sheet and let the chocolate set completely. This adds a layer of richness and texture that complements the delicate meringue perfectly. You can even sprinkle the chocolate with chopped nuts, sprinkles, or sea salt for an extra touch of flair.
I truly believe that everyone should experience the joy of making these Heart Shaped Meringue Kisses at least once. They’re a testament to the fact that simple ingredients, when combined with a little bit of love and attention, can create something truly magical.
So, what are you waiting for? Gather your ingredients, preheat your oven, and get ready to embark on a meringue-making adventure! I’m confident that you’ll be delighted with the results.
And most importantly, I’d love to hear about your experience! Did you try any of the variations I suggested? Did you encounter any challenges along the way? Share your photos, tips, and stories in the comments below. Let’s create a community of meringue-loving bakers and inspire each other to create even more delicious and beautiful treats. Happy baking!
Heart Shaped Meringue Kisses: A Sweet Valentine's Day Treat
Delicate heart-shaped meringue kisses, perfect for Valentine's Day. Light, airy, and surprisingly easy to make with simple ingredients.
Ingredients
- 3 large egg whites, at room temperature
- ¾ cup granulated sugar
- ¼ teaspoon cream of tartar
- ? teaspoon salt
- ½ teaspoon vanilla extract (or other flavoring, like almond or peppermint)
- Pink or red gel food coloring (optional)
- Sprinkles (optional, for decorating)
Instructions
- Separate the Eggs: Separate the eggs, ensuring no yolk gets into the egg whites.
- Bring Egg Whites to Room Temperature: Let egg whites sit at room temperature for about 30 minutes.
- Combine Egg Whites, Cream of Tartar, and Salt: In a clean, grease-free bowl, combine the egg whites, cream of tartar, and salt.
- Whip to Soft Peaks: Whip the egg whites on medium speed until soft peaks form.
- Gradually Add Sugar: Gradually add the granulated sugar, about a tablespoon at a time, while the mixer is running on medium speed.
- Whip to Stiff, Glossy Peaks: Increase the mixer speed to medium-high and continue whipping until stiff, glossy peaks form (about 5-7 minutes).
- Incorporate Vanilla Extract: Reduce the mixer speed to low, add the vanilla extract, and mix until just combined.
- Add Food Coloring (Optional): Add a small drop of gel food coloring and gently fold it in with a spatula until you reach your desired shade.
- Prepare the Piping Bag: Fit a piping bag with a large star tip.
- Fill the Piping Bag: Gently spoon the meringue into the piping bag.
- Prepare the Baking Sheet: Line a baking sheet with parchment paper or a silicone baking mat.
- Pipe the Heart Shapes: Hold the piping bag vertically and pipe heart shapes onto the baking sheet.
- Add Sprinkles (Optional): Add sprinkles immediately after piping.
- Preheat the Oven: Preheat your oven to 200°F (93°C).
- Bake the Meringues: Place the baking sheet in the preheated oven and bake for 1 ½ to 2 hours, or until the meringues are dry and crisp.
- Check for Doneness: Gently try to lift one off the parchment paper. If it comes off easily and feels dry and crisp, it’s done.
- Turn Off the Oven and Let Cool: Turn off the oven and prop the oven door open slightly. Let the meringues cool completely in the oven for at least 1 hour, or preferably overnight.
- Store in an Airtight Container: Store the meringues in an airtight container at room temperature.
Notes
- Use a clean, grease-free bowl and whisk.
- Add sugar gradually to prevent a grainy texture.
- Don’t overmix after adding vanilla or food coloring.
- Bake at a low temperature to dry them out without browning.
- Cool completely in the oven to prevent cracking.
- Store in a dry place to avoid stickiness.
Leave a Comment