
No Bake Strawberry Cheesecake: the very words conjure up images of creamy, dreamy indulgence, don’t they? Forget slaving over a hot oven this recipe is your express ticket to dessert heaven, perfect for those warm summer days or any time you crave a sweet treat without the fuss.
Cheesecake, in its baked form, has a history stretching back to ancient Greece, where it was reportedly served to athletes during the Olympic Games! While our no-bake version might not have quite the same ancient pedigree, it certainly shares the same spirit of celebratory deliciousness. The beauty of a No Bake Strawberry Cheesecake lies in its simplicity. It’s a modern twist on a classic, embracing convenience without sacrificing flavor.
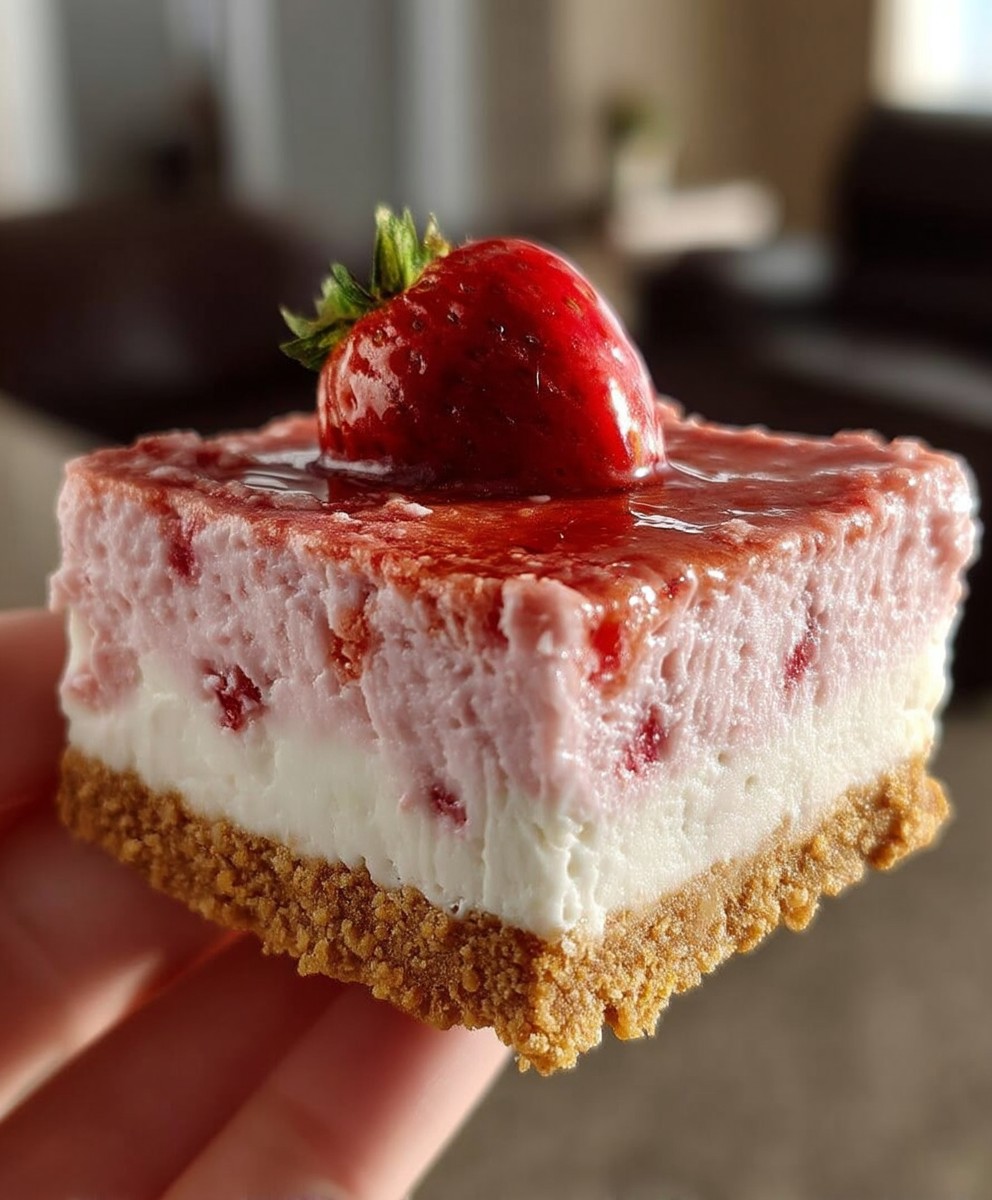
What’s not to love? The creamy, tangy cheesecake filling, perfectly balanced by the sweet and slightly tart strawberries, creates a symphony of flavors that dance on your tongue. The buttery graham cracker crust provides a delightful textural contrast, adding a satisfying crunch to each bite. Plus, let’s be honest, the sheer ease of preparation makes this dessert a winner. Whether you’re a seasoned baker or a kitchen novice, you can whip up this show-stopping dessert with minimal effort and maximum reward. Get ready to impress your friends and family with this irresistible, no-bake delight!

Ingredients:
- For the Crust:
- 1 ½ cups graham cracker crumbs (about 12 full sheets)
- 5 tablespoons (70g) unsalted butter, melted
- ¼ cup (50g) granulated sugar
- Pinch of salt
- For the Cheesecake Filling:
- 24 ounces (680g) cream cheese, softened to room temperature
- 1 ½ cups (300g) granulated sugar
- 1 teaspoon vanilla extract
- ½ teaspoon lemon juice
- 1 cup (240ml) heavy cream, cold
- 1 cup (227g) sour cream, room temperature
- For the Strawberry Topping:
- 1 pound (450g) fresh strawberries, hulled and sliced
- ¼ cup (50g) granulated sugar
- 1 tablespoon lemon juice
- 1 tablespoon cornstarch
- 2 tablespoons water
Preparing the Graham Cracker Crust
- Combine the dry ingredients: In a medium bowl, I like to start by mixing together the graham cracker crumbs, granulated sugar, and a pinch of salt. Make sure everything is evenly distributed. This ensures a consistent flavor throughout the crust.
- Add the melted butter: Pour the melted butter into the bowl with the dry ingredients. Use a fork or your fingers to thoroughly combine the butter with the crumbs. You want the mixture to resemble wet sand. This is crucial for the crust to hold its shape.
- Press the crust into the pan: Transfer the graham cracker mixture into a 9-inch springform pan. I find that using the bottom of a measuring cup or a flat-bottomed glass helps to evenly press the crumbs into the bottom of the pan. Make sure to press firmly to create a compact and sturdy base. You can also press the mixture slightly up the sides of the pan for a more defined crust edge, but this is optional.
- Chill the crust: Place the prepared crust in the refrigerator for at least 30 minutes. This allows the butter to solidify, which will help the crust hold its shape when you add the cheesecake filling. You can also freeze the crust for 15 minutes for a quicker chilling process.
Making the No-Bake Cheesecake Filling
- Beat the cream cheese: In a large bowl, using an electric mixer (either a stand mixer or a hand mixer), beat the softened cream cheese until it is smooth and creamy. This is a very important step! If your cream cheese isn’t soft enough, you’ll end up with lumps in your cheesecake. I usually beat it for about 2-3 minutes on medium speed.
- Add the sugar: Gradually add the granulated sugar to the cream cheese, beating on medium speed until well combined and the mixture is smooth. Again, make sure there are no lumps. Scrape down the sides of the bowl as needed to ensure everything is evenly incorporated.
- Incorporate the vanilla and lemon juice: Add the vanilla extract and lemon juice to the cream cheese mixture. Beat on low speed until just combined. The lemon juice adds a subtle tang that balances the sweetness of the cheesecake.
- Whip the heavy cream: In a separate clean and dry bowl, using the electric mixer, beat the cold heavy cream until stiff peaks form. This is what gives the cheesecake its light and airy texture. Be careful not to overwhip the cream, or it will turn into butter!
- Fold in the sour cream: Gently fold in the sour cream into the cream cheese mixture. The sour cream adds moisture and a slight tang to the cheesecake. Be careful not to overmix, as this can deflate the whipped cream.
- Fold in the whipped cream: Gently fold the whipped cream into the cream cheese mixture in two additions. This is the key to a light and airy no-bake cheesecake. Be very gentle and avoid overmixing, as you want to keep the air in the whipped cream.
- Pour the filling into the crust: Pour the cheesecake filling over the chilled graham cracker crust. Use a spatula to spread the filling evenly.
- Chill the cheesecake: Cover the cheesecake with plastic wrap and refrigerate for at least 6 hours, or preferably overnight. This allows the cheesecake to set completely. The longer it chills, the firmer it will be.
Preparing the Strawberry Topping
- Combine strawberries and sugar: In a medium saucepan, combine the sliced strawberries and granulated sugar. Stir gently to coat the strawberries with the sugar.
- Cook the strawberries: Cook the strawberry mixture over medium heat, stirring occasionally, until the strawberries release their juices and the mixture begins to simmer. This usually takes about 5-7 minutes.
- Add lemon juice: Stir in the lemon juice. The lemon juice enhances the flavor of the strawberries and helps to prevent them from becoming too sweet.
- Make a cornstarch slurry: In a small bowl, whisk together the cornstarch and water until smooth. This will help to thicken the strawberry topping.
- Thicken the topping: Pour the cornstarch slurry into the simmering strawberry mixture. Stir constantly until the mixture thickens. This usually takes about 1-2 minutes. Be careful not to overcook the topping, as it will become too thick.
- Cool the topping: Remove the saucepan from the heat and let the strawberry topping cool completely. As it cools, it will thicken further.
Assembling the No-Bake Strawberry Cheesecake
- Remove the cheesecake from the refrigerator: Once the cheesecake has chilled completely, carefully remove it from the springform pan. Run a thin knife around the edge of the pan to loosen the cheesecake before releasing the sides.
- Top with strawberry topping: Spoon the cooled strawberry topping over the top of the cheesecake. Spread it evenly to cover the entire surface.
- Serve and enjoy: Slice the cheesecake and serve immediately. You can garnish with additional fresh strawberries or a sprig of mint, if desired. This no-bake strawberry cheesecake is best enjoyed cold.
Conclusion:
This No Bake Strawberry Cheesecake isn’t just a dessert; it’s a summer dream on a plate, and I truly believe you absolutely need to experience it. From the satisfying crunch of the graham cracker crust to the creamy, tangy cheesecake filling bursting with fresh strawberry flavor, every bite is a little slice of heaven. And the best part? No oven required! That’s right, you can whip up this impressive dessert without breaking a sweat, making it perfect for those hot days when you crave something sweet but don’t want to heat up your kitchen.
But why is this particular recipe a must-try? It’s all about the balance. We’ve carefully crafted the recipe to ensure the perfect ratio of sweetness to tanginess, creating a flavor profile that’s both refreshing and indulgent. The texture is also key the smooth, velvety cheesecake filling contrasts beautifully with the slightly crumbly crust, providing a delightful sensory experience. Plus, the vibrant red of the fresh strawberries adds a pop of color that makes this dessert visually stunning. Its a guaranteed crowd-pleaser, whether you’re serving it at a backyard barbecue, a family gathering, or simply enjoying a quiet evening at home.
Looking for serving suggestions? I’ve got you covered! For an extra touch of elegance, try topping each slice with a dollop of freshly whipped cream and a few extra strawberry slices. A drizzle of chocolate sauce or a sprinkle of chopped nuts would also be delicious additions. If you’re feeling adventurous, you could even create a strawberry coulis by blending some strawberries with a little sugar and lemon juice, then drizzling it over the cheesecake.
And speaking of variations, the possibilities are endless! If you’re not a fan of strawberries (although I can’t imagine why!), you can easily substitute them with other berries like raspberries, blueberries, or blackberries. You could also add a layer of chocolate ganache to the bottom of the crust for a decadent twist. Or, for a more tropical flavor, try using mangoes or pineapples instead of strawberries. You can even experiment with different types of crusts, such as Oreo cookies or shortbread cookies. The beauty of this No Bake Strawberry Cheesecake is that it’s incredibly versatile and can be easily adapted to suit your own taste preferences.
I’m so excited for you to try this recipe and experience the joy of creating your own delicious No Bake Strawberry Cheesecake. It’s a simple, satisfying, and utterly irresistible dessert that’s sure to become a new favorite.
So, what are you waiting for? Gather your ingredients, follow the easy steps, and get ready to indulge in a truly unforgettable treat. And don’t forget to share your creations with me! I’d love to see your photos and hear about your experiences. Tag me on social media and let me know what variations you tried. Happy baking (or rather, no-baking!) and enjoy every single bite! I am confident that you will love this recipe as much as I do. Let me know in the comments below how it turned out for you!
No Bake Strawberry Cheesecake: The Easiest Dessert Recipe
A creamy, no-bake cheesecake with a buttery graham cracker crust and a sweet, homemade strawberry topping. Perfect for a refreshing dessert!
Ingredients
- 1 ½ cups graham cracker crumbs (about 12 full sheets)
- 5 tablespoons (70g) unsalted butter, melted
- ¼ cup (50g) granulated sugar
- Pinch of salt
- 24 ounces (680g) cream cheese, softened to room temperature
- 1 ½ cups (300g) granulated sugar
- 1 teaspoon vanilla extract
- ½ teaspoon lemon juice
- 1 cup (240ml) heavy cream, cold
- 1 cup (227g) sour cream, room temperature
- 1 pound (450g) fresh strawberries, hulled and sliced
- ¼ cup (50g) granulated sugar
- 1 tablespoon lemon juice
- 1 tablespoon cornstarch
- 2 tablespoons water
Instructions
- In a medium bowl, mix together the graham cracker crumbs, granulated sugar, and a pinch of salt.
- Pour the melted butter into the bowl with the dry ingredients. Use a fork or your fingers to thoroughly combine the butter with the crumbs until the mixture resembles wet sand.
- Transfer the graham cracker mixture into a 9-inch springform pan. Use the bottom of a measuring cup or a flat-bottomed glass to evenly press the crumbs into the bottom of the pan. Press firmly to create a compact and sturdy base. You can also press the mixture slightly up the sides of the pan for a more defined crust edge, but this is optional.
- Place the prepared crust in the refrigerator for at least 30 minutes. You can also freeze the crust for 15 minutes for a quicker chilling process.
- In a large bowl, using an electric mixer (either a stand mixer or a hand mixer), beat the softened cream cheese until it is smooth and creamy (about 2-3 minutes on medium speed).
- Gradually add the granulated sugar to the cream cheese, beating on medium speed until well combined and the mixture is smooth. Scrape down the sides of the bowl as needed.
- Add the vanilla extract and lemon juice to the cream cheese mixture. Beat on low speed until just combined.
- In a separate clean and dry bowl, using the electric mixer, beat the cold heavy cream until stiff peaks form. Be careful not to overwhip the cream.
- Gently fold in the sour cream into the cream cheese mixture. Be careful not to overmix.
- Gently fold the whipped cream into the cream cheese mixture in two additions. Be very gentle and avoid overmixing.
- Pour the cheesecake filling over the chilled graham cracker crust. Use a spatula to spread the filling evenly.
- Cover the cheesecake with plastic wrap and refrigerate for at least 6 hours, or preferably overnight.
- In a medium saucepan, combine the sliced strawberries and granulated sugar. Stir gently to coat the strawberries with the sugar.
- Cook the strawberry mixture over medium heat, stirring occasionally, until the strawberries release their juices and the mixture begins to simmer (about 5-7 minutes).
- Stir in the lemon juice.
- In a small bowl, whisk together the cornstarch and water until smooth.
- Pour the cornstarch slurry into the simmering strawberry mixture. Stir constantly until the mixture thickens (about 1-2 minutes). Be careful not to overcook the topping.
- Remove the saucepan from the heat and let the strawberry topping cool completely.
- Once the cheesecake has chilled completely, carefully remove it from the springform pan. Run a thin knife around the edge of the pan to loosen the cheesecake before releasing the sides.
- Spoon the cooled strawberry topping over the top of the cheesecake. Spread it evenly to cover the entire surface.
- Slice the cheesecake and serve immediately. You can garnish with additional fresh strawberries or a sprig of mint, if desired. This no-bake strawberry cheesecake is best enjoyed cold.
Notes
- Make sure the cream cheese is softened to room temperature to avoid lumps in the filling.
- Be careful not to overwhip the heavy cream.
- Chill the cheesecake for at least 6 hours, or preferably overnight, for best results.
- The strawberry topping will thicken as it cools.
Leave a Comment