
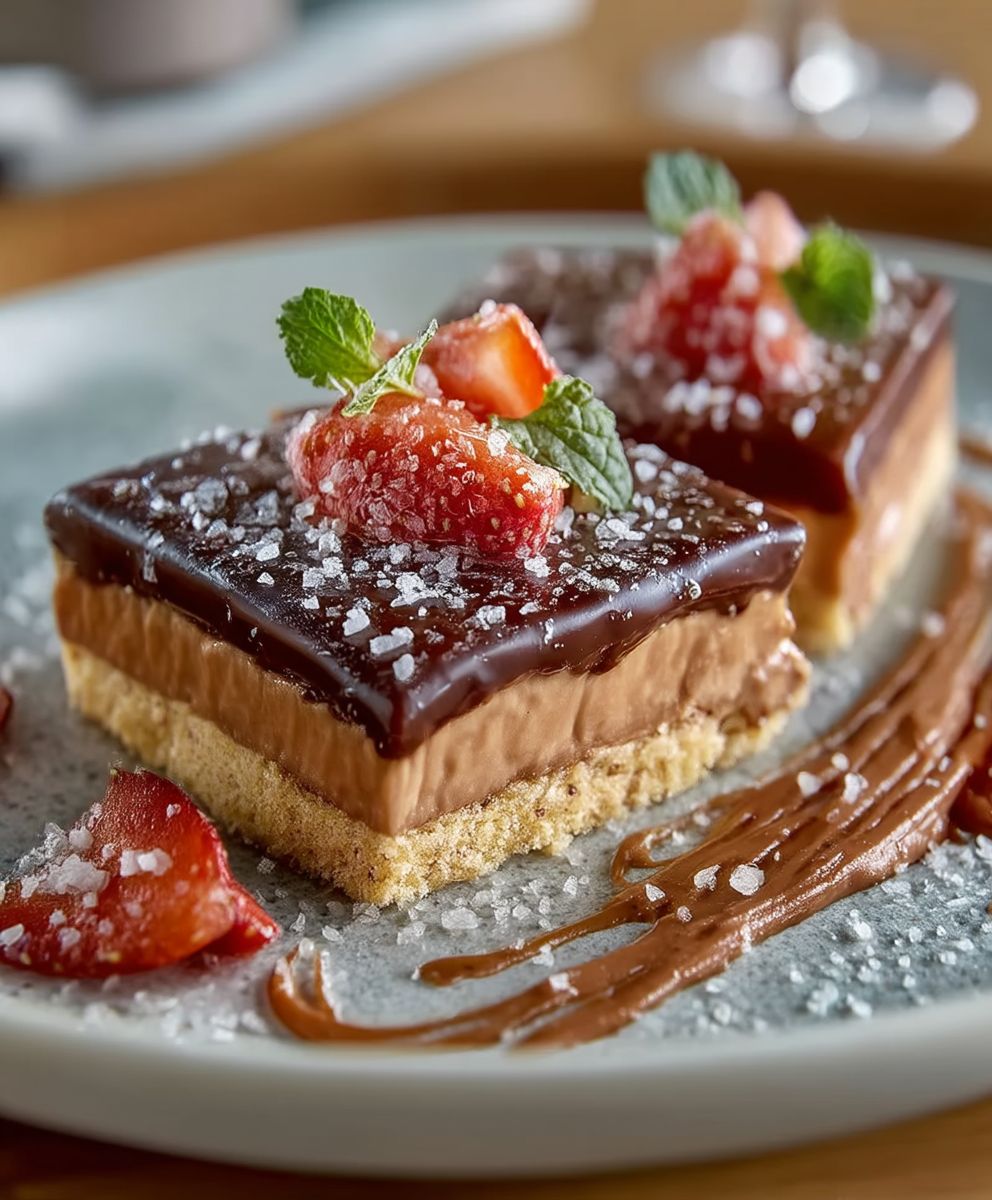
Salt River Dessert Bars: Prepare to be transported to a world of sweet, salty, and utterly irresistible indulgence! Have you ever craved a treat that perfectly balances contrasting flavors and textures? These bars are the answer. Imagine a buttery, crumbly shortbread crust topped with a layer of gooey caramel, studded with crunchy pecans and a generous sprinkle of sea salt. Its a symphony of sensations in every bite!
While the exact origins of these particular Salt River Dessert Bars are shrouded in a bit of mystery (perhaps a happy accident in a Southwestern kitchen?), the concept of combining sweet and salty flavors has a long and fascinating history. From salted caramels to chocolate-covered pretzels, cultures around the globe have recognized the magic that happens when these two opposing tastes collide. This recipe builds upon that tradition, creating a modern classic that’s perfect for potlucks, holiday gatherings, or simply satisfying your sweet tooth.
People adore these bars for several reasons. First, the taste is simply divine the rich caramel, the nutty pecans, and the subtle saltiness create an addictive flavor profile. Second, the texture is equally appealing, offering a delightful contrast between the soft caramel, the crunchy pecans, and the crumbly crust. Finally, while they look impressive, these bars are surprisingly easy to make, making them a perfect choice for both experienced bakers and those just starting out. So, gather your ingredients, preheat your oven, and get ready to experience the magic of Salt River Dessert Bars!

Ingredients:
- For the Crust:
- 1 1/2 cups all-purpose flour
- 1/2 cup (1 stick) unsalted butter, cold and cubed
- 1/4 cup granulated sugar
- 1/4 teaspoon salt
- 3-4 tablespoons ice water
- For the Caramel Layer:
- 1 cup (2 sticks) unsalted butter
- 1 cup packed light brown sugar
- 1/2 cup light corn syrup
- 1 (14 ounce) can sweetened condensed milk
- 1 teaspoon vanilla extract
- 1/2 teaspoon salt
- For the Chocolate Topping:
- 12 ounces semi-sweet chocolate chips
- 2 tablespoons unsalted butter
- 1/4 teaspoon salt
- Optional Toppings:
- Flaky sea salt, for sprinkling
- Chopped pecans or walnuts
Preparing the Crust:
Okay, let’s get started with the foundation of these amazing Salt River Dessert Bars the crust! This is a simple shortbread crust, and it’s crucial for providing a sturdy and delicious base for all that gooey goodness we’re about to pile on top.
- Combine Dry Ingredients: In a large bowl, whisk together the flour, sugar, and salt. This ensures that the salt is evenly distributed throughout the crust, which is important for balancing the sweetness.
- Cut in the Butter: Add the cold, cubed butter to the flour mixture. Using a pastry blender or your fingertips (work quickly to keep the butter cold!), cut the butter into the flour until the mixture resembles coarse crumbs. You should have some pea-sized pieces of butter remaining. These little pockets of butter are what create a flaky crust.
- Add Ice Water: Gradually add the ice water, one tablespoon at a time, mixing gently after each addition. The amount of water you need will vary depending on the humidity, so start with 3 tablespoons and add more only if necessary. You want the dough to just come together when you squeeze a handful of it. Be careful not to overmix! Overmixing develops the gluten in the flour, which will result in a tough crust.
- Form the Dough: Gently press the dough together to form a disc. Wrap the disc in plastic wrap and refrigerate for at least 30 minutes. This chilling time is essential! It allows the gluten to relax, which will prevent the crust from shrinking during baking, and it also firms up the butter, which will contribute to a flakier texture.
- Preheat and Prepare Pan: While the dough is chilling, preheat your oven to 350°F (175°C). Grease and flour a 9×13 inch baking pan. You can also line the pan with parchment paper, leaving an overhang on the sides, for easy removal of the bars later.
- Press into Pan: Remove the dough from the refrigerator and press it evenly into the bottom of the prepared pan. You can use your fingers or the bottom of a measuring cup to create a smooth, even surface.
- Pre-bake the Crust: Bake the crust for 18-20 minutes, or until it’s lightly golden brown. This pre-baking step is crucial! It ensures that the crust is fully cooked and won’t be soggy under the caramel layer. Let the crust cool slightly while you prepare the caramel.
Making the Caramel Layer:
Now for the star of the show the caramel! This is a rich, buttery, and incredibly addictive caramel that will make these bars absolutely irresistible. Don’t be intimidated by making caramel; just follow the instructions carefully, and you’ll be rewarded with a perfect, gooey layer.
- Combine Ingredients in a Saucepan: In a medium saucepan, combine the butter, brown sugar, corn syrup, and sweetened condensed milk.
- Cook the Caramel: Cook over medium heat, stirring constantly, until the butter is melted and the sugar is dissolved. Once the mixture is smooth, bring it to a boil, stirring constantly. Continue to cook, stirring constantly, for 5-7 minutes, or until the caramel is a deep golden brown color and has thickened slightly. Use a candy thermometer if you have one; the caramel should reach 235-240°F (113-116°C). Be patient and don’t rush this step! The longer you cook the caramel, the thicker and chewier it will be. However, be careful not to overcook it, or it will become too hard.
- Remove from Heat and Add Vanilla and Salt: Remove the saucepan from the heat and stir in the vanilla extract and salt. The salt is important for balancing the sweetness of the caramel.
- Pour Over Crust: Pour the caramel evenly over the pre-baked crust.
- Bake Again: Return the pan to the oven and bake for 15-20 minutes, or until the caramel is bubbly and golden brown. Keep a close eye on it to prevent it from burning.
- Cool Completely: Remove the pan from the oven and let the caramel layer cool completely in the pan. This is very important! If you try to cut the bars while the caramel is still warm, it will be a sticky mess.
Creating the Chocolate Topping:
The final touch a smooth, decadent chocolate topping! This layer adds a rich, contrasting flavor to the sweet caramel and buttery crust. It’s super easy to make and takes these bars to the next level.
- Melt Chocolate and Butter: In a heatproof bowl set over a saucepan of simmering water (or in the microwave in 30-second intervals, stirring in between), melt the chocolate chips and butter together, stirring until smooth. Be careful not to let the bottom of the bowl touch the water, or the chocolate could seize.
- Add Salt: Stir in the salt.
- Spread Over Caramel: Pour the melted chocolate evenly over the cooled caramel layer.
- Optional Toppings: If desired, sprinkle with flaky sea salt and/or chopped pecans or walnuts. The sea salt adds a nice salty-sweet contrast, and the nuts add a bit of crunch.
- Chill to Set: Refrigerate the bars for at least 30 minutes, or until the chocolate is set. This will make them easier to cut.
Cutting and Serving:
Almost there! Now for the best part enjoying your delicious Salt River Dessert Bars!
- Cut into Bars: Once the chocolate is set, remove the bars from the refrigerator. If you lined the pan with parchment paper, lift the bars out of the pan using the overhang. Otherwise, run a knife around the edges of the pan to loosen the bars. Cut the bars into squares or rectangles. A warm, clean knife will make cleaner cuts.
- Serve and Enjoy: Serve the bars at room temperature. They can be stored in an airtight container at room temperature for up to 3 days, or in the refrigerator for up to a week.
These Salt River Dessert Bars are perfect for potlucks, parties, or just a special treat for yourself. Enjoy!
Conclusion:
Okay, friends, let’s be honest: you’ve read this far because something about these Salt River Dessert Bars has piqued your interest. And trust me, that interest is well-placed! These aren’t just any dessert bars; they’re a symphony of textures and flavors that will have everyone begging for the recipe. The buttery, crumbly base, the gooey caramel center, and the decadent chocolate topping all come together in perfect harmony. It’s the kind of treat that evokes memories of cozy kitchens and shared laughter, a true comfort food elevated to something truly special.
But why are these bars a must-try? Beyond the incredible taste, they’re surprisingly easy to make. Seriously! The recipe is straightforward, and even if you’re a baking novice, you’ll find yourself whipping up a batch of these beauties in no time. Plus, they’re incredibly versatile. Need a show-stopping dessert for a potluck? Salt River Dessert Bars are your answer. Want a sweet treat to enjoy with your afternoon coffee? These bars are perfect. Looking for a homemade gift that will truly impress? Look no further!
And speaking of versatility, let’s talk about some fun variations. Feeling adventurous? Try adding a sprinkle of sea salt to the caramel layer for a salted caramel twist. Or, incorporate some chopped pecans or walnuts into the base for added crunch. For a festive touch, drizzle white chocolate over the top along with the dark chocolate. You could even experiment with different extracts in the base, like almond or vanilla bean paste, to create unique flavor profiles. The possibilities are truly endless!
Serving Suggestions: These bars are delicious served at room temperature, but they’re also fantastic slightly chilled. Cut them into squares or rectangles, depending on your preference. For an extra touch of elegance, dust them with powdered sugar before serving. And if you really want to take things to the next level, serve them with a scoop of vanilla ice cream or a dollop of whipped cream. Trust me, your taste buds will thank you.
I truly believe that these Salt River Dessert Bars will become a staple in your baking repertoire. They’re the perfect combination of easy, delicious, and impressive. So, what are you waiting for? Gather your ingredients, preheat your oven, and get ready to experience a dessert that will knock your socks off.
I’m so excited for you to try this recipe! Once you do, please, please, please come back and share your experience in the comments below. I’d love to hear what you think, what variations you tried, and how much everyone loved them. Did you add a secret ingredient? Did you make them for a special occasion? I want to know all the details! Your feedback is invaluable, and it helps me continue to create and share recipes that you’ll love. Happy baking! And remember, life is too short to skip dessert, especially when it’s as amazing as these Salt River Dessert Bars.
Salt River Dessert Bars: A Delicious Arizona Treat
Decadent Salt River Dessert Bars featuring a buttery shortbread crust, gooey caramel center, and rich chocolate topping. A perfect sweet and salty treat!
Ingredients
- 1 1/2 cups all-purpose flour
- 1/2 cup (1 stick) unsalted butter, cold and cubed
- 1/4 cup granulated sugar
- 1/4 teaspoon salt
- 3-4 tablespoons ice water
- 1 cup (2 sticks) unsalted butter
- 1 cup packed light brown sugar
- 1/2 cup light corn syrup
- 1 (14 ounce) can sweetened condensed milk
- 1 teaspoon vanilla extract
- 1/2 teaspoon salt
- 12 ounces semi-sweet chocolate chips
- 2 tablespoons unsalted butter
- 1/4 teaspoon salt
- Flaky sea salt, for sprinkling
- Chopped pecans or walnuts
Instructions
- In a large bowl, whisk together the flour, sugar, and salt.
- Cut in the cold, cubed butter using a pastry blender or your fingertips until the mixture resembles coarse crumbs with some pea-sized pieces of butter remaining.
- Gradually add the ice water, one tablespoon at a time, mixing gently after each addition, until the dough just comes together.
- Gently press the dough together to form a disc. Wrap in plastic wrap and refrigerate for at least 30 minutes.
- Preheat oven to 350°F (175°C). Grease and flour a 9×13 inch baking pan (or line with parchment paper).
- Press the dough evenly into the bottom of the prepared pan.
- Bake for 18-20 minutes, or until lightly golden brown. Let cool slightly.
- In a medium saucepan, combine the butter, brown sugar, corn syrup, and sweetened condensed milk.
- Cook over medium heat, stirring constantly, until the butter is melted and the sugar is dissolved.
- Bring to a boil, stirring constantly, for 5-7 minutes, or until the caramel is a deep golden brown color and has thickened slightly (235-240°F (113-116°C) on a candy thermometer).
- Remove from heat and stir in the vanilla extract and salt.
- Pour the caramel evenly over the pre-baked crust.
- Bake again for 15-20 minutes, or until the caramel is bubbly and golden brown.
- Cool completely in the pan.
- Melt the chocolate chips and butter together in a heatproof bowl set over simmering water (or in the microwave in 30-second intervals, stirring in between) until smooth.
- Stir in the salt.
- Pour the melted chocolate evenly over the cooled caramel layer.
- Sprinkle with flaky sea salt and/or chopped pecans or walnuts, if desired.
- Refrigerate for at least 30 minutes, or until the chocolate is set.
- Once the chocolate is set, remove the bars from the refrigerator.
- Lift the bars out of the pan using the parchment paper overhang (if used). Otherwise, run a knife around the edges of the pan to loosen the bars.
- Cut into squares or rectangles.
- Serve at room temperature.
Notes
- Use cold butter for the crust to ensure a flaky texture.
- Don’t overmix the crust dough.
- Chilling the crust dough is essential to prevent shrinking during baking.
- Stir the caramel constantly to prevent burning.
- Cool the caramel layer completely before adding the chocolate topping.
- A warm, clean knife will make cleaner cuts.
- Store in an airtight container at room temperature for up to 3 days, or in the refrigerator for up to a week.


Leave a Comment