
Bleeding Halloween Black Cupcakes are more than just a dessert; they are a thrilling centerpiece for any spooky celebration, promising an unforgettable experience with every bite. There’s something undeniably enchanting about the darker side of culinary creations, especially when they perfectly capture the spirit of Halloween. For centuries, people have celebrated this ancient festival with unique traditions, and crafting treats that are both delicious and dramatically themed has become a beloved modern ritual. These are not merely cupcakes; they are edible art designed to surprise and delight.
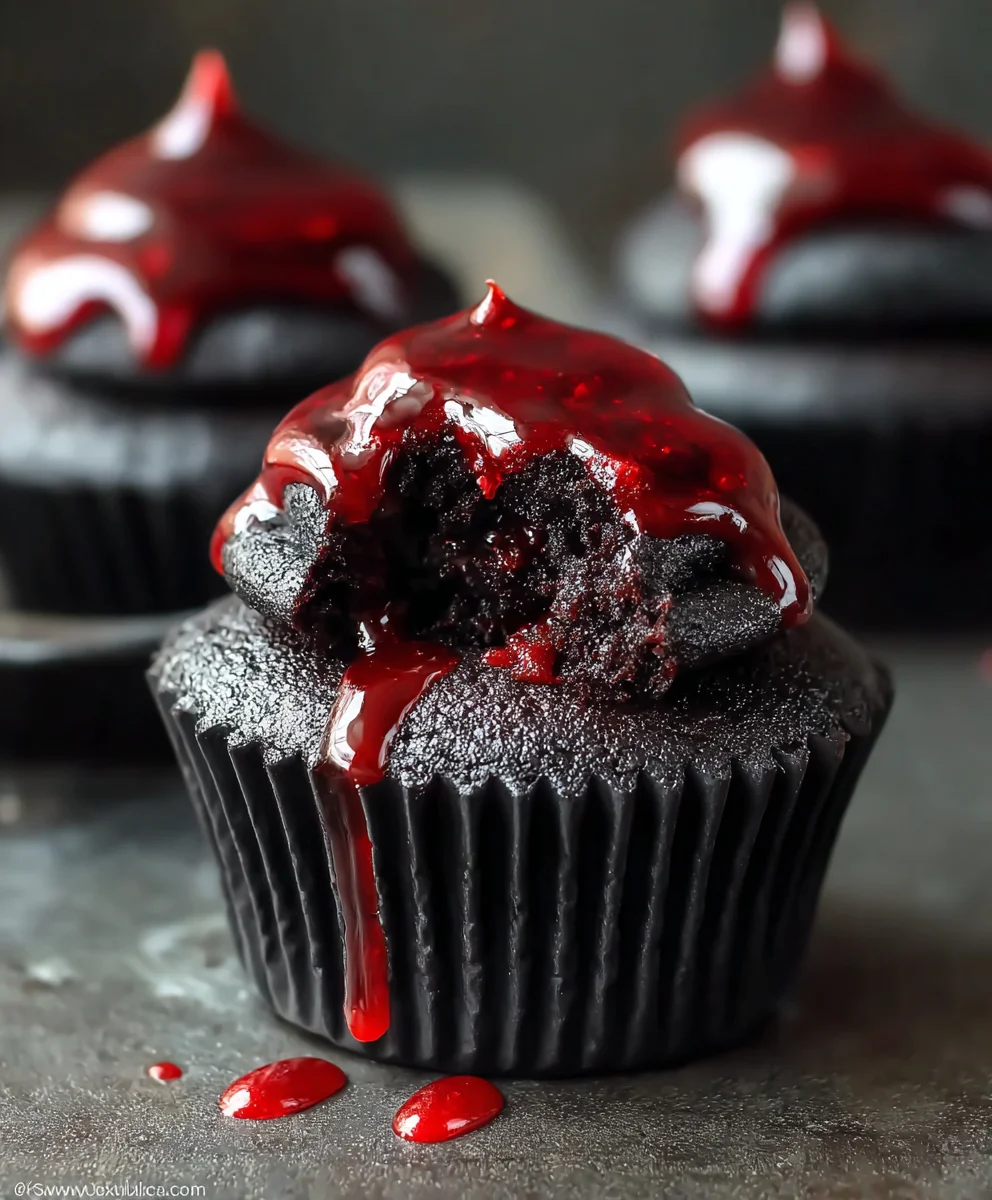
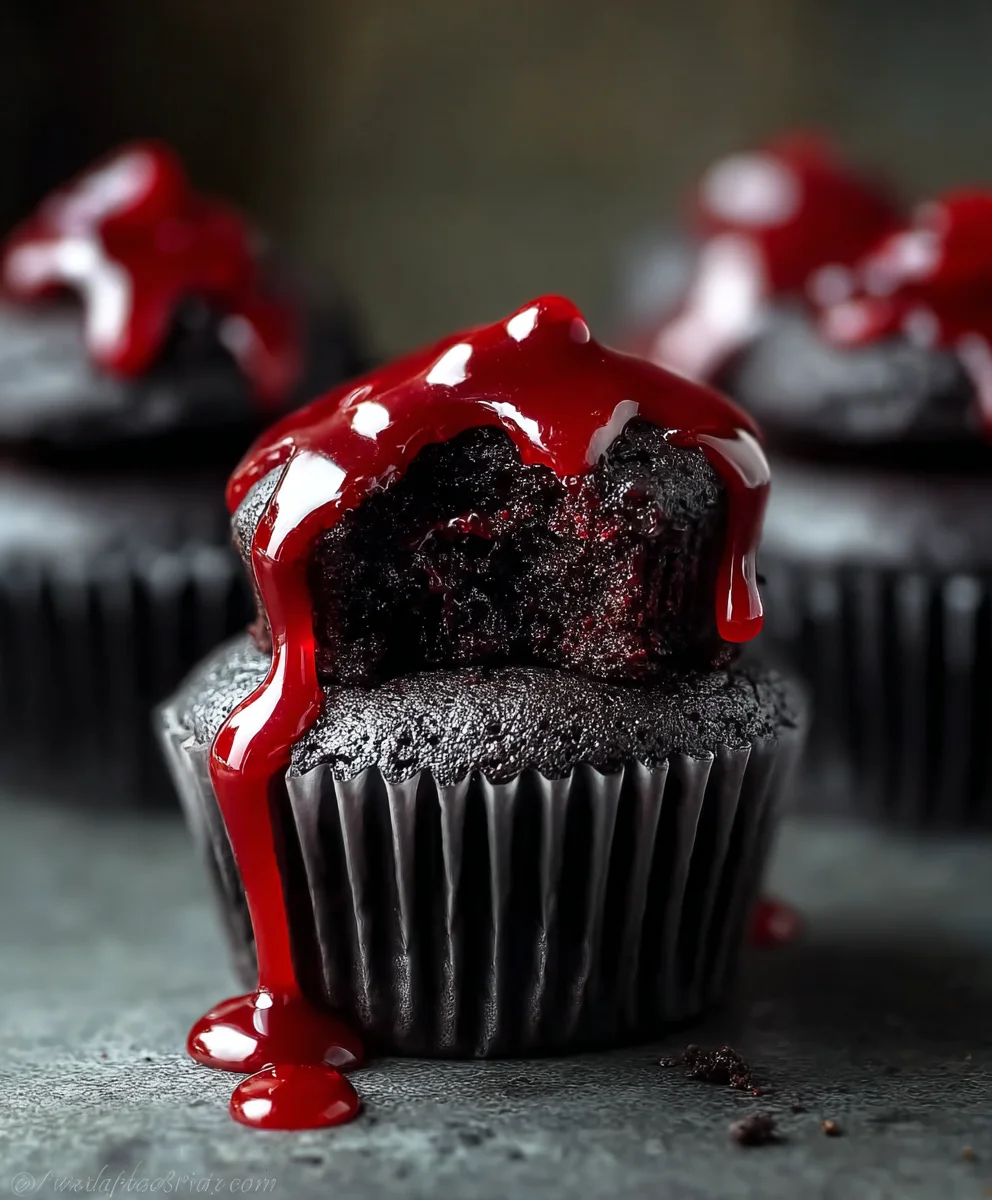
I’m absolutely thrilled to share a recipe that combines rich, decadent chocolate flavor with a truly spectacular visual surprise. Imagine the delight, or perhaps the playful shriek, when your guests bite into a seemingly innocent dark cupcake, only to discover a vibrant “bleeding” red filling seeping out – a macabre yet utterly delicious spectacle! It’s this captivating element of surprise and the rich, moist texture that makes these particular treats so incredibly popular. This recipe elevates the humble cupcake into a conversation starter, perfect for any ghoulish gathering.
Why You’ll Love These Bleeding Halloween Black Cupcakes
People adore this dish not just for its stunning appearance, but also for its exceptional taste. The cupcakes themselves are incredibly moist and deeply chocolatey, perfectly complemented by a smooth, velvety black frosting. This recipe ensures a soft, fluffy crumb that melts in your mouth, while the dramatic, oozing center adds an extra layer of fun and festive flair. They are remarkably straightforward to make, making them an ideal project for both seasoned bakers and those looking for a show-stopping dessert without too much fuss. Get ready to impress everyone with this delightfully ghoulish treat!

Ingredients:
-
For the Bleeding Black Velvet Cupcakes:
- 1 ¾ cups (210g) all-purpose flour, sifted
- 1 ¾ cups (350g) granulated sugar
- ¾ cup (65g) unsweetened Dutch-processed cocoa powder, sifted (this is key for a deep black color!)
- 1 ½ teaspoons baking soda
- 1 teaspoon baking powder
- 1 teaspoon fine sea salt
- 2 large eggs, at room temperature
- 1 cup (240ml) buttermilk, at room temperature
- ½ cup (120ml) vegetable oil (or another neutral oil like canola)
- 2 teaspoons pure vanilla extract
- 1-2 tablespoons high-quality black gel food coloring (like Americolor Super Black or Wilton Black), depending on desired intensity
- ½ cup (120ml) hot strong brewed coffee (or hot water with 1 teaspoon instant espresso powder)
-
For the Raspberry Blood Filling:
- 2 cups (250g) fresh or frozen raspberries (no need to thaw if frozen)
- ½ cup (100g) granulated sugar
- 2 tablespoons fresh lemon juice
- 2 tablespoons cornstarch
- 2 tablespoons cold water
- ½ teaspoon red gel food coloring (like Americolor Super Red or Wilton Red-Red), or more for a deeper “blood” color
-
For the Spooky Black Buttercream Frosting:
- 1 cup (226g) unsalted butter, softened to room temperature
- 4 cups (480g) powdered sugar, sifted, plus more if needed
- ¼ cup (60ml) heavy cream or whole milk, plus more if needed
- 1 teaspoon pure vanilla extract
- Pinch of fine sea salt
- 1-2 tablespoons high-quality black gel food coloring (Americolor Super Black or Wilton Black), depending on desired intensity
-
For Decoration (Optional, but highly encouraged!):
- Edible googly eyes
- Halloween sprinkles
- Small plastic spiders or bat rings
For the Bleeding Black Velvet Cupcakes:
- Preheat and Prep: Before we dive into the fun, let’s get our oven ready. Preheat your oven to a welcoming 350°F (175°C). Line a 12-cup standard muffin tin with black or dark-colored paper liners. If you don’t have dark liners, regular white ones will work, but the black can enhance the spooky aesthetic. This step ensures your cupcakes won’t stick and makes for easy cleanup.
- Combine Dry Ingredients: In a large mixing bowl, I like to whisk together all the dry components. This includes the 1 ¾ cups of sifted all-purpose flour, 1 ¾ cups of granulated sugar, ¾ cup of sifted Dutch-processed cocoa powder, 1 ½ teaspoons of baking soda, 1 teaspoon of baking powder, and 1 teaspoon of fine sea salt. Whisking them thoroughly for about 1-2 minutes is crucial. This isn’t just a casual stir; it aerates the flour and ensures all the leavening agents and flavorings are evenly distributed, preventing any pockets of unmixed ingredients in your final cupcakes. The Dutch-processed cocoa is essential here; it’s less acidic than natural cocoa and reacts differently with the baking soda, giving us that deep, rich, almost black hue we’re aiming for.
- Whisk Wet Ingredients (Part 1): In a separate medium bowl, we’ll start on the liquid components. Crack in your 2 large eggs (at room temperature, please – it helps them emulsify better!), add the 1 cup of room temperature buttermilk, ½ cup of vegetable oil, and 2 teaspoons of pure vanilla extract. Whisk these together until they are well combined and uniform. The buttermilk’s acidity will interact beautifully with the baking soda later, contributing to the cupcakes’ tender crumb.
- Introduce the Black Magic: Now for the transformation! Pour the wet egg mixture into the bowl with your whisked dry ingredients. Use a rubber spatula or a sturdy whisk to gently combine them. Don’t worry about overmixing just yet. Once partially combined, add your 1-2 tablespoons of black gel food coloring. Start with one tablespoon and add more if you desire a truly intense, inky black. Gel food coloring is concentrated, so a little goes a long way, but for a truly “black velvet” cupcake, you need a good amount. Mix until the batter is a uniform, deep black color, scraping down the sides of the bowl to ensure no streaks remain.
- The Hot Coffee Secret: Finally, carefully pour in the ½ cup of hot strong brewed coffee (or hot water with instant espresso powder). This might seem counterintuitive, but the hot liquid helps to bloom the cocoa powder, intensifying its flavor and deepening the color even further. It also thins the batter to the perfect consistency. Gently fold this in until just combined. Be careful not to overmix; overmixing can develop the gluten too much, leading to tough cupcakes. A few lumps are perfectly fine!
- Fill and Bake: Divide the black cupcake batter evenly among your 12 prepared cupcake liners. I usually fill them about two-thirds of the way full. This allows them enough room to rise beautifully without overflowing. Transfer the muffin tin to your preheated oven and bake for 18-22 minutes. You’ll know they’re done when a wooden skewer or toothpick inserted into the center of a cupcake comes out clean or with a few moist crumbs attached. Every oven is a little different, so keep an eye on them after 18 minutes.
- Cool Completely: Once baked, remove the cupcakes from the oven and let them cool in the muffin tin for about 5-10 minutes. This initial cooling helps them set up and prevents them from sticking to the liners. After this short rest, carefully transfer the warm cupcakes to a wire rack to cool completely. This step is crucial! Attempting to fill or frost warm cupcakes will lead to melted frosting and a messy situation. Patience is a virtue here, my friends.
Crafting the Raspberry Blood Filling:
- Simmer the Berries: In a small saucepan, combine the 2 cups of fresh or frozen raspberries, ½ cup of granulated sugar, and 2 tablespoons of fresh lemon juice. Place the saucepan over medium heat. Bring the mixture to a gentle simmer, stirring occasionally. The raspberries will begin to break down and release their juices. Continue to simmer for about 5-7 minutes, until the raspberries are very soft and jammy. The natural pectin in the raspberries, combined with the sugar and lemon juice, will start to create a wonderful base.
- Strain for Smoothness: Carefully pour the hot raspberry mixture through a fine-mesh sieve set over a clean heatproof bowl. Using the back of a spoon or a rubber spatula, press firmly on the solids to extract as much liquid and pulp as possible. We want a smooth, seedless “blood” for our cupcakes, so this straining step is non-negotiable. Discard the seeds and any remaining solids. You should be left with a beautiful, vibrant red liquid.
- Thicken the Blood: Return the strained raspberry liquid to the clean saucepan. In a separate small bowl, whisk together the 2 tablespoons of cornstarch with 2 tablespoons of cold water until a smooth slurry forms. This cornstarch slurry is our thickening agent. Bring the raspberry liquid back to a gentle simmer over medium-low heat. Slowly pour the cornstarch slurry into the simmering liquid while constantly whisking. Continue to whisk and cook for another 1-2 minutes, until the mixture thickens to a consistency similar to a thick syrup or a thin jam. It should coat the back of a spoon. Be patient; it might seem thin at first, but it will thicken.
- Intensify the “Blood” Color: Remove the saucepan from the heat. Now, for the dramatic effect, stir in ½ teaspoon of red gel food coloring. If you want a more gruesome, deeper blood-red color, feel free to add a little more, a drop at a time, until you achieve your desired shade. Mix it in thoroughly until the color is uniform. Gel colors are best here as they won’t thin out your carefully thickened filling.
- Cool Down: Pour the raspberry “blood” filling into a clean bowl or container and cover it directly with plastic wrap to prevent a skin from forming. Let it cool completely to room temperature, then transfer it to the refrigerator to chill for at least 1-2 hours, or until it’s cold and even thicker. A cold filling will be much easier to work with and will prevent your cupcakes from becoming soggy. This step is essential for that perfect “bleeding” effect later on.
Whipping Up the Spooky Black Buttercream Frosting:
- Cream the Butter: In the bowl of a stand mixer fitted with the paddle attachment (or using a hand mixer and a large bowl), beat the 1 cup of softened unsalted butter on medium-high speed for 3-5 minutes. You’re looking for it to become wonderfully light, pale, and fluffy. This aeration process is what makes for truly delightful, airy buttercream. Don’t rush this step!
- Add Powdered Sugar Gradually: Reduce the mixer speed to low. Gradually add in the 4 cups of sifted powdered sugar, one cup at a time. Sifting is important to prevent lumps and ensure a silky-smooth frosting. Once each addition is incorporated, increase the speed to medium and beat until combined. If you add it all at once, you’ll end up in a cloud of sugar dust!
- Introduce Liquids and Flavor: Once all the powdered sugar is incorporated, add the ¼ cup of heavy cream (or milk), 1 teaspoon of pure vanilla extract, and a pinch of fine sea salt. The salt really helps to balance the sweetness of the frosting. Start mixing on low speed, then increase to medium-high and beat for another 2-3 minutes until the frosting is light, fluffy, and smooth. If your frosting seems too thick, add more cream or milk, ½ teaspoon at a time, until it reaches your desired consistency. If it’s too thin, add a tablespoon or two more sifted powdered sugar.
- Achieve the Intense Black Color: Now for the dramatic color. Add 1-2 tablespoons of high-quality black gel food coloring to your frosting. Start with one tablespoon and mix it in thoroughly. You’ll notice it might look gray at first. Don’t panic! Black food coloring needs time to deepen. Continue to beat the frosting on medium speed for another 5-10 minutes. The air being incorporated into the frosting, along with a little time, will allow the color to oxidize and intensify, transforming it into a rich, deep, spooky black. If after a few minutes it’s still not as dark as you’d like, add the second tablespoon of gel coloring and continue beating. Scrape down the sides of the bowl frequently to ensure even coloring.
- Final Whisk and Readiness: Once you’ve achieved that perfect, inky black color, give the frosting a final beat on high speed for about 30 seconds to ensure it’s extra fluffy and smooth. Your black buttercream is now ready to adorn your “Bleeding Halloween Black Cupcakes”! If you’re not using it immediately, cover the bowl with plastic wrap and store it at room temperature for a few hours, or in the refrigerator for up to a week. If refrigerated, let it come to room temperature and re-whip it briefly before using.
Assembly: Bringing Your Bleeding Halloween Black Cupcakes to Life:
- Core the Cupcakes: Ensure your black velvet cupcakes are completely cool before starting this step. Using a cupcake corer, a small sharp knife, or even the back of a large piping tip, carefully cut out a small hole from the center of each cupcake. You want to remove a cylindrical piece of cake, creating a cavity for our “blood” filling. Be careful not to cut all the way through to the bottom. I usually leave about half an inch of cake at the base. You can discard the removed cake pieces, or snack on them if you’re feeling a little hungry!
- Fill with “Blood”: Take your chilled raspberry blood filling from the refrigerator. Give it a good stir. Using a small spoon, a piping bag with a small round tip, or even a squeeze bottle, carefully fill each cupcake cavity with the raspberry “blood.” Fill them almost to the top, but leave a tiny bit of space so it doesn’t overflow once frosted. The thicker and colder the filling, the easier it will be to manage.
- Frost with Spooky Black Buttercream: Now for the dramatic finish! Transfer your black buttercream frosting to a piping bag fitted with your favorite large piping tip (a large star tip like 1M or 2D, or a large round tip like 1A, works wonderfully for a classic cupcake swirl). Pipe a generous swirl of black buttercream onto each cupcake, starting from the outside edge and working your way inward and upward to create a beautiful peak. The dark frosting against the potential peek of red filling is already looking quite eerie!
-
Decorate for Maximum Scare Factor (Optional, but highly recommended!): This is where the true Halloween magic happens!
- Bloody Drips: If you want an extra “bleeding” effect, you can drizzle a tiny bit more of your raspberry “blood” filling over the top of the frosted cupcakes, allowing it to drip down the sides. This looks incredibly gruesome and effective.
- Googly Eyes: Carefully place a pair of edible googly eyes onto the frosting of each cupcake. These instantly bring a fun, spooky character to your treats.
- Spooky Sprinkles: Scatter some Halloween-themed sprinkles (like bats, ghosts, or bones) over the frosting for added texture and visual interest.
- Spider Surprise: For an extra touch of creepy-crawly fun, gently press a small plastic spider ring or a candy spider onto the side or top of the frosted cupcake.
Presentation Tip: Arrange your “Bleeding Halloween Black Cupcakes” on a dark platter or a cake stand for the best visual impact.
- Serve and Scare: These cupcakes are best enjoyed at room temperature, but if you’ve done a lot of detailed piping or your house is very warm, a short stint in the fridge before serving can help the frosting hold its shape. They can be stored in an airtight container at room temperature for up to 2 days, or in the refrigerator for up to 4 days. If refrigerated, allow them to come to room temperature for about 30 minutes before serving for the best flavor and texture. Get ready to delight (and slightly spook!) your guests with these uniquely “Bleeding Halloween Black Cupcakes.” They’re not just a dessert; they’re an experience!
Conclusion:
Alright, my fellow home bakers and Halloween enthusiasts, we’ve reached the grand finale of our recipe journey, and I genuinely hope you’re as excited as I am about the prospect of bringing these hauntingly delicious treats to life in your own kitchen! If there’s one recipe you absolutely must add to your spooky season repertoire, it’s this one. I’m not just saying that because I’m passionate about baking; I truly believe that the magic within these morsels is unparalleled. From the moment you present them, the sheer visual impact of the deep, mysterious black cake, topped with a swirl of rich, creamy frosting, is enough to capture anyone’s attention. But the real showstopper, as we know, is that incredible moment when someone bites in and the vibrant “blood” filling oozes out, creating a delightfully gruesome and utterly unforgettable surprise. It’s a guaranteed conversation starter, a giggle inducer, and a fantastic way to inject some genuine, playful horror into your dessert spread.
Beyond the spectacle, let’s not forget the flavor. These aren’t just pretty faces; they are genuinely scrumptious. The cake itself is moist, tender, and boasts a wonderfully rich, chocolatey depth that perfectly balances the sweetness of the filling and the frosting. I’ve carefully crafted this recipe to ensure that ease of preparation goes hand-in-hand with stunning results, meaning even if you’re a beginner baker, you’ll be able to achieve a professional-looking and tasting treat without any undue stress. Imagine the delighted gasps at your next Halloween gathering as your guests discover the eerie secret hidden within each bite. It’s more than just a cupcake; it’s an experience, a miniature theatrical performance designed to enchant and amuse. The textural contrast, from the fluffy cake to the smooth, surprising filling, creates a multi-layered sensory delight that will have everyone reaching for a second – or third! – cupcake. This isn’t just about satisfying a sweet tooth; it’s about creating a moment of pure, unadulterated Halloween joy.
Elevate Your Spooky Spread: Serving Suggestions & Creative Variations
Now, once you’ve perfected your batch of these incredible cupcakes, the fun doesn’t have to stop there! How you choose to serve them can elevate the entire experience. For a truly immersive Halloween party spread, I highly recommend arranging them on a dark platter, perhaps nestled among some artificial cobwebs or plastic spiders. You could even place them on a multi-tiered stand for a dramatic effect, making them the undeniable centerpiece of your dessert table. Pair them with a “witch’s brew” punch or a smoky mocktail for an extra layer of atmosphere. They also make fantastic individual party favors; simply place them in clear cupcake boxes and tie them with an orange or black ribbon for a memorable take-home treat that will keep the spooky vibes going long after the party ends. Consider adding a small, handwritten tag with a ghostly message for an even more personalized touch.
But wait, there’s more! The beauty of this recipe lies in its versatility. While the classic “blood” effect is undeniably iconic and always a crowd-pleaser, don’t be afraid to unleash your inner mad scientist and experiment. This is where your creativity truly shines, allowing you to adapt the theme to any spooky celebration.
Creative Twists to Try:
- Vary the “Blood” Color: Instead of red, why not try a vibrant green filling for a “monster slime” effect, or a ghostly white (using white chocolate ganache or a very pale cream filling) for an ethereal, phantom surprise? You could even do a mix of colors across your batch for a truly eclectic and unsettling display!
- Frosting Fantasies: While a classic vanilla buttercream dyed black or purple is fantastic, consider a cream cheese frosting for a tangy counterpoint, or even a peppermint buttercream for a chillingly refreshing kick. Pumpkin spice frosting would also be an autumnal dream, perfectly complementing the rich chocolate cake. You could even marble two frosting colors together for a swirly, eerie look.
- Topper Transformations: Beyond the simple swirl, think about adding edible glitter for a shimmering, haunted look, or pressing small candy eyeballs into the frosting. Miniature plastic bats, edible bones, or even tiny gravestone cookies can transform each cupcake into a miniature graveyard scene. Edible sprinkles in themed shapes like skulls or ghosts would also be a quick and easy way to add extra flair.
- Upscale It: For a more gourmet touch, you could infuse the chocolate cake with a hint of espresso to deepen the flavor, or use a high-quality fruit coulis for the “blood” filling (raspberry or cherry would be exquisite). A dark chocolate ganache drip down the sides would also add an element of sophistication to the spookiness, making them look even more decadent.
- Beyond Cupcakes: Feeling ambitious? This exact recipe can be scaled up to create a small “bleeding” cake! Imagine slicing into a single layer black cake to reveal the crimson ooze – utterly dramatic and impressive, and perfect for a smaller, more intimate gathering where you still want that jaw-dropping moment.
This recipe isn’t just about baking; it’s about crafting an experience, sparking joy, and adding a touch of your unique creativity to the festive season. I’ve poured my heart into developing these Bleeding Halloween Black Cupcakes to be the highlight of your celebration, and I truly believe they will be. They are a testament to how simple ingredients, combined with a little imagination and a lot of love, can come together to create something truly extraordinary and memorable. They offer that perfect blend of deliciousness and visual drama that makes any event instantly more exciting.
So, now it’s your turn! I absolutely cannot wait for you to dive into your kitchen, preheat that oven, and embark on this deliciously eerie adventure. Gather your ingredients, put on your favorite spooky playlist, and let the baking begin. When you’ve pulled your masterpieces from the oven, frosted them to perfection, and witnessed that first glorious “bleed,” I sincerely hope you’ll feel a massive sense of accomplishment and fun. The process itself is part of the magic, a delightful ritual that culminates in something truly spectacular.
And please, please, please – don’t keep your culinary triumphs a secret! I would be absolutely thrilled to see your creations. Share your photos, tell me about your serving ideas, or even recount the reactions of your guests. Your baking journey inspires me just as much as I hope my recipes inspire you. Let’s make this Halloween the most deliciously terrifying one yet, one unforgettable bite at a time! Happy baking, everyone!
Bleeding Halloween Black Cupcakes
Bleeding Halloween Black Cupcakes are a thrilling and spooky centerpiece for any Halloween party. These dark, decadent chocolate cupcakes reveal a vibrant ‘bleeding’ red raspberry filling when bitten, creating a macabre yet delicious surprise. Topped with a velvety black buttercream, they are edible art designed to delight and slightly spook your guests.
Ingredients
-
1 ¾ cups (210g) all-purpose flour, sifted
-
1 ¾ cups (350g) granulated sugar
-
¾ cup (65g) unsweetened Dutch-processed cocoa powder, sifted
-
1 ½ teaspoons baking soda
-
1 teaspoon baking powder
-
1 teaspoon fine sea salt
-
2 large eggs, at room temperature
-
1 cup (240ml) buttermilk, at room temperature
-
½ cup (120ml) vegetable oil
-
2 teaspoons pure vanilla extract
-
1-2 tablespoons high-quality black gel food coloring
-
½ cup (120ml) hot strong brewed coffee (or hot water with 1 tsp instant espresso powder)
-
2 cups (250g) fresh or frozen raspberries
-
½ cup (100g) granulated sugar
-
2 tablespoons fresh lemon juice
-
2 tablespoons cornstarch
-
2 tablespoons cold water
-
½ teaspoon red gel food coloring (or more)
-
1 cup (226g) unsalted butter, softened
-
4 cups (480g) powdered sugar, sifted
-
¼ cup (60ml) heavy cream or whole milk
-
1 teaspoon pure vanilla extract
-
Pinch of fine sea salt
-
1-2 tablespoons high-quality black gel food coloring
-
Edible googly eyes (optional)
-
Halloween sprinkles (optional)
-
Small plastic spiders or bat rings (optional)
Instructions
-
Step 1
Preheat oven to 350°F (175°C). Line a 12-cup muffin tin. In a large bowl, whisk flour, sugar, cocoa powder, baking soda, baking powder, and salt. In a separate bowl, whisk eggs, buttermilk, vegetable oil, and vanilla extract. Pour wet ingredients into dry, mix gently. Add 1-2 tbsp black gel food coloring; mix until deep black. Stir in ½ cup hot strong brewed coffee until just combined. Divide batter among liners (2/3 full). Bake 18-22 minutes, until a toothpick comes out clean. Cool in tin 5-10 minutes, then transfer to a wire rack to cool completely. -
Step 2
In a saucepan, combine raspberries, sugar, and lemon juice. Simmer 5-7 minutes until soft. Strain mixture through a fine-mesh sieve, pressing solids to extract liquid; discard seeds. Return strained liquid to saucepan. Whisk 2 tbsp cornstarch with 2 tbsp cold water. Bring raspberry liquid to a simmer, whisk in cornstarch slurry. Cook 1-2 minutes until thickened. Remove from heat, stir in ½ tsp red gel food coloring until desired ‘blood’ color. Cool completely, then chill in refrigerator for 1-2 hours until cold and thick. -
Step 3
In a stand mixer, beat 1 cup softened unsalted butter on medium-high for 3-5 minutes until light and fluffy. Gradually add 4 cups sifted powdered sugar on low, then beat on medium. Add ¼ cup heavy cream, 1 tsp vanilla extract, and a pinch of salt. Beat 2-3 minutes until light and smooth. Add 1-2 tbsp black gel food coloring. Beat on medium for 5-10 minutes, scraping sides, until a deep black color develops. Beat on high for 30 seconds for extra fluffiness. -
Step 4
Core the center of each cooled cupcake, creating a cavity (leave ½ inch at base). Fill each cavity with the chilled raspberry ‘blood’ filling. Pipe a generous swirl of black buttercream frosting onto each cupcake. (Optional) Decorate with a drizzle of ‘blood’ filling, edible googly eyes, Halloween sprinkles, or plastic spiders/bats. Serve at room temperature. Store in an airtight container at room temperature for up to 2 days, or refrigerated for up to 4 days.
Important Information
Nutrition Facts (Per Serving)
It is important to consider this information as approximate and not to use it as definitive health advice.
Allergy Information
Please check ingredients for potential allergens and consult a health professional if in doubt.


Leave a Comment