
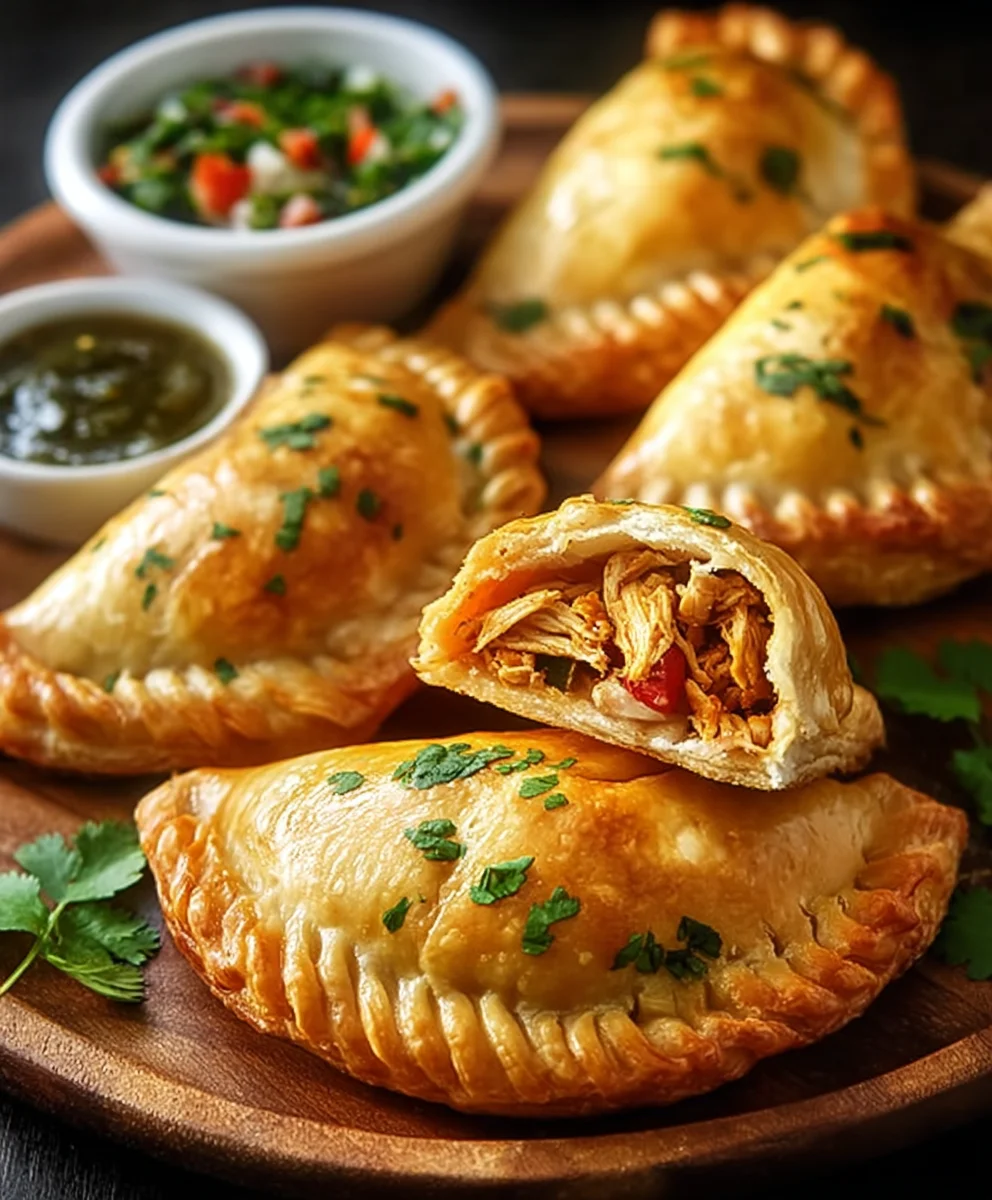
Chicken Empanadas are more than just a snack; they are a culinary embrace, a delightful package of savory satisfaction that promises to transport your taste buds with every golden, flaky bite. Imagine sinking your teeth into a perfectly crimped pastry, revealing a rich, tender, and beautifully seasoned chicken filling within. These handheld wonders have a fascinating history, tracing their origins back to Spain before journeying across continents, becoming a beloved staple in Latin American, Caribbean, and Filipino cuisines. Each region boasts its unique twist, but the core appeal remains universal: the harmonious blend of a crisp, buttery crust with a deeply flavorful interior.
People adore this dish for its incredible versatility and comforting taste. Whether served as a hearty appetizer, a convenient lunch, or a satisfying dinner, Chicken Empanadas offer an unparalleled blend of textures and flavors. The contrast between the delicate, often slightly sweet pastry and the robust, savory chicken creates an irresistible experience. They are perfect for gatherings, lunchboxes, or simply as a comforting treat on a busy weeknight. Join me as we embark on a delicious journey to master these iconic parcels, bringing a touch of global flavor right into your kitchen.

Ingredients:
- For the Empanada Dough:
- 3 cups (360g) all-purpose flour, plus more for dusting
- 1 teaspoon salt
- 1/2 cup (113g) unsalted butter, very cold and cut into small cubes
- 1/2 cup (113g) cold shortening, cut into small cubes (or an additional 1/2 cup cold butter for an all-butter crust)
- 1 large egg, lightly beaten
- 1/2 cup (120ml) ice water, plus 1-2 tablespoons more if needed
- 1 tablespoon white vinegar (optional, but helps with flakiness)
- For the Chicken Empanadas Filling:
- 1 tablespoon olive oil
- 1 pound boneless, skinless chicken breasts or thighs, cooked and shredded (about 3 cups shredded chicken)
- 1 large yellow onion, finely diced
- 2 cloves garlic, minced
- 1 red bell pepper, finely diced
- 1/2 cup frozen peas and carrots blend, thawed
- 1/4 cup green olives, pitted and roughly chopped (optional, but adds a wonderful briny flavor)
- 2 tablespoons tomato paste
- 1/2 cup (120ml) chicken broth
- 1 teaspoon ground cumin
- 1/2 teaspoon smoked paprika
- 1/4 teaspoon dried oregano
- Pinch of cayenne pepper (optional, for a little heat)
- Salt and freshly ground black pepper to taste
- 2 tablespoons chopped fresh cilantro or parsley, for garnish
- For the Egg Wash:
- 1 large egg, beaten with 1 tablespoon water or milk
- For Frying (if not baking):
- 3-4 cups vegetable oil, canola oil, or peanut oil for deep frying
Preparing the Flavorful Chicken Empanadas Filling
- Cook and Shred the Chicken: First things first, we need to get our chicken ready. If you’re starting with raw chicken, I recommend boiling or poaching your chicken breasts or thighs until they are cooked through. This usually takes about 15-20 minutes for average-sized pieces. Once cooked, remove the chicken from the liquid, let it cool slightly, and then shred it using two forks or your hands. Alternatively, if you’re short on time, leftover rotisserie chicken works wonderfully here, providing an incredible depth of flavor with minimal effort. Set the shredded chicken aside; it’s going to be the heart of our delicious Chicken Empanadas.
- Sauté the Aromatics: Grab a large skillet or a Dutch oven and heat the olive oil over medium heat. Once shimmering, add the finely diced yellow onion. We want to cook this until it’s beautifully softened and translucent, which typically takes about 5-7 minutes. Stir occasionally, allowing the natural sweetness of the onion to develop. This foundational step is crucial for building a rich flavor profile for our Chicken Empanadas.
- Add Garlic and Bell Pepper: Now, let’s introduce the minced garlic to the party. Stir it in and cook for just about 1 minute until it becomes fragrant. Be careful not to let it brown too much, as burnt garlic can taste bitter. Immediately follow with the finely diced red bell pepper. Continue to sauté for another 3-4 minutes, until the bell pepper begins to soften. The vibrant colors and fresh flavors of these vegetables will elevate our empanada filling.
- Incorporate the Tomato Paste and Spices: Push the vegetables to one side of the skillet, creating a small clearing in the center. Add the tomato paste directly to the hot pan and cook it for about 1-2 minutes, stirring it frequently. This step is vital because it caramelizes the sugars in the tomato paste, deepening its flavor and reducing its raw acidity, adding a wonderful savory note to our filling. Then, stir in the ground cumin, smoked paprika, dried oregano, and a pinch of cayenne pepper if you like a little kick. Cook for another minute, stirring the spices into the tomato paste and vegetables until incredibly fragrant. This aromatic blend is what truly defines the Latin-inspired flavors of our Chicken Empanadas.
- Bring it All Together: Return the shredded chicken to the skillet, mixing it thoroughly with the sautéed vegetables and fragrant spices. Pour in the chicken broth, stirring well to combine everything. Add the thawed peas and carrots and the chopped green olives (if using). Bring the mixture to a gentle simmer.
- Simmer and Reduce: Reduce the heat to low and let the filling simmer, uncovered, for about 10-15 minutes. We want the liquid to reduce significantly, allowing the flavors to meld beautifully and thicken the filling. A thick filling is key to preventing soggy empanadas! Stir occasionally to prevent sticking. Taste and adjust the seasoning with salt and freshly ground black pepper as needed. You might find it needs a touch more salt, especially with the olives.
- Cool the Filling: Once the filling has reached your desired consistency – thick and flavorful – remove it from the heat. Stir in the fresh cilantro or parsley, if using. Now, this is a very important step: transfer the filling to a shallow dish or baking sheet and allow it to cool completely. A warm filling will make your dough sticky and much harder to work with, so be patient here! You can even make the filling a day ahead and store it in the refrigerator. This allows the flavors to deepen even further, making for truly unforgettable Chicken Empanadas.
Crafting the Perfect Empanada Dough
- Combine Dry Ingredients: In a large mixing bowl, whisk together the all-purpose flour and salt. This ensures even distribution of the salt throughout the dough, which is essential for flavor.
- Cut in the Fats: Add the very cold, cubed unsalted butter and cold shortening to the flour mixture. Using a pastry blender, two knives, or even your fingertips, cut the fats into the flour until the mixture resembles coarse crumbs with some pea-sized pieces of butter and shortening remaining. It’s crucial that the fats remain cold and are not fully incorporated; these pockets of fat are what create a flaky crust.
- Prepare Wet Ingredients: In a separate small bowl, whisk together the lightly beaten egg, ice water, and white vinegar (if using). The vinegar is a little secret ingredient that tenderizes the dough and contributes to a flakier texture, but it’s entirely optional. Using ice water is paramount; it keeps the butter and shortening firm, preventing them from melting prematurely.
- Combine Wet and Dry: Gradually add the wet mixture to the dry ingredients, stirring with a fork until the dough just comes together. Be careful not to overmix! If the dough seems too dry, add an additional tablespoon or two of ice water, one at a time, until it forms a cohesive ball. The dough should be moist enough to hold together but not sticky.
- Form and Chill: Gently gather the dough and form it into a flattened disc. Wrap it tightly in plastic wrap and refrigerate for at least 1 hour, or preferably for 2-3 hours. This chilling period allows the gluten to relax, making the dough easier to roll out, and ensures the fats remain firm, leading to an exceptionally flaky crust for our Chicken Empanadas. You can even make the dough a day ahead.
Assembling Your Delicious Chicken Empanadas
- Prepare Your Workstation: Lightly flour a clean work surface. Remove the chilled dough from the refrigerator. If it’s very firm, let it sit at room temperature for about 5-10 minutes to make it slightly more pliable, but keep it as cold as possible.
- Roll Out the Dough: Using a rolling pin, roll out the dough to an even thickness of about 1/8 inch. You want it thin enough to be delicate but not so thin that it tears easily. Keep your work surface and rolling pin lightly floured to prevent sticking.
- Cut Out Circles: Using a 4-inch (for appetizer-sized) or 5-6 inch (for meal-sized) round cookie cutter, or even the rim of a glass, cut out as many circles as possible. Gather the dough scraps, gently re-form them into a disc, and re-roll once or twice to cut out more circles. Avoid overworking the dough scraps, as this can make the crust tough.
- Fill the Empanadas: Take one dough circle and place about 1 ½ to 2 tablespoons of the completely cooled chicken filling onto one half of the circle, leaving a small border around the edge. Do not overfill, as this will make sealing difficult and can cause the empanadas to burst during cooking. Less is often more when it comes to stuffing these delightful pockets.
- Seal the Empanadas: Lightly moisten the edge of the dough circle with a little water using your fingertip or a pastry brush. Fold the empty half of the dough over the filling to meet the other edge, forming a half-moon shape. Press the edges firmly together to seal them.
-
Crimp the Edges (Repulgue): Now for the signature empanada look! You have a few options for crimping:
- Fork Method: Use the tines of a fork to press down all along the sealed edge, creating a decorative, sealed pattern. This is the easiest method and creates a lovely rustic finish.
- Repulgue Method: For a more traditional look, starting from one end of the sealed edge, fold a small section of the dough upwards and over, then press it down. Continue this “folding and pressing” motion all along the edge, creating a beautiful, braided or rope-like pattern. This takes a little practice but is very rewarding!
Ensure the edges are very well sealed to prevent the filling from escaping during cooking.
- Prepare for Cooking: Place the assembled empanadas on a baking sheet lined with parchment paper. Keep them spaced apart. If you’re not cooking them immediately, you can cover them loosely with plastic wrap and refrigerate for up to an hour, or freeze them solid for later use (see notes below).
Baking or Frying Your Chicken Empanadas
Baking Method (Recommended for a lighter option):
- Preheat Oven: Preheat your oven to 400°F (200°C). Arrange an oven rack in the middle position.
- Egg Wash: In a small bowl, whisk together the egg and 1 tablespoon of water or milk to create an egg wash. Brush the tops of each empanada generously with this egg wash. This will give them a beautiful golden-brown color and a lovely sheen.
- Bake: Transfer the baking sheet with the empanadas to the preheated oven. Bake for 20-25 minutes, or until the empanadas are gloriously golden brown and the crust looks flaky and cooked through. Baking time can vary slightly depending on the size of your empanadas and your oven. Keep an eye on them, as you want that perfect crisp, golden finish without overbrowning.
- Cool: Once baked, remove the empanadas from the oven and let them cool on the baking sheet for a few minutes before transferring them to a wire rack. This brief cooling period helps the crust set and prevents them from getting soggy on the bottom.
Frying Method (For a classic, crispy indulgence):
- Heat Oil: In a large, deep pot or Dutch oven, pour about 3-4 cups of vegetable oil (or canola, peanut oil) to a depth of at least 2-3 inches. Heat the oil over medium-high heat until it reaches 350-375°F (175-190°C). If you don’t have a thermometer, you can test the oil by dropping a tiny piece of dough into it; it should sizzle immediately and float to the surface.
- Fry in Batches: Carefully place 3-4 empanadas into the hot oil, ensuring not to overcrowd the pot. Overcrowding will lower the oil temperature and result in greasy empanadas.
- Cook Until Golden: Fry the empanadas for about 3-5 minutes per side, or until they are beautifully golden brown and puffed up. Use tongs or a slotted spoon to carefully flip them halfway through cooking.
- Drain: Once cooked, remove the empanadas from the oil and transfer them to a plate lined with paper towels to drain any excess oil.
- Maintain Oil Temperature: Allow the oil to return to the proper temperature before frying the next batch. This is important for consistent results.
Serving Your Homemade Chicken Empanadas
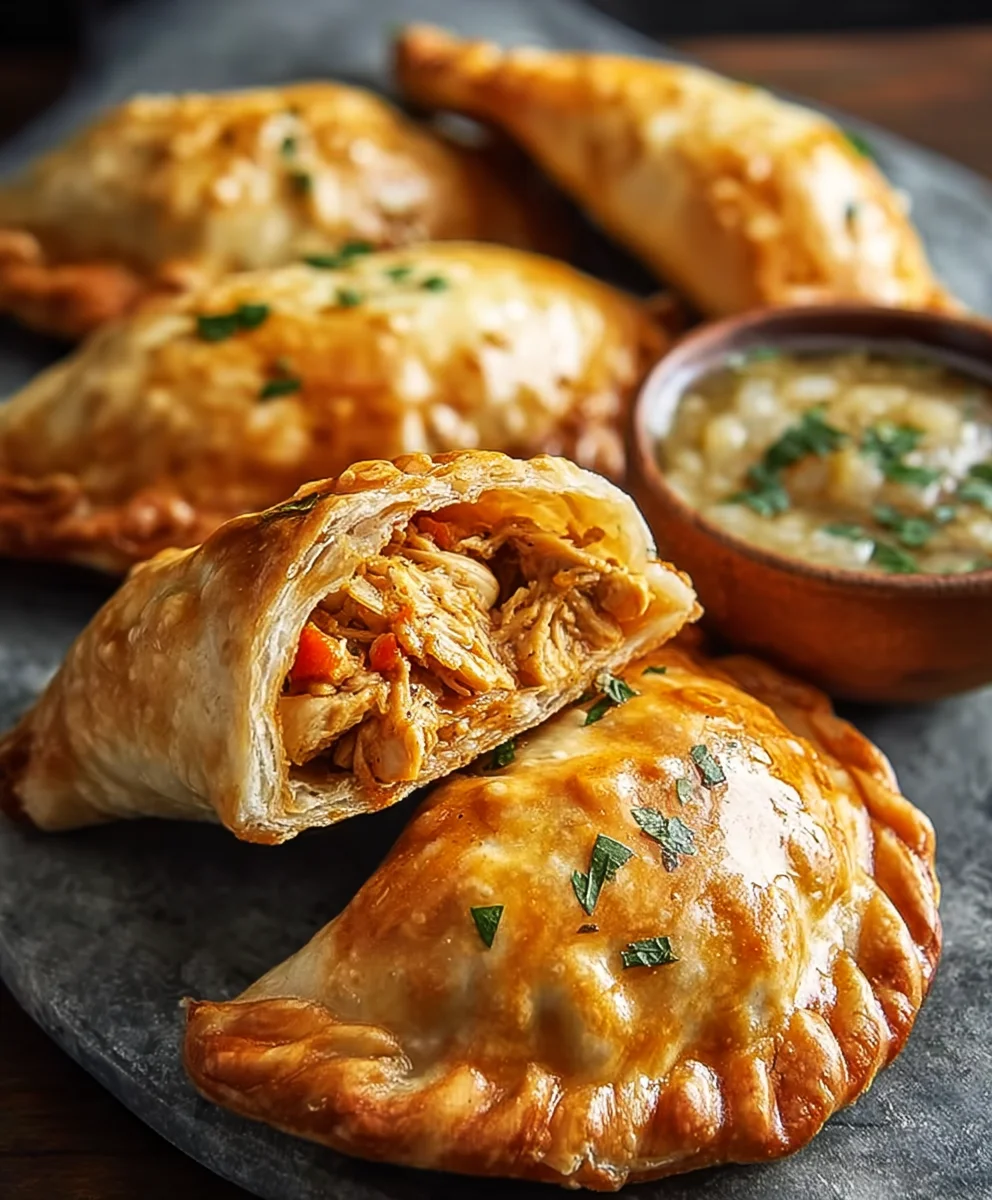
- Cool Slightly and Serve: Whether baked or fried, allow your incredible Chicken Empanadas to cool for a few minutes before serving. The filling will be very hot! This waiting period also allows the flavors to settle and intensify.
- Enjoy Fresh: These empanadas are absolutely best when enjoyed fresh, while the crust is still delightfully crisp and the filling is warm and fragrant.
- Serving Suggestions: Serve them as a delicious appetizer, a satisfying snack, or as part of a main meal. They pair wonderfully with a simple green salad for a lighter option. For dipping, consider a fresh chimichurri, a spicy salsa, a creamy avocado sauce, or even just a squeeze of lime juice to brighten the rich flavors. Every bite of these homemade Chicken Empanadas is a taste of comfort and culinary tradition.
- Storage: Leftover empanadas can be stored in an airtight container in the refrigerator for up to 3 days. Reheat them in a toaster oven or conventional oven at 350°F (175°C) until warmed through and crispy again. Microwaving is not recommended, as it will make the crust soggy.
- Freezing Unbaked Empanadas: If you’ve made a large batch, you can freeze unbaked empanadas for future enjoyment! Place the assembled (but unbaked) empanadas on a parchment-lined baking sheet and freeze until solid. Once frozen, transfer them to a freezer-safe bag or container, separating layers with parchment paper, and store for up to 2-3 months. When ready to cook, bake them directly from frozen, adding about 5-10 minutes to the baking time, or fry as usual, being mindful of the oil temperature and adding extra cooking time. This is a fantastic way to have delicious homemade Chicken Empanadas ready whenever a craving strikes!
<h2>Conclusion:</h2>
<p>As we wrap up our culinary adventure, I truly hope you’re feeling as excited as I am about the prospect of whipping up a batch of these incredible savory pockets. Seriously, if there’s one recipe I could implore you to try from my kitchen, it would be this one. <strong>These aren’t just any pastries; they’re a symphony of flavors and textures encapsulated in a perfectly golden, crispy crust.</strong> From the moment you take that first bite, you’ll understand why they’ve earned a permanent spot on my family’s favorites list. The tender, perfectly seasoned chicken filling, bursting with aromatic spices and subtle hints of vegetables, complements the delicate, flaky pastry shell in a way that is simply irresistible. It’s a dish that feels both comforting and exciting, familiar yet refreshingly delicious. Whether you’re a seasoned chef or a budding home cook, I promise you, this recipe is designed for success, delivering restaurant-quality taste right in your own kitchen.</p>
<p>What makes these <strong>Chicken Empanadas</strong> a true must-try is their incredible versatility and undeniable crowd-pleasing power. They strike that perfect balance between being sophisticated enough for a dinner party appetizer and hearty enough to be the star of a casual weeknight meal. I’ve seen them disappear faster than I can bake them at every gathering, and the compliments are always abundant. They also have that wonderful quality of being surprisingly straightforward to make, especially once you get the hang of the dough – which, trust me, is far less intimidating than it sounds! The satisfaction of pulling a tray of these golden beauties from the oven, filling your home with their tantalizing aroma, is a reward in itself. <strong>Each bite is a delightful combination of savory chicken, often complemented by a subtle sweetness or a gentle kick of spice, all encased in a pastry that crumbles delicately without being greasy.</strong> It’s a culinary experience that truly elevates the humble pastry to something extraordinary.</p>
<h4>Serving Suggestions and Creative Variations:</h4>
<p>Now that you’re hopefully convinced to give these a go, let’s talk about how to make them truly shine on your table. While they are absolutely fantastic on their own, a simple dipping sauce can elevate the experience. My personal go-to is a zesty cilantro-lime crema, or perhaps a sweet and spicy chili sauce for those who enjoy a little heat. For a more complete meal, consider serving them alongside a fresh, vibrant green salad with a light vinaigrette, or a refreshing coleslaw to balance the richness. They also pair wonderfully with a simple rice pilaf or some roasted plantains.</p>
<p>But the fun doesn’t stop there! These empanadas are incredibly adaptable, inviting you to unleash your inner chef with some creative variations. <strong>Feeling adventurous?</strong> Try adding a pinch of smoked paprika to the chicken filling for a deeper, more robust flavor, or introduce some finely diced bell peppers and corn for added texture and sweetness. If you’re a fan of cheese, a sprinkle of Monterey Jack or a sharp cheddar mixed into the cooled chicken filling just before sealing will create a wonderfully gooey surprise inside. For those who prefer a little more spice, a dash of cayenne pepper or a finely minced jalapeño will definitely kick things up a notch. <strong>You could even experiment with different types of dough;</strong> while I stand by my flaky butter-based recipe, a cornmeal dough would offer a different kind of texture and a rustic flavor profile. If you’re looking for a healthier alternative to baking, an air fryer can achieve a wonderfully crisp exterior with very little oil. Remember, the kitchen is your playground, and this recipe provides a fantastic canvas for your culinary imagination.</p>
<h4>Your Turn to Create and Share!</h4>
<p>So, what are you waiting for? Grab your apron, gather your ingredients, and prepare to embark on a truly rewarding cooking adventure. I am absolutely confident that these <strong>Chicken Empanadas</strong> will become a cherished recipe in your repertoire, bringing smiles and satisfied sighs to everyone who tries them. Don’t be afraid to personalize them, to add your own special touch – that’s the beauty of home cooking! I genuinely love hearing from you, so once you’ve made them, please do come back and share your experience. Did you add a secret ingredient? Did you serve them with a unique sauce? <strong>Upload your photos, share your tips, and tell me all about your delicious creations in the comments section below.</strong> Your feedback and culinary experiments inspire me and our entire community of food lovers. Happy cooking, my friends, and enjoy every delectable bite!</p>
Best Chicken Empanadas: Flavorful, Crispy, & Simple Recipe
Chicken Empanadas are delightful packages of savory satisfaction. A perfectly crimped pastry encases a rich, tender, and beautifully seasoned chicken filling. Tracing their origins back to Spain, these handheld wonders are a beloved staple in various cuisines. Enjoyed as an appetizer, lunch, or dinner, they offer an irresistible blend of a crisp, buttery crust and a robust, savory interior. This recipe guides you through mastering these iconic parcels, bringing global flavor right into your kitchen.
Ingredients
-
3 cups (360g) all-purpose flour
-
1 teaspoon salt (for dough)
-
1/2 cup (113g) unsalted butter, very cold and cubed
-
1/2 cup (113g) cold shortening, cubed
-
1 large egg, lightly beaten (for dough)
-
1/2 cup (120ml) ice water, plus 1-2 tbsp more if needed
-
1 tablespoon white vinegar (optional)
-
1 tablespoon olive oil
-
1 pound boneless, skinless chicken breasts or thighs, cooked and shredded (about 3 cups)
-
1 large yellow onion, finely diced
-
2 cloves garlic, minced
-
1 red bell pepper, finely diced
-
1/2 cup frozen peas and carrots blend, thawed
-
1/4 cup green olives, pitted and roughly chopped (optional)
-
2 tablespoons tomato paste
-
1/2 cup (120ml) chicken broth
-
1 teaspoon ground cumin
-
1/2 teaspoon smoked paprika
-
1/4 teaspoon dried oregano
-
Pinch of cayenne pepper (optional)
-
Salt and freshly ground black pepper to taste (for filling)
-
2 tablespoons chopped fresh cilantro or parsley, for garnish
-
1 large egg, beaten with 1 tablespoon water or milk (for egg wash)
-
3-4 cups vegetable oil, canola oil, or peanut oil for deep frying (if frying)
Instructions
-
Step 1
Cook chicken (boil/poach 15-20 min or use rotisserie); shred and set aside. Sauté diced yellow onion in olive oil (5-7 min). Add minced garlic (1 min) and diced red bell pepper (3-4 min) until softened. Push vegetables aside, cook tomato paste (1-2 min). Stir in cumin, smoked paprika, oregano, and optional cayenne (1 min). Return shredded chicken to skillet; add chicken broth, peas & carrots, and optional olives. Simmer uncovered for 10-15 min to reduce liquid and thicken. Season with salt and pepper. Stir in cilantro/parsley. Cool filling completely in a shallow dish. -
Step 2
Whisk flour and salt in a large bowl. Cut in very cold, cubed butter and shortening until mixture resembles coarse crumbs with pea-sized pieces. In a separate bowl, whisk beaten egg, ice water, and optional vinegar. Gradually add wet mixture to dry ingredients, mixing with a fork until dough just comes together. Do not overmix. Form dough into a flattened disc, wrap tightly, and refrigerate for 1-3 hours. -
Step 3
Lightly flour a work surface. Roll chilled dough to 1/8 inch thickness. Cut out 4-6 inch circles using a cookie cutter or glass rim; re-roll scraps once or twice. Place 1.5-2 tablespoons of *cooled* chicken filling onto one half of each dough circle, leaving a small border. Moisten the edge of the dough with water. Fold the dough over to form a half-moon, pressing edges firmly to seal. Crimp edges using a fork or the repulgue method. Place assembled empanadas on a parchment-lined baking sheet. -
Step 4
Preheat oven to 400°F (200°C). Whisk 1 large egg with 1 tablespoon water or milk for egg wash. Brush tops of empanadas generously with egg wash. Bake for 20-25 minutes, or until gloriously golden brown and flaky. Cool on baking sheet for a few minutes before transferring to a wire rack. -
Step 5
In a large, deep pot, heat 3-4 cups vegetable oil to 350-375°F (175-190°C). Carefully place 3-4 empanadas into hot oil; do not overcrowd. Fry for 3-5 minutes per side, until beautifully golden brown and puffed. Remove with tongs or slotted spoon to a paper-towel-lined plate to drain excess oil. Maintain oil temperature between batches. -
Step 6
Allow empanadas to cool slightly before serving (filling will be very hot). Best enjoyed fresh. Serve with chimichurri, salsa, or lime juice. Store leftovers in an airtight container in the refrigerator for up to 3 days; reheat in a toaster oven or conventional oven for crispness (microwaving is not recommended). To freeze unbaked empanadas, place on a parchment-lined baking sheet and freeze until solid. Transfer to a freezer-safe bag for up to 3 months. Bake or fry directly from frozen, adding 5-10 minutes to cooking time.
Important Information
Nutrition Facts (Per Serving)
It is important to consider this information as approximate and not to use it as definitive health advice.
Allergy Information
Please check ingredients for potential allergens and consult a health professional if in doubt.


Leave a Comment