
Easy Hanami Dango Recipe – the very sound of it evokes images of delicate pink cherry blossoms swaying in a gentle spring breeze, don’t you agree? As a passionate home cook, there’s a unique joy in preparing dishes that are not just delicious but also deeply rooted in cultural celebration. This delightful treat, with its iconic trio of pink, white, and green, is an indispensable part of Japan’s cherished hanami (cherry blossom viewing) festivities. Imagine gathering with loved ones under a canopy of blossoms, sharing these beautifully chewy, subtly sweet mochi-like dumplings.
A Taste of Japanese Spring Traditions
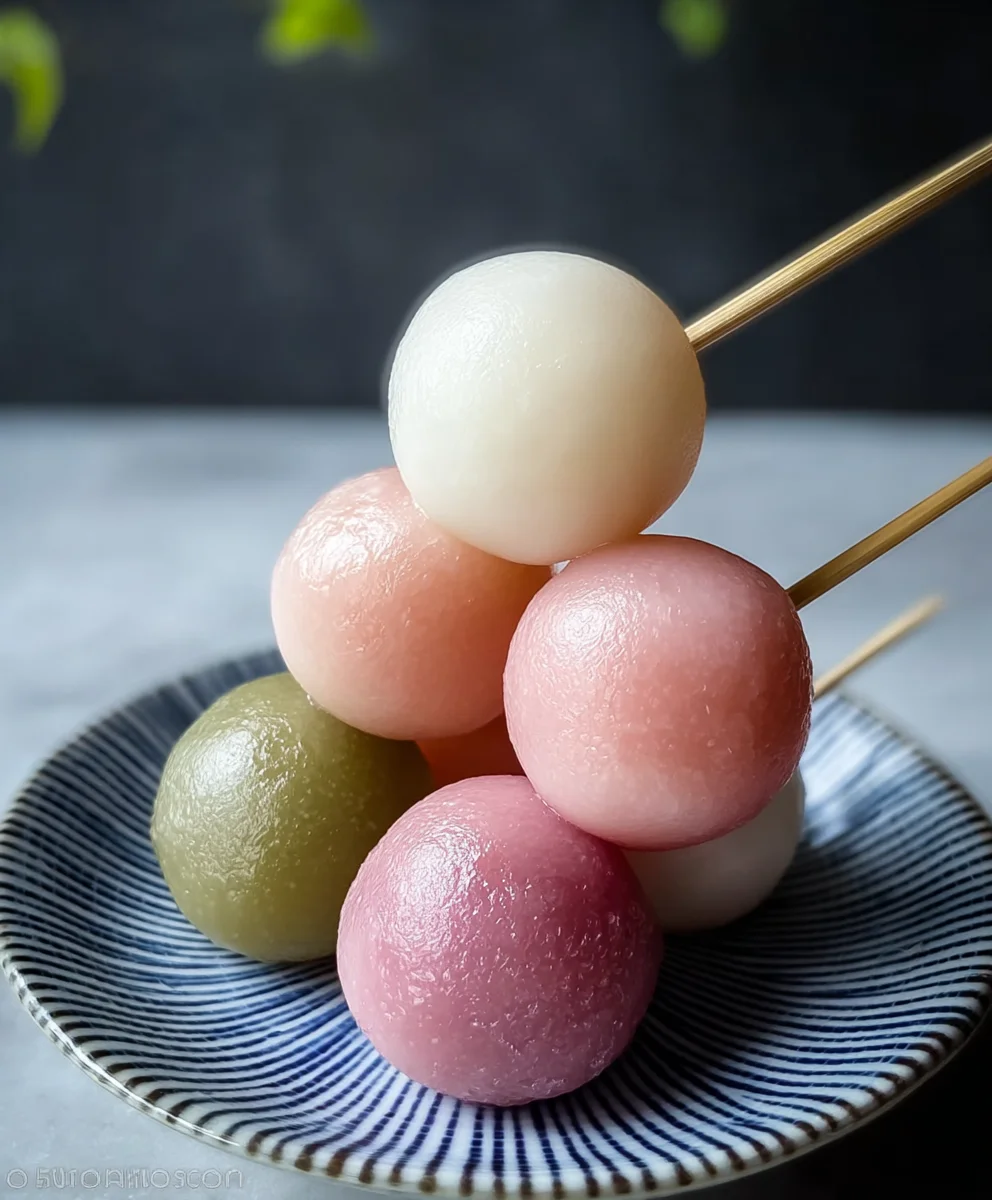
Historically, hanami dango symbolizes the vibrant transition of seasons. The pink represents the cherry blossoms, white signifies the last lingering snow of winter or the sake, and green embodies the fresh, new growth of spring. People adore dango not only for its captivating appearance but also for its wonderfully unique texture – a satisfyingly soft, yet pleasantly firm chewiness that perfectly complements its mild sweetness. It’s an incredibly comforting and visually appealing snack, and I’m thrilled to share an Easy Hanami Dango Recipe that makes bringing this tradition into your home simpler than you might imagine. Get ready to experience a piece of Japanese spring, right in your own kitchen!

Ingredients:
- 100 grams shiratamako (sweet glutinous rice flour)
- 30 grams joshinko (non-glutinous rice flour)
- 130 ml hot water (approximately 80°C or 175°F)
- A pinch of salt (optional, but I think it enhances the flavor)
- Red food coloring (gel or liquid, preferably natural if you have it)
- Green food coloring (matcha powder can be a great natural alternative, about 1-2 teaspoons, or use gel/liquid food coloring)
- Wooden skewers (about 15-20 cm long, typically 3 dango per skewer)
- A large bowl for mixing
- A medium pot for boiling
- A colander
- A large bowl with ice water (for shocking the dango after cooking)
- Measuring cups and spoons
- Plastic wrap or a damp cloth
Preparation Phase: Gathering Your Tools and Mixing the Dough
Embarking on this Easy Hanami Dango Recipe is a truly delightful experience, and it all starts with setting ourselves up for success. Before we even think about mixing, I always like to lay out all my ingredients and equipment. This way, everything is within arm’s reach, making the process smooth and enjoyable. Trust me, a little organization goes a long way, especially when you’re working with sticky dough!
- First things first, let’s grab our largest mixing bowl. Into this bowl, I carefully measure out 100 grams of shiratamako. This specific flour is what gives our dango that wonderful, chewy, and slightly elastic texture we all adore. It’s absolutely essential for achieving the right consistency for an authentic Hanami Dango experience.
- Next, I add 30 grams of joshinko to the shiratamako. While shiratamako provides the chewiness, joshinko adds a bit of firmness and helps the dango hold its shape, preventing it from becoming too soft or overly sticky. It creates a beautiful balance that’s perfect for our Easy Hanami Dango Recipe. If you’re using a pinch of salt, now’s the time to add it. I find that a tiny bit of salt subtly enhances the natural sweetness of the rice flour.
- Using a whisk or even just your fingers, gently combine these two flours and the salt in the bowl. We want to ensure they are thoroughly mixed so that each dango ball has an even texture and flavor. Take a moment to appreciate the fine, powdery texture of the rice flours.
- Now for the hot water! I measure out 130 ml of hot water. The temperature is crucial here; it should be around 80°C (175°F). You don’t want it boiling, as that can cook the flour too quickly, but it needs to be hot enough to activate the starches properly. I usually heat water in a kettle and let it sit for a minute or two after it boils to reach the ideal temperature.
- Gradually pour the hot water into the flour mixture, stirring constantly with a spatula or a sturdy spoon. Do not dump it all in at once! This gradual addition allows the flour to absorb the water evenly. You’ll notice the mixture will start to form clumps and then come together into a shaggy dough. Keep stirring until most of the flour is hydrated.
- Once the mixture is too thick to stir with a spoon, it’s time to get your hands in there! Gently knead the dough within the bowl. The heat from the water will dissipate quickly, making it comfortable to handle. Knead for about 5 to 7 minutes. The goal here is to achieve a smooth, pliant, and uniform dough that isn’t sticky to the touch. It should feel like soft play-dough. This kneading step is vital for developing the texture of your dango, so don’t rush it! If your dough feels a little too dry and crumbly, you can add a tiny bit more hot water, a teaspoon at a time. If it’s too sticky, sprinkle in a very small amount of joshinko. We are aiming for perfection in our Easy Hanami Dango Recipe!
- Once you have a smooth, elastic dough, divide it into three equal portions. I usually eyeball it, but for precision, you could weigh them to ensure even coloring.
Coloring and Shaping the Dango
Now comes the fun, artistic part of our Easy Hanami Dango Recipe – giving our dango their signature Hanami colors! Each color represents a different aspect of spring in Japan: white for the lingering snow, pink for the delicate cherry blossoms, and green for the vibrant new leaves. This visual appeal is just as important as the taste, especially for a dish celebrating spring. It truly makes them a feast for the eyes!
- Leave one portion of the dough as is. This will be our beautiful white dango, representing the last vestiges of winter snow or the purity of early spring.
- For the pink dango, take the second portion of dough. Add just a tiny drop or a very small amount of red food coloring to it. I always start with less because it’s easier to add more than to take away. Knead the dough thoroughly until the color is evenly distributed and the dough is a uniform shade of pink. Make sure there are no streaks of white left. This might take a few minutes of kneading. If you desire a deeper pink, add another tiny speck of coloring and continue kneading.
- For the green dango, take the third portion of dough. If you’re using matcha powder, which I highly recommend for its lovely earthy flavor and natural color, sprinkle about 1-2 teaspoons onto the dough. Knead it in until the dough is a consistent, vibrant green. If you’re using green food coloring, add a small drop and knead until the color is even. Again, adjust the amount of coloring to achieve your desired shade. I love the subtle flavor matcha adds to this segment of our Easy Hanami Dango Recipe.
- Once all three portions are beautifully colored, it’s time to shape them. Take each colored portion and roll it into a long, even log. Then, divide each log into small, equal-sized pieces. I usually aim for about 9-10 pieces per color, which will give us enough for 9-10 skewers, each with one dango of each color. Each piece should be roughly the size of a marble or a small gumball.
- Roll each small piece into a smooth, perfectly round ball. Take your time with this step; uniform balls not only look better on the skewer but also cook more evenly. As you finish shaping each batch of dango balls, place them on a plate and cover them loosely with plastic wrap or a damp cloth. This prevents them from drying out, which can cause cracking during cooking. You should now have three distinct piles of dango: white, pink, and green.
Cooking Process: Boiling Your Dango to Perfection
We’re getting closer to enjoying our homemade dango! The cooking process for this Easy Hanami Dango Recipe is quite straightforward, but a few key steps will ensure your dango turn out perfectly chewy and tender. This is where the magic happens, transforming raw dough into those delightful, bouncy spheres!
- Fill a medium-sized pot with water, about two-thirds full. Place it on the stovetop and bring the water to a rolling boil over high heat. While the water is heating, prepare an ice bath in a large bowl. This is a crucial step for stopping the cooking process and giving the dango its signature chewy texture. Fill the bowl with cold water and plenty of ice cubes.
- Once the water in the pot is vigorously boiling, carefully drop the dango balls into the water, a few at a time. Do not overcrowd the pot! Cook them in batches if necessary, to maintain the water temperature and ensure even cooking. If you put too many in at once, the water temperature will drop, and the dango might not cook properly.
- The dango will sink to the bottom of the pot initially. Cook them for about 2-3 minutes. As they cook, you’ll notice them floating to the surface. This is a good sign that they are almost done, but don’t take them out just yet!
- After they float to the surface, continue to boil them for another 1-2 minutes. This extra cooking time ensures they are thoroughly cooked through and develop that satisfying chewiness. You want them cooked but not mushy. This extended float time is a little secret for achieving the best texture for your Easy Hanami Dango Recipe.
- Using a slotted spoon, carefully scoop the cooked dango balls out of the boiling water. Immediately transfer them into the prepared ice bath. This sudden temperature change (the “shocking”) stops the cooking process, firms up the dango’s exterior, and contributes significantly to their delightfully chewy texture. Let them cool in the ice bath for at least 5 minutes, or until they are completely chilled.
- Once chilled, drain the dango thoroughly in a colander. Gently pat them dry with a clean kitchen towel or paper towels. Removing excess water is important as it prevents them from being slippery and helps them hold their shape better on the skewers. At this point, you’ll notice how wonderfully soft and bouncy they feel. They are perfectly ready for assembly!
Assembling Your Beautiful Hanami Dango Skewers
The moment of truth! Assembling the dango is where all our hard work comes together, creating those iconic, colorful skewers. This is the final step in our Easy Hanami Dango Recipe before we get to enjoy our delicious treat. The visual presentation is key here, capturing the essence of spring’s arrival.
- Grab your wooden skewers. If you’re using standard 15-20 cm skewers, we’ll typically put three dango balls on each. The traditional Hanami Dango order is pink, white, and green, symbolizing cherry blossoms, the snow-capped mountains of winter giving way to spring, and the lush new greenery, respectively.
- Carefully thread one pink dango ball onto the skewer first, pushing it about a third of the way up. Be gentle to avoid cracking the dango, but firm enough to get it centered.
- Next, thread a white dango ball onto the skewer, positioning it snugly against the pink one.
- Finally, thread a green dango ball onto the skewer, completing the classic Hanami Dango trio. Adjust the dango balls so they are evenly spaced and sit nicely on the skewer. You want them to look appealing and symmetrical.
- Repeat this process with the remaining dango balls until all are skewered. You should end up with approximately 9-10 beautiful Hanami Dango skewers, depending on how many balls you made per color.
- And there you have it! Your very own homemade Hanami Dango, ready to be enjoyed. These are perfect for spring picnics, a sweet treat at home, or simply to celebrate the beauty of the season. I always feel such a sense of accomplishment when I see these vibrant skewers laid out.
Serving and Enjoying Your Easy Hanami Dango Recipe
The best part of any recipe is, of course, the tasting! Your homemade Hanami Dango are now ready to be savored. This simple yet elegant Japanese sweet is truly a delight, offering a unique texture and subtle flavor that pairs wonderfully with a cup of green tea. Here are a few tips on how to best enjoy your creation.
- Hanami Dango are traditionally enjoyed at room temperature, making them a perfect portable snack for cherry blossom viewing parties (hanami). Their soft, chewy texture is best appreciated when they’re not too cold, but also not warm.
- While they are delicious plain, some people enjoy them with a light dusting of kinako (roasted soybean flour) or a drizzle of mitarashi sauce (a sweet and savory soy glaze). However, for a classic Hanami Dango experience, I often find them perfect as they are, letting the subtle sweetness of the rice flour shine through.
- These dango are best enjoyed fresh on the day they are made. The texture will be at its peak—wonderfully chewy and soft. As time passes, especially if refrigerated, they tend to harden. If you have leftovers, store them in an airtight container at room temperature for up to one day. If you must store them longer (up to 2-3 days), refrigerate them.
- If refrigerated, the dango will become quite firm. To soften them up slightly, you can gently microwave them for 10-15 seconds or steam them for a few minutes until they regain some of their chewiness. Be careful not to overheat them, as they can become too soft or even sticky.
- Pair your Hanami Dango with a warm cup of green tea. The slightly bitter notes of green tea, particularly sencha or matcha, provide a beautiful contrast to the dango’s mild sweetness and chewy texture. It’s a perfect combination for a peaceful moment, truly embodying the spirit of spring.
- Sharing is caring! Hanami Dango are designed for sharing during gatherings. Pack them in a bento box if you’re heading out for a picnic, or arrange them beautifully on a platter for guests at home. The vibrant colors are always a conversation starter. Making this Easy Hanami Dango Recipe is not just about the food; it’s about the experience and the joy it brings.
Troubleshooting Tips for Your Hanami Dango:
- Dough too dry/crumbly: Add a tiny amount (1/2 teaspoon) of hot water and knead. Repeat if necessary.
- Dough too sticky: Add a tiny amount (1/2 teaspoon) of joshinko or shiratamako and knead. Repeat if necessary.
- Dango cracking during cooking: This usually means the dough was too dry or not kneaded enough to develop elasticity. Ensure your dough is smooth and pliable.
- Dango too hard after cooking: They might have been overcooked or not shocked in the ice bath quickly enough. Always ensure they go straight into ice water. If they harden after refrigeration, try the gentle reheating method.
I genuinely hope you enjoy making and savoring this delightful Easy Hanami Dango Recipe as much as I do. It’s a simple pleasure that truly brings a taste of Japanese spring into your home!
Conclusion:
And there you have it! We’ve journeyed through the simple, yet profoundly rewarding, process of creating a truly special treat. If you’re looking for a dessert that’s not only delightful to eat but also a joy to make and a feast for the eyes, then this recipe is absolutely a must-try. I genuinely believe that every kitchen, regardless of your culinary expertise, deserves to experience the magic of freshly made dango. The combination of delicate chewiness, subtly sweet flavors, and those iconic pastel hues makes it an irresistible addition to any occasion, big or small. It’s the kind of dish that brings smiles, sparks conversation, and leaves a lasting impression. What truly sets this particular endeavor apart is how approachable and forgiving it is; you don’t need a pantry full of exotic ingredients or years of practice to achieve stunning results. It’s a testament to the idea that some of the most beautiful and delicious things in life are also the simplest to create. Trust me, the sense of accomplishment you’ll feel as you skewer those perfectly round, vibrantly colored dumplings will be incredibly satisfying.
Truly, embarking on this Easy Hanami Dango Recipe is more than just making a dessert; it’s an invitation to experience a slice of Japanese culinary charm right in your own kitchen. It’s an opportunity to create something beautiful with your own hands, offering a moment of mindful cooking that culminates in a truly unique treat. The visual appeal alone, with its harmonious pink, white, and green palette, makes it an instant showstopper, perfectly evoking the spirit of spring and new beginnings. But beyond its stunning looks, the texture is what truly captivates – that delightful, bouncy, and slightly chewy mochi consistency that’s unlike anything else. It’s a comforting yet exciting bite, a perfect balance of traditional essence and universal appeal. This isn’t just a recipe; it’s an experience, a miniature celebration waiting to happen.
Elevating Your Dango Experience: Serving Suggestions & Creative Variations
While these gorgeous dango are absolutely perfect enjoyed on their own, perhaps with a cup of green tea as is tradition during Hanami (flower viewing) season, don’t hesitate to get creative with your serving. Imagine them as a light dessert after a spring meal, or even as a unique addition to a brunch spread. For a delightful textural contrast, try lightly toasting them on a grill or in a dry pan for a few minutes until they develop a slight crisp on the outside while remaining wonderfully soft within. You could also serve them with a variety of dipping sauces. A classic mitarashi sauce – a sweet and savory soy glaze – is always a winner. Alternatively, a dollop of sweet red bean paste (anko), a dusting of roasted soybean flour (kinako), or even a drizzle of condensed milk can transform the experience. For those with a sweet tooth, a sprinkle of granulated sugar or a tiny splash of maple syrup can add another layer of flavor without overpowering the dango’s inherent charm.
The beauty of this recipe also lies in its adaptability. While the traditional pink, white, and green are iconic, why not experiment with other natural colorings? A tiny bit of matcha powder can yield a deeper green, while a touch of ube extract could give you a beautiful purple. You could even infuse the dough with subtle flavors – a hint of vanilla, almond, or even a tiny amount of fruit puree can add an unexpected twist. Imagine a batch made with strawberry powder for an intensified pink, or black sesame paste for a sophisticated grey hue. For a truly decadent treat, you could even gently stuff the dango with a small amount of red bean paste before shaping. The possibilities are truly endless, allowing you to personalize your dango to perfectly suit your taste, mood, or the occasion. Consider making smaller dango and serving them in elegant dessert cups, perhaps layered with fruit or a light cream, for a more sophisticated presentation. Or, for a lovely gift, package them beautifully in a small box, tied with a ribbon, to share the joy with friends and family.
Your Culinary Journey Begins Now!
Now, it’s your turn! Don’t let the simplicity of this recipe fool you; the reward is immense. I wholeheartedly encourage you to roll up your sleeves, gather your ingredients, and dive into the delightful process of making your very own Hanami Dango. It’s a wonderfully therapeutic activity, and the end result is a truly special treat that will impress everyone who tries it. Imagine the pride you’ll feel as you present these vibrant, chewy morsels. It’s an edible celebration, a little piece of joy that you’ve crafted yourself. This recipe is designed to be accessible and fun, so banish any fears of complex techniques and embrace the adventure.
Once you’ve made your batch, I would absolutely love to see your creations! Share your photos, tell me about any personal twists you added, or simply let me know how much you enjoyed the experience. Your feedback and creativity inspire me and our entire community of food lovers. Did you try a new flavor? Did you serve them in a unique way? Every shared experience adds to the richness of our collective culinary journey. Don’t be shy; your unique take on this classic treat could inspire someone else to give it a try. So, go on, make some memories in your kitchen, savor every delightful bite, and then come back and tell me all about it!

Easy Hanami Dango: Soft, Chewy Japanese Spring Sweets
Make delightful Hanami Dango, soft, chewy Japanese spring sweets with iconic pink, white, and green colors. Perfect for hanami (cherry blossom viewing) festivities, these mochi-like dumplings are subtly sweet and visually appealing. This easy recipe brings a taste of Japanese spring to your home.
Ingredients
-
100 g shiratamako (sweet glutinous rice flour)
-
30 g joshinko (non-glutinous rice flour)
-
130 ml hot water (approx. 80°C/175°F)
-
Pinch of salt (optional)
-
Red food coloring
-
Green food coloring (or 1-2 tsp matcha powder)
Instructions
-
Step 1
In a large bowl, whisk together 100g shiratamako, 30g joshinko, and a pinch of salt until well combined. -
Step 2
Gradually add 130 ml hot water (80°C/175°F) to the flour mixture, stirring constantly until a shaggy dough forms. Knead the dough within the bowl for 5-7 minutes until it becomes smooth, pliant, and uniform. -
Step 3
Once the dough is smooth, divide it into three equal portions. Leave one portion as is for the white dango. Knead a tiny drop of red food coloring into the second portion until evenly pink. Knead green food coloring (or 1-2 tsp matcha powder) into the third portion until evenly green. -
Step 4
Roll each colored portion into 12 small, equal-sized balls, approximately 20 grams each, for a total of 36 dango balls. Cover the shaped balls loosely with plastic wrap or a damp cloth to prevent them from drying out. -
Step 5
Fill a medium-sized pot two-thirds full with water and bring it to a rolling boil. Prepare an ice bath in a separate large bowl. Carefully drop the dango balls into the boiling water, cooking them in batches to avoid overcrowding. They will initially sink, then float to the surface after 2-3 minutes. Continue boiling for another 1-2 minutes after they float to ensure they are thoroughly cooked. -
Step 6
Using a slotted spoon, immediately transfer the cooked dango balls from the boiling water into the prepared ice bath. Let them cool in the ice bath for at least 5 minutes until completely chilled. Drain the dango thoroughly in a colander and gently pat them dry with a clean cloth. -
Step 7
Grab your wooden skewers. Carefully thread three dango balls onto each skewer in the traditional Hanami Dango order: pink first, then white, and finally green. Adjust the dango balls so they are evenly spaced and sit nicely on the skewer. This process will yield 12 beautiful Hanami Dango skewers. -
Step 8
Your homemade Hanami Dango are best enjoyed fresh at room temperature, offering their peak soft and chewy texture. Pair them with a warm cup of green tea for a delightful experience. Store any leftovers in an airtight container at room temperature for up to one day, or refrigerate for up to 2-3 days. If refrigerated, they may firm up; gently microwave for 10-15 seconds or steam for a few minutes to soften them.
Important Information
Nutrition Facts (Per Serving)
It is important to consider this information as approximate and not to use it as definitive health advice.
Allergy Information
Please check ingredients for potential allergens and consult a health professional if in doubt.


Leave a Comment