
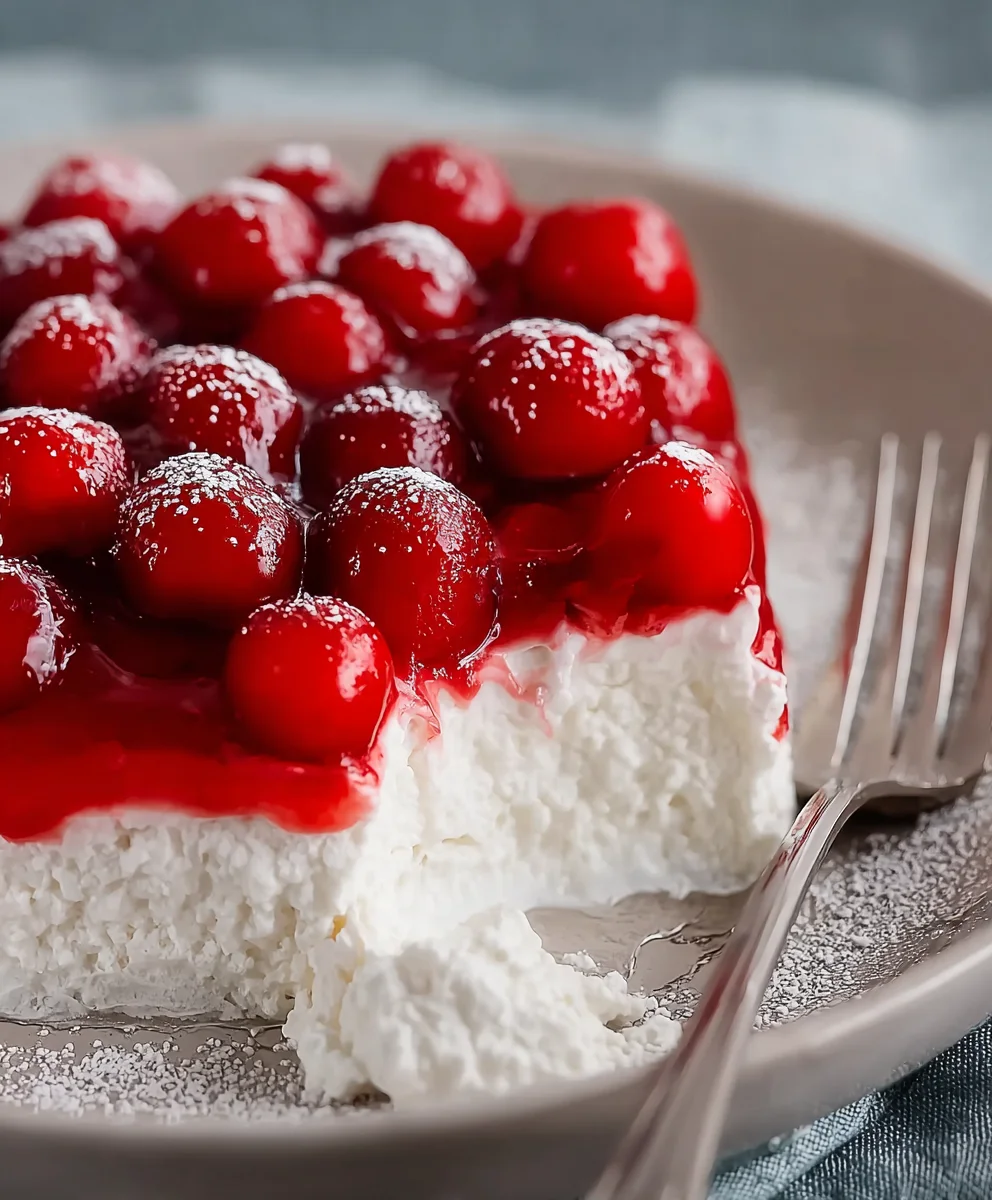
Cherries In The Snow is a dessert that truly captures the imagination, a delightful blend of vibrant fruit and creamy indulgence that promises to be the star of any gathering. Imagine a stunning tableau of crimson cherries nestled within a cloud-like, snowy cream, all resting upon a perfectly crisp, buttery crust. This exquisite creation isn’t just a treat for the taste buds; it’s a feast for the eyes, embodying both elegance and comfort in every single spoonful. It’s a nostalgic nod to simpler times, a cherished recipe passed down through generations, often gracing holiday tables and family celebrations. People adore this dish for its incredible balance of flavors – the luscious sweetness of the cherries perfectly complemented by the rich, airy cream cheese filling, all anchored by that irresistible crunchy base. The convenience of its often no-bake preparation combined with its show-stopping presentation makes Cherries In The Snow an absolute winner for both seasoned dessert enthusiasts and novices alike. I am absolutely thrilled to share the secrets behind this timeless classic with you today.

Ingredients:
- 1 ½ cups (about 10-12 full sheets) Graham Cracker Crumbs: You can purchase pre-crushed crumbs or crush your own in a food processor or by hand using a rolling pin and a Ziploc bag. I find a combination of fine and slightly coarser crumbs adds a lovely texture.
- ½ cup (1 stick) Unsalted Butter: Melted completely. Unsalted butter gives you more control over the overall saltiness of the dish, though salted butter can be used if that’s all you have on hand – just be mindful of any added salt elsewhere.
- ¼ cup Granulated Sugar: This adds a touch of sweetness to balance the buttery richness of the crust and helps with caramelization during baking.
- 2 (8-ounce) packages Cream Cheese: It is absolutely crucial that your cream cheese is completely softened to room temperature. This will ensure a smooth, lump-free mixture, which is essential for the velvety texture of our “Cherries In The Snow”.
- 1 cup Confectioners’ Sugar (Powdered Sugar): Sifted, if possible, to prevent lumps. This provides the primary sweetness for this layer, complementing the tanginess of the cream cheese.
- 1 teaspoon Vanilla Extract: Pure vanilla extract offers a warm, aromatic note that enhances the flavors of both the cream cheese and the cherries.
- 1 (8-ounce) container Frozen Whipped Topping: Thawed completely in the refrigerator. Brands like Cool Whip work perfectly for this, providing a light, airy base for the cream cheese layer without the need for additional whipping.
- 2 (21-ounce) cans Cherry Pie Filling: Look for a good quality pie filling with whole or large pieces of cherries. The vibrant color and tart-sweet flavor are central to the “Cherries In The Snow” experience.
- ½ teaspoon Almond Extract (Optional, but highly recommended): This small addition truly elevates the cherry flavor, giving it a more complex and marzipan-like nuance that pairs beautifully with cherries. If you’re not a fan of almond, feel free to omit it.
- 2 cups Heavy Cream (Cold): Also known as heavy whipping cream. It’s essential that this is very cold for proper whipping.
- ½ cup Confectioners’ Sugar (Powdered Sugar): Sifted. This sweetens the whipped cream and also helps to stabilize it slightly.
- 1 teaspoon Vanilla Extract: Again, pure vanilla extract adds a lovely fragrance and flavor to our final topping.
- Optional garnishes: Fresh cherries, chocolate shavings, or a sprinkle of additional graham cracker crumbs for presentation.
For the Graham Cracker Crust:
For the Cream Cheese Layer:
For the Cherry Topping:
For the Whipped Cream Topping:
Preparation Phase 1: Crafting the Perfect Graham Cracker Crust
- Preheat and Prepare: First things first, let’s get our oven ready. Preheat your oven to a moderate 350°F (175°C). While that’s heating, grab a 9×13 inch baking dish. I usually give mine a very light spray with cooking spray just to be extra sure nothing sticks, even though the butter in the crust generally prevents this.
- Crush Those Crackers: If you’re starting with whole graham crackers, now’s the time to turn them into beautiful crumbs. I like to place them in a sturdy Ziploc bag and use a rolling pin to crush them. Aim for a mix of fine crumbs and some slightly larger pieces for textural interest. Alternatively, a food processor makes quick work of this task, ensuring uniformly fine crumbs. Measure out your 1 ½ cups of crumbs into a medium-sized mixing bowl.
- Sweeten the Crumbs: To your graham cracker crumbs, add the ¼ cup of granulated sugar. Give it a good stir with a fork or whisk to ensure the sugar is evenly distributed throughout the crumbs. This step is crucial for a perfectly sweetened crust.
- Melt and Combine the Butter: Next, melt your ½ cup (1 stick) of unsalted butter. You can do this in a small saucepan over low heat or, more conveniently, in the microwave. Once melted, pour the warm, liquid butter over the sugar-coated graham cracker crumbs.
- Mix Until Moist: Now, using a fork or your hands (which I find works best for this part, ensuring every crumb is coated), mix everything together until the crumbs are uniformly moistened. The mixture should resemble wet sand and hold together when you press it between your fingers. This is the sign of a perfect crust mixture ready for pressing.
- Press into the Dish: Pour the buttery crumb mixture into your prepared 9×13 inch baking dish. Using the bottom of a flat glass or a measuring cup, firmly and evenly press the crumbs into the bottom of the pan. It’s important to get it as compact as possible; this creates a sturdy base that won’t fall apart when you slice into your finished “Cherries In The Snow”. Take your time here to ensure an even layer from edge to edge.
- Bake the Crust: Place the pressed crust into your preheated oven. Bake for approximately 8-10 minutes. You’re looking for a lightly golden-brown crust, and you’ll likely smell that wonderful toasted graham cracker aroma filling your kitchen. This short bake time helps to set the crust, making it less crumbly and more flavorful.
- Cool Completely: Once baked, remove the crust from the oven and let it cool completely on a wire rack. It’s really important that this crust is thoroughly cooled before you add the next layer, otherwise, you risk melting your cream cheese mixture, which would be a tragic turn for our “Cherries In The Snow”. You can even pop it into the refrigerator for 15-20 minutes to speed up the cooling process once it’s no longer hot to the touch.
Preparation Phase 2: Whipping Up the Silky Cream Cheese Layer
- Ensure Room Temperature Cream Cheese: This step cannot be stressed enough! Make sure your two 8-ounce packages of cream cheese are completely softened to room temperature. If it’s even slightly cold, you’ll end up with lumps, and nobody wants lumpy “Cherries In The Snow”! I usually take mine out of the fridge at least an hour, sometimes two, before I plan to start.
- Beat the Cream Cheese: In a large mixing bowl, place your softened cream cheese. Using an electric mixer (either a stand mixer with the paddle attachment or a hand mixer), beat the cream cheese on medium speed for about 2-3 minutes. You want it to be incredibly smooth, light, and fluffy, almost whipped. Scrape down the sides of the bowl occasionally to ensure everything is evenly incorporated.
- Sift and Add Confectioners’ Sugar: Reduce the mixer speed to low. Gradually add the 1 cup of sifted confectioners’ sugar to the cream cheese mixture. Sifting is an extra step, but it truly helps prevent any powdery lumps from forming, contributing to that perfectly smooth texture we’re aiming for. Once all the sugar is added, increase the speed back to medium and beat for another 1-2 minutes, until the mixture is light and creamy.
- Introduce Vanilla Extract: Now, add the 1 teaspoon of vanilla extract. Beat for another 30 seconds or so, just until the vanilla is fully incorporated and its lovely aroma is present.
- Gently Fold in Whipped Topping: This is where the magic happens for lightness! Get your thawed 8-ounce container of frozen whipped topping. Using a spatula, gently fold the whipped topping into the cream cheese mixture. The key word here is gently. You want to maintain as much of that airy volume as possible. Continue folding until there are no streaks of whipped topping visible and the mixture is uniformly combined and cloud-like. Avoid overmixing, as this can deflate the topping.
- Spread Over Cooled Crust: Carefully spoon the luscious cream cheese mixture over your completely cooled graham cracker crust. Using an offset spatula or the back of a spoon, gently spread the layer evenly from edge to edge. Try not to press down too hard, as you don’t want to disturb the crust below. Aim for a smooth, uniform surface.
- Chill Time, Part One: Once the cream cheese layer is spread, place the baking dish into the refrigerator to chill for at least 30-60 minutes. This initial chilling period allows the cream cheese layer to set up firm enough to hold its shape beautifully when we add the cherry topping, preventing the layers from bleeding into each other. Patience is a virtue when creating stunning “Cherries In The Snow”!
Preparation Phase 3: Enhancing Our Luscious Cherry Topping
- Open and Prepare Pie Filling: Grab your two 21-ounce cans of cherry pie filling. Using a can opener, carefully open both cans.
- Add Almond Extract (Highly Recommended!): Pour the cherry pie filling into a medium-sized bowl. If you’re using it, add the ½ teaspoon of almond extract. Stir gently with a spoon to combine. The almond extract truly makes a difference, deepening the cherry flavor and adding a subtle, sophisticated nuance that takes your “Cherries In The Snow” from great to unforgettable. Don’t be afraid to taste a small spoonful at this point; you might be surprised by the delicious transformation!
- Ready for Layering: That’s it! Your cherry topping is now perfectly prepared and ready to be spread over the chilled cream cheese layer. We want to apply it when the cream cheese is firm, ensuring clear, distinct layers for our beautiful dessert.
Preparation Phase 4: Assembling Your Magnificent Cherries In The Snow
- Retrieve Chilled Dessert: Once your cream cheese layer has had ample time to chill and firm up in the refrigerator (at least 30-60 minutes, as instructed in step 7 of the cream cheese section), carefully remove the baking dish from the fridge. You should be able to gently touch the surface without it feeling too soft or sticky.
- Gently Spoon Cherry Topping: Now, using a large spoon, begin to dollop the prepared cherry pie filling (with or without almond extract, as per your preference) over the chilled cream cheese layer. Start from the center and work your way outwards. Be mindful not to dump it all in one spot, as this could create a deep indentation or mix the layers.
- Carefully Spread Evenly: With the back of your spoon or an offset spatula, very gently and slowly spread the cherry topping evenly across the entire surface of the cream cheese layer. The goal is to cover the cream cheese completely without disturbing it underneath. The firm cream cheese layer should act as a barrier, allowing the cherries to sit beautifully on top. Take your time, being delicate with your movements to maintain those distinct, gorgeous layers that make “Cherries In The Snow” so visually appealing.
- Return to Chill: Once the cherry topping is spread, return the baking dish to the refrigerator for another at least 1-2 hours. This is a crucial step for allowing all the layers to fully set and marry their flavors. A longer chill time (even overnight) is always better for optimal slicing and serving. The colder and firmer the dessert, the cleaner your slices will be.
Preparation Phase 5: The Grand Finale – Our Cloud-Like Whipped Cream Topping
While your “Cherries In The Snow” is chilling and setting, you can prepare the final, glorious whipped cream topping. It’s best to prepare this closer to serving time for maximum freshness and fluffiness.
- Chill Your Tools: For the best whipped cream results, I always recommend chilling your mixing bowl (preferably metal) and your whisk attachment (for a stand mixer) or beaters (for a hand mixer) in the freezer for about 10-15 minutes before you start. Cold tools help the cream whip up faster and achieve a firmer, more stable consistency.
- Pour Cold Heavy Cream: Pour your 2 cups of very cold heavy cream into the chilled mixing bowl. The colder the cream, the easier and faster it will whip into beautiful peaks.
- Whip Until Soft Peaks Form: Using an electric mixer on medium-high speed, begin whipping the heavy cream. You’ll notice it start to thicken. Continue whipping until soft peaks form. This means when you lift the beater, the cream forms peaks that curl over gently.
- Gradually Add Sugar and Vanilla: Reduce the mixer speed to low. Gradually add the ½ cup of sifted confectioners’ sugar and the 1 teaspoon of vanilla extract. Once combined, increase the speed back to medium-high.
- Whip to Stiff Peaks: Continue whipping until stiff peaks form. This means that when you lift the beater, the cream holds its shape firmly and doesn’t droop. Be careful not to over-whip, as you’ll end up with butter! It can go from perfect to over-whipped quite quickly, so keep an eye on it.
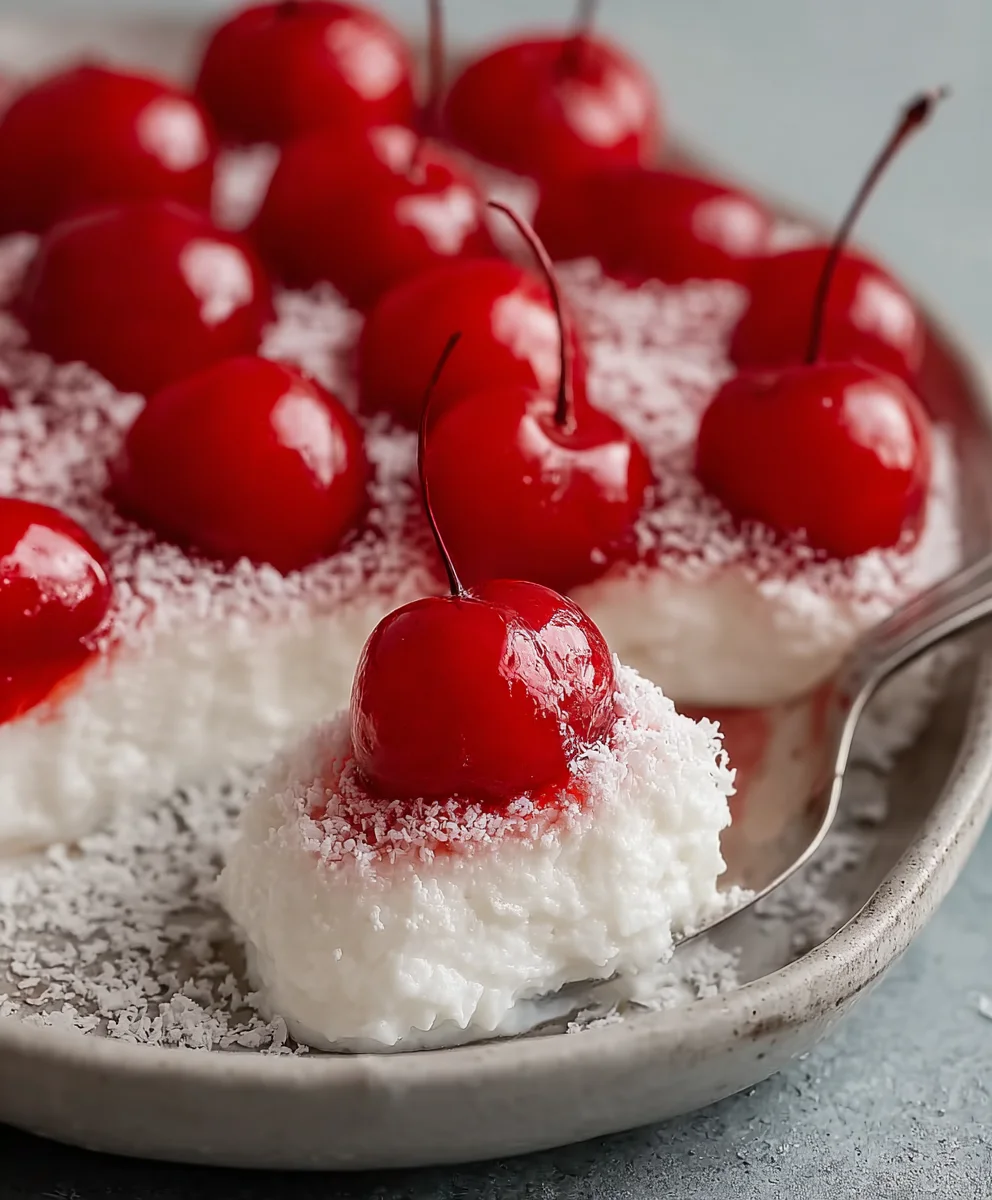
- Spread Over Chilled Dessert: Once your “Cherries In The Snow” has thoroughly chilled and is firm, remove it from the refrigerator. Gently spread the freshly whipped cream over the cherry layer, creating a beautiful, fluffy white cloud on top. You can use an offset spatula to create swirls and peaks for an attractive finish.
- Garnish (Optional): If desired, add your optional garnishes like fresh cherries, a sprinkle of chocolate shavings, or a few extra graham cracker crumbs for visual appeal. This adds a professional touch to your homemade “Cherries In The Snow”.
Chilling and Serving Your Divine Cherries In The Snow
After all the layers are assembled and topped with that magnificent whipped cream, your “Cherries In The Snow” needs one final, important chill before it’s ready to dazzle your guests (or just yourself!).
- Final Chill: For optimal firmness, clean slices, and fully developed flavors, return the entire dessert to the refrigerator for at least another 2-4 hours, or ideally, overnight. This extended chilling time allows all the layers to meld together perfectly, ensuring that each bite is a harmonious blend of textures and tastes. It also makes slicing significantly easier and cleaner, preventing the layers from squishing or sliding around. Trust me, the wait is worth it for a truly spectacular “Cherries In The Snow”.
- Serving with Panache: When you’re ready to serve, remove the dish from the refrigerator. For the cleanest slices, you can dip your knife in hot water and wipe it clean between each cut. This creates crisp edges and a beautiful presentation. Carefully cut your “Cherries In The Snow” into squares. Use a sturdy spatula to lift each piece onto individual dessert plates.
- Enjoy Immediately: This dessert is best enjoyed chilled and fresh. The combination of the crisp graham cracker crust, the creamy and tangy cream cheese, the sweet and slightly tart cherry layer, and the light whipped cream creates a symphony of flavors and textures that is simply irresistible. Each spoonful of “Cherries In The Snow” is a delightful experience.
Tips for Perfect Cherries In The Snow Every Time
To ensure your “Cherries In The Snow” is nothing short of perfection, here are a few extra tips I’ve picked up along the way:
- Room Temperature is Key: I really can’t emphasize this enough for the cream cheese. If it’s not fully softened, you’ll be fighting lumps, and your cream cheese layer won’t be as smooth and uniform. Planning ahead by taking it out of the fridge an hour or two before you start makes a huge difference.
- Don’t Rush the Chill: Patience is truly a virtue with layered desserts. Each chilling stage serves a purpose – from setting the crust to firming up the cream cheese and finally allowing all the flavors to marry beautifully. Resist the urge to cut corners on chilling time, especially the final chill. A well-chilled “Cherries In The Snow” holds its shape magnificently and is far more enjoyable to eat.
- Sifting the Powders: Sifting your confectioners’ sugar for both the cream cheese layer and the whipped cream topping prevents lumps and ensures a silky-smooth texture in both components. It’s a small extra step that makes a noticeable difference in the final mouthfeel of your “Cherries In The Snow”.
- Gentle Folding for Lightness: When incorporating the thawed whipped topping into the cream cheese mixture, and later when spreading the whipped cream, be gentle. Overmixing or heavy-handed spreading can deflate the airiness you’ve worked hard to achieve, leading to a denser texture.
- Flavor Boosters: While optional, a touch of almond extract in the cherry filling is a game-changer. It beautifully enhances the natural cherry flavor. You could also experiment with a splash of cherry liqueur or kirsch in the cherry layer for an adult version, though always in moderation.
- Crust Variations: If you’re not a fan of graham crackers, you can easily substitute them. Vanilla wafers, shortbread cookies, or even digestive biscuits crushed up can make excellent alternatives for the crust. Just ensure you adjust the butter quantity if needed to get that “wet sand” consistency.
- Presentation Matters: A neatly spread whipped cream topping can be made even more appealing with a few simple garnishes. Fresh whole cherries, a sprinkle of chocolate curls, or even a dusting of cocoa powder can make your “Cherries In The Snow” look as good as it tastes.
- Storage: Leftover “Cherries In The Snow” should be stored tightly covered in the refrigerator. It will generally keep well for 3-4 days, though the crust might soften slightly over time. Freezing is generally not recommended as the textures of the cream cheese and whipped cream layers can change upon thawing.
- Serving Temperature: This dessert is absolutely at its best when served cold, directly from the refrigerator. Its refreshing coolness is part of its charm, especially on a warm day.
Creating this “Cherries In The Snow” is a delightful process, and following these detailed steps and tips will undoubtedly lead you to a dessert that is both stunning to look at and incredibly delicious to devour. Enjoy every single bite of this classic, layered treat!
Conclusion:
And so, we arrive at the grand finale of our culinary journey – a true testament to simple pleasures and unforgettable flavors. I truly believe that this recipe isn’t just another dessert; it’s an experience waiting to happen, a sweet symphony of textures and tastes that will undoubtedly earn a permanent spot in your recipe collection. You might be wondering why I’m so enthusiastic, and it all boils down to this: its inherent charm lies in its deceptive simplicity. You don’t need to be a Michelin-star chef to whip up something truly extraordinary. This dish proves that with a handful of accessible ingredients and a little love, you can create a dessert that looks impressive, tastes divine, and leaves everyone clamoring for more. It’s the kind of dish that brings smiles to faces, sparks conversations, and creates those cherished food memories we all adore.
This dessert is a must-try for its unparalleled combination of creamy richness, the delightful crunch of its crust, and the vibrant, juicy bursts of cherry that cut through the sweetness with a perfect tartness. It’s a harmonious balance that I find utterly captivating, a dessert that manages to be both light and satisfying all at once. It’s the ideal candidate for virtually any occasion, from a casual family dinner to a more formal gathering. Imagine the delight on your guests’ faces as you present this stunning, layered creation! The fact that much of the preparation can be done ahead of time is just the icing on the cake, offering you more time to relax and enjoy your company rather than being stuck in the kitchen. It truly embodies the spirit of effortless elegance, allowing you to shine as a host without any added stress.
Serving Suggestions and Creative Variations: Unleash Your Inner Chef!
While this dessert is undeniably spectacular as is, I always encourage a little culinary exploration. To serve, I recommend presenting it perfectly chilled, straight from the refrigerator. A dollop of freshly whipped cream on top, perhaps dusted lightly with a touch of cocoa powder or garnished with a few extra fresh cherries, elevates its presentation to an art form. For an extra touch of sophistication, consider adding a tiny sprig of fresh mint – its bright green hue provides a beautiful contrast and a subtle aromatic lift that I find utterly charming. For those who appreciate a textural contrast, a sprinkle of toasted slivered almonds or finely chopped pecans over each serving can add a wonderful nutty crunch that complements the creamy layers beautifully.
Now, let’s talk variations! This recipe is incredibly adaptable, inviting you to put your own creative spin on it. If cherries aren’t in season or you simply fancy a change, consider swapping them out for other fruits. Imagine a version with sweet, ripe peaches in the summer, or a vibrant mixed berry medley with strawberries, blueberries, and raspberries. For an autumnal twist, a layer of spiced apple pie filling could be absolutely divine, transforming it into a cozy, comforting dessert. You could also experiment with the crust: while my preferred option is fantastic, a crushed graham cracker crust or even a base of vanilla wafers would also work wonderfully, each offering a slightly different flavor profile. For an adult-only indulgence, a subtle splash of kirsch or amaretto folded into the cherry layer can add a sophisticated depth of flavor that is truly special. Furthermore, instead of one large pan, you can easily create individual portions in elegant ramekins or small dessert glasses, making for an even more personalized and visually appealing presentation. The possibilities are truly endless, limited only by your imagination!
Your Turn: Experience the Magic of Cherries In The Snow!
So, now it’s your turn. I truly, truly urge you to set aside some time this week to give this incredible recipe a try. Don’t be intimidated; it’s far simpler than you might think, and the reward is absolutely worth every moment. Imagine the first spoonful: the gentle crunch, the smooth creaminess, and that vibrant burst of cherry. It’s pure bliss, I promise you. This isn’t just a dessert; it’s a delightful culinary journey that culminates in pure joy. You’ll understand exactly why I can’t stop raving about it once you’ve experienced its unique charm firsthand. I am confident that once you taste the delicate balance and delightful textures of this Cherries In The Snow recipe, you’ll be as smitten as I am. It’s a crowd-pleaser, a mood-lifter, and an absolute triumph of simple dessert-making. Please, don’t keep this delicious secret to yourself! After you’ve whipped up your own batch, I would absolutely love to hear all about your experience. Did you try any fun variations? What did your family and friends think? Share your successes, your serving suggestions, and especially, your photos with me! There’s nothing I love more than seeing your culinary creations come to life in your own kitchens. Happy baking, and get ready to fall in love with your new favorite dessert!
Cherries In The Snow
Cherries In The Snow is a delightful no-bake dessert featuring a crisp graham cracker crust, a creamy, tangy cream cheese layer, and a luscious cherry topping, finished with a cloud of whipped cream. This elegant yet comforting treat is perfect for any gathering.
Ingredients
-
1 ½ cups Graham Cracker Crumbs
-
½ cup (1 stick) Unsalted Butter, melted
-
¼ cup Granulated Sugar
-
2 (8-ounce) packages Cream Cheese, softened (for a lighter version, use light cream cheese)
-
1 cup Confectioners’ Sugar, sifted (for cream cheese layer)
-
1 teaspoon Vanilla Extract (for cream cheese layer)
-
1 (8-ounce) container Frozen Whipped Topping, thawed (e.g., Cool Whip; for a lighter version, use fat free Cool Whip)
-
2 (21-ounce) cans Cherry Pie Filling
-
½ teaspoon Almond Extract (optional)
-
2 cups Cold Heavy Cream (for topping)
-
½ cup Confectioners’ Sugar, sifted (for topping)
-
1 teaspoon Vanilla Extract (for topping)
-
Optional Garnishes: Fresh cherries, chocolate shavings, extra graham cracker crumbs
Instructions
-
Step 1
Preheat oven to 350°F (175°C). Lightly spray a 9×13 inch baking dish. Combine 1 ½ cups graham cracker crumbs, ¼ cup granulated sugar, and ½ cup melted unsalted butter. Press mixture firmly into the dish. Bake for 8-10 minutes, then cool completely on a wire rack. -
Step 2
In a large bowl, beat 2 (8-ounce) packages softened cream cheese (or light cream cheese) until smooth and fluffy. Gradually add 1 cup sifted confectioners’ sugar and 1 tsp vanilla extract; beat until creamy. Gently fold in 1 (8-ounce) thawed frozen whipped topping (or fat-free Cool Whip) until combined. Spread this mixture evenly over the cooled crust and chill in the refrigerator for 30-60 minutes to set. -
Step 3
Open 2 (21-ounce) cans cherry pie filling. Pour into a medium bowl and stir in ½ tsp almond extract, if desired. This enhances the cherry flavor. -
Step 4
Retrieve the chilled dessert from the refrigerator (the cream cheese layer should be firm). Gently spoon and spread the prepared cherry topping evenly over the cream cheese layer, being careful not to disturb the layers below. Return the assembled dessert to the refrigerator for at least 1-2 hours (or ideally overnight) to allow the layers to set fully and flavors to meld. -
Step 5
This step is best prepared closer to serving. To make homemade whipped cream: Chill a mixing bowl and whisk. Pour 2 cups cold heavy cream into the chilled bowl and whip until soft peaks form. Gradually add ½ cup sifted confectioners’ sugar and 1 tsp vanilla extract; continue whipping until stiff peaks form. Gently spread this fluffy whipped cream over the chilled cherry layer, creating an attractive finish. Alternatively, if preferring a stabilized homemade whipped cream, substitute the above with 3 cups sweetened whipped cream stabilized with 1 teaspoon gelatin. Garnish as desired with fresh cherries, chocolate shavings, or graham cracker crumbs. -
Step 6
For optimal firmness and flavor development, chill the assembled dessert for a final 2-4 hours (or overnight). When ready to serve, remove from the refrigerator. For the cleanest slices, dip your knife in hot water and wipe it clean between each cut. Cut into squares and use a sturdy spatula to lift pieces onto individual dessert plates. Enjoy this delicious treat chilled.
Important Information
Nutrition Facts (Per Serving)
It is important to consider this information as approximate and not to use it as definitive health advice.
Allergy Information
Please check ingredients for potential allergens and consult a health professional if in doubt.

Leave a Comment