
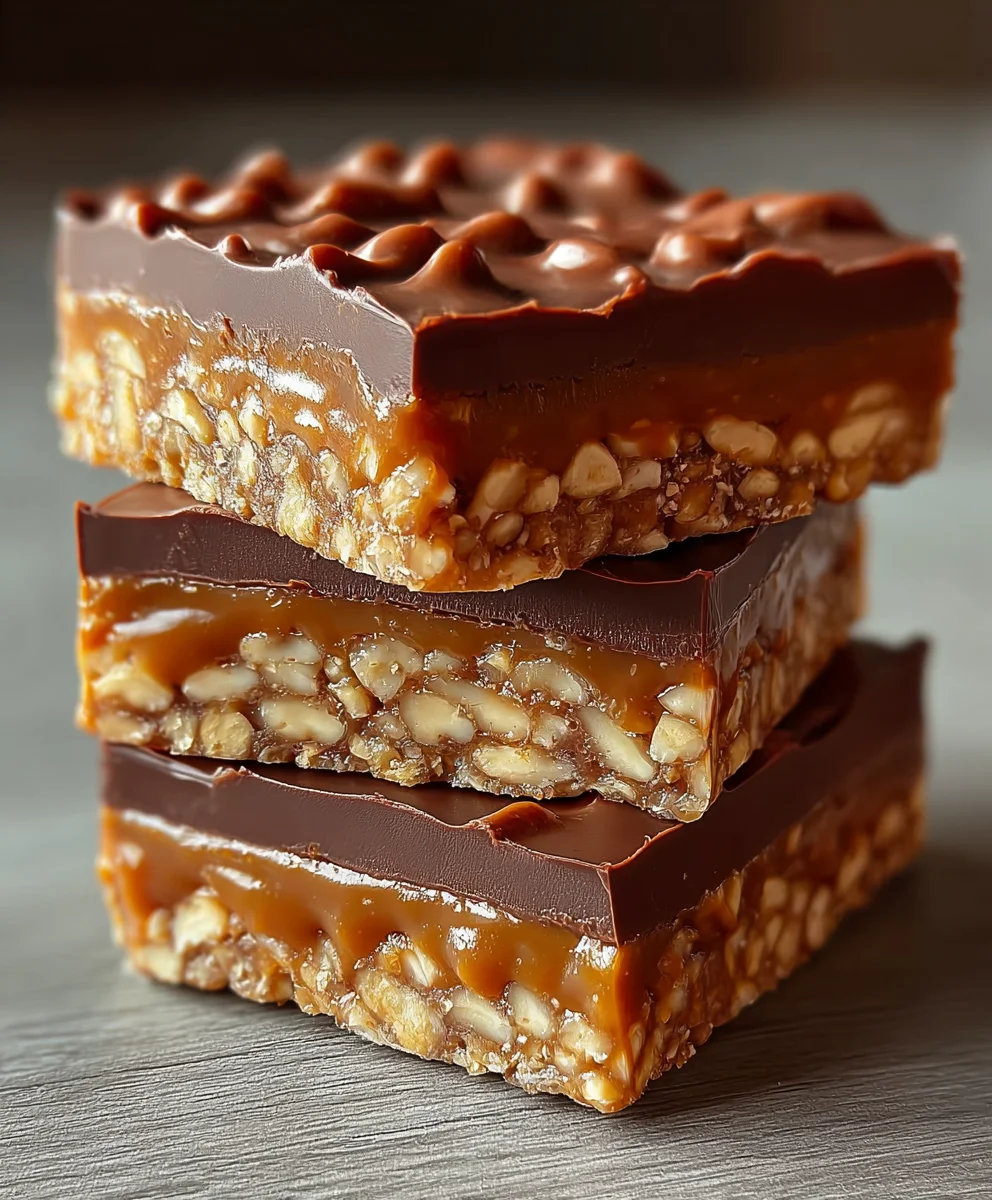
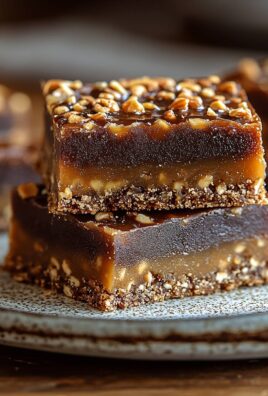
Caramel Fudge Crunch Bars are more than just a dessert; they are an irresistible symphony of textures and flavors that promises pure delight with every single bite. Imagine a blissful combination of rich, velvety fudge, luscious, buttery caramel, and a satisfyingly crisp base, all coming together in one spectacular treat. This is the kind of confection that doesn’t just satisfy a sweet tooth; it creates a memorable experience, making it an absolute showstopper for any occasion.
I find that people absolutely adore this dish not only for its decadent taste but also for its wonderful textural contrast. The smooth, melt-in-your-mouth caramel and dense, chocolatey fudge are perfectly balanced by the delightful crunch of the base, creating a harmonious and utterly addictive sensation. Whether you’re looking for the ultimate potluck contribution, a comforting treat after a long week, or simply a way to impress friends and family, these Caramel Fudge Crunch Bars deliver on all fronts. They represent the best of modern comfort baking: a relatively straightforward recipe yielding impressive results that taste incredibly indulgent.
The Evolution of a Beloved Dessert Bar
While not steeped in ancient history, the concept of the layered dessert bar has evolved into a beloved staple in homes and bakeries across the globe. These bars, like our featured recipe, embody the spirit of approachable gourmet — creating something extraordinary from accessible ingredients. They symbolize the joy of sharing homemade treats, bringing smiles and warmth to gatherings large and small, a true testament to the universal appeal of a well-crafted, sweet indulgence.

Ingredients:
Creating these delightful Caramel Fudge Crunch Bars is a labor of love, but trust me, every single ingredient plays a crucial role in building the layers of flavor and texture that make them absolutely irresistible. Here’s what you’ll need to gather:
-
For the Buttery Graham Cracker Crust:
- 2 cups (about 1 sleeve plus 4-5 additional crackers) graham cracker crumbs (finely crushed)
- 1/2 cup (1 stick or 113g) unsalted butter, melted
- 1/4 cup (50g) granulated sugar
- 1/4 teaspoon fine sea salt
-
For the Rich Chocolate Fudge Layer:
- 1 cup (2 sticks or 226g) unsalted butter
- 1 cup (200g) granulated sugar
- 1/2 cup (42g) unsweetened cocoa powder (Dutch-processed for a darker, smoother fudge is my preference)
- 1/2 cup (120ml) full-fat evaporated milk (not sweetened condensed milk!)
- 1 teaspoon pure vanilla extract
- 1/4 teaspoon fine sea salt
- 2 cups (340g) semi-sweet chocolate chips or chopped baking chocolate
-
For the Chewy Caramel Layer:
- 1 cup (2 sticks or 226g) unsalted butter
- 1 cup (200g) granulated sugar
- 1 cup (240ml) light corn syrup
- 1 (14-ounce or 396g) can sweetened condensed milk
- 1 teaspoon pure vanilla extract
- 1/2 teaspoon fine sea salt
-
For the Crispy Chocolate Crunch Topping:
- 1 cup (170g) semi-sweet chocolate chips
- 1/2 cup (113g) creamy peanut butter (or a nut-free alternative if preferred)
- 2 cups (about 60g) crispy rice cereal
Preparing Your Workspace and Equipment
Before we dive into the fun part of assembling these incredible Caramel Fudge Crunch Bars, a little preparation goes a long way. Trust me, having everything ready will make the process much smoother and more enjoyable. First, you’ll need a good quality 9×13 inch baking pan. I prefer a metal one for even heat distribution, but glass works too – just be mindful that baking times might vary slightly.
To ensure your bars come out of the pan cleanly and are easy to cut, I highly recommend lining your baking pan. Use parchment paper, leaving an overhang on the two longer sides of the pan. This creates handy “handles” that you can use to lift the entire batch of bars out once they’re chilled. Spray the pan lightly with cooking spray before laying down the parchment paper; this helps the paper adhere better and prevents it from shifting around as you press in the crust.
Next, gather all your ingredients, measuring them out and having them at arm’s reach. This is often called “mise en place” in the culinary world, and it truly helps prevent forgotten ingredients and last-minute scrambling. You’ll need several mixing bowls, a sturdy spatula, a whisk, a medium saucepan, and a microwave-safe bowl for melting. For the caramel, a candy thermometer is a must-have tool for accuracy, so make sure yours is calibrated and ready to go. Preheat your oven to 350°F (175°C) now, as we’ll be starting with the crust!
Crafting the Irresistible Crust for Your Caramel Fudge Crunch Bars
The foundation of any great bar is its crust, and for our Caramel Fudge Crunch Bars, we’re going with a classic, buttery graham cracker base that’s both simple to make and utterly delicious. It provides the perfect balance to the rich layers that follow.
- Prepare the Graham Cracker Crumbs: If you’re starting with whole graham crackers, you’ll need to crush them finely. I find the easiest way to do this is to place them in a large zip-top bag and crush them with a rolling pin until they form fine crumbs. Alternatively, a food processor makes quick work of this task. You’re aiming for about 2 cups of tightly packed crumbs. Don’t leave large chunks; fine crumbs ensure a solid, even crust.
- Combine Dry Ingredients: In a medium mixing bowl, combine your finely crushed graham cracker crumbs, granulated sugar, and fine sea salt. Use a whisk to ensure everything is thoroughly mixed. This step ensures an even flavor throughout your crust.
- Add Melted Butter: Pour the half-cup of melted unsalted butter over the dry crumb mixture. Now, using a fork or your clean hands, mix everything together until the crumbs are evenly moistened and resemble wet sand. It’s important that every crumb is coated, as this is what binds the crust together.
- Press into the Pan: Transfer the moistened graham cracker mixture into your prepared 9×13 inch baking pan. Using the bottom of a flat glass or a measuring cup, firmly and evenly press the mixture into the bottom of the pan. Pay special attention to the corners and edges to create a uniform layer. A well-compacted crust is key to preventing crumbling when you cut the bars later.
- Bake the Crust: Place the pan into your preheated oven (350°F or 175°C) and bake for 10-12 minutes. You’re looking for the crust to be lightly golden brown around the edges and fragrant. This baking step helps set the crust and gives it a deeper, toastier flavor.
- Cool Slightly: Once baked, remove the pan from the oven and set it aside on a wire rack to cool slightly while you prepare the next layer. It doesn’t need to be completely cold, but you want it to be cool enough to handle.
The Decadent Fudge Layer: A Core of Sweetness
Now, let’s move on to the second glorious layer of our Caramel Fudge Crunch Bars: the rich, dark, and utterly decadent chocolate fudge. This layer provides a deep chocolatey counterpoint to the sweetness of the caramel and the crunch of the topping.
- Combine Wet Ingredients: In a medium-sized, heavy-bottomed saucepan, combine the 1 cup (2 sticks) of unsalted butter, 1 cup of granulated sugar, 1/2 cup of unsweetened cocoa powder, and 1/2 cup of full-fat evaporated milk. Make sure you’re using evaporated milk, not sweetened condensed milk, as they are very different and will yield different results!
- Bring to a Boil: Place the saucepan over medium heat. Stir constantly with a whisk to ensure all ingredients are well combined and to prevent the cocoa from scorching. Bring the mixture to a rolling boil. Continue to boil, stirring constantly, for exactly 5 minutes. This boiling time is crucial for the fudge to set properly, so don’t cut it short.
- Remove from Heat and Add Flavorings: After 5 minutes of boiling, immediately remove the saucepan from the heat. Stir in the 1 teaspoon of pure vanilla extract and 1/4 teaspoon of fine sea salt. The salt helps to enhance the chocolate flavor and balance the sweetness.
- Melt in the Chocolate Chips: Add the 2 cups of semi-sweet chocolate chips (or chopped baking chocolate) to the hot fudge mixture. Let it sit undisturbed for 2-3 minutes to allow the residual heat to melt the chocolate. Then, stir vigorously with a sturdy spatula or whisk until the chocolate is completely melted and the mixture is smooth, glossy, and uniform in color. You want a perfectly smooth consistency with no streaks of unmixed chocolate.
- Pour Over Crust: Immediately pour the warm fudge mixture evenly over the slightly cooled graham cracker crust in your prepared baking pan. Use an offset spatula or the back of a spoon to gently spread the fudge right to the edges of the pan, ensuring an even layer.
- Chill for Setting: Place the pan in the refrigerator while you prepare the caramel layer. This allows the fudge to start setting up, which will prevent the caramel from sinking into it. You want it to be firm enough to support the next layer, typically about 20-30 minutes.
Creating the Silky Smooth Caramel Layer
Ah, the star of our Caramel Fudge Crunch Bars! This caramel layer is rich, buttery, and perfectly chewy. It’s the kind of caramel that stretches beautifully when you bite into it, creating that utterly satisfying texture. Patience and a candy thermometer are your best friends here.
- Combine Caramel Base Ingredients: In another large, heavy-bottomed saucepan (preferably one with high sides, as caramel can bubble up), combine the 1 cup (2 sticks) of unsalted butter, 1 cup of granulated sugar, 1 cup of light corn syrup, and the entire can of sweetened condensed milk. Again, be sure you’re using sweetened condensed milk for this layer, not evaporated!
- Cook to a Boil: Place the saucepan over medium heat. Stir constantly with a whisk or a sturdy wooden spoon until the butter is melted, the sugar is dissolved, and the mixture comes to a gentle boil. Continuous stirring is important to prevent scorching on the bottom of the pan.
- Cook to Temperature: Once boiling, reduce the heat slightly to medium-low, maintaining a gentle boil. Attach your candy thermometer to the side of the pan, making sure the tip doesn’t touch the bottom. Continue to cook, stirring frequently (don’t walk away!), until the caramel reaches 240°F (115°C) – the soft ball stage. This can take anywhere from 10 to 20 minutes, depending on your stovetop and pan. Reaching the correct temperature is absolutely critical for the caramel to set properly and have that perfect chewy texture. If it doesn’t reach this temperature, your caramel might be too soft and runny. If it goes too high, it will be too hard.
- Remove from Heat and Finish: Once the caramel reaches 240°F (115°C), immediately remove the saucepan from the heat. Carefully stir in the 1 teaspoon of pure vanilla extract and 1/2 teaspoon of fine sea salt. Stir until thoroughly combined.
- Pour Over Fudge: Retrieve your pan from the refrigerator with the semi-set fudge layer. Carefully and evenly pour the warm caramel over the chilled fudge layer. Use an offset spatula or the back of a spoon to gently spread the caramel to the edges of the pan.
- Allow to Cool and Set: Let the pan sit at room temperature for about 30 minutes to cool down slightly, then transfer it back to the refrigerator for at least 2-3 hours, or preferably until the caramel is completely firm. This chilling time is essential for the layers to set properly before you add the final crunch topping.
Adding the Perfect Crunch and Final Touches
The final layer is what truly makes these “Caramel Fudge Crunch Bars” live up to their name! This crispy, chocolatey topping adds a fantastic textural contrast that elevates the whole experience. It’s quick to make and provides a delightful finish.
- Melt Chocolate and Peanut Butter: In a microwave-safe bowl, combine the 1 cup of semi-sweet chocolate chips and the 1/2 cup of creamy peanut butter. Microwave on high for 30-second intervals, stirring well after each interval, until the mixture is completely smooth and melted. This usually takes about 1-2 minutes total. Alternatively, you can melt them together in a double boiler over simmering water.
- Fold in Crispy Rice Cereal: Once the chocolate and peanut butter mixture is smooth and glossy, add the 2 cups of crispy rice cereal. Gently fold the cereal into the chocolate mixture with a spatula until all the cereal pieces are evenly coated. Be gentle to avoid crushing the cereal too much; we want that delightful crunch!
- Spread Over Caramel: Remove your pan of chilled Caramel Fudge Crunch Bars from the refrigerator. The caramel should be firm to the touch. Carefully spoon the chocolate-cereal mixture over the firm caramel layer. Use an offset spatula or the back of a spoon to gently spread it evenly across the entire surface, working quickly before the chocolate sets.
- Final Chill: Once the crunch topping is spread, return the pan to the refrigerator for at least another 1-2 hours, or until the chocolate topping is completely firm. This final chill is crucial for the bars to hold their shape when cut.
Expert Tips for Flawless Caramel Fudge Crunch Bars
Congratulations! You’re almost ready to enjoy your homemade Caramel Fudge Crunch Bars. Here are a few extra tips to ensure they turn out absolutely perfect every time, and to help you store and serve them like a pro.
Cutting Your Caramel Fudge Crunch Bars:
Once your bars are completely chilled and firm, it’s time to cut them. This can sometimes be the trickiest part!
- Warm Your Knife: My secret for clean cuts is to use a large, sharp chef’s knife. Run the knife under hot water for about 30 seconds, then wipe it completely dry.
- Score First: Using the warm, dry knife, score the top layer lightly to mark where you want to cut. This helps prevent the chocolate from cracking unevenly.
- Firm, Even Pressure: Press down with firm, even pressure to cut through all the layers. Wipe the knife clean and re-warm it after every couple of cuts. This will prevent the layers from dragging and ensure beautiful, clean edges on each bar.
- Size Matters: These bars are incredibly rich, so I typically cut them into smaller squares or rectangles, perhaps 2×2 inches or 1.5×3 inches. You’ll likely yield 24-36 bars depending on your desired size.
Storage and Shelf Life:
These Caramel Fudge Crunch Bars are best stored in an airtight container in the refrigerator. They will remain fresh and chewy for up to 7-10 days. If you find yourself with an abundance, they also freeze beautifully! Wrap individual bars or small batches tightly in plastic wrap, then place them in a freezer-safe bag or container. They can be frozen for up to 2-3 months. Thaw them in the refrigerator overnight or at room temperature for about an hour before serving.
Variations to Try:
- Nutty Crunch: Instead of plain crispy rice cereal, try adding chopped toasted pecans, walnuts, or even peanuts to the crunch topping for an extra layer of flavor and texture.
- Salted Caramel: For an enhanced flavor profile, consider sprinkling a pinch of flaky sea salt over the caramel layer just after pouring it, or even over the finished crunch topping before it sets. This adds a sophisticated contrast that caramel lovers adore.
- Darker Chocolate: If you’re a fan of deeper chocolate flavors, swap out the semi-sweet chocolate for dark chocolate in both the fudge and crunch layers. Just be aware that this will result in a less sweet bar.
- Pretzel Crust: For a delightful sweet and salty combination, replace half of the graham cracker crumbs with finely crushed pretzel crumbs in the crust. You’ll get an amazing savory kick!
Troubleshooting Common Issues:
- Fudge or Caramel Too Soft: This usually means they didn’t cook long enough or didn’t reach the correct temperature. For fudge, ensure the full 5 minutes of boiling. For caramel, double-check that it reached 240°F (115°C). Unfortunately, once poured, it’s hard to fix, so precision in cooking is key.
- Crust Crumbles: If your crust falls apart, it likely wasn’t pressed firmly enough into the pan or didn’t have enough butter to bind it. Ensure it’s very compact before baking.
- Topping Not Sticking: Make sure your caramel layer is firm and cold when you add the crunch topping. If the caramel is too warm, the chocolate topping might melt into it slightly.
I genuinely hope you enjoy making (and eating!) these incredible Caramel Fudge Crunch Bars as much as I do. They are truly a treat for any occasion, from a casual dessert to a holiday platter. Happy baking!
Conclusion:
Well, my friends, we’ve reached the sweet finale of our delicious journey! I truly believe that the recipe we’ve explored today isn’t just another dessert; it’s an experience, a delightful symphony of textures and flavors that will undoubtedly earn you rave reviews from anyone lucky enough to try it. Imagine sinking your teeth into a perfectly balanced treat: the rich, deep chocolate fudge base, followed by a luscious, gooey layer of golden caramel, all crowned with an irresistible, satisfying crunch. This isn’t merely about baking; it’s about creating moments of pure, unadulterated joy. It’s the kind of dessert that leaves a lasting impression, a memory of indulgence that you’ll want to recreate time and time again. Forget complicated techniques or obscure ingredients; this recipe delivers maximum impact with approachable steps, making it a stellar choice for both seasoned bakers and enthusiastic newcomers alike.
What truly sets this treat apart is its incredible ability to satisfy every craving in a single bite. That combination of smooth, melt-in-your-mouth richness from the fudge, the sweet, chewy pull of the caramel, and the crisp, textural contrast of the crunch layer is nothing short of magical. It’s a dessert that feels simultaneously comforting and exciting, familiar yet utterly special. Whether you’re looking to impress guests at a dinner party, bring a showstopper to a potluck, or simply treat yourself to something extraordinary after a long week, this recipe fits the bill perfectly. It’s robust enough to hold up well for gatherings, yet decadent enough to feel like a personal indulgence. Seriously, once you taste that harmony of sweet, savory, and crunchy, you’ll understand exactly why this recipe has become such a beloved staple in my own kitchen.
When it comes to serving, these delightful squares are incredibly versatile. They are absolutely fantastic enjoyed just as they are, straight from the pan (once cooled, of course!) or at room temperature. For an extra touch of decadence, try warming them slightly in the microwave for a few seconds; this will make the fudge even gooier and the caramel wonderfully soft and flowing. They pair beautifully with a scoop of vanilla bean ice cream, creating an incredible hot-and-cold dessert sensation. A dollop of freshly whipped cream can also elevate them to an elegant plating, adding a light, airy contrast. And let’s not forget the simple pleasures: a tall glass of cold milk or a steaming mug of coffee or tea are perfect companions, cutting through the richness and making for an ideal afternoon snack or after-dinner treat. These bars also make fantastic homemade gifts; arrange them beautifully in a tin or box, and you’ll instantly become everyone’s favorite person.
Beyond the standard, there are so many creative ways you can personalize and adapt this recipe to your own taste or for different occasions. For an elevated twist, a sprinkle of flaky sea salt over the top of the caramel layer before it sets will truly enhance the flavor profile, bringing out a wonderful sweet and savory contrast. Feel free to experiment with different types of chocolate for the fudge base; dark chocolate will give you a richer, more intense flavor, while milk chocolate will lean towards a sweeter, creamier profile. You could also mix in toasted chopped nuts like pecans or walnuts into the crunch layer for an added depth of flavor and texture, or even a different type of crisp cereal. For the holidays, a touch of peppermint extract in the fudge or some festive sprinkles on top can transform these into a seasonal sensation. Don’t be afraid to make them your own – that’s the beauty of home baking!
I genuinely hope that reading through this has inspired you to preheat your oven and get baking. These aren’t just any ordinary sweet treat; these are the ultimate Caramel Fudge Crunch Bars, and they truly live up to their name in every single bite. The combination of layers creates a truly unforgettable experience that’s both deeply satisfying and incredibly moreish. I promise you, making these will fill your home with the most incredible aromas, and the first taste will confirm that every moment spent in the kitchen was absolutely worth it. This is a recipe designed to bring smiles, to create moments of shared happiness, and to simply make life a little bit sweeter.
So, what are you waiting for? Grab your ingredients, follow these steps, and prepare to delight your senses. Once you’ve had a chance to whip up your own batch, I would absolutely love to hear all about your experience! Please don’t hesitate to leave a comment below and share how your bars turned out, what variations you tried, or who you shared them with. Did you find a new favorite serving suggestion? Did you impress your friends and family? Your feedback and shared photos truly brighten my day and help our community of bakers grow. Happy baking, and I can’t wait to see your delicious creations!
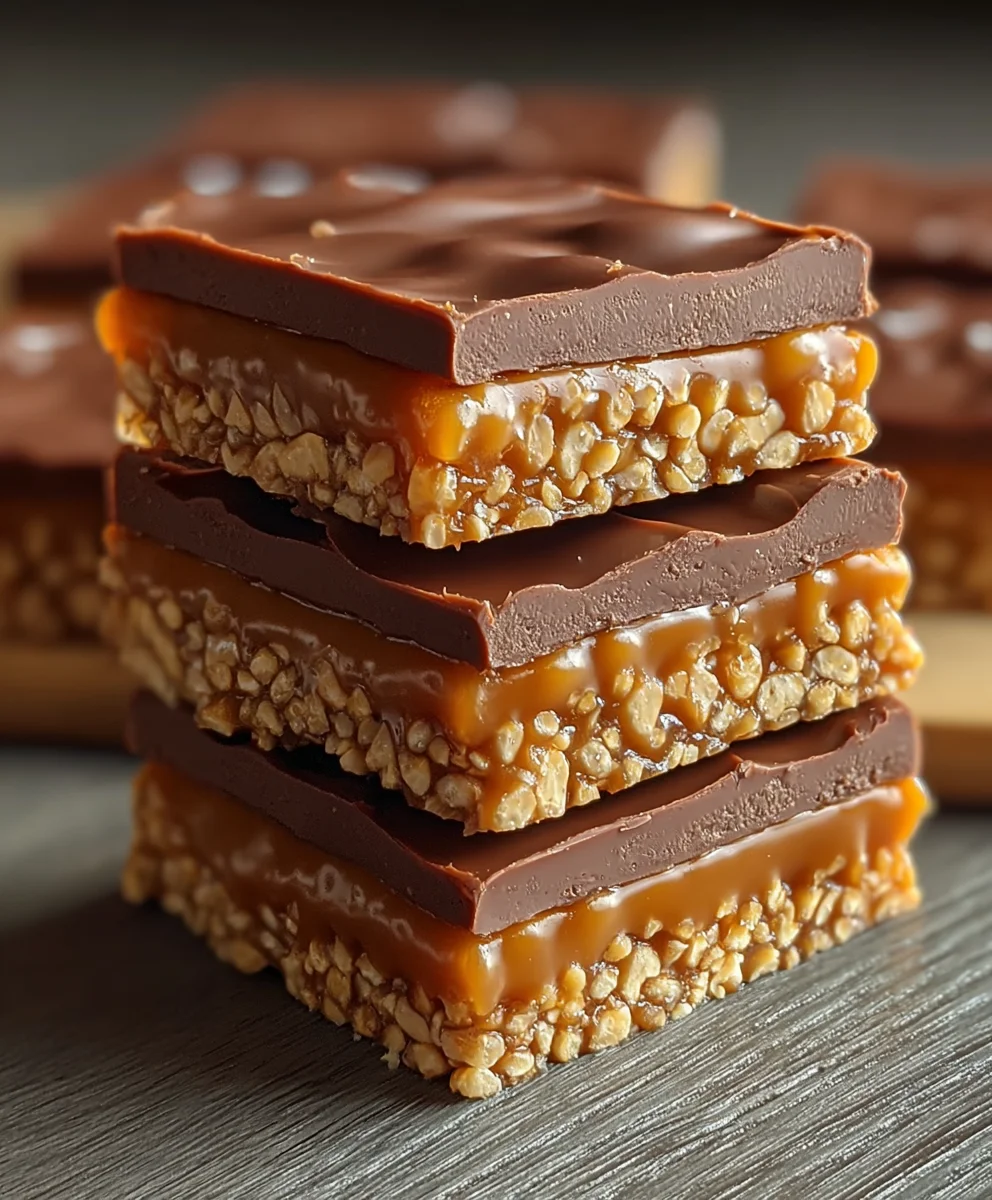
Caramel Fudge Crunch Bars
An irresistible symphony of rich, velvety fudge, luscious buttery caramel, and a satisfyingly crisp base, all coming together in one spectacular no-bake treat for any occasion. These bars promise pure delight with every single bite.
Ingredients
-
2 cups graham cracker crumbs
-
1/2 cup (1 stick) unsalted butter, melted
-
1/4 cup granulated sugar
-
1/4 teaspoon fine sea salt
-
1 cup (2 sticks) unsalted butter
-
1 cup granulated sugar
-
1/2 cup unsweetened cocoa powder
-
1/2 cup full-fat evaporated milk
-
1 teaspoon pure vanilla extract
-
1/4 teaspoon fine sea salt
-
2 cups semi-sweet chocolate chips
-
1 cup (2 sticks) unsalted butter
-
1 cup granulated sugar
-
1 cup light corn syrup
-
1 (14-ounce) can sweetened condensed milk
-
1 teaspoon pure vanilla extract
-
1/2 teaspoon fine sea salt
-
1 cup semi-sweet chocolate chips
-
1/2 cup creamy peanut butter
-
2 cups crispy rice cereal
Instructions
-
Step 1
Line a 9×13 inch baking pan with parchment paper, leaving an overhang. Lightly spray with cooking spray. Preheat oven to 350°F (175°C). Gather all ingredients and equipment, including a candy thermometer. -
Step 2
Finely crush graham crackers to make 2 cups of crumbs. In a bowl, combine crumbs, 1/4 cup granulated sugar, and 1/4 tsp fine sea salt. Add 1/2 cup melted unsalted butter; mix until crumbs are evenly moistened. Press firmly into the prepared pan. Bake at 350°F (175°C) for 10-12 minutes until lightly golden. Cool slightly on a wire rack. -
Step 3
In a heavy saucepan, combine 1 cup unsalted butter, 1 cup granulated sugar, 1/2 cup unsweetened cocoa powder, and 1/2 cup full-fat evaporated milk. Bring to a rolling boil over medium heat, stirring constantly, for exactly 5 minutes. Remove from heat, stir in 1 tsp pure vanilla extract and 1/4 tsp fine sea salt. Add 2 cups semi-sweet chocolate chips; let sit 2-3 min, then stir until smooth. Pour over the slightly cooled crust and spread evenly. Chill for 20-30 minutes. -
Step 4
In a large, heavy saucepan, combine 1 cup unsalted butter, 1 cup granulated sugar, 1 cup light corn syrup, and 1 (14-oz) can sweetened condensed milk. Stir over medium heat until butter melts and mixture boils. Reduce heat to medium-low. Cook, stirring frequently with a candy thermometer, until caramel reaches 240°F (115°C) (soft ball stage). Remove from heat, stir in 1 tsp pure vanilla extract and 1/2 tsp fine sea salt. Pour evenly over the chilled fudge layer and spread. Cool at room temp for 30 min, then refrigerate for 2-3 hours until firm. -
Step 5
In a microwave-safe bowl, melt 1 cup semi-sweet chocolate chips and 1/2 cup creamy peanut butter, stirring every 30 seconds until smooth. Gently fold in 2 cups crispy rice cereal until coated. Spread evenly over the firm caramel layer. Refrigerate for 1-2 hours until the topping is completely firm. -
Step 6
Once completely chilled and firm, warm a sharp chef’s knife under hot water, wipe dry. Score the top, then cut through all layers with firm, even pressure. Wipe and re-warm knife after every few cuts for clean edges. Cut into 24-36 smaller pieces. Store in an airtight container in the refrigerator for up to 7-10 days or freeze for 2-3 months.
Important Information
Nutrition Facts (Per Serving)
It is important to consider this information as approximate and not to use it as definitive health advice.
Allergy Information
Please check ingredients for potential allergens and consult a health professional if in doubt.
Leave a Comment