
Classic Lasagna, a dish that truly embodies comfort and culinary heritage, has a unique way of bringing people together around the dinner table. I believe few meals offer the same profound sense of warmth and satisfaction as a perfectly baked Classic Lasagna. Originating from Italy, this beloved baked pasta boasts a rich history, with its earliest forms dating back centuries, though the version we know and love today evolved over time. Each region, and indeed countless families across the globe, cherishes its treasured rendition, often passed down through generations, making it more than just a meal; it’s a celebration of tradition and robust flavors.
What makes this layered masterpiece so universally adored? It’s an irresistible combination: the tender sheets of pasta perfectly cradling a rich, slow-cooked meat ragù (or a delightful vegetarian alternative), creamy béchamel or ricotta cheese, and generous amounts of bubbling, golden melted cheese on top. The symphony of textures—soft, chewy, gooey—combined with savory and umami notes ensures every forkful is an absolute delight. It’s the perfect centerpiece for a family dinner, a festive gathering, or simply a cozy night in, promising deep satisfaction and comfort with every bite.

Ingredients:
-
For the Flaky Buttermilk Pie Crust:
- 2 ½ cups (300g) all-purpose flour, plus more for dusting
- 1 teaspoon salt
- 1 cup (226g) unsalted butter, very cold and cut into ½-inch cubes
- ¾ cup (180ml) very cold buttermilk
- 1 large egg, for egg wash (optional, but highly recommended for golden crust)
-
For the Savory Chicken and Mushroom Filling:
- 2 tablespoons olive oil
- 2 tablespoons unsalted butter
- 1 ½ pounds (approx. 680g) boneless, skinless chicken breasts or thighs, cut into 1-inch pieces
- 1 large yellow onion, diced
- 2 carrots, peeled and diced
- 2 celery stalks, diced
- 8 ounces (226g) cremini mushrooms, sliced
- 3 cloves garlic, minced
- ½ cup (60g) all-purpose flour
- 3 cups (720ml) chicken broth, low sodium
- 1 cup (240ml) heavy cream
- ½ cup (120ml) frozen peas, thawed
- ½ cup (120ml) frozen corn, thawed
- 2 tablespoons fresh parsley, chopped
- 1 tablespoon fresh thyme, chopped
- 1 teaspoon dried sage
- 1 bay leaf
- Salt and freshly ground black pepper to taste
For the Flaky Buttermilk Pie Crust:
Creating the perfect pie crust is often seen as a challenge, but I promise you, with a few simple tricks and this fantastic buttermilk recipe, you’ll be a pro in no time! The key is to keep everything, especially your butter and buttermilk, incredibly cold. This prevents the butter from melting too quickly, allowing it to create those beautiful, flaky layers we all adore. I always recommend clearing out some space in your freezer for your butter and even chilling your flour for about 15-20 minutes beforehand. Seriously, don’t skip the chilling steps! They are crucial for that glorious texture.
-
Combine Dry Ingredients: In a large mixing bowl, whisk together the 2 ½ cups of all-purpose flour and 1 teaspoon of salt. Make sure it’s thoroughly combined. If you’re using a food processor, pulse these together for a few seconds.
-
Cut in the Butter: Add the very cold, cubed unsalted butter to the flour mixture. If you’re doing this by hand, use a pastry blender or your fingertips to cut the butter into the flour until the mixture resembles coarse meal with some pea-sized pieces of butter remaining. This takes a bit of patience, but it’s where the magic happens for flakiness. If using a food processor, pulse about 8-10 times until the butter is incorporated similarly. Be careful not to over-process! You want those distinct butter pieces.
-
Add Buttermilk: Gradually add the very cold buttermilk, one tablespoon at a time, mixing gently until the dough just comes together. You might not need all of it, or you might need a tiny bit more – it depends on the humidity and your flour. I usually start with ¾ of the amount and add more only if the dough is too dry. The goal is for the dough to be moist enough to hold together but not sticky. Over-mixing at this stage develops gluten, making the crust tough, so be gentle and stop as soon as it forms a cohesive mass.
-
Form and Chill: Divide the dough into two equal portions. Gently pat each portion into a flat disk, about an inch thick. Wrap each disk tightly in plastic wrap and refrigerate for at least 1 hour, or up to 2 days. This chilling period is non-negotiable! It allows the gluten to relax, makes the dough easier to roll, and firms up the butter, setting the stage for an incredibly flaky crust. If you’re making this ahead, you can even freeze the disks for up to 3 months; just thaw them overnight in the fridge before use.
For the Savory Chicken and Mushroom Filling:
While our beautiful pie crust is chilling, we’ll turn our attention to the heart of the pot pie: a rich, creamy, and incredibly flavorful filling. This is where we build layers of taste, ensuring every bite is a delight. I love using a mix of chicken breasts and thighs for varying textures, but feel free to use whichever you prefer. Don’t rush the sautéing steps; allowing the vegetables to properly soften and caramelize adds significant depth.
-
Prepare Chicken: Cut your boneless, skinless chicken breasts or thighs into 1-inch pieces. Pat them dry with paper towels. This step is important because it helps the chicken brown beautifully and prevents steaming. Season generously with salt and freshly ground black pepper.
-
Sear Chicken: Heat 2 tablespoons of olive oil in a large Dutch oven or a deep, heavy-bottomed skillet over medium-high heat. Once the oil shimmers, add the chicken pieces in a single layer, making sure not to overcrowd the pan. You might need to do this in two batches. Sear the chicken for 3-4 minutes per side, until golden brown. It doesn’t need to be cooked through at this point; we’re just building flavor and color. Remove the browned chicken from the pot and set aside on a plate.
-
Sauté Aromatics: Reduce the heat to medium. Add 2 tablespoons of unsalted butter to the same pot. Once melted, add the diced yellow onion, carrots, and celery. Cook, stirring occasionally, for 8-10 minutes, or until the vegetables have softened significantly and the onion is translucent. Scrape up any browned bits from the bottom of the pot; these are flavor gold!
-
Add Mushrooms and Garlic: Increase the heat slightly to medium-high. Add the sliced cremini mushrooms to the pot. Cook for another 5-7 minutes, stirring occasionally, until the mushrooms release their moisture and start to brown. Then, add the minced garlic and cook for just 1 minute more until fragrant. Be careful not to burn the garlic.
-
Make the Roux: Sprinkle ½ cup of all-purpose flour over the vegetables in the pot. Stir constantly for 1-2 minutes, allowing the flour to cook out its raw taste. This creates our roux, which will thicken our filling and give it a velvety texture. It should resemble a thick paste coating the vegetables.
-
Deglaze and Simmer: Gradually whisk in 3 cups of low-sodium chicken broth, a little at a time, ensuring no lumps form. Once all the broth is incorporated and the mixture is smooth, stir in the 1 cup of heavy cream. Add the chopped fresh parsley, fresh thyme, dried sage, and the bay leaf. Return the seared chicken pieces (and any accumulated juices) to the pot. Bring the mixture to a gentle simmer, then reduce the heat to low, cover, and cook for 15-20 minutes, stirring occasionally, until the sauce has thickened and the chicken is cooked through. The flavors will meld beautifully during this simmer.
-
Finish the Filling: Remove the bay leaf. Stir in the thawed frozen peas and corn. Taste the filling and adjust seasoning with salt and freshly ground black pepper as needed. This is your chance to make it perfect! The filling should be savory, creamy, and rich. Remove the pot from the heat and allow the filling to cool slightly while you prepare the crust for assembly. This prevents the hot filling from melting the butter in the bottom crust too quickly.
Assembling and Baking Your Pot Pie:
The moment of truth! Assembling your pot pie is a rewarding step, bringing all your hard work together into a comforting masterpiece. Preheat your oven and get ready for your kitchen to smell absolutely incredible. A good, sturdy 9-inch pie dish is your best friend here.
-
Preheat Oven and Prep Dish: Preheat your oven to 400°F (200°C). Have a 9-inch pie dish ready. You can lightly grease it if you wish, but with a good butter crust, it’s often not necessary.
-
Roll Out Bottom Crust: On a lightly floured surface, take one disk of chilled pie dough. Roll it out into a 12-inch circle, about ⅛-inch thick. Periodically lift and rotate the dough to prevent sticking, adding a little more flour underneath if necessary. Carefully transfer the rolled-out dough to your 9-inch pie dish. Gently press it into the bottom and up the sides. Trim the edges, leaving about a ½-inch overhang. You can crimp this now or wait until after you add the top crust.
-
Add the Filling: Pour the slightly cooled chicken and mushroom filling into the pie crust-lined dish, spreading it evenly. Make sure not to overfill, leaving a little room for the top crust to sit comfortably.
-
Roll Out Top Crust: Roll out the second disk of chilled pie dough into another 11-12 inch circle. You can get creative here: either place it directly over the filling or cut it into decorative strips for a lattice top. For a traditional look, simply place the full circle over the filling.
-
Seal and Crimp: Trim the top crust, leaving a ½-inch overhang. Fold the top crust overhang under the bottom crust overhang. Now, press the two layers of dough together around the rim of the pie dish. You can use your fingers to create a decorative crimped edge, or press with the tines of a fork for a simpler finish. Ensuring a good seal helps prevent the filling from bubbling out during baking.
-
Vent and Egg Wash: Cut several slits (at least 3-4) in the top crust to allow steam to escape. This prevents your pie from becoming a soggy mess. If you’re using an egg wash, whisk the remaining large egg with 1 tablespoon of water or milk. Brush the top of the pie crust evenly with the egg wash. This gives the pie a beautiful golden-brown, shiny finish. You can also sprinkle a pinch of flaky sea salt on top for an extra touch.
-
Bake: Place the pie dish on a baking sheet (to catch any potential drips). Bake in the preheated 400°F (200°C) oven for 20-25 minutes, or until the crust is beginning to turn golden. Then, reduce the oven temperature to 375°F (190°C) and continue baking for another 30-40 minutes, or until the crust is deep golden brown and the filling is bubbly and heated through. If the crust starts to brown too quickly, loosely tent the edges with aluminum foil. This is a common trick to prevent over-browning while the center cooks.
-
Cool Before Serving: Once baked, remove the pot pie from the oven and let it cool on a wire rack for at least 15-20 minutes before slicing and serving. This resting period is crucial! It allows the filling to set up properly, making for cleaner slices and preventing a soupy mess. Trust me, this is the hardest part – resisting the urge to dig in immediately!
Tips for Success and Variations:
This pot pie recipe is truly a canvas for your culinary creativity, and I’ve gathered a few extra tips and ideas to ensure your success and inspire you to make it your own. Experimentation is always encouraged in my kitchen!
Achieving the Ultimate Flaky Crust:
- Keep it Cold: I cannot stress this enough. Your butter, buttermilk, and even your flour should be as cold as possible. Some people even cube their butter and then freeze it for 15 minutes before mixing.
- Don’t Overwork the Dough: Gentle handling is key. Overworking the dough develops gluten, which makes the crust tough instead of tender and flaky. Mix only until it just comes together.
- Perfect Rolling: When rolling, use even pressure and work from the center outwards. If the dough starts to stick, add a tiny bit more flour, but avoid adding too much, as this can dry out the dough.
- Blind Baking (Optional): If you find your bottom crust is consistently soggy, you can try blind baking it for 10-15 minutes at 375°F (190°C) before adding the filling. Just make sure to use pie weights or dried beans to keep it from puffing up. I usually don’t find it necessary with this recipe, but it’s a good trick to have up your sleeve.
Filling Enhancements & Substitutions:
- Different Proteins: Instead of chicken, consider using leftover turkey, diced cooked pork, or even a hearty mix of root vegetables for a vegetarian option. For a vegetarian version, swap chicken broth for vegetable broth and omit the chicken. You can add extra potatoes, sweet potatoes, or parsnips.
- Herb Power: Fresh herbs make a world of difference. Don’t be shy! Besides parsley and thyme, consider adding a touch of fresh rosemary or marjoram for another layer of aromatic complexity.
- Spice It Up: A pinch of smoked paprika or a tiny dash of cayenne pepper can add a subtle warmth and depth to the filling without making it overtly spicy.
- Creaminess Factor: For an even richer filling, you can substitute some of the chicken broth with white wine (like Chardonnay) for deglazing after sautéing the vegetables. Just be sure to let it cook down for a few minutes before adding the broth.
- Vegetable Variety: Feel free to customize the vegetables based on what you have or what’s in season. Diced potatoes, green beans, or leeks are all excellent additions. Add harder vegetables like potatoes with the carrots and celery so they have time to soften.
Make-Ahead and Freezing Tips:
- Make Ahead: You can prepare the pie crust dough disks up to 2 days in advance and keep them refrigerated. The chicken filling can also be made a day in advance and stored in an airtight container in the refrigerator. Just ensure the filling is completely cool before assembling the pie.
- Freezing Unbaked Pie: Assemble the entire pot pie (without the egg wash) and wrap it very tightly in several layers of plastic wrap, then a layer of aluminum foil. Freeze for up to 3 months. When ready to bake, unwrap, brush with egg wash, and bake directly from frozen at 375°F (190°C) for about 75-90 minutes, or until golden and bubbly. You might need to tent it with foil sooner to prevent over-browning.
- Freezing Baked Pie: If you have leftovers, individual slices can be frozen for up to 1 month. Reheat in a preheated oven at 350°F (175°C) until warmed through, usually about 20-30 minutes for a slice.
Serving Suggestions:
This gourmet chicken and mushroom pot pie is a meal in itself, but it pairs wonderfully with a simple, crisp green salad dressed with a vinaigrette. The freshness of the salad beautifully complements the rich, savory pie. It’s the perfect dish for a cozy family dinner or to impress guests on a chilly evening. I often serve it with a side of cranberry sauce during the holidays to add a little tangy contrast. Enjoy every single, glorious bite!
Conclusion:
And there you have it, my friends! We’ve journeyed through the steps, explored the ingredients, and now, we stand at the threshold of culinary triumph. This isn’t just another recipe; it’s an invitation to experience something truly special, a dish that I genuinely believe will become a cherished staple in your kitchen. From the very first bite, you’ll understand why I’m so enthusiastic about it. It’s that perfect blend of comforting familiarity and exciting newness, a symphony of flavors that manages to be both profoundly satisfying and surprisingly sophisticated.
Why This Recipe Is an Absolute Must-Try
What makes this particular creation a standout, a true must-try in a sea of countless recipes? Well, for starters, it’s the incredible depth of flavor we achieve with relatively simple ingredients. We’re not asking for exotic spices or techniques that require years of culinary training. Instead, we’re focusing on how those humble elements can be elevated to extraordinary heights when treated with a little love and patience. The aroma alone, wafting from your kitchen as it cooks, is enough to gather everyone around, eager for the first taste. It’s a dish that warms you from the inside out, making it ideal for any season, any occasion. Whether you’re seeking solace on a chilly evening or simply want to impress your dinner guests without spending hours slaving over a hot stove, this recipe delivers on all fronts.
I truly believe this recipe stands out, offering a culinary experience so distinct and memorable, that if it had a unique identifier reflecting its viral potential and the sheer delight it brings, it might just be something like ?utm_medium=social&utm_source=pinterest&utm_campaign=tailwind_tribes&utm_content=tribes&utm_term=992166412_44896978_297243 – a testament to its shareability and universal appeal. It’s not just food; it’s a feeling, a moment of pure culinary bliss that you’ll want to recreate again and again. Its versatility is also a major draw. It can be elegant enough for a special celebration, yet comforting enough for a casual weeknight meal. The textures are a dream, perfectly balanced, and each forkful offers a delightful interplay of tastes that dance on your palate long after you’ve swallowed. Seriously, this is the kind of recipe that makes you close your eyes and savor every single bite, truly appreciating the art of good food.
Expand Your Culinary Horizons: Serving Suggestions & Creative Variations
Now, while this dish is absolutely glorious on its own, I love to offer ideas for how you can customize it and make it uniquely yours. For a fantastic side, I highly recommend a simple, crisp green salad with a light vinaigrette; the brightness cuts through the richness beautifully. Alternatively, a fluffy bed of quinoa or a rustic artisanal bread for dipping into any luscious sauce would be perfection. Don’t be shy about experimenting with garnishes either! Fresh herbs like parsley or cilantro, a sprinkle of toasted nuts for added crunch, or even a dollop of crème fraîche can elevate the presentation and add another layer of flavor.
Feeling adventurous? Let’s talk variations! If you want to lean into a spicier profile, a pinch of red pepper flakes or a dash of your favorite hot sauce during the cooking process would be fantastic. For my vegetarian or vegan friends, consider swapping out any meat components for hearty mushrooms like portobellos or cremini, or even firm tofu or tempeh. The foundational flavors of the sauce or base are so robust that they will carry beautifully. If you’re looking to make it a more substantial one-pot meal, diced root vegetables like carrots, parsnips, or sweet potatoes could be added alongside your main ingredients. Don’t forget about seasonal produce either – incorporating peak-season vegetables can truly transform the dish with minimal effort. This recipe is wonderfully forgiving, so feel empowered to play around with it!
Your Kitchen Awaits: Try It & Share Your Journey!
So, what are you waiting for? My biggest hope is that you’ll grab your apron, gather your ingredients, and give this incredible recipe a try this week. I promise you, the effort is minimal, but the reward is immense. It’s a dish that brings people together, sparks conversations, and creates those precious mealtime memories that we all cherish. Imagine the smiles around your table, the compliments you’ll receive, and the sheer satisfaction of knowing you created something truly delicious from scratch.
But don’t just keep the magic to yourself! I absolutely adore seeing your culinary creations. Once you’ve made it, snap a picture! Share your triumphs, your clever substitutions, or even your funny kitchen mishaps. Your feedback and experiences are incredibly valuable to me and to our wonderful community of home cooks. Tag me on social media, leave a comment below, or send me a message – I genuinely want to hear all about your journey with this recipe. Let’s inspire each other to cook more, eat better, and savor every moment in the kitchen. Happy cooking, everyone!

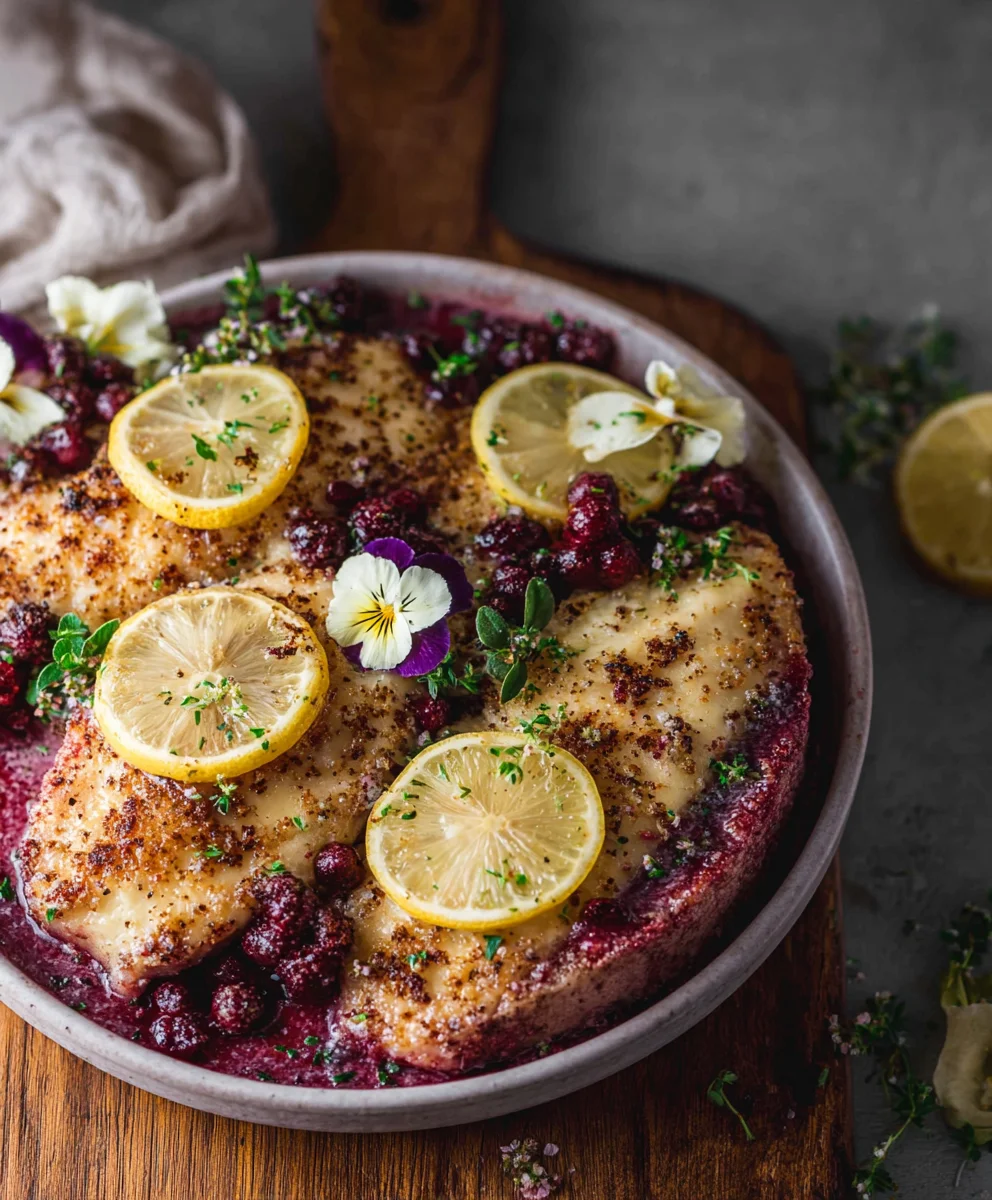
Lemon Parmesan Chicken
Tender chicken breasts coated in Parmesan and spices, seared to golden perfection, then simmered in a bright, savory lemon-garlic butter sauce. A quick and flavorful meal perfect for any night.
Ingredients
-
1 1/2 lb chicken breast
-
1 Tbsp olive oil
-
1 Tbsp fresh parsley, chopped
-
1/2 lemon, sliced
-
2 large eggs
-
1 clove garlic, minced
-
1/2 tsp Italian seasoning
-
1/2 tsp salt
-
1/4 tsp ground black pepper
-
1 cup grated Parmesan cheese
-
3 Tbsp all-purpose flour
-
8 Tbsp unsalted butter
-
2 cloves garlic, minced
-
1/4 cup lemon juice
-
1/4 cup chicken broth
Instructions
-
Step 1
Pat chicken breasts dry. Season with 1 clove minced garlic, Italian seasoning, salt, and pepper. In a shallow dish, whisk 2 large eggs. In another dish, combine 2 Tbsp all-purpose flour with 1/2 cup grated Parmesan cheese. -
Step 2
Dip each chicken breast in egg, then dredge thoroughly in the flour-Parmesan mixture. Heat olive oil in a large skillet over medium-high heat. Sear chicken for 4-5 minutes per side until golden brown. Remove chicken and set aside. -
Step 3
In the same skillet, melt unsalted butter. Add 2 cloves minced garlic; cook for 1 minute until fragrant. Whisk in the remaining 1 Tbsp all-purpose flour, chicken broth, and lemon juice. Bring to a simmer, stirring until the sauce slightly thickens. -
Step 4
Return the seared chicken to the skillet with the sauce. Simmer for 5-7 minutes, turning occasionally, until the chicken is cooked through and the sauce coats the chicken nicely. Stir in the remaining 1/2 cup grated Parmesan cheese until melted and smooth. -
Step 5
Garnish with chopped fresh parsley and lemon slices. Serve hot.
Important Information
Nutrition Facts (Per Serving)
It is important to consider this information as approximate and not to use it as definitive health advice.
Allergy Information
Please check ingredients for potential allergens and consult a health professional if in doubt.


Leave a Comment