
Christmas Sugar Cookie Fudge is more than just a dessert; it’s a delightful culinary embodiment of holiday cheer, designed to evoke the warmest memories of festive seasons past. Imagine the comforting, sweet aroma of freshly baked sugar cookies mingling with the irresistible allure of rich, creamy fudge – now, picture that magic captured in one incredibly easy, no-bake treat. This innovative confection perfectly marries two beloved holiday staples, bringing a unique twist to your traditional dessert repertoire and instantly becoming a new holiday classic for many.
Why Everyone Admires This Festive Fudge
I find that people absolutely adore this specific rendition of Christmas Sugar Cookie Fudge for several compelling reasons. Firstly, its taste is utterly enchanting: a harmonious blend of classic vanilla sugar cookie essence swirled through velvety smooth, decadent fudge, often adorned with festive sprinkles for an extra touch of sparkle. The texture is equally divine, offering a soft, melt-in-your-mouth experience with subtle hints of buttery cookie in every bite. Beyond its delightful taste and texture, this recipe offers remarkable convenience, allowing you to craft impressive holiday treats without the need for an oven. It’s truly a labor of love that feels effortless, making it an ideal candidate for gifting, holiday parties, or simply indulging yourself with a taste of pure Christmas magic.

Ingredients:
- For the Fudge Base:
- 1 cup (2 sticks or 226g) unsalted butter
- 2 cups (400g) granulated sugar
- ¾ cup (180ml) evaporated milk (not sweetened condensed milk!)
- 1 teaspoon pure vanilla extract, good quality
- ½ teaspoon fine sea salt
- 1 (12-ounce or 340g) bag white chocolate chips (good quality for best melting)
- 1 (7-ounce or 200g) jar marshmallow fluff (or 4 cups miniature marshmallows)
- 1 (1-pound or 454g) box powdered sugar (confectioners’ sugar), sifted
- For the Sugar Cookie Infusion:
- ½ cup (about 60g) dry sugar cookie mix (from a standard boxed mix, just the dry powder)
- 1 teaspoon sugar cookie extract or emulsion (optional, but highly recommended for intense flavor)
- Optional: Red and green gel food coloring, a few drops of each
- For the Festive Topping:
- ½ cup (about 60g) crushed baked sugar cookies (store-bought or homemade, for texture and garnish)
- ¼ cup (about 40g) festive Christmas sprinkles (nonpareils, jimmies, shapes)
Gathering Your Tools and Prepping for Success:
Before we dive into the delightful process of making our Christmas Sugar Cookie Fudge, let’s ensure we have everything ready. This is a quick-setting fudge, so once we start cooking, things move rather swiftly! I always find that having all my ingredients measured and laid out (a technique called “mise en place”) makes the whole experience much more enjoyable and less stressful.
- First things first, we need to prepare our pan. I recommend using a 9×13-inch baking pan for a thinner fudge that’s easy to cut into delightful squares, or an 8×8-inch pan for a thicker, more decadent bite. Line your chosen pan with parchment paper, making sure to leave an overhang on the sides. This overhang acts as a convenient “handle” to lift the cooled fudge out of the pan effortlessly. A little non-stick cooking spray on the pan before laying down the parchment can help keep it in place, though it’s not strictly necessary.
- Next, let’s get our ingredients ready. Measure out all your butter, granulated sugar, evaporated milk, vanilla extract, and salt. Have them within arm’s reach of your stovetop.
- Open your bag of white chocolate chips and have them ready to pour into a large, heatproof bowl. This is where the magic really starts to happen, transforming simple ingredients into our rich fudge.
- Measure out your marshmallow fluff. If you’re using mini marshmallows, measure out the 4 cups.
- Sift your powdered sugar. This step is crucial for an ultra-smooth fudge texture, preventing any lumps from disrupting that creamy mouthfeel we’re aiming for. Place the sifted powdered sugar in a separate, very large bowl.
- Don’t forget our special sugar cookie components! Measure your dry sugar cookie mix and have your sugar cookie extract ready.
- Finally, prepare your festive toppings: crush your baked sugar cookies. I like to do this by placing them in a zip-top bag and gently crushing them with a rolling pin or the bottom of a sturdy mug. Have your Christmas sprinkles ready in a small bowl.
- Make sure you have a heavy-bottomed 4-quart saucepan, a sturdy whisk, and a heat-resistant spatula or wooden spoon nearby. A candy thermometer is optional but can be helpful for new fudge makers to ensure the correct temperature, though I’ll guide you through visual cues as well.
Crafting the Christmas Sugar Cookie Fudge Base:
Now that everything is prepped, we can focus on building the foundational layers of our incredible Christmas Sugar Cookie Fudge. This stage is all about creating that rich, creamy base that will hold all our festive flavors.
- In your heavy-bottomed 4-quart saucepan, combine the 1 cup of unsalted butter, 2 cups of granulated sugar, and ¾ cup of evaporated milk. This trio forms the core of our fudge, providing richness and sweetness.
- Place the saucepan over medium heat. Stir constantly with your whisk or wooden spoon until the butter is completely melted and the sugar has dissolved. It’s important to stir continuously to prevent the sugar from scorching at the bottom of the pan, which can lead to a grainy texture or, even worse, a burnt flavor in our beautiful Christmas Sugar Cookie Fudge.
- Once the mixture comes to a full rolling boil – meaning it’s bubbling vigorously even when you stir it – set a timer for precisely 5 minutes. During these 5 minutes, continue to stir constantly. This constant stirring is vital for developing the correct fudge consistency. If you have a candy thermometer, you’re aiming for a temperature between 234°F and 238°F (112°C-114°C), which is the “soft ball” stage. Don’t worry if you don’t have one; the 5-minute rolling boil with constant stirring is a reliable method. The mixture will thicken slightly and become a deeper caramel color.
- After exactly 5 minutes of boiling and stirring, immediately remove the saucepan from the heat. Timing is critical here – too long and your fudge might be crumbly; too short and it might not set properly.
Infusing the Sugar Cookie Magic:
This is where our fudge truly transforms into a magical Christmas Sugar Cookie Fudge! We’ll be adding all the special ingredients that give it that distinct, comforting sugar cookie flavor and a wonderfully smooth texture.
- Immediately after removing the saucepan from the heat, quickly stir in the 1 teaspoon of pure vanilla extract and ½ teaspoon of fine sea salt into the hot mixture. The vanilla adds depth, and the salt balances the sweetness beautifully.
- Now, working quickly, add the entire bag of white chocolate chips and the jar of marshmallow fluff (or miniature marshmallows) to the hot mixture in the saucepan. Stir vigorously with your heat-resistant spatula or wooden spoon until all the white chocolate chips and marshmallow fluff are completely melted and smoothly incorporated. The residual heat from the boiled sugar mixture will melt these additions, creating a wonderfully creamy base. Keep stirring until there are no visible lumps of chocolate or marshmallow.
- Once everything is smooth, it’s time for our star ingredient: the sugar cookie infusion! Add the ½ cup of dry sugar cookie mix to the fudge mixture in the saucepan. If you’re using it, also add the 1 teaspoon of sugar cookie extract or emulsion now. Stir until the dry mix is fully incorporated and no dry streaks remain. This is what truly gives our Christmas Sugar Cookie Fudge its signature flavor.
- Optional step for festive colors: If you’re aiming for a two-toned Christmas Sugar Cookie Fudge, carefully divide the mixture evenly into two separate bowls. Add a few drops of red gel food coloring to one bowl and a few drops of green gel food coloring to the other. Stir each bowl until the color is vibrant and evenly distributed. If you prefer a uniform color, you can add all the food coloring to the main pot before moving to the next step, or simply leave it white for a classic look. I often just make mine white with lots of sprinkles for simplicity and a beautiful contrast.
- Now, pour the entire hot fudge mixture (or your colored portions) over the large bowl containing the sifted powdered sugar. Using a sturdy spatula or electric mixer on low speed, begin mixing immediately. You’ll need to work quickly here, as the fudge starts to set as it cools. Mix until all the powdered sugar is fully incorporated and the fudge is thick, glossy, and smooth. It will be quite stiff, but you want to ensure there are no dry pockets of powdered sugar left. This step takes a bit of arm strength if you’re mixing by hand, but it’s crucial for achieving that perfectly smooth and dense fudge texture we all love in a classic Christmas Sugar Cookie Fudge.
Adding Festive Flair and Setting:
With our delicious base ready, it’s time to add the final festive touches and allow our Christmas Sugar Cookie Fudge to set into beautiful, ready-to-enjoy squares.
- Once the fudge is thoroughly mixed and smooth, immediately spoon or pour it into your prepared 9×13-inch (or 8×8-inch) pan. If you made two colors, you can alternate dollops of each color and then swirl them gently with a knife for a marbled effect, or layer them.
- Working quickly before the fudge sets, use an offset spatula or the back of a spoon to spread the fudge evenly across the pan. Make sure to get into all the corners, creating a nice, uniform layer. You want the top surface to be as smooth as possible.
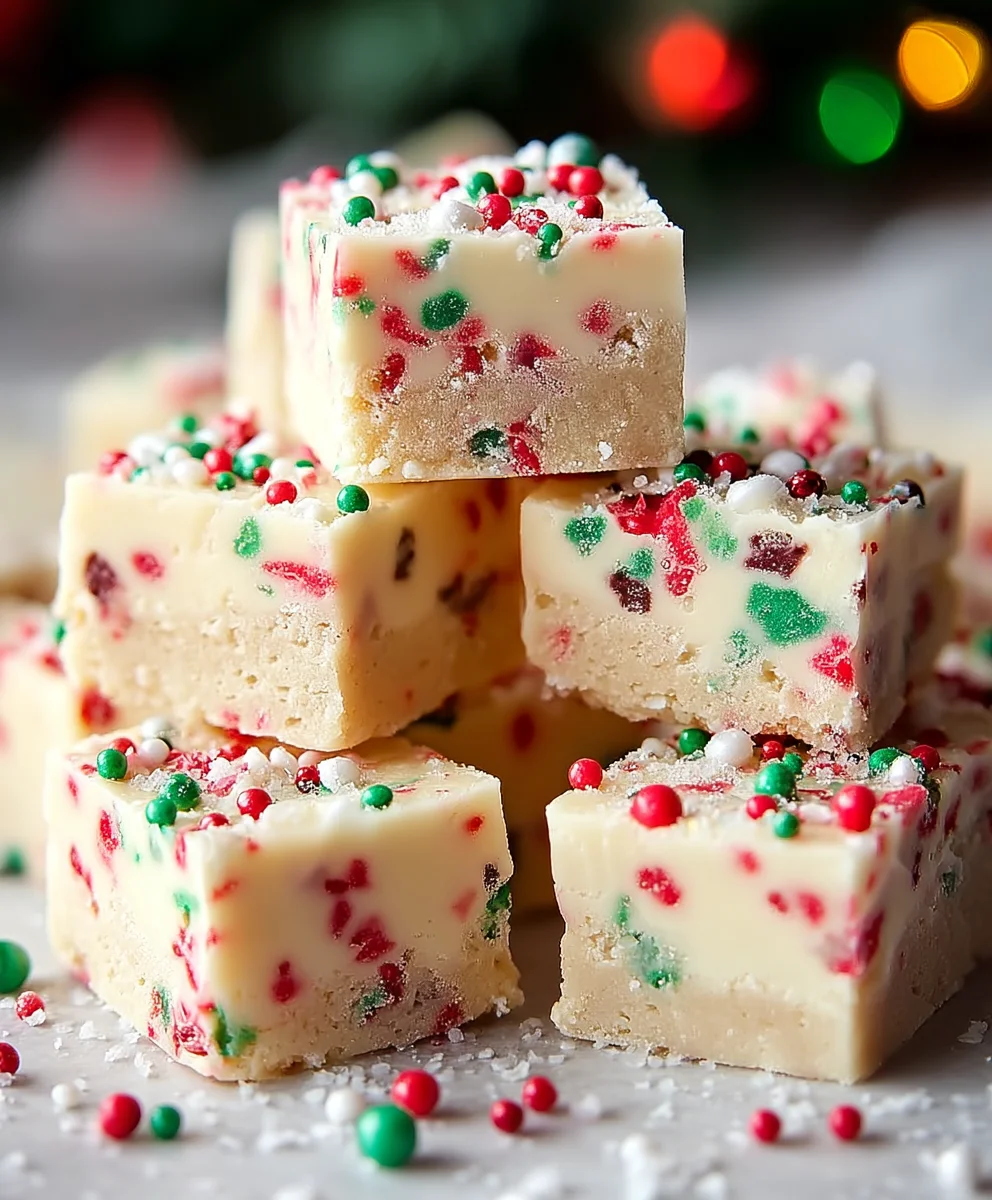
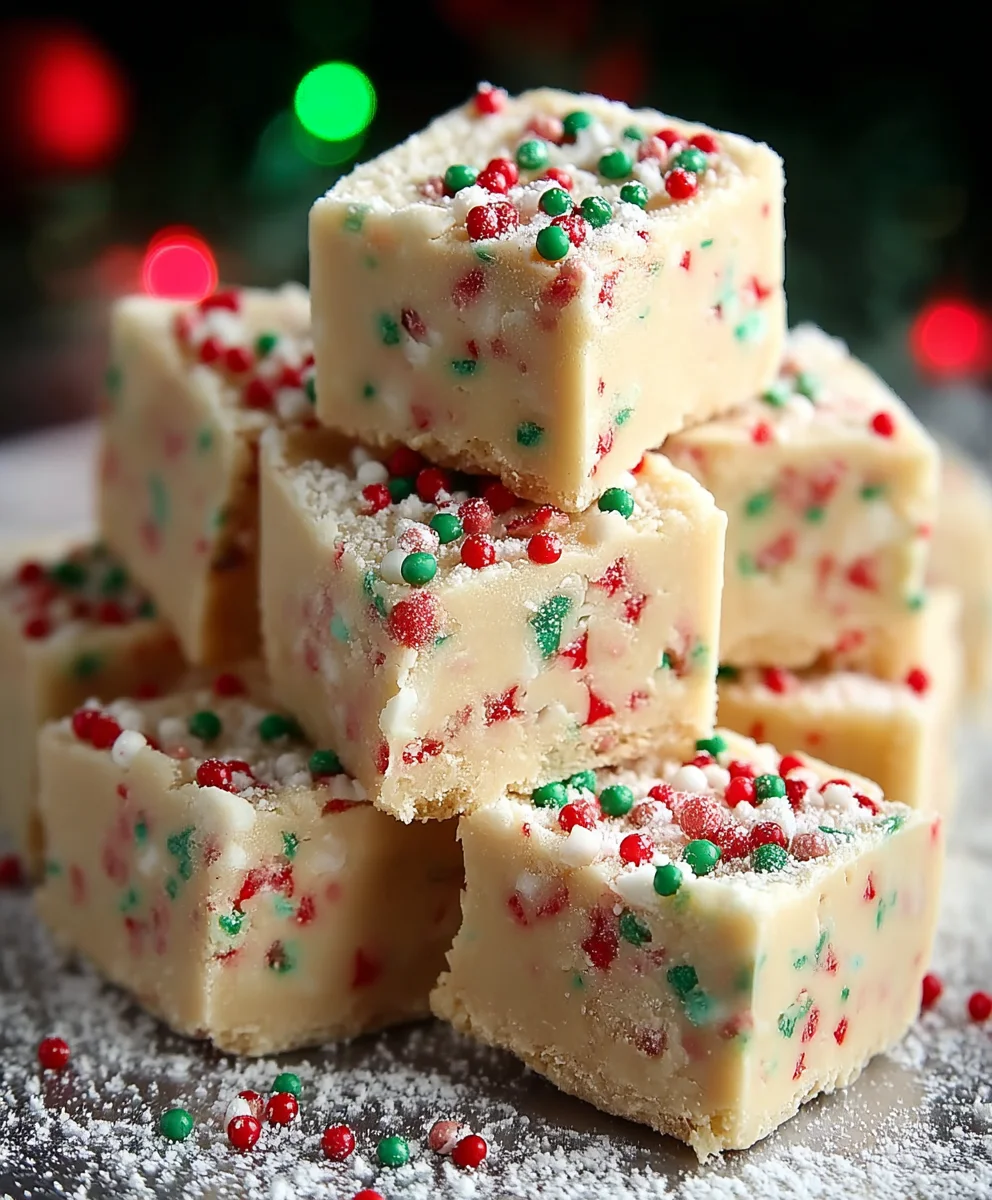
- Now for the fun part: the festive topping! While the fudge is still warm and sticky, generously sprinkle the ½ cup of crushed baked sugar cookies evenly over the top. Then, scatter your ¼ cup of Christmas sprinkles over the entire surface. Gently press them down lightly with your hand or the back of a spoon to ensure they adhere to the fudge as it cools. This not only adds beautiful color and texture but also reinforces that delightful “Christmas Sugar Cookie Fudge” theme!
- Allow the fudge to cool completely at room temperature for at least 3-4 hours, or ideally, place it in the refrigerator for 2 hours to speed up the setting process. Patience is key here; attempting to cut the fudge before it’s fully set will result in a sticky mess rather than clean, perfect squares.
- I always find that chilling the fudge in the refrigerator for a couple of hours ensures it’s firm enough for the cleanest cuts. Once it’s firm to the touch, it’s ready for the next exciting step!
Slicing and Serving Your Festive Treat:
The moment of truth has arrived! After all your hard work and patience, you’re about to enjoy the fruits of your labor – your homemade Christmas Sugar Cookie Fudge!
- Once the fudge is completely firm, use the parchment paper overhangs to carefully lift the entire slab of fudge out of the pan and onto a clean cutting board. This is where that parchment paper truly shines, making removal incredibly easy.
- Using a large, sharp knife, carefully trim off any uneven edges to create a perfectly neat rectangle or square. Then, slice the fudge into your desired size. I usually aim for small, bite-sized 1-inch squares, as this rich Christmas Sugar Cookie Fudge is quite decadent, and a little goes a long way. For a 9×13-inch pan, you can typically get about 60-70 squares; for an 8×8-inch pan, about 36-40 squares. A great tip for clean cuts is to wipe your knife clean with a damp cloth after every few slices, especially when working with sticky fudge like this.
- Arrange your beautiful Christmas Sugar Cookie Fudge squares on a festive platter. They make a stunning display for holiday gatherings, cookie exchanges, or as heartfelt homemade gifts. Each piece is a little burst of holiday cheer!
- Storage: Store your homemade Christmas Sugar Cookie Fudge in an airtight container at room temperature for up to 1 week, or in the refrigerator for up to 2 weeks. If stacking, I recommend placing small sheets of parchment paper between layers to prevent sticking. This fudge also freezes beautifully for up to 3 months; simply thaw it at room temperature before serving.
- Enjoy every delightful, sweet bite of your incredible Christmas Sugar Cookie Fudge! It’s the perfect blend of creamy fudge and nostalgic sugar cookie flavor, truly a star during the holiday season.
Conclusion:
And there you have it, my friends! We’ve journeyed through the simple steps to create a truly magical holiday treat that I genuinely believe will become a staple in your festive repertoire for years to come. This isn’t just another sweet; it’s a vibrant, melt-in-your-mouth embodiment of everything we love about the season – the nostalgic flavors, the comforting textures, and the sheer joy of sharing something homemade with loved ones. I promise you, this recipe is an absolute game-changer for your holiday baking, offering all the delightful essence of a perfectly baked sugar cookie, but in an incredibly rich, dense, and utterly irresistible fudge form. It brings together the buttery sweetness of classic sugar cookies with the smooth, decadent texture of fudge, creating a harmonious symphony of festive flavors that truly captures the spirit of Christmas.
Why You Absolutely Need to Make This Fudge This Year!
I truly believe this is a must-try because it takes the beloved flavors of Christmas sugar cookies – that quintessential vanilla-almond goodness – and transforms them into something effortlessly elegant and remarkably easy to prepare. Forget the rolling pins and cookie cutters; with this recipe, you get all the festive charm without any of the fuss. It’s the ideal solution for those busy holiday moments when you want to impress without spending hours in the kitchen. The rich, creamy texture combined with those iconic sprinkles makes it visually stunning and incredibly palatable for all ages. It’s a guaranteed crowd-pleaser, perfect for gifting, potlucks, or simply indulging yourself after a long day of holiday preparations. When I first developed this recipe, my goal was to encapsulate the very essence of a festive celebration into a single, perfect bite, and I genuinely feel that this Christmas Sugar Cookie Fudge achieves just that. It’s not just a dessert; it’s a little square of holiday cheer, a sweet reminder of simpler times and delightful tastes.
Serving Suggestions & Creative Variations to Elevate Your Treat:
Now that you’ve mastered this incredible fudge, let’s talk about how to make it even more spectacular or adapt it to different occasions. For serving, I love placing small, artfully cut squares on a festive platter alongside other holiday goodies like gingerbread men, peppermint bark, or even fresh cranberries for a pop of color and tartness. Imagine a small square of this delightful fudge melting slowly alongside your morning coffee, a perfect little indulgence to start a chilly winter day, or as a sophisticated accompaniment to an after-dinner espresso, offering a sweet counterpoint to its bitterness. It also makes for an extraordinary edible gift; simply arrange a few pieces in a decorative tin or cellophane bag, tie with a pretty ribbon, and you’ve got a thoughtful, delicious present that will surely be appreciated. Consider pairing it with a steaming mug of hot chocolate or spiced apple cider for the ultimate cozy winter experience. The vanilla and almond notes in the fudge beautifully complement the warmth of these beverages.
But why stop there? Let your creativity shine with these delightful variations! You can easily customize this fudge to suit your taste or theme. For a different flavor profile, try adding a few drops of peppermint extract along with the vanilla for a minty-sweet twist, or perhaps a hint of orange zest to brighten it up. Swirl in some melted dark chocolate or white chocolate chips just before it sets for a marbled effect and an extra layer of flavor. Instead of traditional sprinkles, experiment with edible glitter, crushed candy canes for a refreshing crunch, or even finely chopped pecans or walnuts for a textural contrast. For a truly decadent experience, I’ve even tried crumbling a piece over a scoop of vanilla bean ice cream, allowing the warmth of the fudge to slightly melt the ice cream into a glorious, gooey concoction – trust me, it’s heavenly! If you’re feeling adventurous, you could even press a thin layer of crushed gingerbread cookies into the bottom of the pan before pouring in the fudge for a delightful crunchy base. The possibilities are truly endless, and each variation only adds to the charm of this already wonderful recipe.
Your Turn: Create, Share, and Inspire!
Now, it’s your turn to bring this holiday magic into your own kitchen! I genuinely hope you’ll give this wonderful recipe a try. I can’t wait to hear about your experiences and see your beautiful creations. Please, don’t be shy; share your photos and tell me about your favorite serving ideas or any creative variations you came up with. Did you add a dash of cinnamon? Did you use a different type of sprinkle? Your insights and innovations inspire me and our entire community of fellow food enthusiasts. Let’s make this holiday season extra sweet and filled with delicious homemade treats. Go ahead, gather your ingredients, turn on some festive tunes, and let the aroma of delicious Christmas Sugar Cookie Fudge fill your home. Happy baking, and happy holidays!
Christmas Sugar Cookie Fudge
A delightful no-bake Christmas Sugar Cookie Fudge, combining the comforting taste of sugar cookies with rich, creamy fudge. An easy and festive holiday treat, perfect for gifting or parties.
Ingredients
-
1 cup (226g) unsalted butter
-
2 cups (400g) granulated sugar
-
¾ cup (180ml) evaporated milk
-
1 tsp pure vanilla extract
-
½ tsp fine sea salt
-
1 (340g) bag white chocolate chips
-
1 (200g) jar marshmallow fluff (or 4 cups miniature marshmallows)
-
1 (454g) box powdered sugar, sifted
-
½ cup (60g) dry sugar cookie mix
-
1 tsp sugar cookie extract or emulsion (optional)
-
Red and green gel food coloring (optional)
-
½ cup (60g) crushed baked sugar cookies
-
¼ cup (40g) festive Christmas sprinkles
Instructions
-
Step 1
Line a 9×13-inch (or 8×8-inch) pan with parchment paper, leaving an overhang. Sift powdered sugar into a large, heatproof bowl. Prepare all other ingredients by measuring and having them ready. -
Step 2
In a heavy-bottomed 4-quart saucepan, combine butter, granulated sugar, and evaporated milk. Cook over medium heat, stirring constantly, until butter melts and sugar dissolves. -
Step 3
Bring the mixture to a full rolling boil; continue boiling and stirring constantly for exactly 5 minutes (or until 234-238°F). Immediately remove from heat. -
Step 4
Quickly stir in vanilla extract and sea salt. Add white chocolate chips and marshmallow fluff; stir vigorously until completely melted and smooth. -
Step 5
Add dry sugar cookie mix and sugar cookie extract (if using); stir until fully incorporated. -
Step 6
(Optional) For two-toned fudge, divide mixture and stir red food coloring into one portion and green into the other. -
Step 7
Pour the hot fudge mixture (or colored portions) over the sifted powdered sugar in the large bowl. Mix quickly with a sturdy spatula or electric mixer until thick, glossy, and smooth, ensuring no dry powdered sugar remains. -
Step 8
Immediately spoon the fudge into the prepared pan, spreading evenly. If using two colors, alternate dollops and swirl gently with a knife. -
Step 9
While still warm, generously sprinkle crushed baked sugar cookies and Christmas sprinkles over the top. Gently press them down to adhere. -
Step 10
Allow the fudge to cool completely at room temperature for 3-4 hours, or refrigerate for 2 hours, until firm. -
Step 11
Use the parchment overhangs to lift the fudge slab from the pan onto a cutting board. Trim edges and slice into desired 1-inch squares. Wipe your knife clean after a few cuts for a neat finish. -
Step 12
Store in an airtight container at room temperature for up to 1 week, or in the refrigerator for up to 2 weeks. For longer storage, freeze for up to 3 months and thaw at room temperature before serving. Enjoy!
Important Information
Nutrition Facts (Per Serving)
It is important to consider this information as approximate and not to use it as definitive health advice.
Allergy Information
Please check ingredients for potential allergens and consult a health professional if in doubt.

Leave a Comment