
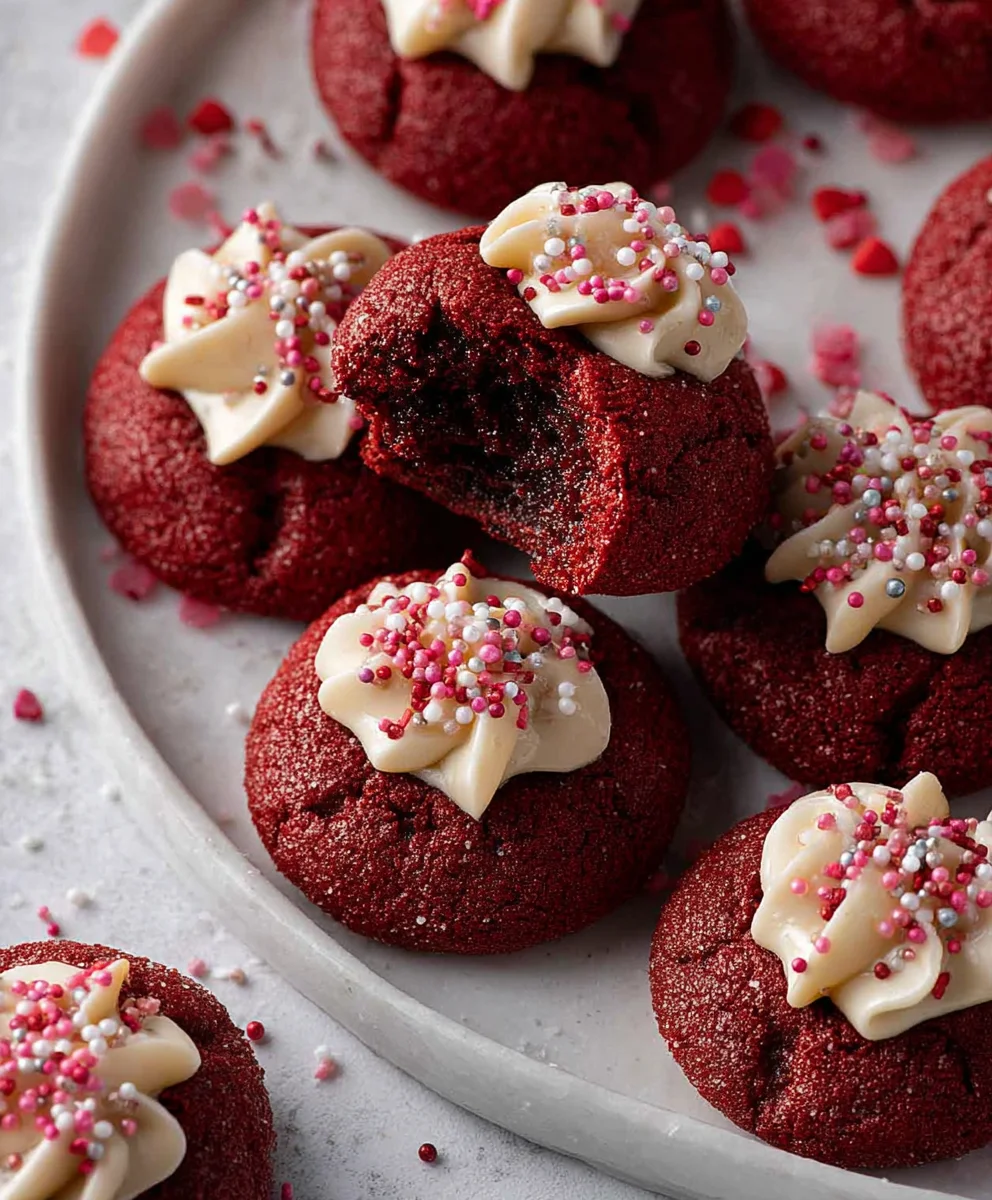
Hershey’s red velvet blossoms are more than just a cookie; they’re a vibrant explosion of holiday spirit and pure, unadulterated deliciousness. Imagin extracte sinking your teeth into a soft, slightly chewy cookie that’s a beautiful ruby red, infused with the subtle tang of buttermilk and the rich warmth of cocoa. The magic truly happens when you discover that delightful surprise waiting at the center – a Hershey’s Kiss, nestled perfectly into the warm dough. People absolutely adore these cookies for so many reasons! They’re incredibly festive, making any gathering feel instantly special, and the combination of the moist red velvet cookie and the melty chocolate kiss is simply irresistible. What makes Hershey’s red velvet blossoms stand out is that perfect marriage of textures and flavors, creating a treat that’s both visually stunning and incredibly satisfying. It’s no wonder they’ve become a beloved classic for bakers of all skill levels, a guaranteed crowd-pleaser that brings smiles with every bite.

Ingredients:
- 7 tablespoons butter (salted or unsalted, softened)
- 1/2 cup packed brown sugar
- 2 tablespoons granulated sugar
- 1 teaspoon vanilla extract
- 1 large egg yolk
- 1/4 teaspoon red food coloring gel
- 1 cup all-purpose flour
- 1 tablespoon unsweetened cocoa powder
- 1/2 teaspoon baking powder
- 1/4 teaspoon salt
- 1/4 cup red sanding sugar
- 18 Hershey’s chocolate kisses
Preparing the Dough
First, let’s get our dough ready for these delightful Hershey’s red velvet blossoms. In a large mixing bowl, cream together the softened butter, brown sugar, and granulated sugar until the mixture is light and fluffy. This step is crucial for a tender cookie texture. You can use an electric mixer for this, or a sturdy whisk and some elbow grease. Once combined, beat in the vanilla extract and the egg yolk. The egg yolk adds richness and helps bind the dough together. Now comes the fun part – adding the color! Gently mix in the red food coloring gel. Start with the 1/4 teaspoon and add a tiny bit more if you desire a deeper red hue, but be careful not to overdo it, as a little gel goes a long way. You want a uniform, vibrant red color throughout the mixture.
Combining Dry Ingredients and Forming the Dough
In a separate, medium-sized bowl, whisk together the all-purpose flour, unsweetened cocoa powder, baking powder, and salt. Whisking these dry ingredients ensures that the leavening agent and salt are evenly distributed, preventing any pockets of bitterness or uneven rising. Now, gradually add the dry ingredients to the wet ingredients, mixing on low speed or by hand until just combined. Be careful not to overmix the dough at this stage, as overmixing can lead to tough cookies. Once the flour is incorporated, the dough will be thick and slightly sticky. This is exactly what we want.
Shaping and Coating the Cookies
Next, we’ll prepare the cookies for baking. Place the red sanding sugar in a shallow bowl. Take about a tablespoon of the red velvet dough and roll it into a ball between your palms. Aim for uniform size so that all your cookies bake evenly. Once you have a nice, smooth ball, gently roll it in the red sanding sugar, ensuring it’s completely coated. This sugar coating will give our Hershey’s red velvet blossoms a beautiful, sparkly finish and a delightful crunch. Place the coated dough balls onto a baking sheet lined with parchment paper, leaving about 2 inches of space between each one to allow for spreading.
Baking the Red Velvet Blossoms
Now it’s time to bake these beauties! Preheat your oven to 350°F (175°C). Bake the cookies for 8-10 minutes, or until the edges are just set and the centers still look slightly soft. They will continue to firm up as they cool. This brief baking time is important to prevent them from becoming dry and crum extractbly. While the cookies are baking, unwrap your Hershey’s chocolate kisses. You’ll want to have them ready to go as soon as the cookies come out of the oven.
Adding the Chocolate Kisses
This is where the magic happens for our Hershey’s red velvet blossoms! As soon as the cookies come out of the oven, while they are still warm and soft, gently press one Hershey’s chocolate kiss into the center of each cookie. The residual heat from the cookie will begin extract to melt the chocolate kiss, creating that iconic blossom look. Allow the cookies to cool on the baking sheet for about 5 minutes before transferring them to a wire rack to cool completely. As they cool, the chocolate kiss will set slightly, creating a lovely contrast with the soft, chewy red velvet cookie. These cookies are best enjoyed at room temperature, and they make a wonderful addition to any cookie platter or a special treat for any occasion.
Conclusion:
I hope you’ve enjoyed learning how to create these delightful Hershey’s red velvet blossoms! This recipe offers a wonderful balance of rich chocolate and subtle tang, all wrapped up in a festive red hue. They are truly a treat for the eyes and the palate, perfect for any occasion, from holiday gatherings to simple afternoon pick-me-ups. Don’t be intimidated by the color; the process is straightforward and incredibly rewarding. I encourage you to give them a try and experience the joy of baking these unique cookies.
For serving, these Hershey’s red velvet blossoms are fantastic on their own, perhaps with a glass of cold milk or a warm cup of coffee. They also make a beautiful addition to a cookie platter, especially during the festive seasons. Consider pairing them with vanilla ice cream for a decadent dessert. If you’re feeling adventurous, try incorporating them into a trifle or crushing them to use as a topping for cupcakes.
Regarding variations, feel free to experiment! You can swap out the Hershey’s Kisses for other flavored kisses, like peppermint or caramel, for a different twist. Adding a touch of almond extract along with the vanilla can also enhance the flavor profile. For an extra decadent touch, drizzle some melted white chocolate over the cooled blossoms.
Frequently Asked Questions:
Q: How do I ensure my Hershey’s red velvet blossoms have a vibrant red color?
A: The key to achieving a deep red color is using a good quality red food coloring. Gel-based food coloring is often more concentrated and provides a more intense color than liquid versions. Ensure you mix the food coloring thoroughly into the dough until it’s evenly distributed. Don’t be afraid to add a little more if you desire a more striking red.
Q: Can I make the dough for these red velvet blossoms ahead of time?
A: Yes, absolutely! The dough for these Hershey’s red velvet blossoms can be made up to 2-3 days in advance and stored in an airtight container in the refrigerator. When you’re ready to bake, let the dough sit at room temperature for about 15-20 minutes to make it easier to roll into balls. This makes them a convenient option for making ahead for parties or holidays.
Hershey’s Red Velvet Blossoms – Easy Cookie Recipe
An easy and festive recipe for Hershey’s Red Velvet Blossoms cookies, perfect for holidays and celebrations.
Ingredients
-
7 tablespoons butter, softened
-
1/2 cup packed brown sugar
-
2 tablespoons granulated sugar
-
1 teaspoon vanilla extract
-
1 large egg yolk
-
1/4 teaspoon red food coloring gel
-
1 cup all-purpose flour
-
1 tablespoon unsweetened cocoa powder
-
1/2 teaspoon baking powder
-
1/4 teaspoon salt
-
1/4 cup red sanding sugar
-
18 Hershey’s chocolate kisses
Instructions
-
Step 1
In a large bowl, cream together softened butter, brown sugar, and granulated sugar until light and fluffy. Beat in vanilla extract and egg yolk. Gently mix in red food coloring gel until a uniform red color is achieved. -
Step 2
In a separate bowl, whisk together flour, cocoa powder, baking powder, and salt. Gradually add dry ingredients to wet ingredients, mixing until just combined. Do not overmix. -
Step 3
Place red sanding sugar in a shallow bowl. Roll about a tablespoon of dough into a ball and then roll it in the red sanding sugar until completely coated. Place coated dough balls on a parchment-lined baking sheet, leaving 2 inches between each. -
Step 4
Preheat oven to 350°F (175°C). Bake cookies for 8-10 minutes, or until edges are set and centers are slightly soft. -
Step 5
While cookies bake, unwrap Hershey’s chocolate kisses. As soon as cookies come out of the oven, gently press one chocolate kiss into the center of each warm cookie. -
Step 6
Allow cookies to cool on the baking sheet for 5 minutes before transferring to a wire rack to cool completely. The chocolate kiss will set as it cools.
Important Information
Nutrition Facts (Per Serving)
It is important to consider this information as approximate and not to use it as definitive health advice.
Allergy Information
Please check ingredients for potential allergens and consult a health professional if in doubt.

Leave a Comment