
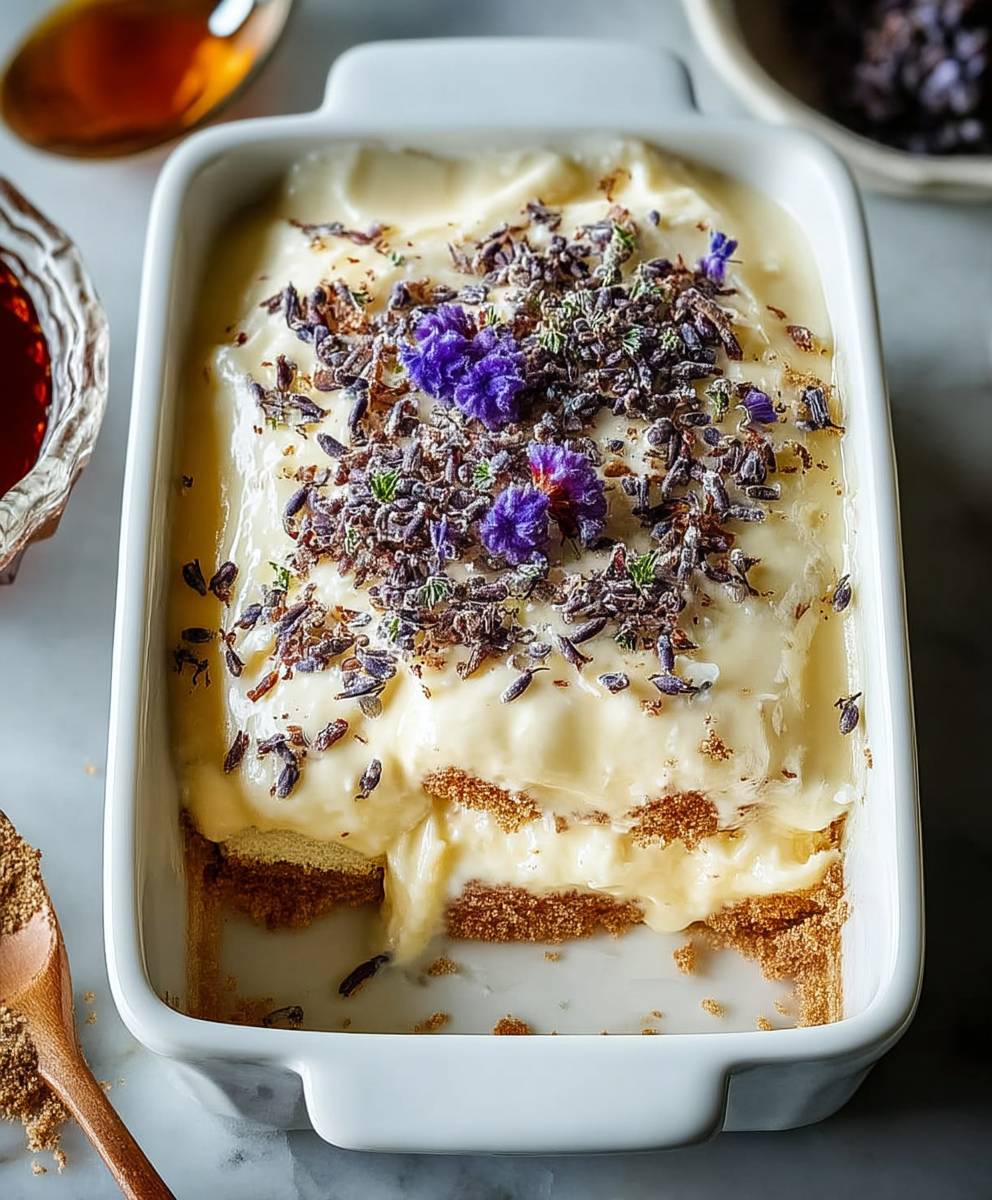
Earl Grey Tiramisu: Prepare to experience a delightful twist on a classic Italian dessert! Imagine the creamy, coffee-soaked layers of traditional tiramisu, but infused with the delicate, floral notes of Earl Grey tea. Intrigued? I certainly was when I first conceived this recipe, and the result is nothing short of extraordinary.
Tiramisu, meaning “pick me up” or “cheer me up” in Italian, has a relatively recent history, believed to have originated in the Veneto region of Italy in the latter half of the 20th century. Its popularity quickly spread worldwide, becoming a beloved dessert for its rich flavors and comforting texture. But why stick to tradition when you can elevate it with a touch of sophistication?
People adore tiramisu for its harmonious blend of textures the soft, coffee-soaked ladyfingers, the velvety mascarpone cream, and the dusting of cocoa powder. This Earl Grey Tiramisu recipe retains all those beloved qualities while adding a unique aromatic dimension. The bergamot in the Earl Grey tea complements the creamy mascarpone beautifully, creating a dessert that is both comforting and refined. It’s surprisingly easy to make, perfect for impressing guests at your next dinner party, or simply indulging in a little self-care. Trust me, once you try this Earl Grey Tiramisu, you’ll never look at traditional tiramisu the same way again!

Ingredients:
- For the Earl Grey Syrup:
- 1 cup water
- 1/2 cup granulated sugar
- 4 Earl Grey tea bags
- For the Mascarpone Cream:
- 1 1/2 cups heavy cream, cold
- 16 ounces mascarpone cheese, softened
- 1/2 cup granulated sugar
- 1 teaspoon vanilla extract
- Pinch of salt
- For Assembly:
- About 40-50 ladyfingers (savoiardi biscuits)
- Unsweetened cocoa powder, for dusting
- Optional: Chocolate shavings or grated dark chocolate, for garnish
Preparing the Earl Grey Syrup
First, we need to infuse our ladyfingers with that beautiful Earl Grey flavor. This syrup is super easy to make, and it’s the key to a truly special tiramisu.
- Combine Water and Sugar: In a medium saucepan, combine the water and granulated sugar.
- Heat and Dissolve: Place the saucepan over medium heat. Stir constantly until the sugar is completely dissolved. You should see a clear, shimmering liquid.
- Infuse with Earl Grey: Once the sugar is dissolved, remove the saucepan from the heat. Add the Earl Grey tea bags, making sure they are fully submerged in the syrup.
- Steep: Cover the saucepan and let the tea bags steep for at least 15-20 minutes. The longer you steep, the stronger the Earl Grey flavor will be. I usually go for the full 20 minutes to get a really pronounced tea taste.
- Remove Tea Bags: After steeping, remove the tea bags and discard them. Don’t squeeze them, as this can release bitter tannins into the syrup.
- Cool Completely: Allow the Earl Grey syrup to cool completely before using it to soak the ladyfingers. This is important because hot syrup will make the ladyfingers too soggy. You can speed up the cooling process by transferring the syrup to a shallow dish and placing it in the refrigerator.
Making the Mascarpone Cream
Now for the star of the show: the mascarpone cream! This is what gives tiramisu its rich, decadent texture. It’s crucial to use cold heavy cream and softened mascarpone for the best results.
- Whip the Heavy Cream: In a large bowl (or the bowl of a stand mixer), pour the cold heavy cream. Using an electric mixer (handheld or stand mixer), whip the cream on medium-high speed until stiff peaks form. Be careful not to overwhip, or you’ll end up with butter! You want the cream to hold its shape when you lift the beaters.
- Combine Mascarpone, Sugar, Vanilla, and Salt: In a separate large bowl, combine the softened mascarpone cheese, granulated sugar, vanilla extract, and salt. Use a rubber spatula or wooden spoon to gently mix these ingredients together until they are smooth and well combined. Avoid overmixing, as this can make the mascarpone cheese watery.
- Gently Fold in Whipped Cream: This is the most important step for achieving a light and airy cream. Gently fold the whipped cream into the mascarpone mixture in two or three additions. Use a rubber spatula and be careful not to deflate the whipped cream. Fold until just combined; a few streaks of whipped cream are okay. Overmixing will result in a dense, less appealing cream.
Assembling the Earl Grey Tiramisu
Finally, the fun part! Layering everything together to create our masterpiece. This is where the magic happens, and you get to see all your hard work come to fruition.
- Prepare Your Dish: Choose a rectangular or square dish that is at least 2 inches deep. I usually use a 9×13 inch dish, but you can adjust the size depending on how many servings you want.
- Dip the Ladyfingers: Working one at a time, quickly dip each ladyfinger into the cooled Earl Grey syrup. Don’t soak them for too long, just a quick dip on each side (about 1-2 seconds per side) is enough. You want them to be moistened but not soggy. If they are too wet, the tiramisu will be mushy.
- Create the First Layer: Arrange the dipped ladyfingers in a single layer at the bottom of the dish. You may need to break some of the ladyfingers to fit them snugly into the dish. Try to cover the entire bottom of the dish with ladyfingers.
- Spread a Layer of Mascarpone Cream: Spread half of the mascarpone cream evenly over the layer of ladyfingers. Use a spatula or the back of a spoon to smooth the cream into an even layer.
- Repeat Layers: Repeat the dipping and layering process. Dip the remaining ladyfingers in the Earl Grey syrup and arrange them in a second layer over the mascarpone cream.
- Top with Remaining Cream: Spread the remaining mascarpone cream evenly over the second layer of ladyfingers. Again, smooth the cream into an even layer.
- Dust with Cocoa Powder: Using a fine-mesh sieve, dust the top of the tiramisu generously with unsweetened cocoa powder. This adds a beautiful visual appeal and a slightly bitter counterpoint to the sweetness of the cream and syrup.
- Garnish (Optional): If desired, garnish the tiramisu with chocolate shavings or grated dark chocolate. This adds an extra touch of elegance and flavor.
- Chill: Cover the tiramisu with plastic wrap and refrigerate for at least 4 hours, or preferably overnight. This allows the flavors to meld together and the ladyfingers to soften. The longer it chills, the better it will taste!
- Serve: Before serving, remove the tiramisu from the refrigerator. Cut into squares or rectangles and serve chilled. Enjoy!
Tips for Success
Here are a few extra tips to ensure your Earl Grey Tiramisu is a resounding success:
- Use High-Quality Ingredients: The quality of your ingredients will directly impact the flavor of your tiramisu. Use good-quality mascarpone cheese, heavy cream, and Earl Grey tea bags.
- Don’t Oversoak the Ladyfingers: This is the most common mistake people make when making tiramisu. Oversoaked ladyfingers will result in a soggy, unpleasant texture. Dip them quickly and briefly.
- Chill Thoroughly: Chilling the tiramisu for at least 4 hours (or overnight) is essential for allowing the flavors to meld and the ladyfingers to soften.
- Adjust Sweetness to Taste: If you prefer a less sweet tiramisu, you can reduce the amount of sugar in the mascarpone cream and/or the Earl Grey syrup.
- Experiment with Flavors: While this recipe is for Earl Grey Tiramisu, you can easily adapt it to other flavors. Try using different types of tea, coffee, or even liqueurs to soak the ladyfingers.
Variations
Want to put your own spin on this classic dessert? Here are a few ideas:
- Coffee Tiramisu: Replace the Earl Grey tea bags with strong brewed coffee or espresso. You can also add a splash of coffee liqueur to the mascarpone cream.
- Chocolate Tiramisu: Add cocoa powder to the mascarpone cream and/or drizzle melted chocolate over the ladyfingers.
- Berry Tiramisu: Layer fresh berries (such as raspberries, strawberries, or blueberries) between the ladyfingers and the mascarpone cream.
- Lemon Tiramisu: Add lemon zest and lemon juice to the mascarpone cream for a bright, citrusy flavor.
I hope you enjoy making and eating this delicious Earl Grey Tiramisu! It’s a perfect dessert for any occasion, and it’s sure to impress your friends and family.
Conclusion:
This Earl Grey Tiramisu isn’t just another dessert; it’s an experience. The delicate bergamot notes of the Earl Grey tea infuse every layer with a sophisticated aroma and flavor that perfectly complements the creamy mascarpone and the subtly bitter cocoa. It’s a delightful twist on a classic that will impress your guests and leave them craving more. Trust me, the unique blend of flavors makes this Earl Grey Tiramisu a must-try for any dessert enthusiast.
But the beauty of this recipe lies not only in its taste but also in its versatility. Feel free to experiment with different variations to suit your preferences. For a richer, more decadent experience, try using dark chocolate shavings instead of cocoa powder. Or, if you’re looking for a lighter option, you can substitute the mascarpone with Greek yogurt for a tangy twist.
Serving suggestions? I’ve got you covered! This tiramisu is fantastic on its own, but it also pairs beautifully with a cup of freshly brewed Earl Grey tea, of course! The warm tea enhances the bergamot notes in the dessert, creating a truly harmonious experience. Alternatively, a glass of dessert wine, like a Moscato d’Asti, would also be a delightful accompaniment. For a more casual presentation, you can serve the tiramisu in individual glasses or ramekins. This makes it easier for your guests to enjoy and adds a touch of elegance to your dessert table. If you’re feeling adventurous, try adding a layer of fresh berries, such as raspberries or blueberries, for a burst of fruity flavor and a pop of color.
And don’t be afraid to get creative with the presentation! A dusting of edible glitter can add a touch of sparkle, while a few strategically placed chocolate curls can elevate the visual appeal. Remember, the goal is to make your Earl Grey Tiramisu look as good as it tastes!
I truly believe that this recipe is a winner. It’s relatively easy to make, requires minimal baking skills, and delivers a flavor profile that is both comforting and sophisticated. It’s the perfect dessert for any occasion, from a casual weeknight dinner to a fancy dinner party.
So, what are you waiting for? Gather your ingredients, put on your apron, and get ready to embark on a culinary adventure. I promise you won’t be disappointed. This Earl Grey Tiramisu is a guaranteed crowd-pleaser.
Once you’ve tried this recipe, I’d love to hear about your experience! Did you make any variations? What did your guests think? Share your photos and stories in the comments below. I’m always eager to learn from your culinary creations and see how you’ve made this recipe your own. Happy baking, and enjoy every delicious bite! I am confident that you will love this recipe as much as I do. Don’t forget to rate the recipe and share it with your friends and family. Let’s spread the joy of this amazing dessert far and wide!
Earl Grey Tiramisu: A Delicious Twist on a Classic Dessert
A sophisticated twist on classic tiramisu, this Earl Grey Tiramisu features ladyfingers soaked in aromatic Earl Grey syrup, layered with a creamy mascarpone filling, and dusted with cocoa powder. A delightful dessert that's both elegant and easy to make!
Ingredients
- 1 cup water
- 1/2 cup granulated sugar
- 4 Earl Grey tea bags
- 1 1/2 cups heavy cream, cold
- 16 ounces mascarpone cheese, softened
- 1/2 cup granulated sugar
- 1 teaspoon vanilla extract
- Pinch of salt
- About 40-50 ladyfingers (savoiardi biscuits)
- Unsweetened cocoa powder, for dusting
- Optional: Chocolate shavings or grated dark chocolate, for garnish
Instructions
- In a medium saucepan, combine the water and granulated sugar.
- Place the saucepan over medium heat. Stir constantly until the sugar is completely dissolved. You should see a clear, shimmering liquid.
- Once the sugar is dissolved, remove the saucepan from the heat. Add the Earl Grey tea bags, making sure they are fully submerged in the syrup.
- Cover the saucepan and let the tea bags steep for at least 15-20 minutes. The longer you steep, the stronger the Earl Grey flavor will be.
- After steeping, remove the tea bags and discard them. Don’t squeeze them, as this can release bitter tannins into the syrup.
- Allow the Earl Grey syrup to cool completely before using it to soak the ladyfingers. You can speed up the cooling process by transferring the syrup to a shallow dish and placing it in the refrigerator.
- In a large bowl (or the bowl of a stand mixer), pour the cold heavy cream. Using an electric mixer (handheld or stand mixer), whip the cream on medium-high speed until stiff peaks form. Be careful not to overwhip.
- In a separate large bowl, combine the softened mascarpone cheese, granulated sugar, vanilla extract, and salt. Use a rubber spatula or wooden spoon to gently mix these ingredients together until they are smooth and well combined. Avoid overmixing.
- Gently fold the whipped cream into the mascarpone mixture in two or three additions. Use a rubber spatula and be careful not to deflate the whipped cream. Fold until just combined; a few streaks of whipped cream are okay. Overmixing will result in a dense, less appealing cream.
- Choose a rectangular or square dish that is at least 2 inches deep. A 9×13 inch dish is recommended.
- Working one at a time, quickly dip each ladyfinger into the cooled Earl Grey syrup. Don’t soak them for too long, just a quick dip on each side (about 1-2 seconds per side) is enough.
- Arrange the dipped ladyfingers in a single layer at the bottom of the dish. You may need to break some of the ladyfingers to fit them snugly into the dish.
- Spread half of the mascarpone cream evenly over the layer of ladyfingers. Use a spatula or the back of a spoon to smooth the cream into an even layer.
- Repeat the dipping and layering process. Dip the remaining ladyfingers in the Earl Grey syrup and arrange them in a second layer over the mascarpone cream.
- Spread the remaining mascarpone cream evenly over the second layer of ladyfingers. Again, smooth the cream into an even layer.
- Using a fine-mesh sieve, dust the top of the tiramisu generously with unsweetened cocoa powder.
- If desired, garnish the tiramisu with chocolate shavings or grated dark chocolate.
- Cover the tiramisu with plastic wrap and refrigerate for at least 4 hours, or preferably overnight.
- Before serving, remove the tiramisu from the refrigerator. Cut into squares or rectangles and serve chilled.
Notes
- Use high-quality ingredients for the best flavor.
- Don’t oversoak the ladyfingers, or the tiramisu will be soggy.
- Chilling thoroughly is essential for the flavors to meld.
- Adjust sweetness to taste by reducing sugar in the syrup or cream.
- Experiment with flavors by using different teas, coffee, or liqueurs.
Leave a Comment