
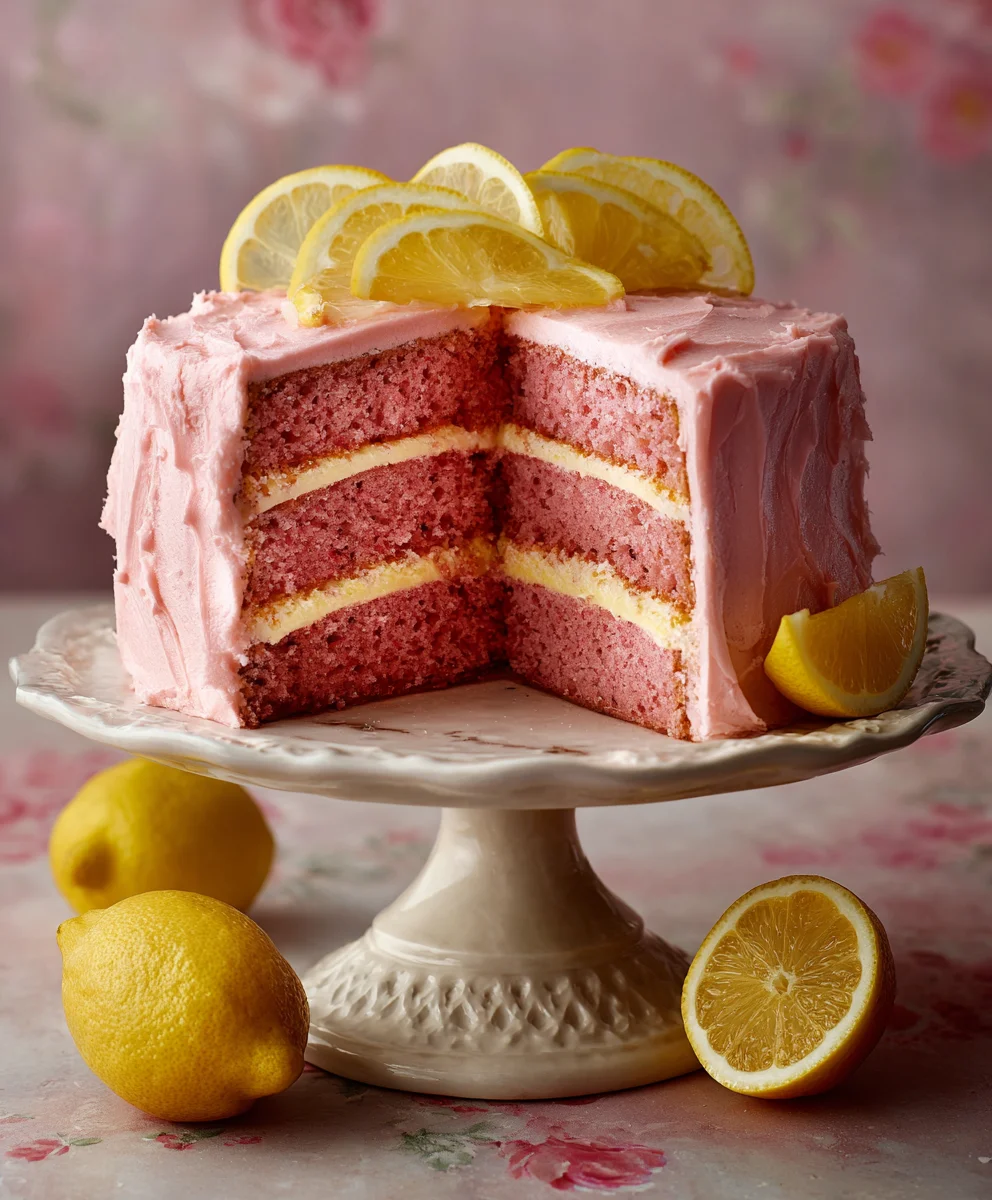
Pink Lemonade Cake, with its vibrant hue and delightfully zesty flavor, offers a truly refreshing twist on traditional dessert. Imagine a slice that instantly transports you to a sun-drenched porch on a warm summer’s day, each bite a perfect balance of sweet and tart that awakens your palate. While the concept of pink lemonade itself has whimsical origins, often attributed to the circuses of the late 19th century, transforming this beloved beverage into a cake is a relatively modern culinary marvel that captures its nostalgic charm. People adore this particular confection not only for its stunning visual appeal and Instagram-worthiness but also for its incredibly moist crumb and the bright, citrusy punch that perfectly cuts through the sweetness, leaving a wonderfully light and satisfying sensation. It’s the ultimate showstopper for any gathering, from cheerful spring brunches to elegant summer soirées, promising a taste experience that is both familiar and exciting. I am absolutely delighted to guide you through creating this exquisite Pink Lemonade Cake, a dessert that truly embodies joy in every slice.

<h2>Ingredients:</h2>
<ul>
<li><strong>For the Pink Lemonade Cake Layers:</strong>
<ul>
<li>3 cups (360g) all-purpose flour, sifted – <em>Sifting ensures a light and airy crumb for our <strong>Pink Lemonade Cake</strong>.</em></li>
<li>1 tablespoon baking powder – <em>Our crucial leavening agent for that perfect rise and tender texture.</em></li>
<li>1/2 teaspoon salt – <em>A pinch of salt is essential to balance the sweetness and enhance all the wonderful flavors, making the lemon truly pop.</em></li>
<li>1 cup (226g) unsalted butter, softened to room temperature – <em>Room temperature butter is absolutely crucial for proper creaming, which incorporates air and creates a tender, moist cake.</em></li>
<li>2 cups (400g) granulated sugar – <em>The primary sweetener, contributing to both the cake's flavor and its wonderful moisture retention.</em></li>
<li>4 large eggs, at room temperature – <em>Like butter, room temperature eggs emulsify much better with the butter and sugar mixture, resulting in a smoother batter and a more uniform cake texture.</em></li>
<li>1 cup buttermilk, at room temperature – <em>Buttermilk adds an incredible tenderness and a slight, pleasant tang that beautifully complements the lemon flavors in our <strong>Pink Lemonade Cake</strong>.</em></li>
<li>1/2 cup pink lemonade concentrate, thawed – <em>This is the heart and soul of our <strong>Pink Lemonade Cake</strong>'s signature flavor! Make sure it's thawed and ready to incorporate.</em></li>
<li>2 tablespoons fresh lemon juice – <em>To brighten and intensify that wonderful, zesty lemon flavor without making it overly sour.</em></li>
<li>1 teaspoon vanilla extract – <em>A classic flavor enhancer that rounds out the fruity notes and adds depth to the cake.</em></li>
<li>1-2 drops pink or red gel food coloring (optional) – <em>For that vibrant, signature pink hue in our <strong>Pink Lemonade Cake</strong> layers. Gel coloring provides concentrated color without adding excess liquid.</em></li>
</ul>
</li>
<li><strong>For the Pink Lemonade Syrup (Optional but highly recommended!):</strong> – <em>This syrup is a game-changer for moisture and an extra burst of <strong>Pink Lemonade</strong> flavor.</em>
<ul>
<li>1/4 cup pink lemonade concentrate</li>
<li>1/4 cup granulated sugar</li>
<li>1/4 cup water</li>
</ul>
</li>
<li><strong>For the Pink Lemonade Buttercream Frosting:</strong>
<ul>
<li>2 cups (452g) unsalted butter, softened to room temperature – <em>Essential for a smooth, rich, and perfectly spreadable buttercream.</em></li>
<li>8 cups (900g-1kg) powdered sugar, sifted – <em>Sifting is non-negotiable here to prevent any lumps and ensure a silky-smooth texture for our luscious <strong>Pink Lemonade</strong> frosting.</em></li>
<li>1/2 cup pink lemonade concentrate – <em>To infuse our buttercream with that irresistible, vibrant taste of <strong>pink lemonade</strong>.</em></li>
<li>2 tablespoons fresh lemon juice – <em>Enhances the zesty lemon notes, making the frosting wonderfully bright.</em></li>
<li>1 teaspoon vanilla extract – <em>Complements the fruit flavors and adds a touch of warmth to the frosting.</em></li>
<li>2-4 tablespoons heavy cream or milk, as needed – <em>To achieve the ideal light, fluffy, and spreadable consistency for your buttercream. Adjust as you go!</em></li>
<li>3-5 drops pink or red gel food coloring (optional) – <em>To make our <strong>Pink Lemonade</strong> Buttercream truly pop with its signature cheerful color.</em></li>
</ul>
</li>
<li><strong>For Garnish (Optional):</strong> – <em>These additions elevate the visual appeal and fresh flavor of your <strong>Pink Lemonade Cake</strong>.</em>
<ul>
<li>Fresh lemon slices or wedges</li>
<li>Raspberries or strawberries</li>
<li>Edible glitter or sprinkles</li>
</ul>
</li>
</ul>
<h3>Preparing the <strong>Pink Lemonade Cake</strong> Layers</h3>
<ol>
<li>
<h4>Preheat and Prep Your Pans:</h4>
Let's get started by preheating your oven to 350°F (175°C). <strong>This ensures a consistent baking temperature from the moment your cake goes in,</strong> which is vital for even baking. Next, prepare three 8-inch round cake pans. I always recommend lightly greasing them with butter or baking spray, then dusting them with a thin layer of flour. You can also line the bottoms with parchment paper circles for extra assurance that your beautiful <strong>Pink Lemonade Cake</strong> layers will release perfectly. This meticulous prep work is key to avoiding sticking and frustration later on!
</li>
<li>
<h4>Whisk the Dry Ingredients:</h4>
In a medium bowl, whisk together your sifted all-purpose flour, baking powder, and salt. <strong>Sifting the flour beforehand is a small but mighty step that helps aerate the flour,</strong> preventing lumps and ensuring a light, even crumb in your finished <strong>Pink Lemonade Cake</strong>. It also ensures the baking powder and salt are evenly distributed throughout the dry mixture. Set this dry mixture aside for now.
</li>
<li>
<h4>Cream Butter and Sugar:</h4>
In the bowl of a stand mixer fitted with the paddle attachment (or using a large bowl and a hand mixer), beat the softened unsalted butter on medium speed for about 1-2 minutes until it's light and creamy. Gradually add the granulated sugar, beating on medium-high speed for another 3-5 minutes. <strong>You're looking for a mixture that is significantly lighter in color and wonderfully fluffy in texture, almost like whipped cream.</strong> This process, known as creaming, incorporates air into the butter and sugar, which is essential for a tender cake structure and contributes significantly to the overall volume and texture of your <strong>Pink Lemonade Cake</strong>. Scrape down the sides of the bowl frequently to ensure everything is evenly combined.
</li>
<li>
<h4>Incorporate the Eggs:</h4>
Add the eggs one at a time, beating well after each addition until fully incorporated. After adding each egg, make sure to beat until no traces of yellow yolk remain before adding the next. <strong>This ensures proper emulsification,</strong> which prevents the batter from curdling and contributes to a smooth, stable cake batter. This is a critical step for a structurally sound and delicious <strong>Pink Lemonade Cake</strong>.
</li>
<li>
<h4>Combine Wet Ingredients:</h4>
In a separate small bowl or measuring cup, whisk together the room temperature buttermilk, pink lemonade concentrate, fresh lemon juice, and vanilla extract. If you're using food coloring for the cake layers, now is the time to add 1-2 drops of pink or red gel food coloring to this mixture and stir until evenly colored. <strong>Adding the color to the liquid ensures an even distribution throughout your <strong>Pink Lemonade Cake</strong> layers,</strong> giving them that perfect, cheerful hue.
</li>
<li>
<h4>Alternate Dry and Wet Ingredients:</h4>
With the mixer on low speed, gradually add the dry ingredients to the butter mixture in three additions, alternating with the buttermilk mixture in two additions. Begin and end with the dry ingredients. So, you'll add about a third of the flour mixture, mix until just combined, then half of the buttermilk mixture, mix, then another third of the flour, mix, the remaining buttermilk mixture, mix, and finally the last third of the flour mixture. <strong>Important:</strong> Mix only until <em>just combined</em> after each addition. <strong>Overmixing develops gluten, which can lead to a tough cake, and we want our <strong>Pink Lemonade Cake</strong> to be wonderfully tender and moist.</strong> Scrape down the bowl as needed to ensure no dry pockets remain.
</li>
<li>
<h4>Fill Pans and Bake:</h4>
Divide the cake batter evenly among your three prepared 8-inch cake pans. I like to use a kitchen scale to ensure each pan has roughly the same weight of batter, which helps them bake evenly and prevents uneven layers. Smooth the tops with a spatula. Bake for 25-30 minutes, or until a wooden skewer or toothpick inserted into the center of a cake layer comes out clean. <strong>The exact baking time can vary depending on your oven, so keep a close eye on them!</strong> The layers should be lightly golden, spring back when gently touched, and smell absolutely divine, hinting at the delightful <strong>Pink Lemonade Cake</strong> to come.
</li>
<li>
<h4>Cooling the Cake Layers:</h4>
Once baked, remove the cakes from the oven and let them cool in their pans on a wire rack for about 10-15 minutes. <strong>This allows the cakes to firm up slightly before you attempt to remove them,</strong> preventing breakage. After 10-15 minutes, carefully invert the cakes onto the wire rack, remove the pans, and peel off the parchment paper (if used). Let the cake layers cool completely on the wire rack before moving on to the next steps. <strong>This is crucial!</strong> Attempting to frost or syrup warm cakes will lead to a melty, crumbly mess. Patience is a virtue when baking a magnificent <strong>Pink Lemonade Cake</strong>!
</li>
</ol>
<h3>Making the <strong>Pink Lemonade</strong> Syrup</h3>
<ol start="9">
<li>
<h4>Combine and Simmer:</h4>
In a small saucepan, combine the 1/4 cup pink lemonade concentrate, 1/4 cup granulated sugar, and 1/4 cup water. Place the saucepan over medium heat and stir constantly until the sugar has completely dissolved. Bring the mixture to a gentle simmer, but do not boil it vigorously. <strong>Allow it to simmer for about 2-3 minutes, just enough for the flavors to meld and the syrup to thicken ever so slightly.</strong> This simple syrup infusion will add an extra punch of <strong>Pink Lemonade</strong> flavor and incredible moisture to our cake layers, making each bite even more delightful and preventing any dryness.
</li>
<li>
<h4>Cool the Syrup:</h4>
Remove the saucepan from the heat and allow the <strong>Pink Lemonade</strong> syrup to cool completely to room temperature before using. You can speed up this process by transferring it to a heat-proof bowl and placing it in an ice bath or refrigerating it briefly, but make sure it's not cold or gelled when you apply it. <strong>A cool, liquid consistency is what we are aiming for to perfectly soak into our cake layers.</strong>
</li>
</ol>
<h3>Crafting the <strong>Pink Lemonade</strong> Buttercream Frosting</h3>
<ol start="11">
<li>
<h4>Cream the Butter:</h4>
In the bowl of a stand mixer fitted with the paddle attachment, or using a large bowl and a hand mixer, beat the softened unsalted butter on medium speed for about 3-5 minutes. <strong>We want it to be incredibly light, pale, and fluffy.</strong> This step is paramount for a smooth, airy buttercream. Don't rush it! Thoroughly creaming the butter incorporates a significant amount of air, which helps create that desirable light texture for your <strong>Pink Lemonade</strong> frosting. Scrape down the sides of the bowl once or twice during this process to ensure consistent aeration.
</li>
<li>
<h4>Gradually Add Powdered Sugar:</h4>
With the mixer on low speed, gradually add the sifted powdered sugar, about 1-2 cups at a time. Beat until each addition is fully incorporated before adding more. Once all the powdered sugar is in, increase the speed to medium-high and beat for another 3-5 minutes. <strong>The mixture should become very thick, fluffy, and quite white.</strong> Sifting the powdered sugar beforehand is crucial to prevent a lumpy frosting texture and ensures a silky-smooth finish. This is the foundation of our perfectly smooth <strong>Pink Lemonade</strong> buttercream.
</li>
<li>
<h4>Infuse with Pink Lemonade Flavor:</h4>
Reduce the mixer speed to low. Add the 1/2 cup pink lemonade concentrate, fresh lemon juice, and vanilla extract. Mix until just combined. The frosting might look a little curdled at this point, but don't worry, it will come together! <strong>This is where the magic of the <strong>Pink Lemonade Cake</strong> truly shines, infusing the buttercream with that signature tangy-sweet, incredibly refreshing flavor.</strong>
</li>
<li>
<h4>Adjust Consistency and Color:</h4>
Increase the mixer speed to medium-high again and beat for another 2-3 minutes. This will help make the frosting extra light and smooth. <strong>If the frosting seems too thick, add heavy cream or milk one tablespoon at a time until it reaches your desired spreadable consistency.</strong> If it's too thin, you can add a little more sifted powdered sugar. Now, for the fun part: add 3-5 drops of pink or red gel food coloring. Start with a few drops and add more until you achieve your desired lovely <strong>pink lemonade</strong> hue. Beat until the color is evenly distributed and the frosting is smooth and fluffy, ready to adorn your cake.
</li>
</ol>
<h3>Assembling the <strong>Pink Lemonade Cake</strong></h3>
<ol start="15">
<li>
<h4>Level the Cake Layers:</h4>
Ensure your cake layers are completely cool. Using a serrated knife or a cake leveler, carefully trim the tops of each cake layer if they have domed, creating flat surfaces. <strong>This step is important for creating a stable, even cake structure and a professional-looking <strong>Pink Lemonade Cake</strong> that won't lean or wobble.</strong>
</li>
<li>
<h4>Soak with Syrup:</h4>
Place one leveled cake layer on your serving plate or cake stand. Using a pastry brush or a spoon, generously brush or drizzle about one-third of the cooled <strong>Pink Lemonade</strong> syrup over the top surface of the cake layer. Allow a moment for the syrup to absorb. <strong>This step adds incredible moisture and an extra burst of <strong>pink lemonade</strong> flavor, making the cake truly irresistible and preventing it from drying out.</strong>
</li>
<li>
<h4>First Layer of Frosting:</h4>
Spread about 1 to 1.5 cups of the <strong>Pink Lemonade</strong> buttercream evenly over the first syrup-soaked cake layer, right to the edges. You can use an offset spatula for this, as it makes spreading smooth and easy. Aim for an even thickness across the layer to ensure a balanced flavor in every bite.
</li>
<li>
<h4>Stack and Repeat:</h4>
Carefully place the second cake layer on top of the frosted layer, pressing down gently to secure it. Repeat the syrup soaking and frosting steps: brush with another third of the <strong>Pink Lemonade</strong> syrup, then spread with another 1 to 1.5 cups of buttercream. Place the final cake layer on top, pressing gently. Brush the top of this final layer with the remaining syrup. <strong>This layering creates a beautiful visual appeal and ensures consistent flavor distribution throughout your <strong>Pink Lemonade Cake</strong>.</strong>
</li>
<li>
<h4>The Crumb Coat:</h4>
Apply a very thin layer of <strong>Pink Lemonade</strong> buttercream over the entire cake – top and sides. This is called a crumb coat, and <strong>its purpose is to trap any loose crumbs, preventing them from mixing into your final, pristine layer of frosting.</strong> Don't worry about perfection here; just get a thin, even coverage. Once applied, refrigerate the cake for 15-30 minutes, or until the crumb coat is firm to the touch. This chilling time is vital for a clean final frost and a smooth, professional finish.
</li>
<li>
<h4>Final Frosting and Decoration:</h4>
Once the crumb coat is firm, apply the remaining <strong>Pink Lemonade</strong> buttercream generously over the entire cake. Use an offset spatula or a bench scraper to create smooth sides and a level top. You can leave the frosting rustic for a charming homemade look or strive for perfectly smooth edges – it's entirely up to your preference! If you're feeling fancy, you can pipe decorative borders or swirls on top with any leftover frosting. For an extra touch, garnish your magnificent <strong>Pink Lemonade Cake</strong> with fresh lemon slices, vibrant raspberries or strawberries, and a dusting of edible glitter or sprinkles. <strong>These garnishes not only add visual appeal but also complement the fresh, zesty flavors beautifully.</strong>
</li>
</ol>
<h3>Storage and Serving Your <strong>Pink Lemonade Cake</strong></h3>
<ol start="21">
<li>
<h4>Chill Before Slicing:</h4>
For the cleanest slices and best presentation, it's always a good idea to chill your fully assembled <strong>Pink Lemonade Cake</strong> in the refrigerator for at least 30 minutes (or up to an hour) before serving. <strong>This allows the buttercream to firm up, making it significantly easier to cut beautiful, intact slices without smudging the frosting.</strong>
</li>
<li>
<h4>Serving Perfection:</h4>
When ready to serve, remove the cake from the refrigerator about 15-20 minutes before slicing to allow the buttercream to soften slightly, ensuring a perfect texture that's not too hard. Use a sharp, warm knife (you can warm it by running it under hot water and wiping it dry) to cut neat slices. <strong>Clean the knife between each cut for the prettiest results and a truly elegant presentation.</strong>
</li>
<li>
<h4>Storage:</h4>
Leftover <strong>Pink Lemonade Cake</strong> can be stored in an airtight container at room temperature for up to 2-3 days, though I find it best within the first day for peak freshness. If your kitchen is particularly warm, or for longer storage, it's best to store it in the refrigerator for up to 5 days. <strong>Just make sure to bring it back to room temperature for about 30 minutes before enjoying for the optimal taste and texture.</strong> This cake also freezes beautifully, tightly wrapped in plastic wrap and then foil, for up to 2-3 months. Simply thaw in the refrigerator overnight and then at room temperature for an hour before serving for a delightful treat anytime.
</li>
<li>
<h4>Enjoy Your Masterpiece:</h4>
Now, step back and admire your handiwork. You've created a stunning and delicious <strong>Pink Lemonade Cake</strong> that's sure to be the star of any gathering, from backyard barbecues to elegant brunches. The bright, zesty lemon combined with the sweet, subtle tartness of pink lemonade in both the moist cake layers and the luscious buttercream makes for an unforgettable dessert experience. <strong>Enjoy every single vibrant, refreshing bite of your homemade creation!</strong>
</li>
</ol>
Conclusion:
So, there you have it! My absolute favorite recipe for a delightful, show-stopping dessert that’s guaranteed to bring a burst of sunshine to any occasion. This isn’t just any cake; it’s a celebration in every single slice, a culinary hug that’s as beautiful to look at as it is utterly delicious to eat. I’ve poured my heart into perfecting this recipe, ensuring that every step is clear and achievable, guiding you towards a masterpiece that tastes like pure joy. The delicate balance of sweet and tart, the vibrant, cheerful pink hue – it’s simply irresistible. I promise you, one bite of this incredible Pink Lemonade Cake, and you’ll understand exactly why it has become such a cherished staple in my baking repertoire. It’s light, it’s refreshing, and it brings a smile to everyone’s face, making it a guaranteed crowd-pleaser.
I truly believe this recipe is a must-try for everyone, from novice bakers to seasoned pros. It’s incredibly forgiving, and the steps are straightforward, yielding consistently stunning results that look and taste like they came straight from a professional patisserie. Perfect for a summer gathering, a festive spring brunch, a birthday party, or even just to brighten up an ordinary Tuesday afternoon, this cake transcends occasions. The bright, zesty lemon notes cut through the sweetness beautifully, creating a harmonious flavor profile that leaves you feeling refreshed rather than overly full. It’s a symphony of flavors that truly captures the essence of a sun-drenched afternoon, making you long for another slice almost immediately. The airy texture of the cake combined with the luscious, tangy frosting is a match made in dessert heaven, creating an experience that’s both comforting and exhilarating.
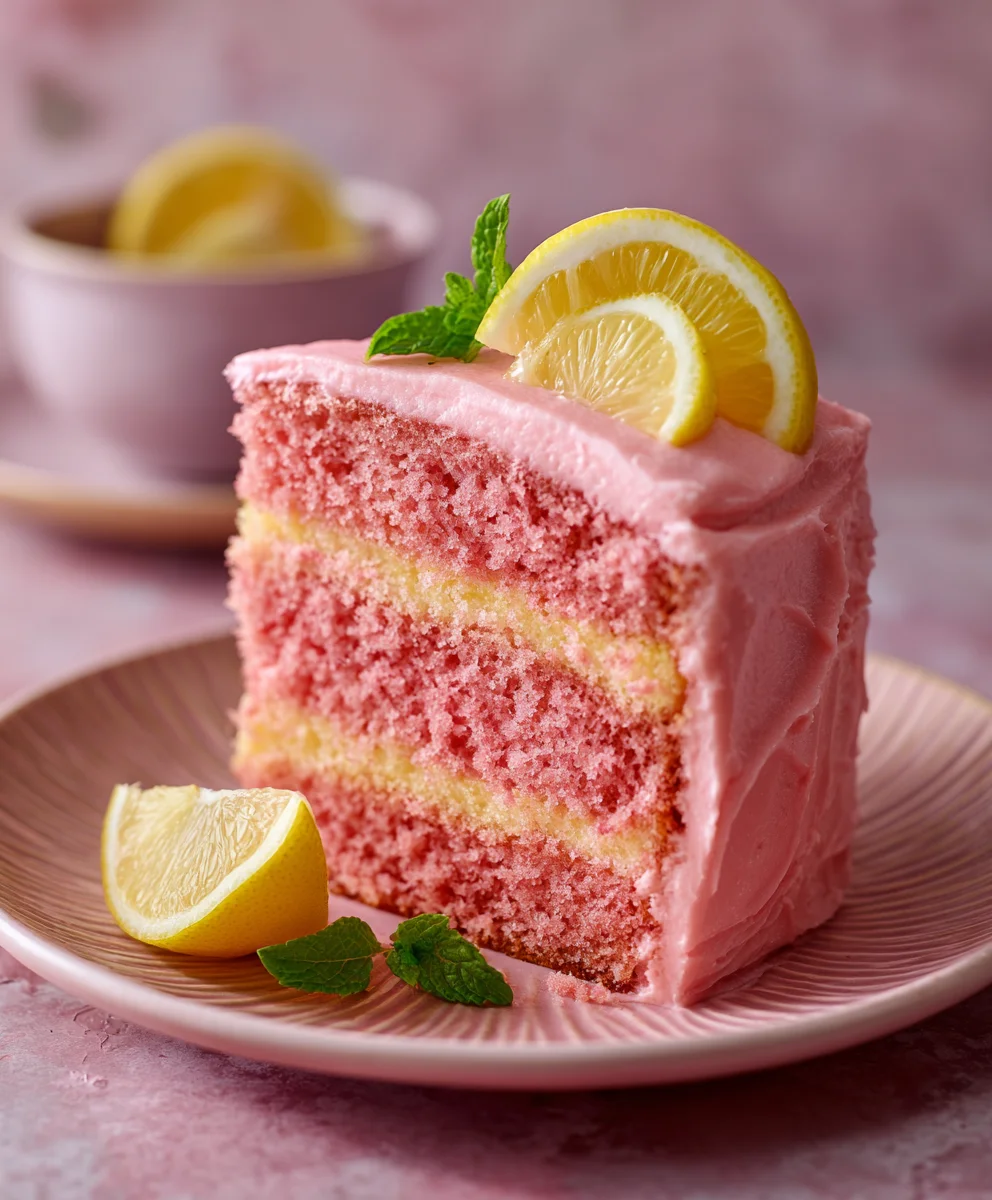
Now, while this cake is phenomenal on its own, I’ve got a few tips and serving suggestions to elevate your experience even further. For a simple yet elegant presentation, I absolutely love to garnish each slice with a few fresh raspberries, a thin curl of lemon zest, or even a delicate sprig of fresh mint. These small touches not only add a lovely contrasting pop of color but also a hint of extra freshness that complements the cake beautifully. If you’re feeling particularly adventurous, consider serving a slice with a side of homemade raspberry coulis for an extra layer of fruitiness, or a scoop of high-quality vanilla bean ice cream to create a truly decadent dessert experience. And don’t feel limited to just a traditional round cake! This versatile batter is fantastic for cupcakes – just adjust the baking time and prepare for rave reviews from everyone who tries them. You could even transform it into a stunning layered trifle by cubing the cake and layering it with whipped cream and fresh berries for a truly impressive dessert.
Another delightful variation I often try is to infuse the frosting with a little extra lemon zest for an even more intense citrus kick, or for a slightly less sweet option, swap out the traditional buttercream for a lighter, tangier cream cheese frosting, which pairs wonderfully with the bright cake flavors. You could even play with different fruit purees in the frosting to complement the lemon, like strawberry or blueberry, creating your own unique take on this classic. The possibilities are truly endless, and that’s one of the reasons I love this recipe so much – it’s a fantastic canvas for your own creativity. Don’t be afraid to experiment and make it your own!
I’ve poured my heart into perfecting this recipe, and I genuinely believe it’s one you’ll return to again and again. There’s something incredibly satisfying about creating something so beautiful and delicious from scratch, and watching the sheer delight on the faces of those who taste it. So, please, don’t just read about it – gather your ingredients, preheat your oven, and dive into the joyful process of creating your very own Pink Lemonade Cake. I am so excited for you to experience the magic and the sheer pleasure of baking and tasting this magnificent dessert! Once you’ve baked it, I would absolutely love for you to come back here and share your experience with me in the comments below. Did you try a unique variation? What was your favorite part of the baking process or the taste? Your insights, tips, and especially your photos truly make my day and inspire me endlessly. Happy baking, my friends – I can’t wait to hear all about your Pink Lemonade Cake adventures!
FAQs:
What gives Pink Lemonade Cake its signature pink color?
The beautiful pink hue typically comes from a very small amount of red food coloring or, for a more natural approach, a touch of beet juice, cranberry juice concentrate, or even raspberry puree added to the batter and/or the frosting. It’s usually just enough to tint it a lovely pastel pink without affecting the delicious lemon flavor.
Can I use fresh lemon juice instead of bottled concentrate for this cake?
Absolutely! Using fresh lemon juice and zest will undoubtedly enhance the vibrant, natural lemon flavor of your cake. While concentrate is convenient, fresh lemons offer a brighter, more aromatic citrus punch. Just be sure to measure carefully and adjust for taste if you find fresh lemons to be more tart than the concentrate you might typically use.
How should I store Pink Lemonade Cake, and how long does it last?
To keep your cake fresh, store it covered at room temperature for up to 2-3 days. If your kitchen is particularly warm, or if your frosting contains perishable ingredients like cream cheese or fresh fruit puree, it’s best to store the cake in an airtight container in the refrigerator. Refrigerated, it can last for up to 5-7 days. Just remember to bring it to room temperature for about 30 minutes before serving for the best flavor and texture.
Can I make Pink Lemonade Cake ahead of time?
Yes, this cake is an excellent make-ahead dessert! You can bake the cake layers a day or two in advance, wrap them tightly in plastic wrap once completely cooled, and store them at room temperature or in the refrigerator. You can also prepare the frosting a day ahead and store it in an airtight container in the fridge, then bring it to room temperature and re-whip it slightly before assembling and frosting the cake.
Is Pink Lemonade Cake suitable for making into cupcakes?
Definitely! This recipe adapts beautifully into cupcakes. Simply line a muffin tin with cupcake liners, fill them about two-thirds full with batter, and reduce the baking time. Cupcakes typically bake in about 18-25 minutes, but keep an eye on them and test for doneness with a toothpick. The frosting works wonderfully on cupcakes too!
What if I want a more intense lemon flavor?
If you’re a true lemon lover and want an extra burst of citrus, you have a few options! You can increase the amount of lemon zest in both the cake batter and the frosting. You could also create a simple lemon syrup (sugar, water, and lemon juice) to brush over the cake layers while they are still warm, which will moisten the cake and infuse it with even more lemon flavor. Just be careful not to make it too soggy!
Classic Pink Lemonade Cake: Zesty, Refreshing, and Delicious
Pink Lemonade Cake, with its vibrant hue and delightfully zesty flavor, offers a truly refreshing twist on traditional dessert. It’s adored for its stunning visual appeal, moist crumb, and bright, citrusy punch, making it the ultimate showstopper for any gathering.
Ingredients
-
3 cups all-purpose flour, sifted
-
1 tablespoon baking powder
-
1/2 teaspoon salt
-
1 cup unsalted butter, softened
-
2 cups granulated sugar
-
4 large eggs, at room temperature
-
1 cup buttermilk, at room temperature
-
1/2 cup pink lemonade concentrate, thawed (Note: Use frozen for stronger flavor; if using bottled, reduce milk in recipe by ¼ cup.)
-
2 tablespoons fresh lemon juice
-
1 teaspoon vanilla extract
-
1-2 drops pink or red gel food coloring (optional)
-
For syrup: 1/4 cup pink lemonade concentrate
-
For syrup: 1/4 cup granulated sugar
-
For syrup: 1/4 cup water
-
For frosting: 2 cups unsalted butter, softened
-
For frosting: 8 cups powdered sugar, sifted
-
For frosting: 1/2 cup pink lemonade concentrate
-
For frosting: 2 tablespoons fresh lemon juice
-
For frosting: 1 teaspoon vanilla extract
-
For frosting: 2-4 tablespoons heavy cream or milk, as needed
-
For frosting: 3-5 drops pink or red gel food coloring (optional)
-
Garnish (optional): Fresh lemon slices or wedges
-
Garnish (optional): Raspberries or strawberries
-
Garnish (optional): Edible glitter or sprinkles
Instructions
-
Step 1
Preheat oven to 350°F (175°C). Grease and flour three 8-inch round cake pans; optionally line bottoms with parchment paper. -
Step 2
In a medium bowl, whisk together the sifted all-purpose flour, baking powder, and salt. Set aside. -
Step 3
In a stand mixer, beat 1 cup softened unsalted butter until creamy (1-2 min). Gradually add 2 cups granulated sugar, beating on medium-high for 3-5 minutes until light and fluffy. Scrape down bowl. -
Step 4
Add 4 large eggs one at a time, beating well after each addition until fully incorporated. -
Step 5
In a separate bowl, whisk together 1 cup buttermilk, 1/2 cup pink lemonade concentrate, 2 tablespoons fresh lemon juice, 1 teaspoon vanilla extract, and optional 1-2 drops pink or red gel food coloring. -
Step 6
With mixer on low speed, gradually add dry ingredients (in 3 additions) alternating with wet ingredients (in 2 additions), beginning and ending with dry. Mix only until just combined to avoid overmixing. -
Step 7
Divide batter evenly among prepared pans. Bake for 25-30 minutes, or until a wooden skewer inserted into the center comes out clean. -
Step 8
Cool cakes in pans for 10-15 minutes, then invert onto a wire rack, remove pans and parchment. Let cool completely. -
Step 9
In a small saucepan, combine 1/4 cup pink lemonade concentrate, 1/4 cup granulated sugar, and 1/4 cup water. Simmer over medium heat for 2-3 minutes until sugar dissolves. Cool completely to room temperature. -
Step 10
In a clean stand mixer bowl, beat 2 cups softened unsalted butter on medium speed for 3-5 minutes until very light and fluffy. Scrape down bowl. -
Step 11
Gradually add 8 cups sifted powdered sugar on low speed. Once incorporated, increase speed to medium-high and beat for 3-5 minutes until thick and fluffy. -
Step 12
Reduce speed to low. Add 1/2 cup pink lemonade concentrate, 2 tablespoons fresh lemon juice, and 1 teaspoon vanilla extract. Mix until just combined. -
Step 13
Increase mixer speed to medium-high and beat 2-3 minutes until light and smooth. Add 2-4 tablespoons heavy cream or milk as needed for desired consistency. Add 3-5 drops pink or red gel food coloring until desired hue is achieved. -
Step 14
Trim tops of cooled cake layers to create flat surfaces. Place one leveled cake layer on a serving plate. Brush generously with about one-third of the cooled pink lemonade syrup. -
Step 15
Spread about 1 to 1.5 cups of buttercream over the first syrup-soaked layer. Carefully place the second layer on top, press gently. Brush with another third of syrup, then spread with buttercream. Repeat with the final layer, brushing its top with remaining syrup. -
Step 16
Apply a very thin layer of buttercream over the entire cake (top and sides) to trap crumbs. Refrigerate for 15-30 minutes until the crumb coat is firm. -
Step 17
Once crumb coat is firm, apply remaining buttercream generously over the cake, smoothing sides and top. Garnish with fresh lemon slices, raspberries/strawberries, or edible glitter/sprinkles if desired. -
Step 18
Chill the assembled cake in the refrigerator for at least 30 minutes before serving for cleaner slices. -
Step 19
Remove cake from refrigerator 15-20 minutes before slicing. Use a sharp, warm knife, cleaning between cuts for neat presentation. Enjoy your vibrant, refreshing Pink Lemonade Cake! -
Step 20
Store leftover cake in an airtight container at room temperature for 2-3 days, or refrigerated for up to 5 days (bring to room temp before serving). Cake also freezes well for 2-3 months when tightly wrapped.
Important Information
Nutrition Facts (Per Serving)
It is important to consider this information as approximate and not to use it as definitive health advice.
Allergy Information
Please check ingredients for potential allergens and consult a health professional if in doubt.


Leave a Comment