
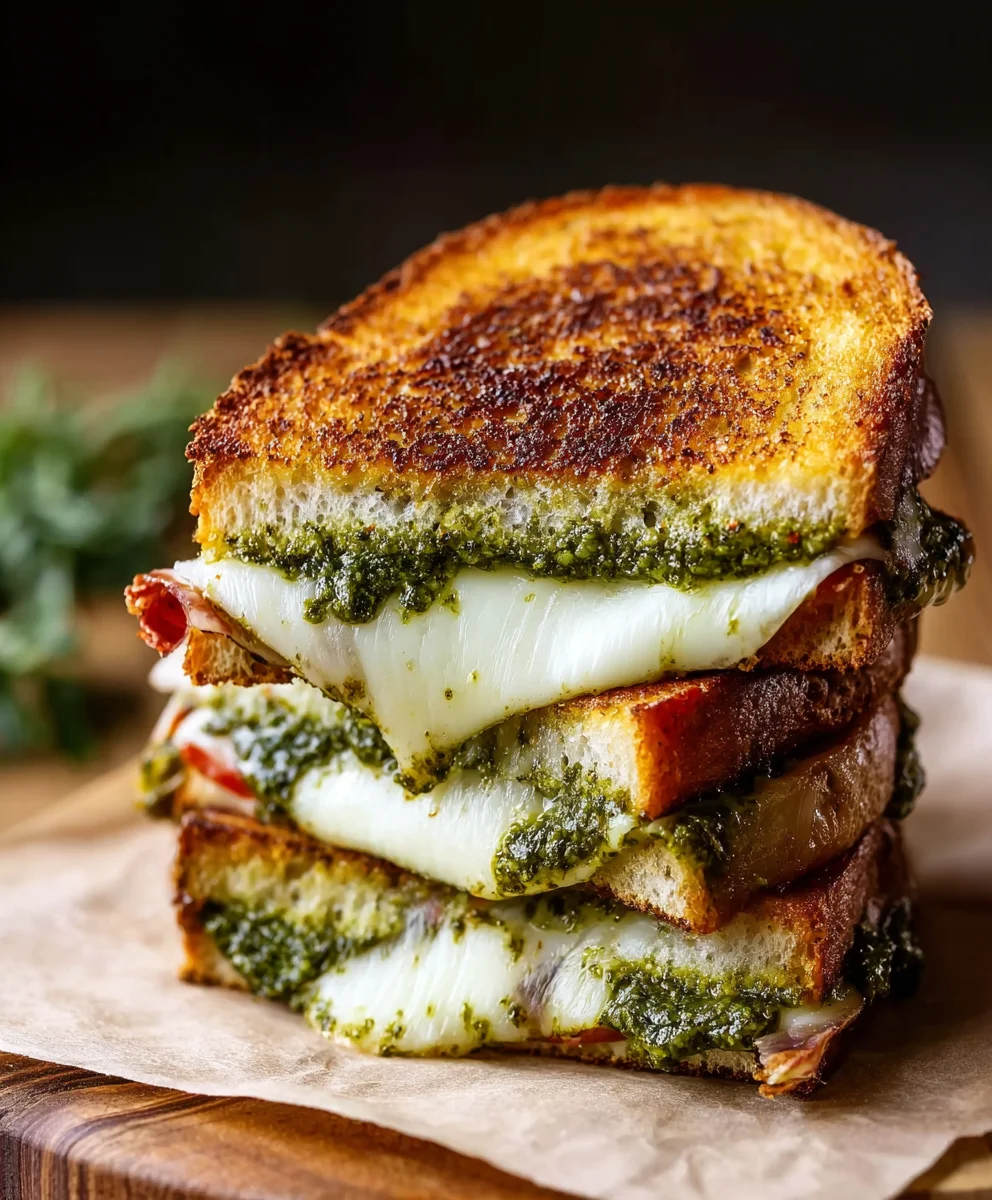
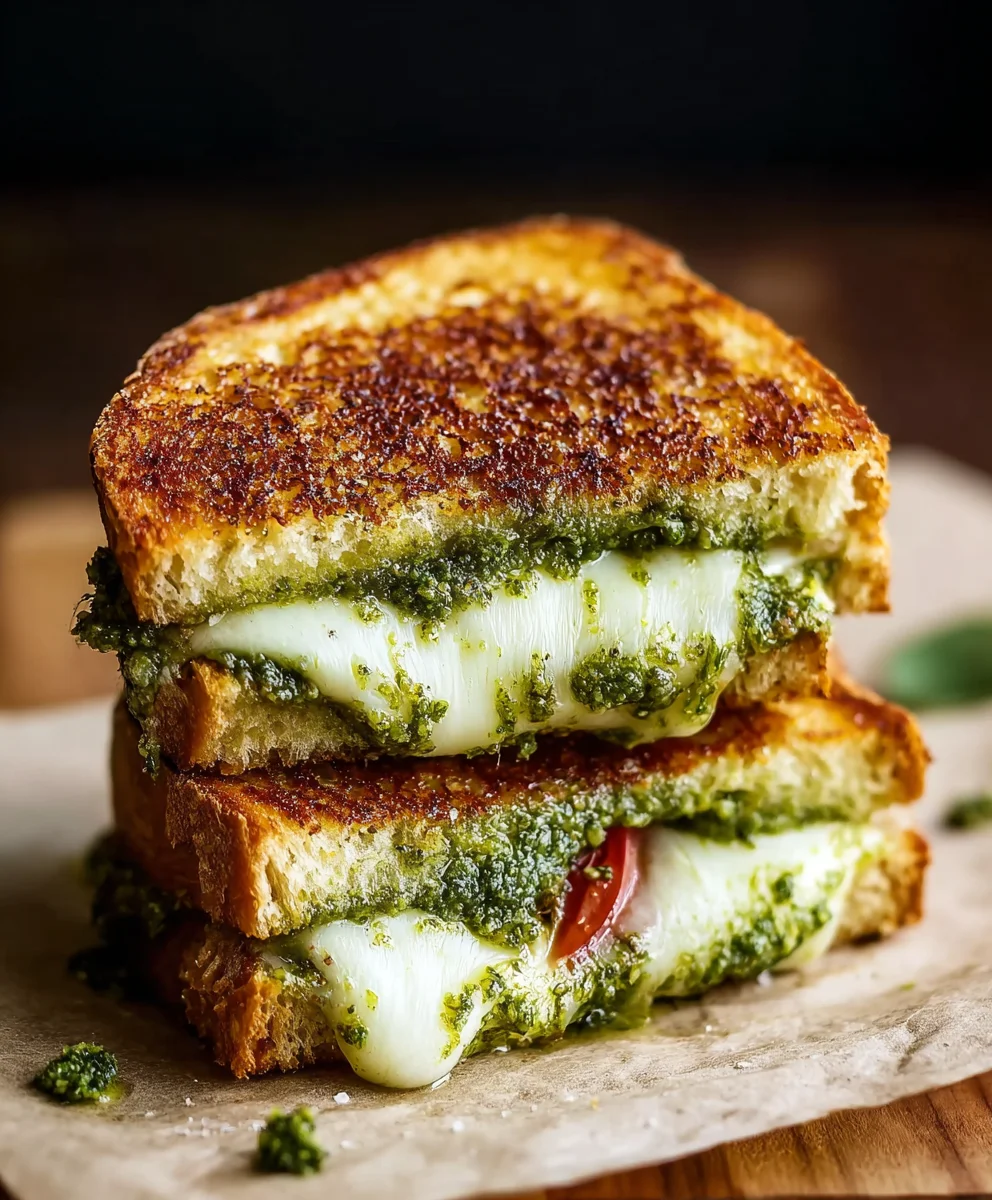
Pesto Grilled Cheese Sandwich. Oh, just uttering those words conjures images of golden-brown bread, melted cheese, and the vibrant green swirl of aromatic basil. I remember the pure joy of a classic grilled cheese as a child – a simple, yet profoundly satisfying, culinary hug. But what if I told you there’s a way to elevate this beloved comfort food to an entirely new dimension of flavor and sophistication? While the grilled cheese sandwich itself is a quintessential American comfort food, a symbol of home and warmth, the addition of pesto introduces a beautiful layer of Mediterranean vibrancy. Originating from Genoa, Italy, pesto’s fresh, garlicky, and nutty profile transforms the humble grilled cheese into something truly extraordinary. People adore this dish not just for its incredible convenience and speed – perfect for a quick lunch or a comforting dinner – but for the irresistible symphony of textures and tastes. Imagine the crispy, buttery exterior yielding to a rich, gooey blend of cheeses, all perfectly complemented by the bright, herbaceous kick of basil pesto. It’s a flavor explosion that’s both familiar and excitingly new. This isn’t just a sandwich; it’s an experience, a delightful fusion that makes the Pesto Grilled Cheese Sandwich an absolute must-try for anyone seeking a gourmet twist on a classic.

Ingredients:
- 4 slices of your favorite sandwich bread: I personally love a good sourdough or a hearty artisan white bread for my Pesto Grilled Cheese Sandwich. The sturdy texture holds up beautifully to the fillings and crisps up wonderfully. Brioche or challah can offer a richer, slightly sweeter contrast, if that’s more your style.
- 2 tablespoons unsalted butter, softened, or mayonnaise: This is our secret weapon for achieving that golden-brown, crispy exterior. Softened butter offers a classic, rich flavor, while mayonnaise (I know, it sounds unconventional!) actually yields an even crispier, more evenly browned crust without burning as easily. Feel free to use whichever you prefer or even a combination for the best of both worlds!
- 4 tablespoons high-quality pesto: Whether you choose a vibrant store-bought basil pesto or whip up a batch of homemade pesto, this ingredient is the heart of our Pesto Grilled Cheese Sandwich. Look for one with fresh, bright flavors. If you’re feeling adventurous, sun-dried tomato pesto can also be a delightful twist.
- 4 slices (about 2-3 ounces) Provolone cheese: I find Provolone melts beautifully and offers a mild, slightly tangy flavor that complements the pesto without overpowering it. It’s an excellent foundation for our cheese blend.
- 4 slices (about 2-3 ounces) Mozzarella cheese: For that irresistible, gooey stretch, mozzarella is a must-have. Its mild creaminess acts as a fantastic counterpoint to the more assertive flavors of the pesto and other cheeses. Fresh mozzarella can be used, but ensure it’s well-drained to avoid excess moisture.
- 2 slices (about 1 ounce) Fontina or Gruyère cheese: To add a layer of sophisticated nuttiness and a more complex flavor profile, a semi-hard cheese like Fontina or Gruyère is ideal. These cheeses melt beautifully and add a depth that truly elevates your Pesto Grilled Cheese Sandwich from good to extraordinary.
-
Optional additions for an elevated Pesto Grilled Cheese Sandwich:
- Thinly sliced ripe tomatoes (2-4 slices): For a burst of fresh, juicy acidity that cuts through the richness.
- Baby spinach leaves (a small handful): Adds a touch of freshness and a subtle earthy note, plus a pretty green pop.
- Roasted red peppers (2 tablespoons, drained and sliced): Offers a sweet, smoky counterpoint that pairs wonderfully with pesto.
- Cooked bacon or prosciutto (1-2 slices, crumbled or torn): For those who love a salty, savory crunch and an extra layer of umami.
- Caramelized onions (1-2 tablespoons): Sweet, savory, and incredibly aromatic, they add a gourmet touch to any grilled cheese.
Gathering and Preparing Your Components
- Prepare Your Workstation: Before you dive into assembling your magnificent Pesto Grilled Cheese Sandwich, take a moment to set up your kitchen. Gather all your ingredients, a sharp knife, a cutting board, a small bowl for your softened butter or mayonnaise, and a non-stick skillet or cast-iron pan. This preparation will ensure a smooth and enjoyable cooking process, letting you focus on the art of sandwich making.
- Butter or Mayonnaise the Bread: This step is crucial for achieving that coveted golden-brown, crispy exterior. Lay your four slices of bread out on a clean surface. Using a butter knife or a small offset spatula, spread a generous, even layer of softened butter or mayonnaise on one side of each slice. You want to cover the surface from edge to edge. This fat not only provides flavor but also acts as a conductor for heat, ensuring an even crisp. Don’t skimp here; this is where the magic happens for the perfect Pesto Grilled Cheese.
- Pre-Shred or Slice Your Cheeses: If your cheeses aren’t already sliced, now is the time to prepare them. For optimal melting, I recommend either slicing them thinly or even lightly shredding them if they’re a block. This ensures that the heat penetrates evenly and the cheese melts into a luscious, gooey dream. Layering different types of cheese is one of my favorite tricks for developing a complex flavor profile in a grilled cheese.
- Prepare Optional Additions: If you’re incorporating any of the optional ingredients like tomatoes, spinach, or roasted red peppers, make sure they are ready to go. Thinly slice your tomatoes, patting them dry if they’re very juicy (excess moisture can make your sandwich soggy). Have your spinach washed and dried, and your roasted red peppers drained and sliced. If using bacon, ensure it’s cooked and crumbled. Having everything prepped makes assembly a breeze.
Assembling the Ultimate Pesto Grilled Cheese Sandwich
This is where your vision for the perfect Pesto Grilled Cheese Sandwich truly comes to life. Layering is key to ensuring every bite is balanced and delicious.
- First Cheese Layer: Take two of your buttered/mayonnaised bread slices and place them butter-side down on your clean cutting board or work surface. On the unbuttered side of each, place one slice of Provolone cheese and one slice of Mozzarella cheese. I like to spread them out to cover most of the bread, reaching close to the edges without hanging over. This forms a protective barrier for the pesto and creates the initial gooey layer.
- Spread the Pesto: Now for the star of the show! On top of the cheese layers you just created, spread approximately 2 tablespoons of pesto onto each sandwich. Use the back of a spoon to gently spread it evenly across the cheese, ensuring you get a good distribution. The generous amount of pesto is what gives this sandwich its signature flavor and aroma, making it a true Pesto Grilled Cheese Sandwich.
-
Add Your Optional Fillings (If Using): If you’re incorporating any of the optional ingredients, this is the layer for them.
- If using tomatoes, arrange 1-2 slices on top of the pesto.
- For baby spinach, place a small handful evenly over the pesto.
- Distribute roasted red peppers or caramelized onions.
- Sprinkle crumbled bacon or torn prosciutto.
Remember, less is often more with grilled cheese fillings to ensure it cooks evenly and isn’t too bulky.
- Second Cheese Layer: On top of the pesto and any optional fillings, place your remaining cheese. I like to use the Fontina or Gruyère here, laying one slice on each sandwich. This final cheese layer not only adds more flavor but also helps to ‘glue’ the sandwich together and prevent fillings from escaping when you flip it. It also ensures maximum cheese pull!
- Top with Remaining Bread: Take your two remaining slices of bread, which should already have butter or mayonnaise on one side. Gently place them on top of the assembled fillings, butter-side up. Press down lightly but firmly on each sandwich to secure all the layers. This gentle compression helps the sandwich hold its shape and ensures good contact with the pan for even browning. You now have two perfectly assembled Pesto Grilled Cheese Sandwiches, ready for the heat!
The Art of Cooking Your Pesto Grilled Cheese
Cooking a grilled cheese is more than just throwing it in a pan; it’s about patience and managing heat to achieve that perfect balance of crispy exterior and molten interior. This is where your Pesto Grilled Cheese Sandwich truly transforms.
- Preheat Your Pan: Place your non-stick skillet or cast-iron pan over medium-low heat. This is a critical step: low and slow is the secret to a perfect grilled cheese. If the heat is too high, your bread will burn before the cheese has a chance to fully melt. Allow the pan to preheat for about 3-5 minutes, ensuring it’s evenly warm across the surface. You shouldn’t see any smoke, just a gentle warmth radiating from the pan.
- Place the Sandwiches in the Pan: Once your pan is adequately heated, carefully place the assembled sandwiches into the pan. If you’re cooking two at once, ensure there’s enough space between them for easy flipping. You should hear a gentle sizzle, but not an aggressive crackle. This indicates the heat is just right for developing that beautiful golden crust.
-
Cook the First Side: Allow the sandwiches to cook undisturbed for approximately 4-7 minutes. During this time, resist the urge to peek too often or press down too hard. You’re looking for a rich, golden-brown crust and for the cheese to begin softening. The lower heat allows the warmth to penetrate through the bread and start melting the cheese from the bottom up. You might even see a little cheese begin to ooze out, which is a wonderful sign!
How to Check for Doneness on the First Side:
Gently lift one corner of a sandwich with a spatula. If the bread is golden brown and crispy, and the cheese underneath is starting to melt, it’s ready to flip. If it’s still pale, give it a minute or two more.
-
Flip and Cook the Second Side: With a wide, sturdy spatula, carefully flip each Pesto Grilled Cheese Sandwich. Now, cook the second side for another 4-7 minutes, or until it’s also golden brown and crispy. This side will often cook a little faster because the pan is fully heated and the internal temperature of the sandwich has already risen.
Achieving the Perfect Melt:
If your cheese isn’t melting as quickly as your bread is browning, you can cover the pan with a lid for the last few minutes of cooking on the second side. This traps the steam and heat, encouraging the cheese to become wonderfully gooey without burning the bread. Just be sure to remove the lid for the final minute or so to re-crisp the exterior.
- Check for Ultimate Gooeyness: The true test of a great Pesto Grilled Cheese Sandwich is the melt. Once both sides are beautifully golden brown, gently press down on the top of the sandwich with your spatula. You should feel a slight give, indicating that the cheese inside is molten and gooey. If you’re unsure, a quick peek inside (carefully lifting the top slice with a fork) will confirm if your cheese has reached peak melty perfection. Remove the sandwiches from the pan immediately once they’re done to prevent overcooking.
Serving and Enjoying Your Perfect Pesto Grilled Cheese
You’ve put in the work, and now it’s time for the reward! The way you serve your Pesto Grilled Cheese Sandwich can enhance the experience even further.
- Allow to Rest (Briefly): I know, it’s tempting to dive right in, but trust me on this one. Transfer your beautifully cooked Pesto Grilled Cheese Sandwiches to a cutting board. Let them rest for just 1-2 minutes. This brief pause allows the molten cheese to set slightly, preventing all that delicious goo from spilling out the moment you cut into it. It also makes the sandwich easier to handle.
- Slice and Serve: Using a sharp, serrated knife, slice each sandwich diagonally in half. The diagonal cut isn’t just for aesthetics; it exposes more of that magnificent, gooey interior and creates two perfect dipping triangles. You’ll hear the satisfying crunch of the crust and see the vibrant layers of pesto and cheese.
-
Enjoy Immediately: A Pesto Grilled Cheese Sandwich is best enjoyed fresh off the pan, while the cheese is still warm and melty and the bread is perfectly crisp. Serve it on its own for a quick, satisfying meal, or alongside a cup of hot tomato soup for a classic pairing. A fresh side salad or some potato chips also make excellent accompaniments.
Pairing Suggestions:
Consider serving your Pesto Grilled Cheese with a simple green salad dressed with a lemon vinaigrette to cut through the richness. A bowl of creamy tomato basil soup is always a winner. Or, for a light bite, a side of fresh fruit adds a refreshing contrast.
Tips for Pesto Grilled Cheese Perfection
To truly master the art of the Pesto Grilled Cheese Sandwich, here are some invaluable tips and tricks I’ve picked up over the years. These will help you elevate your grilled cheese game from good to absolutely legendary, ensuring a consistently delicious result every single time you make this flavorful sandwich.
Choosing Your Bread Wisely for the Ultimate Pesto Grilled Cheese
The foundation of any great grilled cheese is the bread. For a Pesto Grilled Cheese Sandwich, you need something sturdy yet tender. My top recommendations are:
- Sourdough: Its tangy flavor beautifully complements the basil in the pesto, and its robust crust gets incredibly crispy.
- Artisan White or Italian Bread: Often slightly denser than standard sandwich bread, these options offer a great texture and neutral flavor that lets the pesto and cheese shine.
- Brioche or Challah: For a richer, slightly sweeter experience, these breads create a golden, buttery crust that’s utterly decadent.
- Avoid overly thin or soft breads: They can get soggy easily with the pesto and won’t hold up to the heat as well, potentially tearing during flipping.
The Debate: Butter vs. Mayonnaise for a Crispy Exterior
This is a topic passionate grilled cheese enthusiasts often discuss! Both softened butter and mayonnaise work wonders for the exterior of your Pesto Grilled Cheese Sandwich, but they offer slightly different results:
- Unsalted Butter: Provides that classic, rich, nutty flavor and a beautiful golden-brown crust. Ensure it’s softened, not melted, for easy and even spreading.
- Mayonnaise: Don’t knock it ’til you try it! Mayonnaise (on the outside of the bread, not inside!) creates an incredibly even, crispy, and beautifully golden crust without burning as quickly as butter can. This is because mayo has a higher smoke point. Plus, the slight tanginess from the mayo actually enhances the flavor profile of the Pesto Grilled Cheese.
- Pro Tip: For the best of both worlds, some chefs swear by spreading a thin layer of mayonnaise first, then a very thin layer of softened butter on top. Experiment to find your personal preference!
Mastering the Heat: Low and Slow is Key
I cannot emphasize this enough: the most common mistake in making a Pesto Grilled Cheese Sandwich is cooking it over heat that’s too high. High heat will quickly burn the bread, leaving you with a dark, charred exterior and a cold, unmelted interior. Instead:
- Use Medium-Low Heat: This allows the heat to gently penetrate the sandwich, slowly toasting the bread to a perfect golden-brown while giving the cheese ample time to melt into a glorious, gooey consistency.
- Patience is a Virtue: Expect each side to take 4-7 minutes. Don’t rush it. The extended cooking time on lower heat is what transforms disparate ingredients into a cohesive, perfectly melted, and crispy sandwich.
- Use a Lid: If your cheese isn’t melting fast enough, especially with thicker sandwiches, covering the pan for the last few minutes on the second side can help. The trapped steam acts like a mini oven, accelerating the melt. Just remember to uncover it for the final minute to re-crisp the bread.
Layering for Maximum Flavor and Melt
The order in which you layer your ingredients matters for a successful Pesto Grilled Cheese Sandwich:
- Cheese First, Then Pesto: By placing a slice of cheese directly on the bread (before the pesto), you create a barrier that prevents the bread from getting soggy from the pesto. This also ensures that the cheese starts melting from the moment it hits the pan, adhering the pesto and other fillings as it warms.
- Distribute Pesto Evenly: A common mistake is to dollop the pesto in the center. Spread it out as much as possible, covering the cheese layer below it, so that every bite of your Pesto Grilled Cheese has that vibrant, herbaceous flavor.
- Multiple Cheeses: Don’t be afraid to mix and match! Using different types of cheese (as outlined in the ingredients) adds depth of flavor and varying textures. One cheese for melt, another for flavor, and perhaps a third for stretch.
Don’t Forget the Press!
For an even crispier crust and a more compressed, cohesive sandwich, consider pressing your Pesto Grilled Cheese Sandwich while it cooks. You don’t need a fancy panini press:
- Use another heavy pan: Place a smaller, heavy skillet or a brick wrapped in foil on top of your sandwich as it cooks.
- Gentle Pressure: You want to apply gentle, even pressure, not smash the sandwich flat. This helps to maximize contact with the hot pan, promoting even browning and melting, and gives your grilled cheese that delightful, thin profile.
Variations to Keep Your Pesto Grilled Cheese Exciting
While the classic Pesto Grilled Cheese Sandwich is a masterpiece, feel free to experiment with additions to suit your mood or what you have on hand:
- Protein Power-Up: Add thinly sliced cooked chicken, turkey, or even a fried egg for a heartier meal.
- Veggie Boost: Beyond tomatoes and spinach, consider grilled zucchini slices, sautéed mushrooms, or a sprinkle of fresh basil leaves for an extra aromatic kick.
- Spice It Up: A pinch of red pepper flakes mixed into the pesto, or a thin slice of jalapeño, can add a welcome heat.
- Different Pestos: Experiment with sun-dried tomato pesto, kale pesto, or even a walnut pesto for distinct flavor profiles.
Serving Suggestions Beyond Tomato Soup
While tomato soup is the quintessential partner, consider these alternatives for your Pesto Grilled Cheese:
- Simple Green Salad: A light, fresh salad with a vinaigrette offers a refreshing contrast to the rich sandwich.
- Pickles or Pickled Onions: The tanginess can be a wonderful palate cleanser.
- A side of fresh fruit: Sliced apples or grapes can provide a sweet and juicy counterpoint.
- A drizzle of balsamic glaze: A touch of sweet and sour can really elevate the flavors.
By following these detailed steps and embracing these tips, you’re not just making a sandwich; you’re crafting an experience. Each bite of your homemade Pesto Grilled Cheese Sandwich will be a testament to your patience, your technique, and your passion for delicious food. Enjoy the process, and savor every last, gooey bite!
Conclusion:
Truly, I believe you’ve just found your new favorite comfort food, elevated to an art form. This isn’t just any grilled cheese; it’s the ultimate Pesto Grilled Cheese Sandwich. We’ve taken a classic, humble dish and infused it with vibrant, aromatic pesto, creating a symphony of flavors that will truly sing on your palate. The gooey, molten cheese, perfectly browned, crispy bread, and that unmistakable herbaceous kick from the pesto make for an unforgettable culinary experience. It’s incredibly satisfying, yet feels fresh and exciting. It’s proof that sometimes, the simplest ingredients, when combined thoughtfully, can create something truly extraordinary. You’ll be amazed at how quickly this elevates a simple lunch into a gourmet delight, perfect for any day of the week. Trust me, once you try this, you’ll wonder how you ever lived without it. The balance of creamy, savory, and fresh notes is simply unmatched, making it a staple in my kitchen, and I’m confident it will become one in yours too.
Now, about enjoying this masterpiece. While it’s absolutely perfect on its own, a glorious main event for your taste buds, there are so many delightful ways to serve your exquisite sandwich. I often pair it with a steaming bowl of classic tomato soup – the tanginess of the soup beautifully cuts through the richness of the cheese and pesto, creating a comforting and harmonious meal. A light, peppery arugula salad, dressed simply with lemon vinaigrette, also makes an excellent companion, offering a refreshing contrast that brightens the entire plate. For something a bit heartier, a minestrone or even a creamy roasted red pepper soup would be fantastic, providing a more substantial pairing. Think about making it a sophisticated appetizer by cutting the sandwich into smaller, elegant triangles for your next gathering; they disappear quickly! It’s versatile enough to fit into any meal plan, whether you’re looking for a quick, fulfilling lunch or an impressive starter that hints at gourmet flair without the fuss. Imagine serving these alongside some olives and cured meats for a delightful Mediterranean-inspired spread.
And for those who love to experiment, the beauty of this recipe lies in its adaptability. Don’t hesitate to play around with the cheeses – a blend of sharp cheddar and creamy provolone works wonders, or perhaps a smoky gouda for an added layer of complexity and depth. If you’re feeling adventurous, a dollop of fresh goat cheese alongside the mozzarella can introduce a delightful tang that truly elevates the flavor profile. You can also layer in some extra goodies to customize each bite: thinly sliced sun-dried tomatoes, a few vibrant roasted red peppers, or even some caramelized onions will add incredible sweetness and depth. For a non-vegetarian option, a thin slice of prosciutto or turkey tucked in with the cheese would be divine, adding a salty, savory kick. Experiment with different types of bread too – a hearty sourdough or a rustic ciabatta can totally change the texture and flavor profile, offering a new dimension to the crispiness. Don’t limit yourself to traditional basil pesto either; a sundried tomato pesto or even a vibrant kale pesto could open up a whole new world of flavor variations for your very own personalized Pesto Grilled Cheese Sandwich creation. The possibilities are truly endless, limited only by your imagination!
So, what are you waiting for? I truly hope I’ve convinced you that this isn’t just a recipe; it’s an experience waiting to happen in your very own kitchen. I encourage you, wholeheartedly, to gather your ingredients and give this incredible sandwich a try. It’s simple, it’s quick, and the reward is absolutely immense. You’ll be so glad you did! Once you’ve savored every glorious bite, I would absolutely love to hear about your culinary adventure. Did you stick to the original recipe, or did you put your own unique spin on it? What were your favorite additions or serving suggestions? Please feel free to share your thoughts, your photos, and your triumphs in the comments section below, or tag me on social media. Your feedback and creativity inspire me and our entire cooking community, and I’m always eager to see how you make these recipes your own. Let’s make some delicious memories together, one perfectly golden-brown, cheesy, pesto-packed sandwich at a time!
Best Pesto Grilled Cheese Sandwich
A gourmet twist on classic grilled cheese featuring creamy mozzarella, zippy basil pesto, and fresh tomatoes on crusty sourdough bread. This impressive yet easy-to-make sandwich offers a flavor explosion, perfect for any occasion. Optional cooked beef bacon adds extra savory depth.
Ingredients
-
4 slices sourdough or artisan white bread
-
2 tbsp unsalted butter, softened, or mayonnaise
-
4 tbsp high-quality basil pesto
-
4 slices (2-3 oz) provolone cheese
-
4 slices (2-3 oz) mozzarella cheese
-
2 slices (1 oz) fontina or gruyère cheese
-
Optional: 2-4 slices ripe tomato
-
Optional: Small handful baby spinach leaves
-
Optional: 2 tbsp roasted red peppers, sliced
-
Optional: 1-2 slices cooked beef bacon or beef prosciutto, crumbled/torn
-
Optional: 1-2 tbsp caramelized onions
Instructions
-
Step 1
Gather all ingredients. Spread butter or mayonnaise evenly on one side of each of the 4 bread slices. Slice cheeses if not already prepared. Prepare any optional fillings (e.g., slice tomatoes, wash spinach, cook/crumble beef bacon). -
Step 2
Place two buttered/mayonnaised bread slices (butter-side down) on a clean surface. On the unbuttered side of each, layer one slice of provolone and one slice of mozzarella. -
Step 3
Spread approximately 2 tablespoons of pesto evenly over the cheese layers on each sandwich. Add any desired optional fillings (e.g., tomatoes, spinach, roasted red peppers, beef bacon, caramelized onions) on top of the pesto. -
Step 4
Place one slice of fontina or gruyère on top of the pesto/fillings on each sandwich. Top with the remaining 2 bread slices (butter-side up) and press gently to secure layers. -
Step 5
Preheat a non-stick skillet or cast-iron pan over medium-low heat for 3-5 minutes (low and slow is key to prevent burning). -
Step 6
Carefully place sandwiches in the preheated pan. Cook for 4-7 minutes, undisturbed, until the bottom is golden brown and crispy, and cheese begins to soften. Gently lift a corner to check for doneness. -
Step 7
Using a wide spatula, carefully flip each sandwich. Cook for another 4-7 minutes until the second side is also golden brown and crispy and the cheese is fully melted and gooey. (Optional: cover pan with a lid for a few minutes to aid melting, then uncover to re-crisp). -
Step 8
Transfer cooked sandwiches to a cutting board and let rest for 1-2 minutes. Slice diagonally in half with a serrated knife and serve immediately, ideally with tomato soup or a side salad.
Important Information
Nutrition Facts (Per Serving)
It is important to consider this information as approximate and not to use it as definitive health advice.
Allergy Information
Please check ingredients for potential allergens and consult a health professional if in doubt.


Leave a Comment