
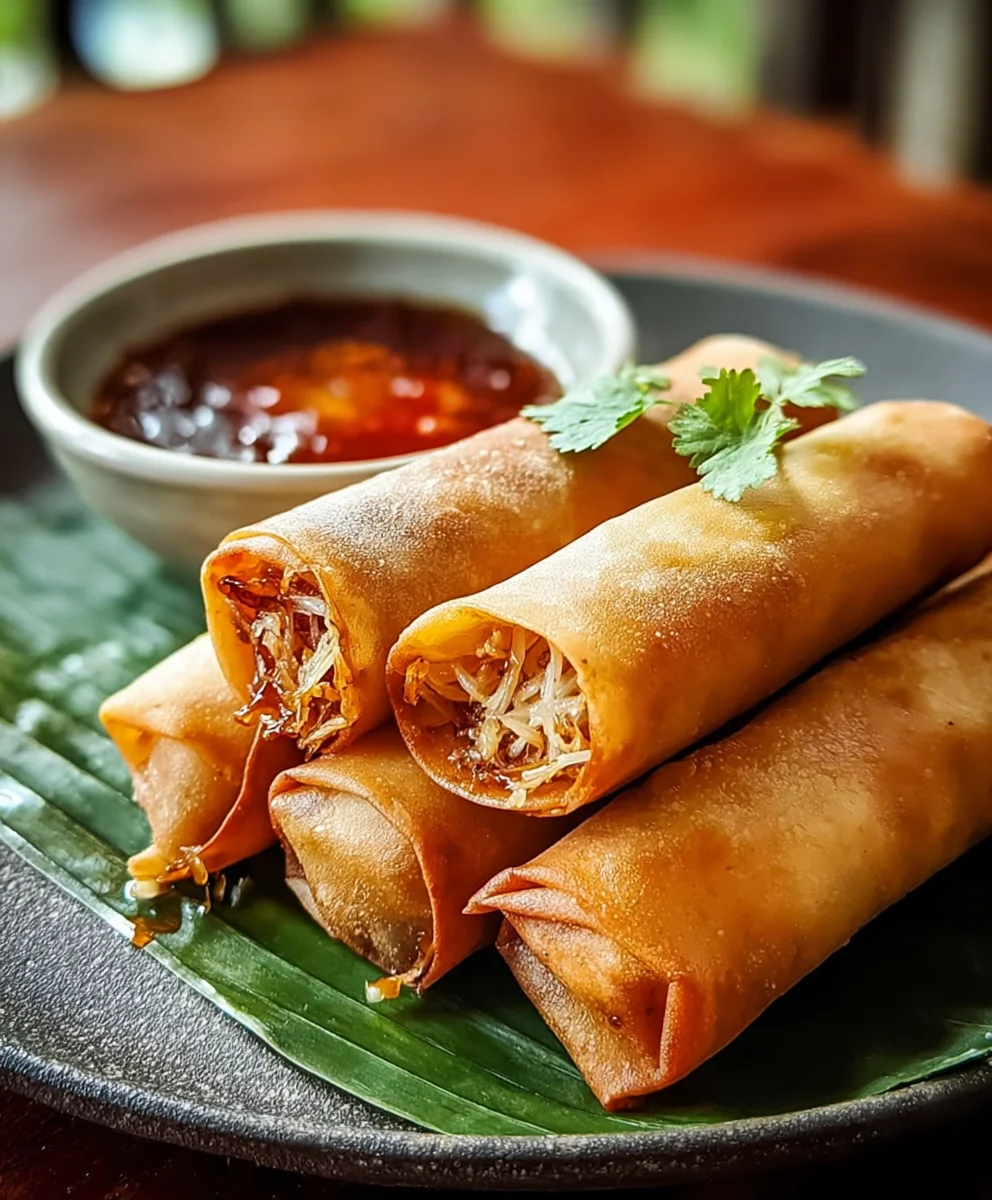
Filipino Lumpia – just hearing those words evokes images of golden, crispy rolls, packed with savory goodness, and an irresistible aroma that instantly transports you to festive gatherings and family feasts. If you’ve ever had the pleasure of biting into one of these deep-fried treasures, you know exactly what I’m talking about. They are, without a doubt, one of the most iconic and beloved dishes in Filipino cuisine, a staple that graces every celebration from birthdays to graduations, and even simple weekend get-togethers.
The Irresistible Allure of Filipino Lumpia
While often compared to spring rolls, Filipino Lumpia has a distinct charm all its own. Its roots can be traced back to Chinese culinary influences, but over centuries, Filipinos have perfected it into a unique culinary art form, typically featuring a seasoned mixture of ground meat (pork or beef), finely chopped vegetables, and a medley of aromatic spices, all wrapped in a thin, delicate wrapper and fried to a perfect crisp. What truly makes this dish a universal favorite isn’t just its satisfying crunch or its flavorful filling, but its incredible versatility and the joy it brings to every table. It’s the appetizer that disappears first, the snack everyone reaches for, and a dish that truly embodies comfort and tradition. Join me as we embark on a delicious journey to recreate this culinary masterpiece in your own kitchen!

Ingredients:
- 1.5 lbs (about 700g) ground pork (a mix of lean and a little fat works best for flavor and moisture, I usually go for 80/20)
- 1/2 lb (about 225g) small shrimp, peeled, deveined, and finely minced (this is optional but adds a wonderful depth of flavor to your Filipino Lumpia!)
- 2 medium carrots, peeled and very finely minced (you can grate them too, but I prefer the slightly firmer texture from a fine mince)
- 1 cup finely shredded green cabbage or Napa cabbage (some people skip this, but I find it adds a nice, subtle crunch and freshness)
- 1 large yellow onion, finely minced (the finer, the better!)
- 4-5 cloves garlic, minced (fresh garlic is always superior here)
- 3-4 stalks green onions (scallions), thinly sliced, white and green parts separated (we’ll use the white part in the filling and some green for garnish, if desired)
- 1 large egg, beaten (this acts as a binder)
- 2 tablespoons soy sauce (I prefer a low-sodium variety, but regular works just fine)
- 1 tablespoon sesame oil (a little goes a long way in adding that distinct aromatic depth)
- 1 teaspoon salt (adjust to your preference, remember soy sauce is also salty)
- 1/2 teaspoon black pepper, freshly ground is ideal
- 50-60 sheets Lumpia wrappers (Shanghai style), usually 6.5 x 6.5 inches (these are thinner and crispier than regular spring roll wrappers, crucial for authentic Filipino Lumpia)
- 2-3 cups cooking oil for frying (vegetable, canola, or peanut oil works well)
- Water or a little beaten egg white for sealing the wrappers
For the Dipping Sauce (optional, but highly recommended):
- 1/2 cup white vinegar (cane vinegar or apple cider vinegar also works)
- 2 tablespoons soy sauce
- 1-2 tablespoons granulated sugar (adjust to taste for sweet and sour balance)
- 2 cloves garlic, minced
- 1-2 bird’s eye chilies (siling labuyo), thinly sliced (optional, for a spicy kick!)
- Pinch of black pepper
Preparing the Filling:
- Prepare the Vegetables: First things first, let’s get our veggies ready. You’ll want to finely mince your carrots, cabbage, yellow onion, and garlic. The key to a truly fantastic Filipino Lumpia filling is ensuring all your ingredients are minced very, very finely. This prevents large, chunky bits that can tear the wrapper or create an uneven texture. For the green onions, separate the white and light green parts from the darker green tops; mince the white parts for the filling and set aside the darker green for garnish later, if you like.
- Mince the Shrimp (if using): If you’re adding shrimp, make sure they are peeled, deveined, and then finely minced. You want them to almost disappear into the mixture, contributing flavor without being distinct pieces.
- Combine Ingredients: In a large mixing bowl, combine your ground pork, the finely minced shrimp (if using), minced carrots, cabbage, onion, garlic, and the white parts of the green onions.
- Add the Seasonings and Binder: Now, add the beaten egg, soy sauce, sesame oil, salt, and black pepper to the mixture.
- Mix Thoroughly: Using clean hands (this is the best tool for the job, trust me!), gently but thoroughly mix all the ingredients together. You want to ensure everything is evenly distributed – no pockets of just meat, or just vegetables. Mix until the mixture just comes together, but be careful not to overmix, which can make the meat tough. I usually mix for about 2-3 minutes, ensuring every bit is incorporated.
- Taste Test (Optional but Recommended): For a truly confident cook, I always recommend a quick taste test. Take a tiny bit of the mixture (about a teaspoon), flatten it, and pan-fry it in a small non-stick pan until cooked through. Taste it and adjust your seasonings (salt, pepper, soy sauce) as needed. This step is a game-changer for perfecting your Filipino Lumpia flavor profile!
Rolling the Lumpia:
- Set Up Your Station: Clear a clean, flat surface like a large cutting board or your kitchen counter. Have your bowl of filling, a small bowl of water (or beaten egg white) for sealing, and your stack of lumpia wrappers ready. Keep your wrappers covered with a damp cloth to prevent them from drying out and cracking, especially if you’re working on a lot of Filipino Lumpia.
- Prepare the Wrappers: Carefully peel one lumpia wrapper from the stack. Lay it flat on your work surface in a diamond shape (with one corner pointing towards you).
- Place the Filling: Take about 1 to 1.5 tablespoons of the meat filling and place it horizontally near the corner closest to you. Avoid overfilling! Too much filling will make your lumpia difficult to roll tightly and prone to bursting during frying. Think of a small log shape, about 2.5-3 inches long.
-
Start Rolling:
- Fold the bottom corner up and over the filling, tucking it in snugly.
- Fold in the side corners towards the center, creating an envelope shape.
- Now, roll the lumpia tightly away from you, forming a compact cylinder. The tighter you roll, the crispier and less greasy your Filipino Lumpia will be, and it’s less likely to unravel.
- As you get to the last inch of the wrapper, lightly dab a little water or egg white on the exposed corner. This acts as your “glue.”
- Complete the Roll: Finish rolling to seal the lumpia. You should now have a neat, tightly rolled cylindrical spring roll.
-
Repeat and Store: Continue this process with the remaining filling and wrappers. As you finish each lumpia, place them in a single layer on a baking sheet or platter. If you’re not frying them immediately, you can layer them with parchment paper in between to prevent sticking, then cover tightly with plastic wrap and refrigerate for a few hours, or freeze them for later (see tips below).
Pro Tip for Consistency:
Try to make each Filipino Lumpia roughly the same size. This ensures they cook evenly when fried. It takes a little practice, but you’ll get the hang of it!
Frying the Lumpia:
- Heat the Oil: In a deep skillet or a wok, pour enough cooking oil to submerge at least half of the lumpia when frying (about 2-3 inches deep). Heat the oil over medium heat. The ideal temperature for frying Filipino Lumpia is around 350-375°F (175-190°C). If you don’t have a thermometer, you can test the oil by dropping a tiny piece of wrapper into it. If it sizzles gently and immediately floats to the top, your oil is ready. If it browns too quickly, the oil is too hot; if it just sits there, it’s not hot enough.
- Fry in Batches: Once the oil is hot, carefully place the lumpia into the hot oil, ensuring not to overcrowd the pan. Frying in batches is crucial; overcrowding will drop the oil temperature too much, leading to greasy, soggy lumpia instead of beautifully crispy Filipino Lumpia. Fry about 6-8 pieces at a time, depending on the size of your pan.
- Cook Until Golden Brown: Fry for about 5-8 minutes, turning occasionally with tongs, until the lumpia are evenly golden brown and crispy on all sides. The internal temperature of the pork should reach 160°F (71°C) for safety, but with thin lumpia and proper frying, this is usually achieved when the wrapper is golden brown.
- Drain Excess Oil: Once cooked, remove the lumpia from the oil using tongs or a spider strainer. Transfer them to a plate lined with paper towels to drain any excess oil. For maximum crispiness, you can also place them on a wire rack set over a baking sheet.
- Serve Immediately: Filipino Lumpia are best served hot and fresh out of the fryer!
Preparing the Dipping Sauce:
- Combine Ingredients: In a small bowl, combine the white vinegar, soy sauce, granulated sugar, minced garlic, and thinly sliced bird’s eye chilies (if using).
- Mix and Adjust: Stir well until the sugar is fully dissolved. Taste and adjust the sweetness, sourness, or spiciness to your preference. Some people like it sweeter, others prefer a more pungent, garlicky kick. I like a good balance, where the tanginess of the vinegar really cuts through the richness of the fried Filipino Lumpia.
Serving Suggestions and Storage Tips:
- Enjoy Your Filipino Lumpia! Serve your crispy, delicious Filipino Lumpia alongside the prepared dipping sauce. They are absolutely perfect as an appetizer, a party snack, or even as a main dish paired with steamed white rice and other Filipino favorites like Pancit or Adobo.
- Freezing Uncooked Lumpia: If you’ve rolled a large batch and want to save some for later, uncooked lumpia freeze beautifully. Arrange the rolled lumpia in a single layer on a baking sheet lined with parchment paper. Freeze until solid (about 2-3 hours), then transfer them to an airtight freezer-safe bag or container. They can be stored for up to 3 months. When ready to cook, you can fry them directly from frozen; just add a few extra minutes to the frying time and ensure your oil is at the correct temperature to prevent them from becoming soggy.
- Reheating Cooked Lumpia: Cooked Filipino Lumpia can be reheated in an air fryer at 350°F (175°C) for 5-7 minutes, or in an oven at 375°F (190°C) for 10-15 minutes, until crispy and heated through. Microwaving is generally not recommended as it can make them soggy.
-
Leftovers: If you happen to have any leftover cooked lumpia (which is rare in my household!), store them in an airtight container in the refrigerator for up to 3-4 days. They’re still delicious, though perhaps a little less crispy, when reheated.
A Note on Wrappers:
Choosing the right wrapper is paramount for authentic Filipino Lumpia. Look specifically for “Lumpia Wrappers” or “Spring Roll Pastry” that are thin, usually labeled “Shanghai style.” These are much thinner than Vietnamese spring roll wrappers or egg roll wrappers, resulting in that signature delicate, shattering crispness when fried. Thicker wrappers will give you a different texture, more akin to an egg roll, which isn’t quite the traditional Filipino Lumpia experience.
Don’t be afraid to make this recipe your own! While the traditional Filipino Lumpia filling is pork-based, you can certainly experiment with ground chicken or beef. Some families also add water chestnuts for an extra crunch, or even finely chopped jicama. The joy of cooking is in the personalization, but the core technique of finely minced ingredients and a tight roll will always lead to success for your homemade Filipino Lumpia.

Conclusion:
And there you have it, my friends! We’ve reached the delicious culmination of our culinary journey. After spending time perfecting this recipe, I truly believe this isn’t just another dish; it’s an experience waiting to happen in your very own kitchen. This recipe for authentic Filipino Lumpia is, without a doubt, a must-try for anyone who appreciates the magic that happens when simple ingredients come together to create something truly extraordinary. It’s a symphony of textures and flavors, starting with that initial, satisfying crunch of the perfectly golden-brown wrapper, giving way to the savory, seasoned filling within. The aroma alone, as these little parcels sizzle to perfection, is enough to get anyone’s mouth watering, promising a taste that lives up to every expectation. We’re talking about an irresistible blend of savory meat and crisp vegetables, perfectly seasoned, all wrapped up in a delicate, crispy shell. It’s comfort food elevated, a guaranteed crowd-pleaser that disappears from the plate almost as quickly as it arrives.
What I adore most about this recipe, beyond its incredible taste, is its versatility and the sheer joy it brings to any table. Whether you’re hosting a grand celebration, a casual get-together with friends, or simply looking for a delightful treat for your family dinner, these lumpia fit the bill perfectly. They’re more than just an appetizer; they can easily become the star of the show. I’ve seen them vanish off platters at potlucks, become the centerpiece of Sunday lunches, and even serve as a fun, interactive snack during movie nights. There’s a profound satisfaction that comes from watching people’s faces light up with that first bite, an acknowledgment of the love and effort poured into making something so inherently delicious. It’s truly a testament to the power of fantastic, homemade food.
Serving Suggestions:
Now, let’s talk about enhancing this already incredible dish. While these lumpia are absolutely divine on their own, a dipping sauce truly takes them to the next level. My personal favorite is a classic sweet chili sauce, whose subtle heat and sugary notes perfectly complement the savory filling. However, don’t be afraid to experiment! A simple vinegar-garlic dip, perhaps with a hint of black pepper and a pinch of sugar, offers a tangy contrast that is equally delightful. For those who prefer a more umami-rich experience, a soy-lemon dip (soy sauce, calamansi or lime juice, and a touch of minced garlic) can be incredibly refreshing and addictive. Consider serving them alongside a steaming bowl of jasmine rice for a more substantial meal, or with a light, crisp salad to balance the richness. They also pair wonderfully with other Filipino staples, creating a vibrant spread that celebrates the rich culinary heritage of the Philippines.
Variations to Explore:
The beauty of this recipe also lies in its adaptability. While the traditional pork filling is heavenly, feel free to customize it to your preferences. You could easily substitute ground chicken, beef, or even a mix of mushrooms and finely diced tofu for a vegetarian option. Imagine the possibilities: a chicken and mushroom lumpia, or perhaps a shrimp and cabbage combination! For a slightly healthier twist, consider air frying or oven baking your lumpia instead of deep frying. While the deep-fried crunch is iconic, both alternative methods can still yield a wonderfully crispy result with a fraction of the oil. Just brush them lightly with oil before baking or air frying, and cook until golden brown and crispy. Don’t be afraid to play with the vegetable components too; finely shredded carrots, bean sprouts, or water chestnuts can add extra texture and nutritional value.
So, what are you waiting for? This recipe is more than just instructions; it’s an invitation to create, to savor, and to share. I genuinely hope you’ll take the plunge and try making these delicious lumpia at home. There’s a special kind of pride that comes with serving something you’ve crafted with your own hands, especially when it’s met with such enthusiastic approval. I promise you, the effort is truly worth the reward. The satisfaction of mastering that perfect roll, achieving that golden crispness, and experiencing the explosion of flavor is unparalleled. It’s a culinary adventure that I wholeheartedly encourage you to embark upon.
Once you’ve had the chance to whip up your own batch, I would absolutely love to hear about your experience! Did you stick to the classic, or did you venture into exciting variations? What dipping sauce became your go-to? Please, don’t hesitate to share your stories, your tips, and even your photos! Your feedback not only brightens my day but also helps inspire other home cooks in our community. Let’s celebrate the joy of cooking and the universal language of good food together. Happy cooking, everyone, and get ready to fall in love with these irresistible lumpia!
Crispy Filipino Beef Lumpia Recipe – Authentic & Easy!
Filipino Lumpia – golden, crispy rolls, packed with savory goodness and an irresistible aroma, are a beloved staple in Filipino cuisine, gracing every celebration. While influenced by Chinese spring rolls, Filipino Lumpia has been perfected over centuries, typically featuring a seasoned mixture of ground beef, finely chopped vegetables, and aromatic spices, all wrapped in a thin, delicate wrapper and fried to a perfect crisp. This recipe guides you to recreate this culinary masterpiece at home.
Ingredients
-
1.5 lbs (700g) ground beef (80/20)
-
0.5 lb (225g) small shrimp, finely minced (optional)
-
2 medium carrots, finely minced
-
1 cup finely shredded green cabbage
-
1 large yellow onion, finely minced
-
4-5 cloves garlic, minced
-
3-4 stalks green onions, thinly sliced (white/light green parts for filling)
-
1 large egg, beaten
-
2 tbsp soy sauce
-
1 tbsp sesame oil
-
1 tsp salt
-
0.5 tsp black pepper
-
50-60 sheets Lumpia wrappers (Shanghai style, 6.5×6.5 inches)
-
2-3 cups cooking oil for frying
-
Water or beaten egg white for sealing
-
— For the Dipping Sauce —
-
0.5 cup white vinegar
-
2 tbsp soy sauce
-
1-2 tbsp granulated sugar
-
2 cloves garlic, minced
-
1-2 bird’s eye chilies, thinly sliced (optional)
-
Pinch of black pepper
Instructions
-
Step 1
Finely mince carrots, cabbage, yellow onion, garlic, and the white/light green parts of the green onions. Mince shrimp if using. -
Step 2
In a large mixing bowl, combine the ground beef, minced shrimp (if using), and all finely minced vegetables. -
Step 3
Add the beaten egg, soy sauce, sesame oil, salt, and black pepper to the mixture. Using clean hands, gently but thoroughly mix all ingredients until evenly distributed (about 2-3 minutes), being careful not to overmix. -
Step 4
Pan-fry a tiny bit of the mixture in a small non-stick pan until cooked. Taste and adjust seasonings (salt, pepper, soy sauce) as needed. -
Step 5
Clear a clean, flat surface. Have your bowl of filling, a small bowl of water (or beaten egg white) for sealing, and your stack of lumpia wrappers ready. Keep wrappers covered with a damp cloth to prevent drying. -
Step 6
Carefully peel one lumpia wrapper and lay it flat in a diamond shape. Place about 1 to 1.5 tablespoons of the meat filling horizontally near the corner closest to you, forming a small log shape (about 2.5-3 inches long). Avoid overfilling. -
Step 7
Fold the bottom corner up and over the filling, tucking it in snugly. Fold in the side corners towards the center, creating an envelope shape. Roll the lumpia tightly away from you to form a compact cylinder. As you reach the last inch, lightly dab water or egg white on the exposed corner to seal, then complete the roll. -
Step 8
Continue rolling the remaining filling and wrappers. Place finished lumpia in a single layer on a baking sheet. For immediate frying, refrigerate. For later, freeze on a baking sheet until solid (2-3 hours), then transfer to an airtight freezer bag for up to 3 months. -
Step 9
In a deep skillet or wok, pour enough cooking oil (2-3 inches deep) to submerge at least half the lumpia. Heat oil over medium heat to 350-375°F (175-190°C). -
Step 10
Carefully place 6-8 lumpia into the hot oil, ensuring not to overcrowd the pan. Fry for about 5-8 minutes, turning occasionally, until evenly golden brown and crispy on all sides. (If frying from frozen, add 1-2 minutes to cooking time). -
Step 11
Once cooked, remove lumpia from oil using tongs or a spider strainer. Transfer to a plate lined with paper towels or a wire rack to drain excess oil. Serve immediately, hot and fresh. -
Step 12
In a small bowl, combine white vinegar, soy sauce, granulated sugar, minced garlic, and thinly sliced bird’s eye chilies (if using). Stir well until sugar is dissolved. Taste and adjust sweetness, sourness, or spiciness to your preference. -
Step 13
Reheat cooked lumpia in an air fryer at 350°F (175°C) for 5-7 minutes, or in an oven at 375°F (190°C) for 10-15 minutes, until crispy and heated through. Microwaving is not recommended.
Important Information
Nutrition Facts (Per Serving)
It is important to consider this information as approximate and not to use it as definitive health advice.
Allergy Information
Please check ingredients for potential allergens and consult a health professional if in doubt.


Leave a Comment