
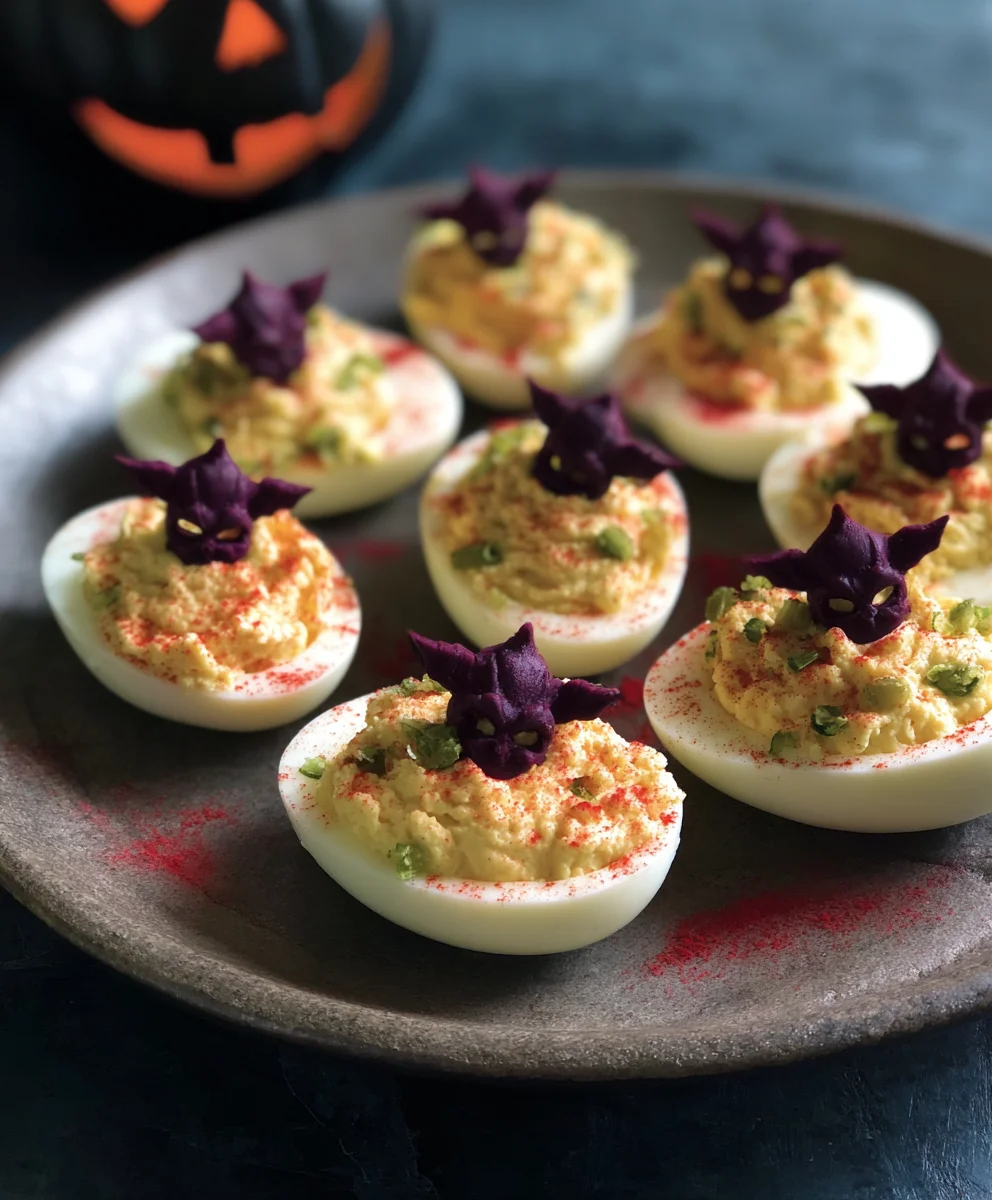
Creepy Deviled Eggs For Halloween are not just a dish; they’re a statement, a delightful blend of classic party favorite and spine-tingling visual intrigue, perfect for any spooky gathering. While the concept of seasoned egg yolks dates back to ancient Rome, evolving into various forms through history, deviled eggs as we know them gained widespread popularity in America during the 20th century, becoming a beloved staple at picnics, potlucks, and celebrations. For Halloween, however, we take this universally adored appetizer to an entirely new, ghoulish level.
People adore deviled eggs for their irresistibly creamy texture, savory tang, and incredible versatility. They are effortlessly elegant finger foods, consistently among the first to disappear from any buffet table. But when transformed into their ‘creepy’ alter ego, they become the undisputed, show-stopping stars of your Halloween spread.
The sheer joy of seeing guests’ reactions to these uniquely themed treats is immeasurable!
This year, I am thrilled to share my secret to crafting the most memorable and frightfully delicious Creepy Deviled Eggs For Halloween, ensuring your celebration is both tasty and terrifyingly fun. Get ready to impress your party-goers with a dish that’s as delicious as it is delightfully macabre!

Ingredients:
- 12 large eggs: Fresh eggs are always best, but a week-old egg can sometimes be easier to peel, which is a big plus when you’re aiming for perfectly smooth whites for your Creepy Deviled Eggs For Halloween.
- ½ cup mayonnaise: I prefer a good quality, full-fat mayonnaise. It contributes significantly to the creamy texture and rich flavor of the deviled egg filling. You can experiment with lighter versions, but for the most decadent creepy treat, go for the good stuff!
- 2 tablespoons Dijon mustard: The tangy, slightly spicy kick of Dijon mustard perfectly balances the richness of the mayonnaise and egg yolks. If you’re not a fan of Dijon, a good yellow mustard will also work, but adjust to your taste.
- 1 tablespoon white vinegar or apple cider vinegar: This is my secret weapon for adding a subtle brightness and a little tang that cuts through the richness, preventing the deviled eggs from tasting too heavy.
- ½ teaspoon salt: Fine sea salt is my go-to for seasoning, as it dissolves beautifully and seasons evenly.
- ¼ teaspoon black pepper: Freshly ground black pepper makes a noticeable difference in flavor.
- Gel food coloring kit (red, green, black, purple): Essential for transforming your ordinary deviled eggs into truly Creepy Deviled Eggs For Halloween! Gel colors are concentrated and won’t thin out your filling.
- 1 can (6 oz) black olives, pitted: These are primarily for crafting our notorious olive spiders and other dark, ominous accents.
- Fresh chives or dill sprigs: For adding a touch of eerie “veins” or “spider legs” to your creations.
- Paprika or smoked paprika: A sprinkle for color, a hint of smokiness, and a touch of “blood” effect on your Creepy Deviled Eggs For Halloween.
- Red bell pepper: A small amount, julienned very thinly, for creating “worms” or “tongues.”
- Small, sharp knife or a paring knife: Crucial for detailed decorative work.
- Piping bag with a large star tip or round tip: For elegantly (or grotesquely, depending on your design!) piping the filling back into the egg whites. A simple Ziploc bag with a corner snipped off works in a pinch!
Phase 1: Preparing the Eggs for Your Creepy Deviled Eggs
The first crucial step to creating truly spectacular Creepy Deviled Eggs For Halloween is perfectly boiling your eggs. I’ve learned over countless batches that the method truly matters for a smooth peel and vibrant yolk. Trust me, nothing is more frustrating than a beautifully cooked egg that peels like a nightmare, tearing away precious egg white and ruining the smooth canvas for your spooky designs. So, let’s get this right!
- Boiling the Eggs: Place your 12 large eggs in a single layer in a large pot. Ensure they are not stacked on top of each other, as this can lead to uneven cooking. Add enough cold water to cover the eggs by at least one inch. I always start with cold water to help prevent cracking as the temperature gradually rises.
- Bringing to a Boil: Place the pot on the stove over high heat and bring the water to a rapid, rolling boil. As soon as the water reaches a full boil, immediately remove the pot from the heat. Do NOT let the eggs continue to boil vigorously, as this can cause them to become rubbery and can also encourage that unsightly green ring around the yolk, which we definitely want to avoid for the best-looking Creepy Deviled Eggs For Halloween, even if they are spooky!
- The Covered Rest: Cover the pot tightly with a lid and let the eggs sit in the hot water for exactly 10-12 minutes. For large eggs, 10 minutes usually yields a perfectly set but still creamy yolk. If you prefer a firmer yolk, go for 12 minutes. This method ensures that the eggs cook gently and evenly using residual heat, resulting in a tender texture.
- The Ice Bath: As soon as the resting time is up, carefully transfer the eggs to a large bowl filled with ice water. I mean, truly filled with ice – you want a very cold bath! Let them chill in the ice bath for at least 15 minutes, or until they are completely cool to the touch. This rapid cooling stops the cooking process instantly, preventing overcooking and, crucially, it helps the egg whites contract away from the shell, making them much easier to peel. This step is absolutely essential for pristine egg whites, which are our canvas for these Creepy Deviled Eggs For Halloween.
- Peeling with Care: Once thoroughly chilled, gently tap each egg on a hard surface to crack the shell all around. Start peeling from the wider end, where the air pocket usually is. I find it helpful to peel them under a gentle stream of cold water, as this helps to wash away any tiny shell fragments and makes the process smoother. Take your time to ensure the egg whites remain as intact and smooth as possible. We want perfect, unblemished halves for our spooky creations!
- Halving the Eggs: Using a sharp, non-serrated knife, carefully slice each peeled egg in half lengthwise. Wipe your knife blade clean between each cut for the cleanest possible lines. Gently scoop out the bright yellow yolks into a medium-sized mixing bowl. Place the beautiful, empty egg white halves onto a serving platter or a large tray, cut-side up, ready for their spooky transformation.
Phase 2: Crafting the Spooky Filling for Creepy Deviled Eggs
Now, this is where the magic truly begins for your Creepy Deviled Eggs For Halloween! We’re not just making a delicious filling; we’re creating the various “goo” and “guts” that will give these eggs their signature creepy look. Get ready to mix, mash, and color your way to a truly ghoulish treat!
- Mashing the Yolks: In the bowl with your scooped-out egg yolks, use a fork to mash them thoroughly. You want them to be as fine and crumbly as possible, with no large lumps. The smoother the mashed yolks, the creamier and more pipeable your filling will be.
- Adding the Base Flavors: Add the mayonnaise, Dijon mustard, white vinegar, salt, and black pepper to the mashed yolks. Now, using that same fork or a spatula, mix everything together until the mixture is completely smooth and well combined. Taste a small amount and adjust the seasoning if needed. Sometimes, I add a tiny pinch more salt or a dash more vinegar, depending on my mood. This is our delicious base filling, before it gets its creepy makeover.
- Dividing for Color: This is where it gets fun! Divide your smooth deviled egg filling into several smaller bowls. I usually aim for three or four separate portions, depending on how many different “creepy” colors I want to create for my Creepy Deviled Eggs For Halloween. For instance, I might put one-third in one bowl for green, one-third in another for purple, and leave the last third for black or a more natural, but still spooky, shade.
-
Coloring the Fillings:
- Green “Slime” Filling: In one bowl, add 2-3 drops of green gel food coloring. Mix vigorously until the color is evenly distributed and you have a vibrant, eerie green. Add more drops if you desire a deeper, more unsettling shade of green. This is perfect for a toxic sludge or monster-inspired look.
- Purple “Bruise” or “Poison” Filling: In another bowl, add 2-3 drops of purple gel food coloring. Mix until it’s a uniform, deep purple. This shade adds a mysterious, almost bruised quality to your Creepy Deviled Eggs For Halloween.
- Black “Tar” or “Shadow” Filling: For a truly dramatic effect, add several drops of black gel food coloring to a portion of the filling. This might take a bit more coloring to achieve a deep, true black, so be patient and mix well. This black filling is fantastic for creating “spider egg” effects or simply a dark, menacing contrast.
- Optional Red “Blood” Filling: If you want a red filling, remember that adding red to yellow will make it orange. To get a true red, you might need to use a very concentrated red gel and potentially start with a slightly smaller portion of yolk mixture. Alternatively, you could use a very small amount of cream cheese mixed with red food coloring for a vibrant red accent instead of a full filling.
A Quick Tip: Remember to use gel food coloring. Liquid food coloring can thin out your filling, making it less pipeable and creamy.
- Preparing for Piping: Spoon each colored filling into its own piping bag fitted with your chosen tip (a large star tip creates a nice textured look, while a round tip gives a smoother, more orb-like appearance). If you don’t have piping bags, a sturdy zip-top bag with one corner snipped off will work just fine. Make sure to snip a hole that’s large enough for the filling to pass through easily but not so large that you lose control.
Phase 3: Assembling Your Creepy Deviled Eggs Masterpiece
Now for the most exciting part: transforming those innocent egg white halves and colorful fillings into truly terrifying Creepy Deviled Eggs For Halloween! This is where your creativity can truly shine. Don’t be afraid to get a little messy – it just adds to the spooky charm!
- Piping the Filling: Pick up one of your piping bags. Hold the egg white half steady with one hand and pipe the filling into the hollowed-out center. You can pipe a simple mound, a swirl, or even just a blob – remember, we’re going for creepy, not always perfectly elegant! Experiment with different colors in different egg halves. For instance, pipe the green filling into some, the purple into others, and the black into the remaining ones.
-
Creating Olive Spiders: This is a classic for Creepy Deviled Eggs For Halloween and always a crowd-pleaser!
- Take your pitted black olives. For the spider’s body, cut one olive in half lengthwise. Place one half, cut-side down, on top of the piped filling.
- For the legs, take another olive and slice it into very thin rounds. Then, cut each round in half to create crescent shapes.
- Carefully arrange 3-4 crescent “legs” on each side of the olive body, sticking them gently into the piped filling. You can bend them slightly to make them look like they’re crawling.
-
“Bloodshot Eye” Effect: This is surprisingly simple yet incredibly effective.
- Pipe a plain or lightly colored filling (like a very pale green or yellow) into some of the egg white halves, creating a slightly domed “eyeball.”
- Dip a very thin, clean paintbrush or a toothpick into red gel food coloring.
- Carefully draw thin, squiggly lines radiating out from the center of the “eyeball” to mimic blood vessels. You can make them as delicate or as ghoulishly thick as you like!
- For a pupil, place a small piece of black olive or a tiny drop of black food coloring gel in the center.
-
“Vein” or “Worm” Details with Chives/Dill:
- For a subtle veined look, take tiny snippets of fresh chives or dill and gently press them into the piped filling. This works wonderfully on the green or purple fillings to add texture and an organic, slightly unsettling detail.
- Alternatively, for a “worm” effect, take a very thin strip of red bell pepper (julienned with your small, sharp knife) and coil it slightly on top of the filling. The bright red against a green or black filling is particularly striking.
-
“Brain” or “Molded Flesh” Texture:
- For some of your Creepy Deviled Eggs For Halloween, you might want a more organic, grotesque texture. Instead of a smooth swirl, pipe the filling in a more uneven, clumpy manner.
- Then, gently drag the tines of a fork across the surface of the piped filling to create ridges and valleys, mimicking brain folds or decaying flesh. This works especially well with the green or purple fillings.
- A light dusting of paprika on a green or purple brain can look like a rusty, decaying organ.
-
Paprika/Chili Powder “Bloodstains” or “Rust”:
- For an extra touch of gore, lightly dust some of your finished Creepy Deviled Eggs For Halloween with a sprinkle of paprika or smoked paprika. This adds a warm, reddish hue that can resemble dried bloodstains or an old, rusty surface.
- A tiny pinch of chili powder can add a fiery red and a slight kick, if you’re feeling adventurous!
- Arranging Your Creepy Deviled Eggs: Once all your eggs are filled and decorated, arrange them artfully on your serving platter. You can scatter some extra olive pieces, a few more chive snippings, or even some plastic spiders around the platter to enhance the Halloween vibe.
Tips and Tricks for the Ultimate Creepy Deviled Eggs
To truly elevate your Creepy Deviled Eggs For Halloween from mere snacks to a terrifying culinary spectacle, a few extra tips and considerations can make all the difference. Remember, presentation is key when it comes to spooky treats!
- Chill for Maximum Creepiness: Once all your deviled eggs are assembled and adorned with their spooky decorations, it’s crucial to chill them properly. Place the platter of Creepy Deviled Eggs For Halloween in the refrigerator for at least 30 minutes, or even better, an hour. Chilling allows the flavors to meld beautifully and helps the filling set, making them easier to handle and ensuring they taste absolutely delicious, not just look gruesome. Cold deviled eggs are the best deviled eggs!
-
Make Ahead Magic: You can absolutely prepare parts of your Creepy Deviled Eggs For Halloween ahead of time to reduce stress on party day.
- Boil and peel the eggs up to two days in advance. Store the peeled whole eggs in an airtight container in the refrigerator.
- You can also prepare the flavored and colored yolk filling (before piping) a day in advance. Store each color in its own airtight container or a sealed piping bag in the fridge.
- However, I recommend doing the final piping and decorating no more than a few hours before serving. This keeps the filling fresh and prevents the decorations (especially the olive spiders and chives) from wilting or drying out.
- Transporting Your Terrors: If you need to transport your Creepy Deviled Eggs For Halloween, a specialized deviled egg carrier is a lifesaver. These trays have individual indentations that keep each egg perfectly in place, preventing them from sliding around and getting smushed. If you don’t have one, a flat, sturdy container lined with a non-slip mat or a damp paper towel can work, but be extra careful!
-
Presentation Enhancers: Don’t underestimate the power of a themed serving dish!
- Serve your Creepy Deviled Eggs For Halloween on a black or dark-colored platter to make the vibrant (and grotesque!) colors pop.
- Surround the platter with some faux spiderwebs, plastic spiders, or even some small, creepy-crawly toys.
- A few strategically placed dry ice cubes (used safely, of course, with proper ventilation and no direct contact with food) can add an incredible, eerie fog effect around your display, truly elevating the spooky ambiance.
-
More Creepy Variations: Don’t stop at just these ideas!
- Mummy Eggs: Pipe white filling over half the egg in strips, leaving a gap for two olive slice “eyes.”
- Monster Eyes: Use green filling, a black olive pupil, and red food coloring veins. You can even add tiny slivers of red bell pepper for more realistic, bloodshot lines.
- Swamp Monster Eggs: Blend a tiny bit of cooked spinach or avocado into the green filling for a more natural, murky swamp color and texture.
- Ghost Eggs: Pipe a tall, swirly white filling and use two tiny dots of black food coloring for eyes.
- Black “Caviar” Topping: For an extra touch of luxury and a creepy texture, top some of your black deviled eggs with a small dollop of black lumpfish caviar (if your budget allows!). It adds both visual appeal and a unique burst of flavor.
- Food Safety First: Since deviled eggs contain mayonnaise and are meant to be served chilled, it’s very important to keep them at a safe temperature. Do not leave your Creepy Deviled Eggs For Halloween out at room temperature for more than two hours. If you’re serving them at a party, consider placing the platter over a bowl of ice to keep them properly chilled throughout the event. This ensures everyone enjoys their spooky treat safely.
Conclusion:
So there you have it, my friends! We’ve journeyed through the simple steps to create a show-stopping appetizer that truly embodies the spirit of spooky season. What makes this recipe a definite must-try isn’t just its undeniable deliciousness – that creamy, savory filling nestled in perfectly cooked egg whites is a classic for a reason. No, the true magic lies in its incredible transformation from an everyday favorite into something truly extraordinary and unforgettable. This isn’t just another deviled egg recipe; it’s an experience, a conversation starter, and a playful nod to the delightfully eerie ambiance of Halloween.
Imagine your guests’ faces when they see a platter of these ghoulish delights. There’s a wonderful satisfaction in serving something that elicits gasps of surprise and delight in equal measure. They are incredibly easy to make, requiring no specialized skills or fancy equipment, yet they deliver a visual punch that suggests hours of intricate work. It’s the perfect blend of effortlessness and impact, making you look like a culinary wizard without breaking a sweat. Whether you’re hosting a lavish Halloween bash or just looking for a fun, themed snack for your family, these eggs are guaranteed to be the star of your snack table. I promise you, once you whip up a batch, you’ll be adding this recipe to your annual Halloween traditions.
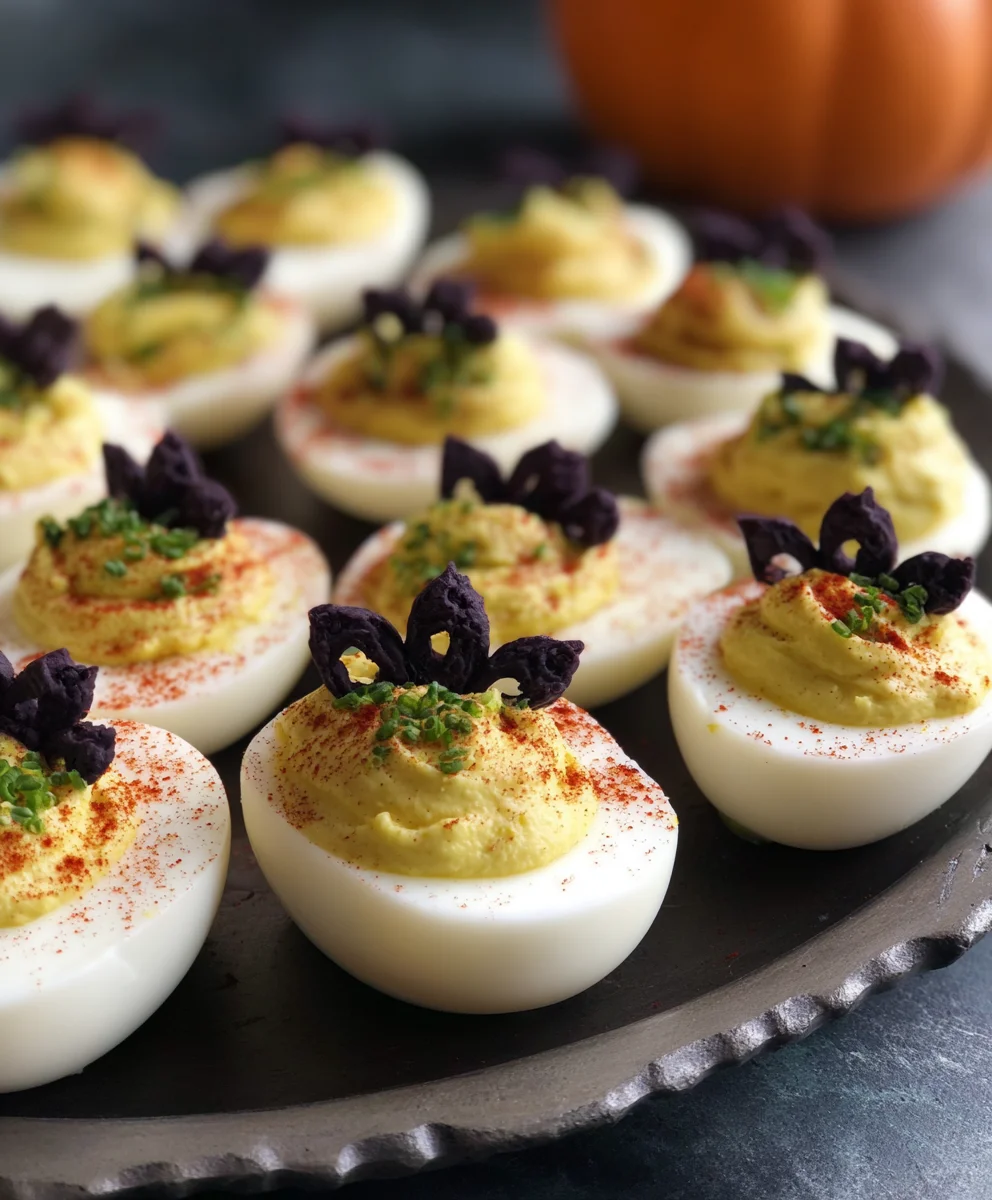
Serving Suggestions & Spooky Variations:
Now, let’s talk about how to elevate your spooky spread even further. These deviled eggs are fantastic on their own, but they also play well with others. Serve them on a dark, moody platter, perhaps dusted with a tiny bit of smoked paprika for an extra touch of “grime” or a sprinkle of finely chopped black olives to mimic specks of dirt. You could even arrange them on a bed of “spiderwebs” made from stretched cotton or on a serving board adorned with plastic spiders for maximum effect. For a complete appetizer spread, pair them with other themed bites like “mummy” hot dogs, “witch’s brew” punch, or a veggie platter arranged to look like a skeleton. They are a fantastic counterpoint to sweeter Halloween treats, offering a much-needed savory break.
But don’t stop there! Feel free to get creative with your garnishes and make these eggs even more unique. Instead of just paprika, consider using a touch of black sesame seeds for an extra eerie texture or some finely chopped chives arranged to look like ghostly wisps. For an even more dramatic effect, you can experiment with food coloring for the filling itself – a touch of black or deep purple food gel mixed into the yolk mixture can create an even more unsettling, yet still delicious, hue. Another fun idea is to use small pieces of black olive for pupils or thin strips of red bell pepper as bloodshot veins to truly bring out their creepy potential. And if you’re feeling adventurous, edible sugar eyes can be a fantastic, playful addition, instantly transforming each egg into a quirky, watchful monster. Remember, presentation is key to truly nailing the Halloween vibe, so let your imagination run wild!
My hope is that you feel inspired and excited to try this recipe for yourself. It’s truly a joy to make, and even more fun to watch people react to them. They’re proof that sometimes the simplest ingredients can create the most impactful and memorable dishes. I genuinely encourage you to dive into your kitchen, grab those eggs, and start crafting your very own batch of Creepy Deviled Eggs For Halloween! You won’t regret it. Once you’ve created your masterpiece, please don’t keep it to yourself! I would absolutely love to see your creations. Share your photos, your serving ideas, and any fun variations you come up with. Did you use different food coloring? Add a unique garnish? Tell me all about it! Your experiences and creativity inspire me and our whole community of fellow food enthusiasts. So go forth, get spooky, and happy cooking!
Creepy Deviled Eggs: Spooky Halloween Party Recipe
Delightful blend of classic party favorite and spine-tingling visual intrigue, perfect for any spooky Halloween gathering.
Ingredients
-
12 large eggs
-
½ cup mayonnaise
-
2 tbsp Dijon mustard
-
1 tbsp white vinegar or apple cider vinegar
-
½ tsp salt
-
¼ tsp black pepper
-
Gel food coloring kit (red, green, black, purple)
-
1 can (6 oz) pitted black olives
-
Fresh chives or dill sprigs (for garnish)
-
Paprika or smoked paprika (for garnish)
-
Small red bell pepper (julienned, for garnish)
Instructions
-
Step 1
Place 12 large eggs in a pot, cover with 1 inch cold water. Bring to a rapid boil, then immediately remove from heat. Cover and let sit for 10-12 minutes. -
Step 2
Transfer eggs to an ice bath for 15 minutes until thoroughly chilled. Carefully peel, then slice each egg in half lengthwise. Scoop yolks into a bowl and place egg white halves onto a platter. -
Step 3
Mash egg yolks until fine. Mix in mayonnaise, Dijon mustard, white vinegar, salt, and black pepper until the mixture is completely smooth. -
Step 4
Divide the smooth filling into several smaller bowls. Add 2-3 drops of green, purple, and black gel food coloring to separate portions, mixing vigorously until desired eerie colors are achieved. -
Step 5
Spoon each colored filling into its own piping bag fitted with a large star or round tip (a Ziploc bag with a snipped corner also works). -
Step 6
Pipe the various colored fillings into the hollowed-out egg white halves, creating mounds or swirls. -
Step 7
Decorate your deviled eggs: For Olive Spiders, use a half olive for the body and thin slices for legs. For Bloodshot Eyes, pipe pale filling, draw red gel lines with a toothpick, and add a black olive piece or gel dot for the pupil. For Veins or Worms, press tiny chive snippets or thin red bell pepper strips into the filling. For Brain/Molded Flesh, pipe unevenly, drag a fork to create texture, and dust with paprika. -
Step 8
Arrange all decorated Creepy Deviled Eggs on a serving platter. Chill in the refrigerator for at least 30-60 minutes before serving. Do not leave at room temperature for more than two hours to ensure food safety.
Important Information
Nutrition Facts (Per Serving)
It is important to consider this information as approximate and not to use it as definitive health advice.
Allergy Information
Please check ingredients for potential allergens and consult a health professional if in doubt.


Leave a Comment