
Banana Waffles – what a delightful way to start your day! Forget everything you thought you knew about breakfast, because I’m about to introduce you to a culinary revelation that will transform your mornings forever. Imagine the golden-brown perfection of a classic waffle, elevated with the natural sweetness and incredible moistness of ripe bananas, creating a truly irresistible treat that promises a burst of flavor with every bite.
While waffles themselves boast a rich and fascinating history dating back to medieval Europe, evolving from simple flatbreads to the gridded delights we adore today, the addition of fruit, particularly bananas, has become a cherished modern twist. This ingenious pairing not only transforms overripe bananas into a star ingredient, ensuring not a single fruit goes to waste in your kitchen, but also infuses every waffle with a comforting, wholesome sweetness. It’s a testament to how simple ingredients can create something extraordinary.
Why People Adore Banana Waffles
People absolutely adore these Banana Waffles for so many reasons. The crisp exterior gives way to an incredibly soft, fluffy interior, studded with tender pockets of sweet banana that caramelize slightly as they cook. It’s a symphony of textures and flavors that is both comforting and exciting, perfect for a leisurely weekend brunch or a special weekday breakfast. Beyond the incredible taste and delightful texture, the sheer convenience of using ripe bananas makes this recipe a go-to for busy home cooks looking to add a touch of gourmet flair without the fuss. I promise you, once you try this recipe, you’ll understand why it has become such a beloved staple in countless homes, including mine. Get ready to experience breakfast bliss!

Ingredients:
- All-Purpose Flour: 1 ½ cups (180g) all-purpose flour.
- Gluten-Free Flour Option: For my gluten-free friends I use a good cup-for-cup flour blend. They come out just as delicious and everyone can enjoy waffle morning together.
- Baking Powder: 2 teaspoons. This is crucial for that perfect lift and fluffy texture we all crave in a good waffle!
- Salt: ½ teaspoon. Just a touch to balance the sweetness and enhance all the flavors.
- Granulated Sugar: ¼ cup (50g), optional. If your bananas are super ripe, they’ll add a lot of natural sweetness, so feel free to adjust this to your liking or omit it entirely for a less sweet option.
- Very Ripe Bananas: 2 large, mashed (about 1 cup). Look for bananas with lots of brown spots – that’s when they’re at their peak sweetness and flavor for baking!
- Large Eggs: 2, lightly beaten. Eggs help bind everything together and contribute to a rich, golden waffle.
- Milk: 1 cup (240ml). Whole milk works beautifully for richness, but feel free to use 2%, skim, or even a non-dairy alternative like almond, soy, or oat milk.
- Melted Unsalted Butter or Neutral Oil: ¼ cup (60ml). Melt your butter and let it cool slightly before adding it to the wet ingredients. If you prefer, a neutral oil like canola, vegetable, or grapeseed oil works just as well.
- Vanilla Extract: 1 teaspoon. A splash of vanilla always elevates the flavor profile, adding a warm, comforting aroma.
- Suggested Accompaniments: Nothing beats these waffles with a hot cup of coffee or fresh orange juice. For special occasions we’ll serve them with hot chocolate topped with whipped cream.
Prepping Your Waffle Batter: The Heart of Your Banana Waffles
Making the perfect banana waffle batter is all about balance and not overworking the ingredients. We want a tender, fluffy interior, not a tough, rubbery one! Follow these steps carefully, and you’ll be well on your way to waffle nirvana.
- Gather Your Tools and Ingredients: Before you even think about mixing, take a moment to gather all your listed ingredients. This is called “mise en place” in culinary terms, and it makes the entire cooking process smoother and more enjoyable. You’ll need two large mixing bowls, a whisk, a spatula, and measuring cups and spoons. Ensure your bananas are truly ripe for the best flavor – soft, speckled, and easy to mash. Your butter should be melted and cooled, not hot, to avoid scrambling the eggs.
- Whisk the Dry Ingredients: In your first large mixing bowl, combine the all-purpose flour (or your preferred gluten-free cup-for-cup blend), baking powder, and salt. If you’re using granulated sugar, add it in now as well. Take your whisk and thoroughly combine these ingredients. The goal here is not just to mix them, but to aerate the flour and evenly distribute the baking powder and salt. This ensures uniform leavening and flavor throughout your waffles. Whisk for about 30 seconds until everything looks consistent and there are no visible lumps of baking powder or salt. This seemingly small step is vital for a consistent texture.
- Prepare the Wet Ingredients: In your second large mixing bowl, it’s time to bring together the stars of our show. Start by mashing your ripe bananas. You can use a fork, a potato masher, or even your hands (just make sure they’re clean!). You want a fairly smooth consistency with perhaps a few small lumps for texture – it’s entirely up to you. Next, add the lightly beaten eggs, milk, cooled melted butter (or neutral oil), and vanilla extract to the mashed bananas. Whisk these wet ingredients together until they are well combined. You’ll have a wonderfully fragrant, creamy mixture.
- Combine Wet and Dry Ingredients (The Golden Rule): This is where many home bakers make a common mistake, leading to tough waffles. Gently pour the wet banana mixture into the bowl with the dry ingredients. Using a spatula or a large spoon, fold the ingredients together until just combined. The key here is to not overmix. A few lumps of flour are perfectly acceptable and even desirable; they signify you haven’t developed the gluten too much, which would result in dense, chewy waffles. Mix only until there are no streaks of dry flour visible. It should be a somewhat thick, slightly lumpy batter. Overmixing can also cause your waffles to become tough and prevent them from getting that beautiful crispy exterior.
- Rest the Batter (Optional but Recommended): If you have 10-15 minutes to spare, let your waffle batter rest on the counter. This allows the flour to fully hydrate, the gluten to relax, and the baking powder to start working its magic, leading to even fluffier and more tender waffles. It’s a small step that makes a noticeable difference in the final texture. If you’re in a hurry, you can skip this, but I highly recommend it for optimal results. While the batter rests, you can start getting your waffle iron ready!
Getting Your Waffle Iron Ready: The Stage for Perfection
A perfectly preheated and lightly greased waffle iron is the secret to crispy, golden-brown waffles that don’t stick. Don’t rush this step!
- Preheat Your Waffle Iron: Plug in your waffle iron and set it to your desired temperature. Most waffle irons have a light that indicates when it’s preheated and ready. Generally, a medium to medium-high setting works best for a golden exterior and fully cooked interior. Allow it ample time to heat up properly – at least 5-10 minutes. A truly hot waffle iron will ensure a quick, even cook and prevent sticking. If your iron isn’t hot enough, your waffles might steam rather than bake and crisp, resulting in a soggy texture.
- Lightly Grease the Grids: Even if your waffle iron boasts “non-stick” capabilities, I always recommend a light coat of cooking spray or brushing with a little melted butter or neutral oil before the first waffle. This acts as extra insurance against sticking and contributes to that beautiful, slightly crispy crust. Do this while the iron is heating, but be careful not to touch the hot surfaces. For subsequent waffles, you might not need to grease every time, depending on your waffle iron, but keep an eye on it. If you notice any sticking, a quick spray will do the trick.
Cooking Your Delicious Banana Waffles: Watch the Magic Happen!
Now for the exciting part – transforming that fragrant batter into glorious banana waffles! This is where the aromas really start to fill your kitchen.
- Portion the Batter: Once your waffle iron is hot and ready, it’s time to add the batter. The exact amount will depend on the size and style of your waffle iron (Belgian vs. traditional). As a general guide, for a standard 7-inch round waffle iron, you’ll typically use about ½ cup to ¾ cup of batter per waffle. For larger Belgian-style irons, you might need up to 1 cup. The best way to know is to start with a smaller amount and add more if needed. You want enough batter to fill the grids without overflowing. Use a ladle or a ¼-cup measure to carefully spoon the batter onto the center of the bottom grid.
- Close and Cook: Gently close the lid of your waffle iron. Avoid pressing down forcefully, as this can compress the waffle and make it less fluffy. Let the waffle iron do its work. Most irons have an indicator light that turns off or changes color when the waffle is done, or a timer that beeps. If yours doesn’t, cook for approximately 3-5 minutes for thinner waffles or 5-7 minutes for thicker Belgian-style waffles. The cooking time will vary depending on your iron’s wattage and your desired level of crispness. You’re looking for a beautiful golden-brown color and steam ceasing to escape from the sides of the iron. Don’t be tempted to open the iron prematurely, as this can disrupt the cooking process and lead to unevenly cooked or torn waffles.
- Check for Doneness: When the indicator light signals readiness or your estimated cooking time is up, carefully open the waffle iron. The waffle should be golden brown, easily liftable from the grids, and have a somewhat crisp exterior. If it’s sticking or looks pale, close the lid and cook for another minute or two. You can usually tell a waffle is perfectly cooked when it releases easily and steam production significantly reduces.
- Carefully Remove the Waffle: Use a non-stick safe utensil, such as a plastic or wooden spatula, to gently lift the cooked waffle from the iron. Avoid using metal forks or knives, as these can scratch the non-stick coating of your waffle iron. Transfer the hot waffle to a wire cooling rack. This is a crucial step! If you place hot waffles directly on a plate, the steam will condense underneath, making them soggy. A wire rack allows air to circulate, keeping them crisp while you finish cooking the rest of the batch.
- Repeat the Process: Continue cooking the remaining batter, greasing the waffle iron again if necessary between batches. As you make more waffles, you’ll get a better feel for the exact amount of batter and cooking time your specific waffle iron requires. If you’re serving a crowd, you can keep cooked waffles warm in a single layer on a baking sheet in an oven preheated to 200°F (95°C) while you finish the rest.
Serving and Enjoying Your Waffles: The Grand Finale
Once your kitchen is filled with the sweet aroma of banana waffles, it’s time for the best part – digging in! These waffles are incredibly versatile and pair beautifully with a variety of toppings.
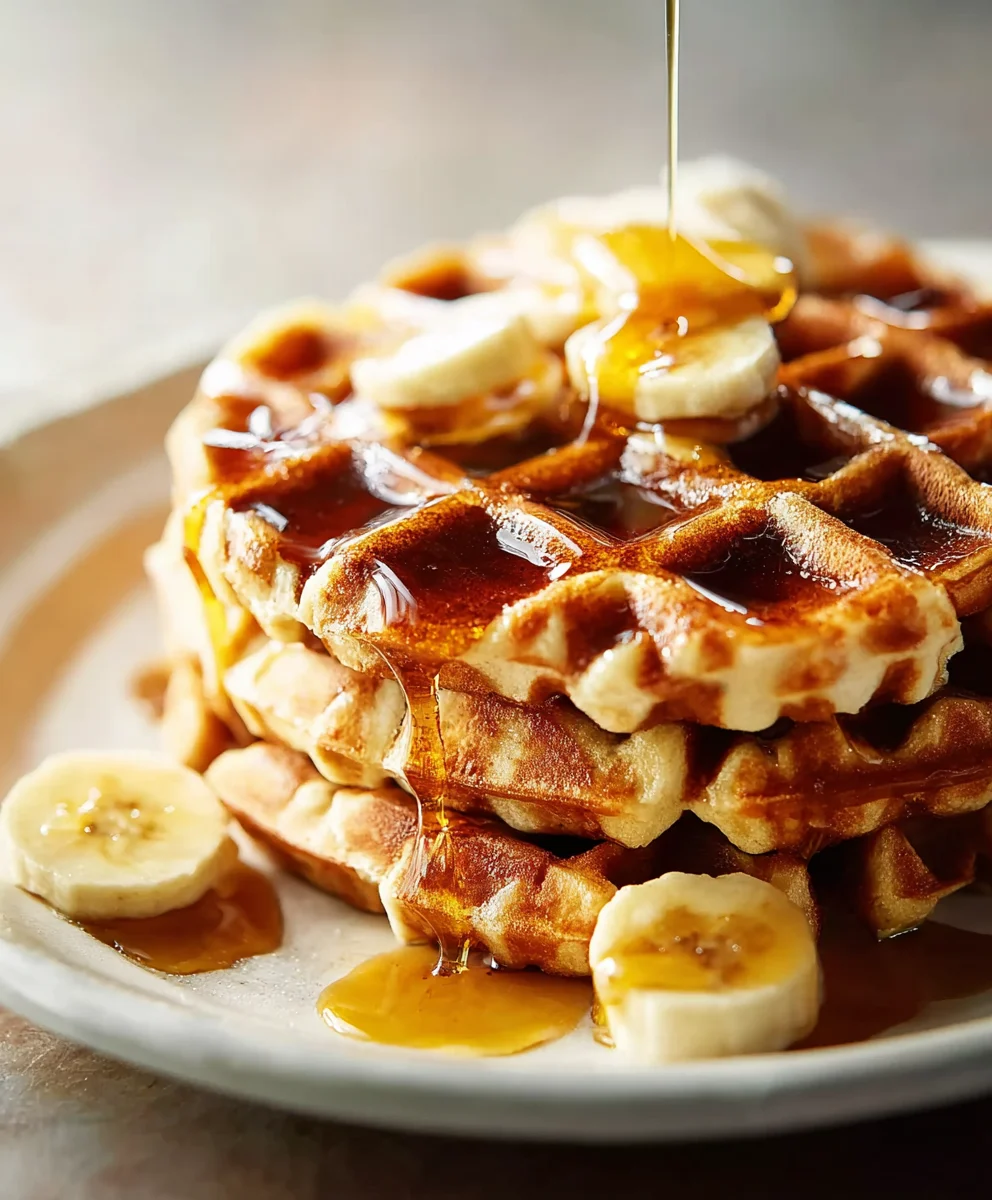
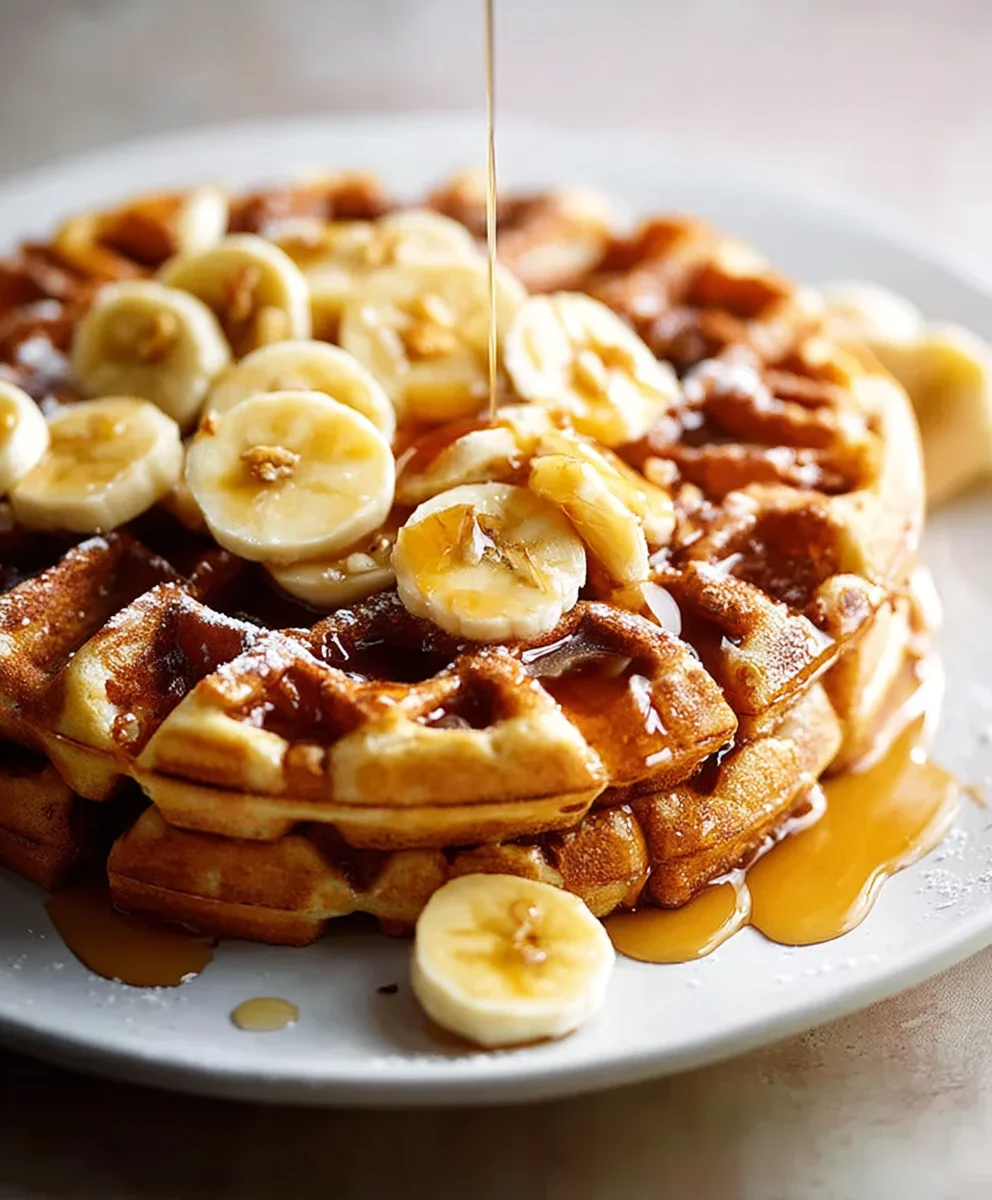
- Classic Maple Syrup: A generous drizzle of warm, pure maple syrup is, of course, a timeless choice. Its rich, sweet notes perfectly complement the banana flavor.
- Fresh Fruit: Slice up some extra bananas, berries (strawberries, blueberries, raspberries), or a medley of your favorite seasonal fruits. The freshness and slight tartness provide a lovely contrast to the warm, sweet waffles.
- Whipped Cream or Ice Cream: For a more decadent treat, especially if you’re serving these for dessert or a special brunch, a dollop of homemade whipped cream or a scoop of vanilla ice cream is absolutely divine.
- Nut Butters and Nuts: A spread of peanut butter, almond butter, or hazelnut spread can add a protein boost and a wonderful nutty flavor. Sprinkle with chopped walnuts, pecans, or almonds for extra crunch.
- Chocolate Drizzle: A warm chocolate sauce or a sprinkle of chocolate chips can turn these into an irresistible dessert-like experience, especially if you’re serving them with that hot chocolate and whipped cream!
- Powdered Sugar: A simple dusting of powdered sugar (confectioners’ sugar) adds a touch of elegance and extra sweetness.
Tips for Waffle Perfection: Elevate Your Banana Waffle Game
Achieving consistently perfect waffles isn’t just about following the steps; it’s also about understanding the nuances. Here are a few extra tips to ensure your banana waffles are always a hit:
- Don’t Overmix the Batter: I can’t stress this enough! Overmixing develops the gluten in the flour, leading to tough, chewy waffles. Mix only until the dry ingredients are just incorporated into the wet. Lumps are your friends here!
- Very Ripe Bananas are Key: The browner your bananas, the sweeter and more flavorful they will be, imparting a deep, authentic banana taste to your waffles. Don’t be afraid of those speckled, almost black bananas; they’re perfect for this recipe.
- Rest Your Batter: As mentioned, a 10-15 minute rest period for your batter allows the flour to fully hydrate and the leavening agents to begin working. This results in a lighter, fluffier waffle.
- Preheat Thoroughly: A properly preheated waffle iron is essential for crispy exteriors and even cooking. If your iron isn’t hot enough, your waffles will stick and turn out pale and soggy. Be patient!
- Don’t Overfill: Too much batter will result in overflow and a messy cleanup. Start with a conservative amount and adjust as you get to know your waffle iron.
- Maintain Heat: For consecutive waffles, ensure your waffle iron reheats between each batch. Some irons have a ready light that will turn back on to indicate it’s at optimal temperature again.
- Serve Immediately or Keep Warm: Waffles are best enjoyed fresh off the iron. If serving a crowd, you can keep them warm and crisp in a single layer on a wire rack set over a baking sheet in a 200°F (95°C) oven. Avoid stacking them, as this will trap steam and make them soggy.
- Consider a Waffle Maker Type: Belgian waffle makers (with deeper grids) produce thicker, fluffier waffles, while traditional waffle makers yield thinner, often crispier ones. Both are fantastic with this banana batter, but your cooking time might vary slightly.
Fun Variations & Add-ins: Get Creative!
While these banana waffles are absolutely perfect on their own, a little creativity can take them to the next level. Don’t be afraid to experiment!
- Chocolate Chip Banana Waffles: Stir in ½ cup of chocolate chips (milk, dark, or white chocolate) into the batter just before cooking. The melting chocolate adds an extra layer of sweetness and indulgence.
- Nutty Banana Waffles: Fold in ½ cup of chopped walnuts or pecans for a delightful crunch and nutty flavor that complements the banana beautifully.
- Spice It Up: Add ½ teaspoon of ground cinnamon or a pinch of nutmeg to the dry ingredients for a warm, comforting spice note. Pumpkin pie spice blend also works wonderfully here.
- Coconut Banana Waffles: Stir in ¼ cup of shredded unsweetened coconut to the batter for a tropical twist.
- Fruity Boost: While bananas are the star, you can gently fold in ¼ to ½ cup of other small diced fruits like pineapple or berries for a mixed fruit waffle experience. Just be mindful that fruits with high water content might make the waffles a bit softer.
Storing and Reheating Leftovers: Enjoy Them Later!
Sometimes you might make a big batch, or simply have a few waffles left over. No problem! These banana waffles freeze and reheat beautifully, making them perfect for a quick breakfast on busy mornings.
- Cool Completely: Allow any leftover waffles to cool completely on a wire rack before storing. This prevents condensation and keeps them from becoming soggy.
- Freezing for Later: Once cooled, place the waffles in a single layer on a baking sheet and freeze for about 1-2 hours, or until solid. This flash-freezing step prevents them from sticking together when stored. Once solid, transfer the frozen waffles to an airtight freezer-safe bag or container. They will keep well in the freezer for up to 3 months. Don’t forget to label the bag with the date!
- Reheating from Fresh: If your waffles are just a day or two old and stored in the fridge, you can easily pop them back into a toaster, toaster oven, or even the waffle iron itself for a few minutes until heated through and crisp again.
-
Reheating from Frozen: For frozen waffles, you have a few excellent options:
- Toaster: This is my favorite method for individual waffles. Pop them directly into a toaster on a medium setting until hot and crispy.
- Toaster Oven: Preheat your toaster oven to 350°F (175°C). Place frozen waffles directly on the rack and toast for 5-7 minutes, or until heated through and crispy.
- Oven: If you’re reheating a larger batch, preheat your regular oven to 350°F (175°C). Place frozen waffles in a single layer on a baking sheet and bake for about 8-12 minutes, flipping halfway through, until thoroughly heated and crisp.
- Waffle Iron: You can also reheat them in your preheated waffle iron for about 1-2 minutes until warmed and crisp. This often yields the best texture!
Avoid reheating in the microwave, as this will make your waffles soft and chewy rather than crisp.
And there you have it! A comprehensive guide to making the most delicious, fluffy, and perfectly golden banana waffles. Whether you enjoy them on a lazy weekend morning or freeze them for a quick weekday treat, these waffles are sure to bring smiles to everyone’s faces. Happy waffling!
Conclusion:
And there you have it, my friends! We’ve reached the sweet end of our journey with this incredible recipe, and I truly hope you’re as excited to make these as I am to share them. If you’ve been searching for a breakfast recipe that effortlessly combines comfort, flavor, and a touch of wholesome goodness, then look no further. This isn’t just another waffle recipe; it’s a culinary hug, a golden, fluffy invitation to start your day with a smile. I’ve personally found that few things can brighten a morning quite like the aroma of freshly cooked waffles filling the kitchen, and when those waffles are imbued with the natural sweetness and moist texture of ripe bananas, you’ve truly hit the breakfast jackpot. This recipe for Banana Waffles is, without a doubt, a must-try. It’s remarkably simple to follow, yielding consistently perfect results every single time, making it ideal for both seasoned home cooks and those just beginning their culinary adventures.
What makes these banana waffles so undeniably irresistible? It’s a symphony of textures and flavors. The exterior is wonderfully crisp, offering that satisfying crunch we all adore in a good waffle, while the interior remains incredibly light, airy, and moist, thanks to the star ingredient – those perfectly ripe bananas. Their natural sugars caramelize slightly on the griddle, adding a depth of flavor that a plain waffle simply can’t achieve. Plus, the ease with which this recipe comes together means you can have a gourmet-level breakfast on the table without any fuss, leaving you more time to savor those precious morning moments with loved ones. Imagine a lazy Sunday morning, brewing a fresh pot of coffee, and then presenting a stack of these golden beauties. It’s an experience that truly elevates the everyday.
Now, let’s talk about enhancing this already fantastic experience with some serving suggestions. While these banana waffles are absolutely divine on their own, a little embellishment never hurt anyone! For a classic approach, a drizzle of pure maple syrup is non-negotiable. It’s the perfect complement to the banana’s sweetness. But don’t stop there! Fresh berries – think strawberries, blueberries, or raspberries – add a burst of color and tartness that cuts through the richness beautifully. A dollop of whipped cream or Greek yogurt can add a creamy texture, while a sprinkle of chopped nuts like pecans or walnuts introduces a delightful crunch. For an indulgent treat, a scoop of vanilla ice cream with a warm chocolate drizzle transforms them into a decadent dessert. Or, for a healthier twist, a spoonful of almond butter and sliced bananas makes for a protein-packed start to your day.
Beyond toppings, consider variations to make this recipe truly your own. Feeling adventurous? Try adding a handful of chocolate chips to the batter for a banana chocolate chip waffle experience that will win over even the pickiest eaters. A pinch of cinnamon or nutmeg can enhance the warm, comforting flavors of the banana even further. If you’re looking to sneak in some extra nutrients, finely grated zucchini or carrots can be incorporated into the batter; the bananas and spices will mask their presence, making them perfect for stealthy veggie consumption. For those with dietary considerations, this recipe is incredibly adaptable. You can easily substitute dairy milk with almond, soy, or oat milk, and for a gluten-free version, simply use your favorite gluten-free all-purpose flour blend, ensuring it contains xanthan gum or adding a quarter teaspoon if it doesn’t. These small adjustments prove just how versatile and forgiving this recipe truly is.
Ultimately, this recipe isn’t just about making waffles; it’s about creating memories. It’s about the joy of cooking something delicious from scratch, the satisfaction of seeing happy faces around your breakfast table, and the simple pleasure of a truly exceptional meal. Whether you’re whipping them up for a special occasion brunch, a quick weekday breakfast, or an afternoon snack, these banana waffles are guaranteed to be a hit. They’re easy enough for kids to help with, yet elegant enough to impress guests. I genuinely believe that once you try these, they will become a cherished staple in your breakfast rotation.
So, what are you waiting for? Grab those ripe bananas, heat up your waffle iron, and prepare to embark on a delightful culinary journey. I wholeheartedly encourage you to give this recipe a try this weekend, or even tomorrow morning! Don’t forget to share your creations and experiences with me. I absolutely love hearing how your batches turn out, what toppings you experimented with, and any fun twists you added. Your feedback and stories inspire me and our entire community of food lovers. Happy Waffling!
Frequently Asked Questions About Banana Waffles:
Can I use really overripe bananas for banana waffles?
Absolutely! In fact, the riper your bananas are, the better. Those brown, spotty, or even nearly black bananas sitting on your counter are perfect. They are sweeter and softer, making them easier to mash and imparting a richer banana flavor and more moisture to your waffles. Don’t throw them out; waffle them!
Can I make the banana waffle batter ahead of time?
Yes, you can! You can prepare the batter the night before and store it in an airtight container in the refrigerator. This is a fantastic time-saver for busy mornings. Just give it a good stir before pouring it into your waffle iron, as it might thicken slightly overnight. However, for the absolute fluffiest results, I recommend making the batter fresh, as the leavening agents (baking powder/soda) are most active when first mixed.
How do I store leftover banana waffles?
Allow any leftover banana waffles to cool completely on a wire rack to prevent them from becoming soggy. Once cooled, you can store them in an airtight container or a resealable plastic bag in the refrigerator for up to 3-4 days. They are also excellent for freezing!
Can I freeze banana waffles?
Freezing is a fantastic way to enjoy homemade banana waffles any day of the week! Once cooled, arrange the waffles in a single layer on a baking sheet and flash-freeze them for about 1-2 hours until solid. Then, transfer them to a freezer-safe bag or container, separating layers with parchment paper to prevent sticking. They’ll keep well in the freezer for up to 2-3 months. To reheat, simply pop them directly into a toaster, toaster oven, or even a regular oven (at 350°F/175°C) until warmed through and crispy.
What are some recommended toppings for banana waffles?
Oh, the possibilities are endless! Classic maple syrup is a must. Beyond that, consider fresh berries (strawberries, blueberries, raspberries), sliced bananas, a dollop of whipped cream or Greek yogurt, chopped nuts (pecans, walnuts), a sprinkle of cinnamon, chocolate chips, a drizzle of honey, or even a spoonful of nut butter for extra protein. Get creative and find your favorite combination!
How can I make banana waffles healthier?
There are several ways to boost the nutritional profile of your banana waffles. You can use whole wheat flour (or a blend of whole wheat and all-purpose flour) for added fiber, reduce the amount of added sugar (the bananas provide a lot of natural sweetness), swap dairy milk for unsweetened plant-based milk, and incorporate extra protein with Greek yogurt or a scoop of protein powder (though this might alter the texture slightly). Adding a handful of chia seeds or ground flaxseed to the batter also adds healthy fats and fiber.
Can I make this banana waffle recipe gluten-free or dairy-free?
Absolutely! This recipe is very adaptable. To make them gluten-free, simply substitute the all-purpose flour with your favorite gluten-free all-purpose flour blend. If your blend doesn’t contain xanthan gum, add about 1/4 teaspoon per cup of flour to help with structure. For a dairy-free version, replace the dairy milk with an equal amount of unsweetened plant-based milk such as almond, soy, or oat milk. The results will still be wonderfully delicious!
Best Banana Waffles Recipe: Fluffy & Easy Breakfast!
Discover the best recipe for fluffy, easy-to-make banana waffles, perfect for a cozy breakfast or special brunch. Made with ripe bananas for natural sweetness, these waffles can be enjoyed with classic maple syrup, fresh fruit, or even hot chocolate and whipped cream for special occasions.
Ingredients
-
1 ½ cups (180g) all-purpose flour (or cup-for-cup gluten-free flour blend)
-
2 teaspoons baking powder
-
½ teaspoon salt
-
¼ cup (50g) granulated sugar, optional
-
2 large very ripe bananas, mashed (about 1 cup)
-
2 large eggs, lightly beaten
-
1 cup (240ml) milk (whole, 2%, skim, or non-dairy)
-
¼ cup (60ml) melted unsalted butter or neutral oil
-
1 teaspoon vanilla extract
Instructions
-
Step 1
In a large bowl, whisk together the flour (or gluten-free blend), baking powder, salt, and optional granulated sugar until well combined. -
Step 2
In a separate large bowl, mash the ripe bananas. Add the lightly beaten eggs, milk, cooled melted butter (or oil), and vanilla extract. Whisk until well combined. -
Step 3
Pour the wet banana mixture into the dry ingredients. Using a spatula, fold until just combined. Do not overmix; a few lumps are fine. -
Step 4
For best results, let the batter rest on the counter for 10-15 minutes while you prepare your waffle iron. This leads to fluffier waffles. -
Step 5
Preheat your waffle iron to medium-high. Lightly grease the grids with cooking spray or melted butter/oil before the first waffle, even if non-stick. -
Step 6
Ladle ½ to ¾ cup of batter onto the center of the preheated waffle iron (adjust based on iron size). Close the lid and cook for 3-7 minutes, or until golden brown and steam ceases to escape. Avoid opening prematurely. -
Step 7
Carefully remove the cooked waffle with a non-stick safe spatula and transfer to a wire cooling rack to keep crisp. Repeat for remaining batter, greasing the iron if needed between batches. Serve immediately with your favorite toppings. -
Step 8
Cool leftover waffles completely on a wire rack. Freeze single layers on a baking sheet, then transfer to a freezer bag for up to 3 months. Reheat in a toaster, toaster oven, or conventional oven at 350°F (175°C) until hot and crisp (5-12 minutes).
Important Information
Nutrition Facts (Per Serving)
It is important to consider this information as approximate and not to use it as definitive health advice.
Allergy Information
Please check ingredients for potential allergens and consult a health professional if in doubt.


Leave a Comment