
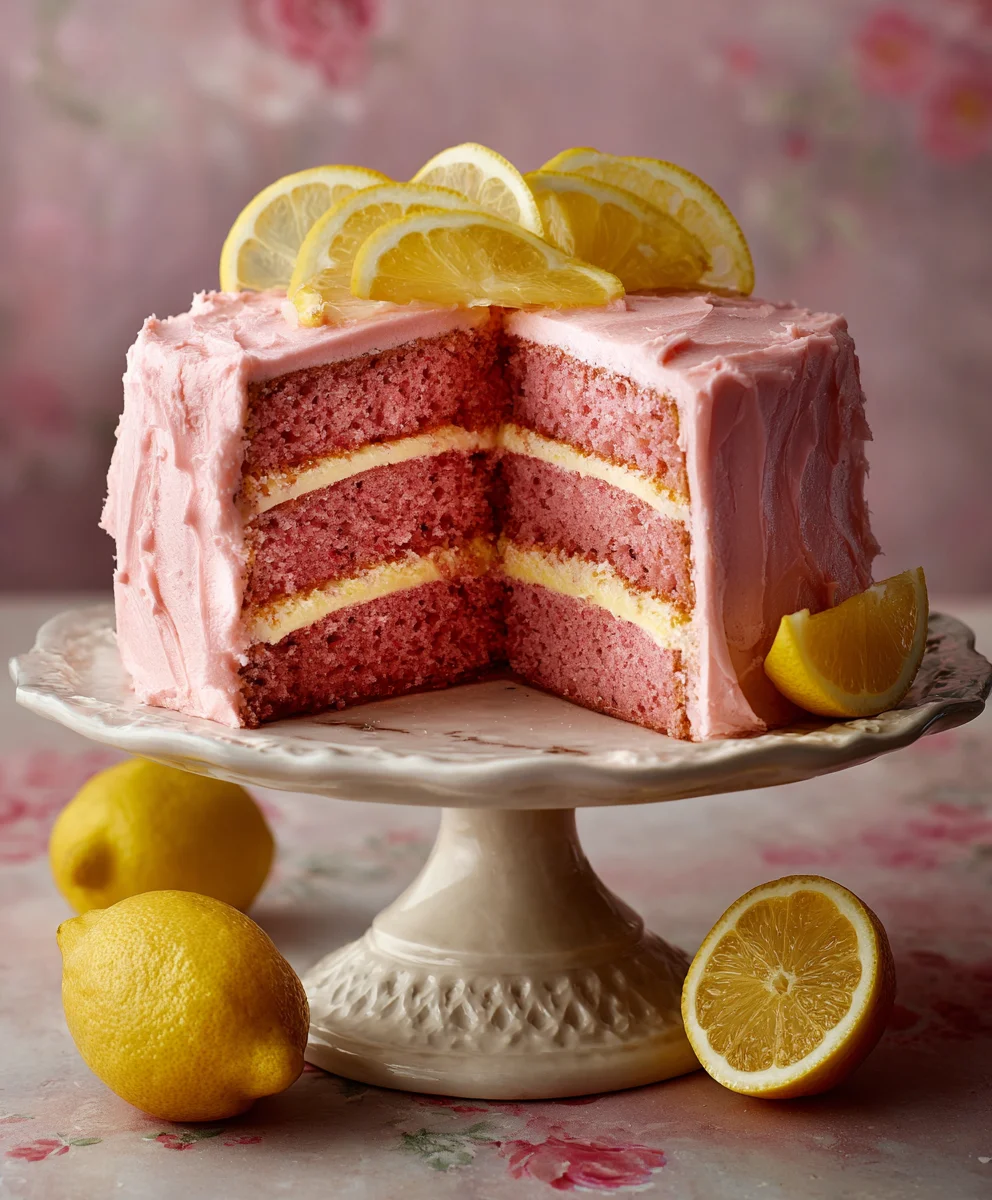
Pink Lemonade Cake is more than just a dessert; it’s a delightful experience that captures the essence of summer in every vibrant, tangy bite. I still remember the first time I encountered this beautifully colored treat – its cheerful pink hue and a whisper of citrus promised something truly special. While pink lemonade itself has a charming, perhaps even whimsical, history rooted in American refreshment culture, evolving from simple lemonade dyed with fruit or even a dropped cinnamon stick at a circus, this cake takes that nostalgic joy to an entirely new level. It’s the perfect marriage of tart lemon and sweet berry, creating a refreshing flavor profile that’s incredibly invigorating without being overpowering.
Why This Pink Lemonade Cake Will Be Your New Favorite
People absolutely adore this Pink Lemonade Cake for its stunning visual appeal, its incredibly moist crumb, and that irresistible balance of sweet and tart that awakens the palate. It’s not just a feast for the eyes; it’s a symphony of flavors and textures, making it an ideal centerpiece for birthdays, picnics, or simply a sunny afternoon treat. Prepare to fall in love with this unforgettable dessert – it truly embodies the joy of a sunny day!

Ingredients:
-
For the Pink Lemonade Cake Layers:
- 3 cups (360g) all-purpose flour, sifted
- 2 cups (400g) granulated sugar
- 1 tablespoon baking powder
- 1/2 teaspoon salt
- 1 cup (226g) unsalted butter, softened to room temperature
- 4 large eggs, room temperature
- 1 cup (240ml) whole milk, room temperature
- 1/4 cup (60ml) fresh lemon juice (from 2-3 lemons)
- 2 tablespoons fresh lemon zest (from 2-3 lemons)
- 2 teaspoons pure vanilla extract
- 2-3 drops pink gel food coloring (optional, for a light pink tint in the cake layers)
-
For the Pink Lemonade Simple Syrup:
- 1/2 cup (100g) granulated sugar
- 1/2 cup (120ml) water
- 1/4 cup (60ml) fresh lemon juice
- 1-2 drops pink gel food coloring (optional, to enhance the pink hue)
-
For the Pink Lemonade Buttercream Frosting:
- 2 cups (452g) unsalted butter, softened to room temperature
- 6-8 cups (720g-960g) powdered sugar, sifted
- 1/4 cup (60ml) fresh lemon juice
- 1 tablespoon fresh lemon zest
- 2-4 tablespoons (30-60ml) whole milk or heavy cream, as needed
- 1 teaspoon pure vanilla extract
- 3-5 drops pink gel food coloring, or more to achieve desired shade
- Pinch of salt (optional, to balance sweetness)
-
For Garnish (Optional):
- Fresh lemon slices or wedges
- Fresh raspberries or strawberries
- Edible glitter or sprinkles
Preparing the Pink Lemonade Cake Layers
Creating the perfect layers for our Pink Lemonade Cake is where the magic truly begins. This section is all about precision and a bit of patience to ensure you have light, fluffy, and perfectly baked cake layers that sing with vibrant lemon flavor.
- Preheat and Prepare: Start by preheating your oven to 350°F (175°C). This ensures a consistent baking temperature from the moment your cake batter enters the oven. Next, generously grease and flour three 8-inch round cake pans. You can also line the bottoms with parchment paper circles for extra assurance against sticking. This small step makes a world of difference when it comes to easily releasing your beautiful cake layers.
- Combine Dry Ingredients: In a large mixing bowl, whisk together the sifted all-purpose flour, granulated sugar, baking powder, and salt. Sifting the flour is crucial here as it removes any lumps and aerates the flour, contributing to a lighter cake texture. Whisking ensures all these dry components are evenly distributed, ready to blend seamlessly with the wet ingredients.
- Cream Butter and Sugar: In a separate, even larger mixing bowl (or the bowl of a stand mixer fitted with the paddle attachment), beat the softened unsalted butter on medium speed for about 2 minutes until it’s light and creamy. Gradually add the granulated sugar to the butter, continuing to beat on medium-high speed for another 3-5 minutes. This creaming process is vital; it incorporates air into the mixture, which will give our Pink Lemonade Cake its tender crumb. You’ll notice the mixture becoming much lighter in color and fluffy in texture.
- Add Eggs and Flavor: With the mixer still running on medium speed, add the large eggs one at a time, beating well after each addition. It’s important to scrape down the sides of the bowl often to ensure everything is fully incorporated. After the eggs, mix in the fresh lemon zest, fresh lemon juice, and pure vanilla extract. If you’re opting for a slightly pink tint in your cake layers, add 2-3 drops of pink gel food coloring now and mix until just combined. The mixture might look a little curdled at this point due to the acidity of the lemon juice, but don’t worry, it will come together once the dry ingredients are added.
- Alternate Wet and Dry: Now, we’ll gradually add the dry ingredients mixture alternately with the room temperature whole milk to the wet ingredients. Begin by adding about one-third of the dry ingredients to the butter mixture, mixing on low speed until just combined. Then, add half of the milk, mixing until just incorporated. Repeat with another third of the dry ingredients, followed by the remaining milk, and finally, the last third of the dry ingredients. Do not overmix! Overmixing develops gluten in the flour, which can lead to a tough cake. Mix only until the streaks of flour disappear.
- Divide and Bake: Evenly divide the cake batter among your three prepared 8-inch cake pans. Use a kitchen scale for precision if you want perfectly uniform layers. Smooth the tops with an offset spatula. Bake for 25-30 minutes, or until a wooden skewer or toothpick inserted into the center of a cake comes out clean. Baking times can vary, so keep an eye on them.
- Cooling Process: Once baked, remove the cakes from the oven and let them cool in their pans on a wire rack for about 10-15 minutes. This allows the cakes to firm up slightly. After this initial cooling, invert the cakes onto the wire rack, remove the pans, and gently peel off any parchment paper. Let the cake layers cool completely to room temperature before moving on to the next steps. This is a critical step; warm cakes will melt your frosting!
Making the Pink Lemonade Simple Syrup
This simple syrup is a delightful secret weapon that infuses our Pink Lemonade Cake with even more bright lemon flavor and helps keep the layers incredibly moist. It’s quick to make and absolutely worth the extra step.
- Combine and Heat: In a small saucepan, combine the granulated sugar and water. Place the saucepan over medium heat, stirring occasionally, until the sugar has completely dissolved. You’ll see the liquid become clear and shimmering.
- Infuse with Lemon: Once the sugar is dissolved, remove the saucepan from the heat. Stir in the fresh lemon juice. If you desire a slightly pink syrup to match our theme, add 1-2 drops of pink gel food coloring and stir until evenly colored.
- Cool Down: Allow the Pink Lemonade Simple Syrup to cool completely to room temperature before applying it to your cake layers. You can even make this a day ahead and store it in an airtight container in the refrigerator.
- Moisten the Cakes: Once your cake layers are completely cool and the syrup is at room temperature, gently brush or spoon the syrup evenly over the tops of each cake layer. Don’t drench them, but aim for a good, even coating that soaks into the top. This will ensure every bite of your Pink Lemonade Cake is bursting with flavor and moisture.
Crafting the Pink Lemonade Buttercream Frosting
The buttercream is the crowning glory of our Pink Lemonade Cake. This frosting needs to be light, fluffy, and bursting with zesty lemon flavor, with that signature beautiful pink hue. Getting the texture right is key to a gorgeous and delicious cake.
- Cream the Butter: In the bowl of a stand mixer fitted with the paddle attachment (or using a hand mixer), beat the softened unsalted butter on medium-high speed for 5-7 minutes. You want the butter to become incredibly pale, light, and very fluffy. This aeration process is fundamental for a truly light and airy buttercream, not dense or greasy. Scrape down the sides of the bowl periodically.
- Gradually Add Powdered Sugar: With the mixer on low speed, gradually add the sifted powdered sugar, about 1-2 cups at a time. Mix until each addition is fully incorporated before adding more. Once all the powdered sugar is in, increase the speed to medium-high and beat for another 3-5 minutes. This ensures the sugar is fully dissolved and the frosting is smooth. Add a pinch of salt now, if using, to enhance the flavors and cut the sweetness.
- Infuse with Lemon and Vanilla: Reduce the mixer speed to low. Add the fresh lemon juice, lemon zest, and pure vanilla extract. Mix until just combined.
- Adjust Consistency and Color: At this point, assess the consistency of your buttercream. If it seems too thick, add the whole milk or heavy cream one tablespoon at a time, mixing well after each addition, until you reach your desired spreading consistency. For a thick, pipes-well frosting, you might use less; for a softer, easier-to-spread frosting, you might use more.
- Achieve the Perfect Pink: Now for the signature color! Add 3-5 drops of pink gel food coloring to the buttercream. Mix on medium speed until the color is evenly distributed and you’ve achieved your desired shade of pink. You can add more drops for a deeper pink or fewer for a pastel hue. Beat on medium-high speed for one last minute to ensure everything is well combined and the frosting is beautifully fluffy.
- Final Check: Give the buttercream a taste test! Adjust any flavors if necessary. If it needs more tang, add a touch more lemon juice. If too sweet, a tiny pinch more salt can help. This buttercream should be wonderfully bright, zesty, and sweet.
Assembling Your Magnificent Pink Lemonade Cake
Now comes the most satisfying part: bringing all our components together to create a stunning Pink Lemonade Cake. This step-by-step guide will help you stack, frost, and decorate your creation with ease.
- Level the Layers (if necessary): Ensure your cake layers are completely cool. If any of your cake layers have domed tops, use a serrated knife or a cake leveler to carefully trim them flat. This creates stable, even layers for a professional-looking cake.
- First Layer and Crumb Coat Prep: Place one cake layer on your serving plate or cake stand. If you haven’t already, ensure it has been brushed with the Pink Lemonade Simple Syrup. Apply a generous dollop of Pink Lemonade Buttercream Frosting to the top and spread it evenly with an offset spatula.
- Stacking and Filling: Carefully place the second cake layer on top, pressing down gently. Brush with syrup, then add another layer of frosting. Repeat with the third cake layer, brushing it with syrup as well. You should now have a stacked, filled cake.
- The Crumb Coat – Your Best Friend: This is a crucial step for a neat finish. Apply a very thin layer of buttercream all over the entire cake – sides and top. This “crumb coat” traps any loose crumbs, preventing them from showing up in your final layer of frosting. Don’t worry about perfection here; its job is functional.
- Chill for Stability: Once the crumb coat is applied, place the cake in the refrigerator for 20-30 minutes, or until the crumb coat is firm to the touch. This chilling time helps set the crumbs and makes the final frosting much easier to apply smoothly.
- The Final Frosting Layer: Remove your chilled cake from the refrigerator. Apply the remaining Pink Lemonade Buttercream Frosting to the top and sides of the cake. Use an offset spatula or a bench scraper to smooth out the frosting. Work your way around the cake, achieving as smooth and even a finish as you desire. For a rustic look, you can create swirls with your spatula. For a super smooth finish, dip your spatula in hot water and wipe it clean between passes.
- Decorate (Optional but Recommended!): This is where you can let your creativity shine!
- Piping: If you have a piping bag fitted with a decorative tip (like a star or round tip), you can pipe a border around the top and/or bottom edge of your Pink Lemonade Cake.
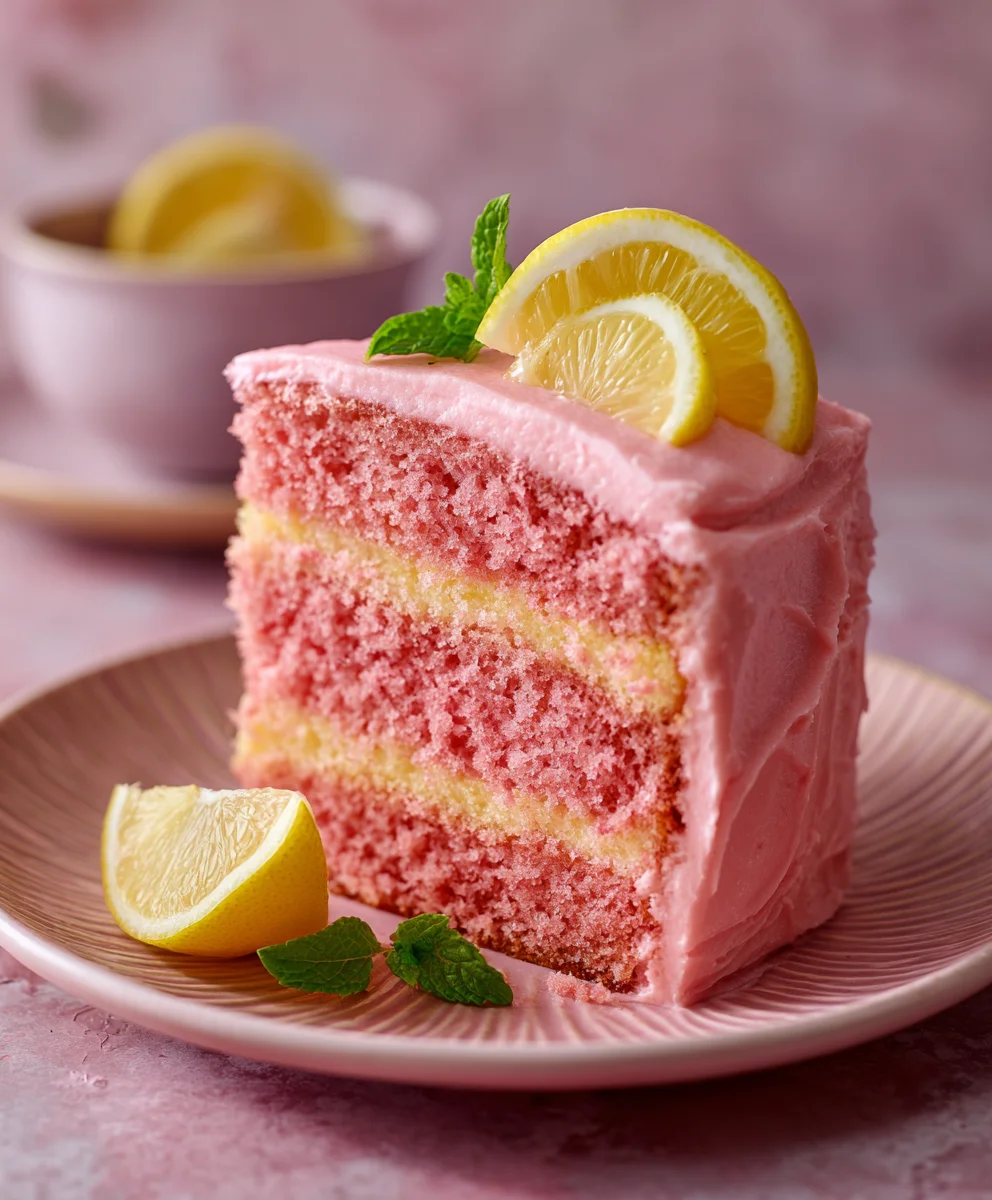
- Lemon Garnish: Arrange fresh lemon slices, wedges, or twists artfully on top of the cake. The bright yellow contrast against the pink is stunning.
- Berries: Fresh raspberries or sliced strawberries can add a pop of color and freshness, complementing the lemon flavors beautifully.
- Sparkle: A sprinkle of edible glitter or some festive sprinkles can add an extra touch of celebration to your Pink Lemonade Cake.
- Serve and Enjoy: Once decorated, your magnificent Pink Lemonade Cake is ready to be admired and, most importantly, devoured! Slice with a sharp, warm knife for clean cuts.
Tips for Pink Lemonade Cake Perfection
To ensure your Pink Lemonade Cake turns out absolutely perfect every single time, here are some invaluable tips gathered from years of baking experience. These little details can make a significant difference in the final taste, texture, and presentation of your beautiful dessert.
- Room Temperature Ingredients are Non-Negotiable: This is arguably the most crucial tip for any successful baking, especially for cakes and buttercreams. Softened butter and room temperature eggs and milk emulsify much better, creating a smooth, cohesive batter that traps air efficiently. This results in a lighter, fluffier cake. If your butter is too cold, it won’t cream properly; if it’s too warm, it will be greasy. For eggs and milk, simply take them out of the refrigerator an hour or two before you plan to bake.
- Measure Flour Correctly: Do not scoop flour directly from the bag with your measuring cup. This compacts the flour, leading you to use too much, which can result in a dry, dense cake. Instead, spoon the flour into your measuring cup and then level it off with a straight edge. Better yet, use a kitchen scale for the most accurate measurement (360g for 3 cups of all-purpose flour).
- Do Not Overmix the Batter: Once you start adding the dry ingredients to the wet, mix only until the flour streaks have just disappeared. Overmixing develops gluten, making your cake tough and chewy instead of tender and light. A few small lumps are perfectly fine; they’ll bake out.
- Don’t Rush the Cooling Process: It’s tempting to want to frost a cake as soon as it comes out of the oven, but resist! Your cake layers must be completely cool before frosting. Even slightly warm cake will melt your beautifully crafted buttercream, leading to a messy, unstable cake. Allow sufficient time for cooling on a wire rack, and if possible, chill the crumb-coated cake for at least 20-30 minutes for a cleaner final frosting layer.
- Quality Lemon Products: Since lemon is the star of our Pink Lemonade Cake, using fresh, high-quality lemons for juice and zest makes a world of difference. Avoid bottled lemon juice if possible, as it often contains preservatives that can alter the flavor profile. Organic lemons are a great choice if you can find them, ensuring a pure, bright lemon taste.
- Sift Powdered Sugar for Buttercream: Always sift your powdered sugar before adding it to the buttercream. Powdered sugar is notorious for clumping, and sifting ensures a silky-smooth, lump-free frosting. This will make your buttercream easy to spread and pipe beautifully.
- Achieve the Perfect Pink Hue with Gel Food Coloring: Gel food coloring is recommended over liquid food coloring. It’s more concentrated, so you need less to achieve a vibrant color, and it won’t thin out your batter or frosting. Start with a tiny drop and gradually add more until you reach your desired shade for both the cake (if coloring layers) and the buttercream.
- Storing Your Pink Lemonade Cake: This cake tastes best when enjoyed at room temperature, but if you have leftovers, cover them loosely and store them in the refrigerator for up to 3-4 days. Allow slices to come to room temperature for about 30 minutes before serving for the best flavor and texture. For longer storage, individual slices or the entire cake (unfrosted layers or frosted) can be tightly wrapped in plastic wrap and then aluminum foil and frozen for up to 1-2 months. Thaw in the refrigerator overnight.
- Practice Makes Perfect: Don’t get discouraged if your first cake isn’t absolutely perfect. Baking, especially decorating, is a skill that improves with practice. Each Pink Lemonade Cake you make will be better than the last!
Conclusion:
And there you have it, my friends! We’ve journeyed through the steps, celebrated the vibrant colors, and now it’s time to truly appreciate the masterpiece we’ve created. This isn’t just any dessert; it’s a slice of pure joy, a culinary hug, and a surefire way to brighten anyone’s day. I genuinely believe that this particular Pink Lemonade Cake recipe is an absolute must-try for so many wonderful reasons, and I’m just bursting with excitement for you to experience it yourself.
First and foremost, the flavor profile is simply unparalleled. Imagine that perfect balance of tart and sweet, reminiscent of a lazy summer afternoon spent sipping cool pink lemonade, but now in cake form! The light, zesty notes of lemon cut through the sweetness beautifully, ensuring every bite is refreshing and never cloying. Then there’s the texture – oh, the texture! It’s incredibly moist, wonderfully fluffy, and practically melts in your mouth, leaving you craving just one more slice (and trust me, you’ll be reaching for it). Beyond the taste, the visual appeal of this cake is undeniable. Its charming pink hue and elegant presentation make it a showstopper at any gathering, from casual backyard barbecues to sophisticated afternoon tea parties, or even just a delightful treat to make an ordinary Tuesday feel special. It’s a cake that doesn’t just taste good; it makes you feel good just by looking at it.
Now, let’s talk about making this delightful creation even more uniquely yours! While it’s utterly perfect as is, I always encourage a little creative flair. For serving suggestions, imagine a generous slice accompanied by a small scoop of creamy vanilla bean ice cream, allowing the cool, smooth texture to complement the cake’s light crumb. A dollop of fresh, lightly sweetened whipped cream and a scattering of fresh raspberries or sliced strawberries would also be absolutely divine, adding another layer of freshness and a touch of elegance. If you’re feeling adventurous, a few delicate sprigs of mint as a garnish can elevate its presentation even further, adding a pop of green against the vibrant pink.
Thinking about variations for future baking adventures? This recipe is wonderfully versatile. You could easily transform it into charming cupcakes, perfect for individual servings at a birthday party or potluck. Simply adjust the baking time and keep an eye on them! For an even simpler dessert, bake it as a sheet cake for easy slicing and serving a crowd. And while the current frosting is heavenly, don’t hesitate to experiment. A tangy cream cheese frosting would provide a richer counterpoint, or for a lighter touch, a simple lemon glaze drizzled over the top would be fantastic. You could even infuse your lemonade mixture with a tiny splash of rosewater for a subtle floral note that pairs beautifully with the lemon, adding an extra layer of sophistication.
My greatest hope is that this recipe inspires you to get into your kitchen, embrace the joy of baking, and create something truly special. There’s an immense satisfaction that comes from seeing a cake like this come to life, and even more so from sharing it with loved ones. I wholeheartedly encourage you to give this Pink Lemonade Cake a try. Don’t be shy! Once you’ve baked it, I would absolutely love to hear about your experience. Did you add any unique twists? How was it received by your family and friends? Please share your stories, your photos, and any tips you discovered along the way. You can tag me on social media or leave a comment below – I can’t wait to see your beautiful creations and hear your glowing reviews. Happy baking!
People Also Ask:
What makes a Pink Lemonade Cake pink?
The beautiful pink hue of this cake typically comes from a very small amount of red or pink food coloring added to the batter and sometimes the frosting. Some recipes might also achieve a natural pink tint by incorporating a reduction of raspberry or cranberry juice into the lemonade mixture, offering both color and a subtle berry note.
Can I use store-bought pink lemonade for this recipe?
Absolutely! Using good quality store-bought pink lemonade, either from concentrate or pre-mixed, is a fantastic shortcut that doesn’t compromise on flavor. Just make sure it’s a brand you enjoy drinking, as its flavor will be prominent in your cake. If using a concentrate, ensure you dilute it according to package instructions before adding it to the recipe.
What kind of frosting pairs best with Pink Lemonade Cake?
A classic lemon buttercream or a tangy cream cheese frosting infused with a little lemon zest and juice are incredibly popular and delicious choices. The rich creaminess of these frostings provides a wonderful contrast to the cake’s light, zesty flavor. For something lighter, a simple lemon glaze made with powdered sugar and lemon juice also works beautifully.
How long does Pink Lemonade Cake last, and how should I store it?
When properly stored, your Pink Lemonade Cake will typically last for about 3-4 days at room temperature in an airtight container. If it’s a very warm environment or if your frosting contains perishable ingredients like fresh cream cheese, it’s best to store the cake in the refrigerator. In the fridge, it can last up to a week. Always bring it to room temperature before serving for the best flavor and texture.
Can I make this Pink Lemonade Cake gluten-free or dairy-free?
Yes, with a few substitutions! To make it gluten-free, swap out the all-purpose flour for a good quality 1:1 gluten-free baking flour blend that contains xanthan gum. For a dairy-free version, use plant-based milk (like almond or oat milk), dairy-free butter or oil, and a dairy-free cream cheese or buttercream alternative for the frosting. Always check ingredient labels to ensure they meet your dietary needs.
Zesty Pink Lemonade Cake: The Perfect Refreshing Dessert
This Pink Lemonade Cake is a delightful experience that captures the essence of summer in every vibrant, tangy bite. It’s the perfect marriage of tart lemon and sweet berry, creating an incredibly invigorating flavor profile.
Ingredients
-
— For the Pink Lemonade Cake Layers —
-
3 cups (360g) all-purpose flour
-
2 cups (400g) granulated sugar
-
1 tablespoon baking powder
-
1/2 teaspoon salt
-
1 cup (226g) unsalted butter, softened
-
4 large eggs, room temperature
-
3/4 cup (180ml) whole milk, room temperature
-
1/4 cup (60ml) frozen pink lemonade concentrate, thawed
-
1/4 cup (60ml) fresh lemon juice
-
2 tablespoons fresh lemon zest
-
2 teaspoons pure vanilla extract
-
2-3 drops pink gel food coloring (optional)
-
— For the Pink Lemonade Simple Syrup —
-
1/2 cup (100g) granulated sugar
-
1/2 cup (120ml) water
-
1/4 cup (60ml) fresh lemon juice
-
1-2 drops pink gel food coloring (optional)
-
— For the Pink Lemonade Buttercream Frosting —
-
2 cups (452g) unsalted butter, softened
-
6-8 cups (720g-960g) powdered sugar, sifted
-
1/4 cup (60ml) fresh lemon juice
-
1 tablespoon fresh lemon zest
-
2-4 tablespoons (30-60ml) whole milk or heavy cream, as needed
-
1 teaspoon pure vanilla extract
-
3-5 drops pink gel food coloring
-
Pinch of salt (optional)
-
— For Garnish (Optional) —
-
Fresh lemon slices or wedges
-
Fresh raspberries or strawberries
-
Edible glitter or sprinkles
Instructions
-
Step 1
Preheat oven to 350°F (175°C). Grease and flour three 8-inch round cake pans; line bottoms with parchment paper. Whisk together flour, sugar, baking powder, and salt. In a stand mixer, beat softened butter until creamy. Gradually add sugar, beat until light and fluffy. Add eggs one at a time, then mix in lemon zest, lemon juice, pink lemonade concentrate, and vanilla extract. Add pink food coloring if desired. Alternately add dry ingredients and milk to the wet mixture, mixing on low until just combined (do not overmix). Divide batter evenly among pans. Bake 25-30 minutes, or until a toothpick comes out clean. Cool in pans 10-15 minutes, then invert onto a wire rack to cool completely. -
Step 2
In a small saucepan, combine sugar and water. Heat over medium until sugar dissolves. Remove from heat, stir in lemon juice and pink food coloring (optional). Cool syrup completely. Brush or spoon cooled syrup evenly over the tops of each cooled cake layer. -
Step 3
Beat softened butter in a stand mixer on medium-high for 5-7 minutes until pale and fluffy. Gradually add sifted powdered sugar on low speed, then beat on medium-high for 3-5 minutes until smooth. Add pinch of salt if desired. Reduce speed to low. Add lemon juice, lemon zest, and vanilla extract; mix until combined. Adjust consistency with 2-4 tbsp milk/cream as needed. Add 3-5 drops pink gel food coloring; mix until desired shade is reached. Beat on medium-high for 1 minute until fluffy. Taste and adjust flavors. -
Step 4
Level cooled cake layers if needed. Place one layer on serving plate. Brush with simple syrup. Spread a generous dollop of buttercream. Stack the second layer, brush with syrup, and frost. Repeat with the third layer, brushing with syrup. Apply a thin “crumb coat” of buttercream over the entire cake. Chill cake in refrigerator for 20-30 minutes until crumb coat is firm. Remove chilled cake. Apply remaining buttercream to top and sides, smoothing as desired. Decorate with optional garnishes like lemon slices, fresh berries, or edible glitter/sprinkles. Serve and enjoy. Store leftovers in the refrigerator; bring to room temperature before serving.
Important Information
Nutrition Facts (Per Serving)
It is important to consider this information as approximate and not to use it as definitive health advice.
Allergy Information
Please check ingredients for potential allergens and consult a health professional if in doubt.


Leave a Comment