
Healthy No Bake Oreos are about to revolutionize your snack game, offering that universally adored chocolate-and-cream delight without a single moment of oven time or the usual guilt. Who among us hasn’t cherished the simple joy of twisting apart a classic Oreo, savoring the creamy filling, or dunking it into a cold glass of milk? It’s a treat deeply embedded in our collective memory, a symbol of childhood and simple pleasures. However, as our palates evolve and our awareness of wholesome eating grows, many of us seek alternatives that align with a healthier lifestyle without sacrificing taste or that nostalgic comfort.
That’s precisely where this incredible recipe steps in. We’ve meticulously crafted a way to enjoy that iconic flavor profile using thoughtful, nourishing ingredients, making it an ideal option for anyone looking for a smarter indulgence. People absolutely adore this dish because it combines unparalleled convenience with irresistible taste and texture. Imagine a rich, chocolatey base layered with a smooth, sweet, vanilla-infused “cream” that delivers on all the familiar promises of its inspiration – chewy, satisfying, and utterly delicious – all without a drop of refined sugar or unhealthy fats. Whether you’re a busy parent needing a quick, wholesome treat for the kids, a student craving a study break snack, or simply someone who believes that delicious doesn’t have to mean detrimental, these Healthy No Bake Oreos are a true game-changer. They offer the perfect solution for satisfying those sweet cravings, proving that you can indeed have your cookie and eat it too, healthily!

Ingredients:
- For the Chocolate “Cookie” Discs:
- 1 ½ cups (about 20-25) Medjool dates, pitted (make sure they are soft and fresh; if not, soak in warm water for 10 minutes then drain well)
- 1 cup rolled oats (certified gluten-free if needed)
- ½ cup unsweetened cocoa powder (high-quality makes a big difference here!)
- ¼ cup unsweetened shredded coconut (optional, but adds a lovely texture and subtle flavor)
- 2 tablespoons almond butter (or any nut/seed butter of your choice, for richness and binding)
- 1 teaspoon pure vanilla extract
- Pinch of sea salt (enhances the chocolate flavor beautifully)
- For the Creamy Vanilla Filling:
- 1 cup raw cashews, soaked in hot water for at least 30 minutes, then drained thoroughly (or overnight in cold water)
- ¼ cup full-fat coconut milk (from a can, only the thick cream part) OR ½ cup plant-based milk (almond, soy, oat) for a lighter filling
- ¼ cup pure maple syrup (or agave nectar)
- 1 teaspoon pure vanilla extract (or 1/2 teaspoon vanilla bean paste for an intense vanilla burst)
- 2 tablespoons coconut oil, melted (helps the filling set firmly)
- Pinch of sea salt
Preparing the Chocolate Discs – The “Healthy No Bake Oreo” Base
- Gather Your Tools: Before we start, make sure you have a good food processor. This is essential for achieving that crumbly yet cohesive texture for our “Healthy No Bake Oreos” base. Also, grab a baking sheet lined with parchment paper – this will be our canvas for forming and chilling the cookie discs.
- Process the Dry Ingredients First: In the bowl of your food processor, add the rolled oats, unsweetened cocoa powder, unsweetened shredded coconut (if using), and a pinch of sea salt. Pulse these ingredients several times until the oats are broken down into a fine, flour-like consistency. This step is crucial for creating a smooth, “cookie-like” texture rather than chewy oatmeal. I find that about 30-60 seconds of pulsing usually does the trick, depending on your food processor’s power.
- Add the Wet Binders: Now, add your pitted Medjool dates, almond butter, and pure vanilla extract to the food processor. If your dates aren’t super soft, I highly recommend soaking them in warm water for about 10 minutes beforehand and then draining them very well. This makes them much easier to process and helps achieve a smoother dough.
- Blend Until a Dough Forms: Process the mixture again, initially pulsing, then letting it run continuously. At first, it will look like a crumbly mixture, but keep going! The dates and almond butter will gradually bind everything together. You’ll know it’s ready when the mixture starts to clump together and form a large ball or a sticky, cohesive dough that pulls away from the sides of the food processor. This usually takes a few minutes, so be patient. Don’t be afraid to scrape down the sides of the bowl with a spatula a few times to ensure everything is evenly incorporated. The goal is a rich, dark, and slightly sticky dough.
- Test the Dough’s Consistency: Take a small piece of the dough and press it between your fingers. It should hold together firmly without being overly crumbly or too wet. If it’s too dry and won’t hold shape, add a tiny bit (1/2 teaspoon at a time) of water or plant-based milk and process again until it reaches the right consistency. If it’s too wet, you can add another tablespoon of oats or cocoa powder, but this rarely happens if your dates are drained well.
- Forming the “Oreo” Discs: Now for the fun part! Pinch off small pieces of the dough – I aim for about 1 tablespoon per piece. Roll each piece into a smooth ball between your palms, then gently flatten it into a disc shape, similar in size and thickness to a classic Oreo cookie. Try to make them as uniform as possible for easy sandwiching later. You can use a cookie cutter for perfectly round shapes, but I prefer the rustic charm of hand-formed discs. Place each disc on your parchment-lined baking sheet. This recipe typically yields about 24-30 discs, which will make 12-15 “Healthy No Bake Oreos.”
- Chill Time for Firmness: Once all your discs are formed, transfer the baking sheet to the refrigerator and chill them for at least 30 minutes. This step is crucial. Chilling helps the discs firm up, making them easier to handle and preventing them from falling apart when we add the filling. It also allows the flavors to meld beautifully. You want them to be quite firm before moving on.
Crafting the Dreamy Vanilla Filling
- Prepare Your Cashews: If you haven’t already, ensure your cashews are properly soaked and drained. Soaking helps soften them significantly, leading to an incredibly smooth and creamy filling without any gritty texture. For quick soaking, place them in a bowl and cover with boiling hot water for at least 30 minutes, then drain thoroughly. For a longer soak, cover with cold water and let them sit overnight, then drain. A good drain is key to not thinning out your filling!
- Blend the Filling Ingredients: Transfer the drained cashews to a high-speed blender. Add the full-fat coconut milk cream (or plant-based milk), pure maple syrup, pure vanilla extract (or vanilla bean paste), melted coconut oil, and a pinch of sea salt.
- Achieve Ultimate Creaminess: Blend on high speed, scraping down the sides of the blender jar frequently with a spatula. This might take a few minutes, so be patient. The goal here is a perfectly smooth, velvety, and thick cream – absolutely no cashew pieces should remain. If your blender is struggling, add an extra tablespoon of plant-based milk at a time, but only if absolutely necessary, as we want a thick filling that will set well. The coconut oil helps immensely with the setting process. You’ll notice the mixture becoming wonderfully thick and luxurious as it blends.
- Taste and Adjust: Once smooth, give the filling a taste. This is your chance to adjust the sweetness or vanilla intensity to your liking. If you prefer it sweeter, add a touch more maple syrup. If you want a stronger vanilla presence, another dash of extract will do the trick. Remember, this filling is the heart of our “Healthy No Bake Oreos,” so make it sing!
- Brief Chill for the Filling: If your filling seems too soft or warm from blending, pop it into the refrigerator for 15-20 minutes. This will help it firm up slightly, making it easier to pipe or spread evenly onto your chocolate discs.
Assembling Your “Healthy No Bake Oreos” and Final Chilling
- Retrieve the Chilled Discs: Take your firm chocolate discs out of the refrigerator. They should be sturdy and ready to be filled. Layout half of your discs face up on the parchment-lined baking sheet. These will be the bottom halves of your “Healthy No Bake Oreos.”
- Fill the Discs: There are a couple of ways to do this. For neatness and that classic Oreo look, you can spoon the vanilla filling into a piping bag fitted with a round tip (or simply snip off the corner of a Ziploc bag). Pipe a generous dollop of cream onto the center of half of your chocolate discs. Alternatively, you can use a small spoon or an offset spatula to spread the filling onto the discs. I personally love a thick layer of cream, so I tend to be quite generous! Aim for a consistent amount on each disc.
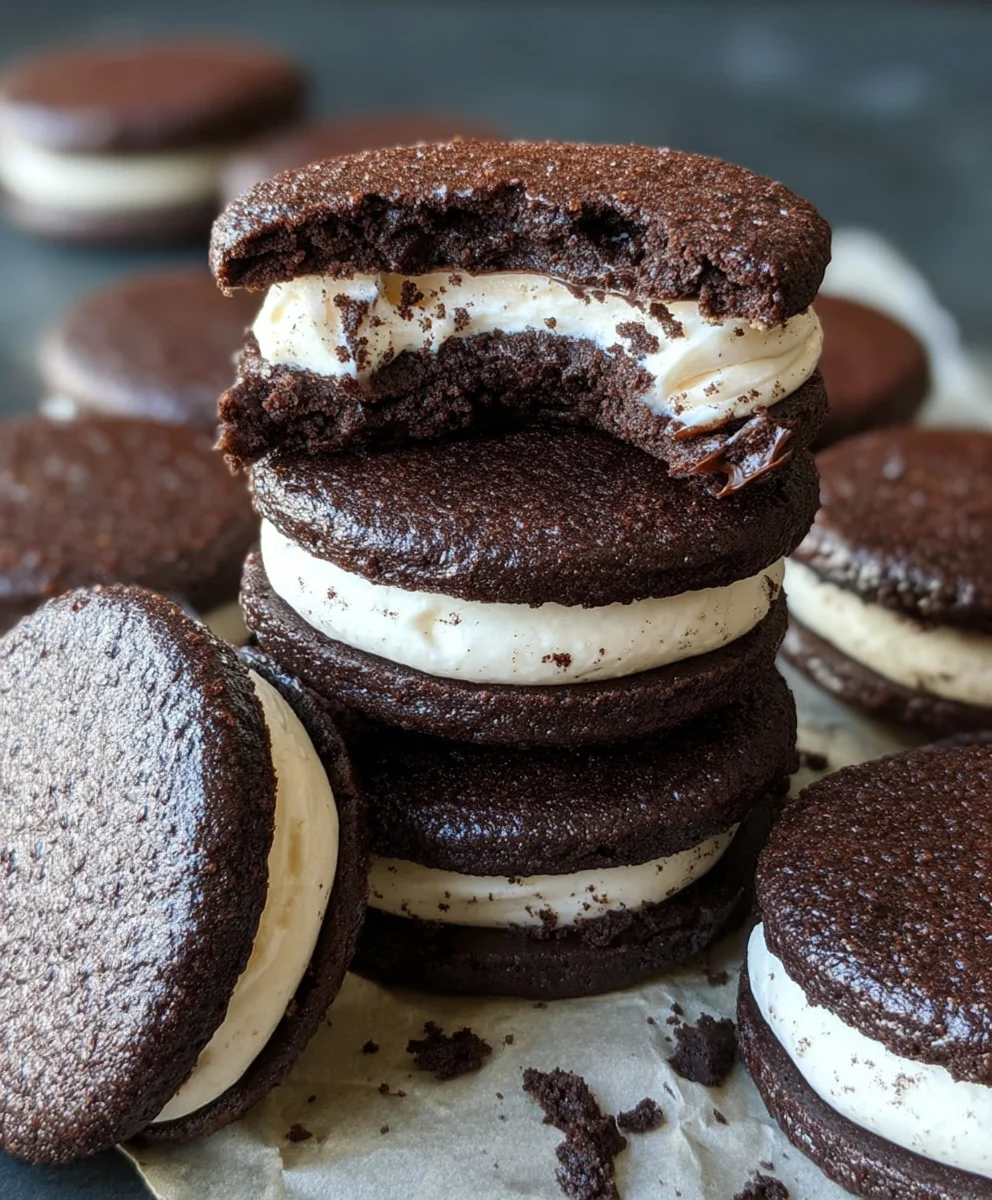
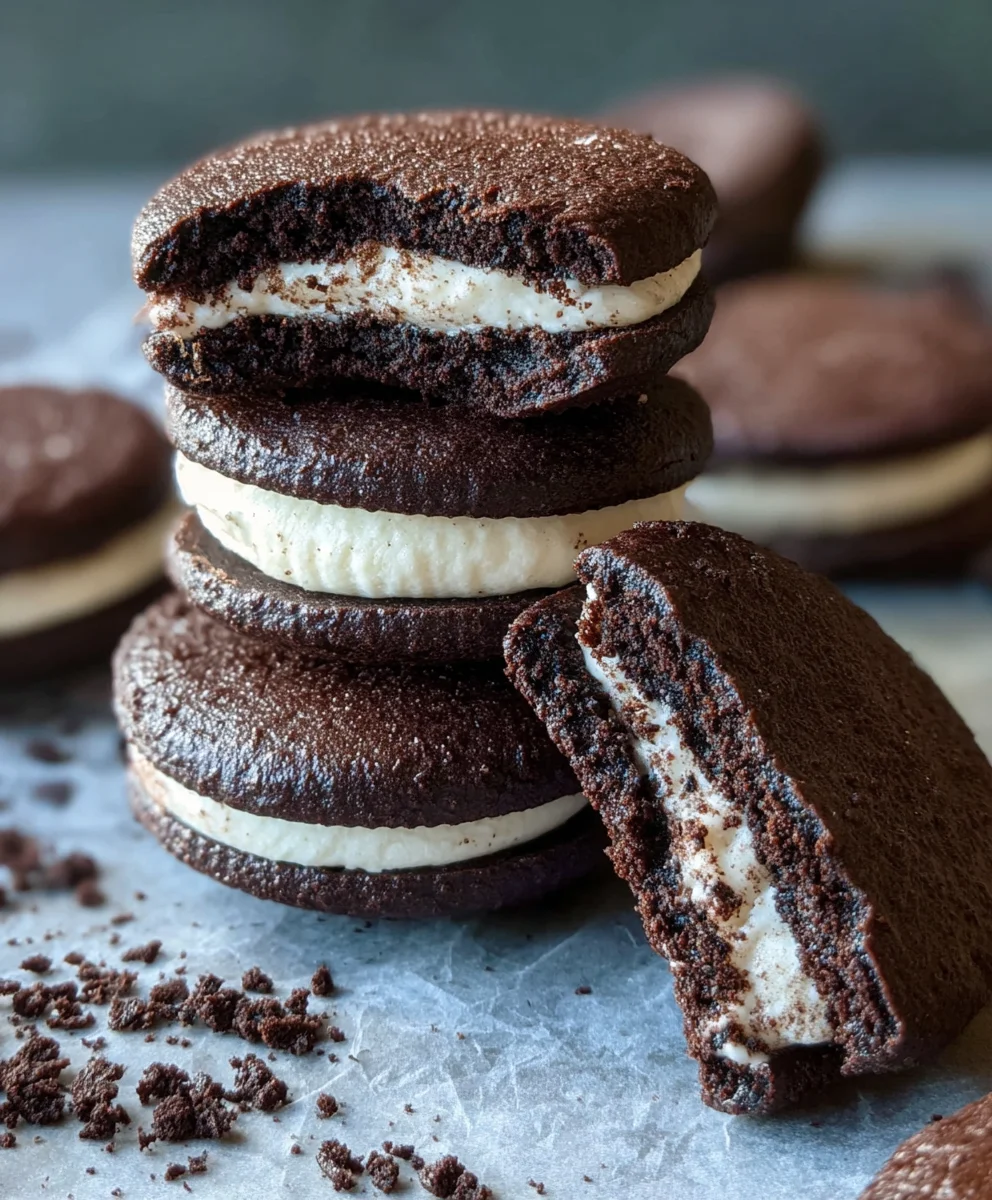
- Create the Sandwich: Carefully take another chocolate disc and gently place it on top of the cream-filled disc, pressing down very lightly until the cream just reaches the edges. Be gentle so you don’t crack the chocolate discs. You want to create a neat sandwich that looks just like those store-bought beauties, but these are so much better because they are Healthy No Bake Oreos!
- Final Chill for Setting: Once all your “Healthy No Bake Oreos” are assembled, return the baking sheet to the refrigerator for at least 1-2 hours. This final chill is incredibly important. It allows the coconut oil in the filling to fully set, creating a firm, creamy center that holds its shape beautifully. It also allows all the incredible flavors to meld together even more, intensifying the chocolate and vanilla notes. This step truly transforms them into proper “Healthy No Bake Oreos” that are sturdy and delightful to eat.
- Serving and Storage: Once firm, your homemade Healthy No Bake Oreos are ready to enjoy! They taste best when slightly chilled. These treats are perfect for a healthy snack, a guilt-free dessert, or even a lunchbox addition. I adore making a big batch and having them ready for whenever a sweet craving hits.
- Storage Instructions: Store any leftover “Healthy No Bake Oreos” in an airtight container in the refrigerator for up to one week. The flavors will deepen over time, and the texture will remain perfectly firm. You can also freeze them for up to a month – just be sure to separate layers with parchment paper to prevent sticking. When ready to enjoy from the freezer, let them thaw for about 10-15 minutes at room temperature for the best texture. They hold up surprisingly well, making them an excellent meal-prep friendly dessert.
-
Tips for Success and Variations:
- Date Quality: Always use fresh, soft Medjool dates for the best results. Dry dates will make your dough crumbly and hard to work with.
- Cocoa Powder: Using a high-quality, unsweetened cocoa powder will elevate the chocolate flavor significantly. I often use Dutch-processed cocoa for a darker color and smoother taste.
- Spice It Up: For a delightful twist, add a tiny pinch of cayenne pepper to the chocolate dough for a Mexican chocolate kick, or a pinch of cinnamon for warmth. A few drops of peppermint extract in the filling can turn these into a mint chocolate “Healthy No Bake Oreo” dream!
- Nut-Free Option: If you have nut allergies, swap the almond butter for sunflower seed butter (SunButter) and ensure your plant-based milk is nut-free (like oat milk).
- Decorative Touch: For an extra fancy look, you can finely crush some extra oats or shredded coconut and gently roll the edges of the filled cookies in them before the final chill. This adds a lovely textural element.
I truly believe these Healthy No Bake Oreos will become a staple in your kitchen. They are so incredibly satisfying, surprisingly easy to make, and a much healthier alternative to store-bought cookies. Enjoy every delicious, guilt-free bite!
Conclusion:
Well, there you have it! We’ve journeyed together through the simple yet utterly delightful process of creating what I truly believe will become a staple in your dessert repertoire. If you’ve been searching for that perfect guilt-free indulgence, something that satisfies your sweet tooth without derailing your wellness goals, then this recipe for Healthy No Bake Oreos is precisely what you need in your life. It’s a game-changer, plain and simple.
What makes these treats an absolute must-try? Firstly, their sheer convenience is unmatched. In a world where time is a precious commodity, the “no-bake” aspect is a gift. No oven preheating, no anxious waiting, just quick mixing, chilling, and pure enjoyment. You can whip up a batch in under 20 minutes of active prep time, making them ideal for last-minute cravings, spontaneous get-togethers, or simply when you need a little pick-me-up without the fuss. Secondly, let’s talk about the flavor and texture. We’re not just talking about a healthy alternative; we’re talking about a genuinely delicious treat. The rich cocoa combined with the creamy filling creates that iconic, comforting taste that we all associate with our favorite sandwich cookies, but with a wonderfully wholesome twist. Each bite offers a delightful contrast – a slightly firm, crumbly exterior giving way to a smooth, sweet center. It’s truly satisfying and surprisingly sophisticated for such a straightforward recipe.
But beyond the taste and convenience, the real star here is the incredible flexibility and health-conscious approach. By using natural sweeteners and wholesome ingredients, we’ve transformed a classic into something you can feel genuinely good about eating and serving to your loved ones. You’ll find yourself reaching for these instead of less nutritious options, knowing you’re nourishing your body while still indulging in pure bliss.
Now, let’s talk about making these your own. While they are perfect straight from the fridge, there are so many ways to elevate your Healthy No Bake Oreos experience. Imagine crumbling them over a scoop of vanilla bean or mint chocolate chip ice cream for an instant upgrade to any dessert. Or, for a more virtuous treat, sprinkle them over a bowl of Greek yogurt with some fresh berries – it adds a delightful crunch and a burst of flavor. For the ultimate party platter, arrange them alongside fresh fruit, nuts, and perhaps a small bowl of melted dark chocolate for dipping. A sprinkle of sea salt immediately after dipping can take them to an entirely new level of gourmet.
Don’t be afraid to experiment with variations either! For a touch of festive cheer, try adding a tiny drop of peppermint extract to the filling around the holidays. Or, for an autumnal twist, a pinch of pumpkin pie spice would be absolutely divine. If you’re a fan of citrus, a hint of orange zest in the chocolate base can add a surprisingly bright and refreshing note. Consider swapping out a portion of the almond flour for oat flour for a different texture, or incorporating finely chopped nuts into the base for an extra layer of crunch and healthy fats. The possibilities are truly endless, limited only by your imagination.
I truly hope you’re as excited to try this recipe as I am to share it with you. There’s a unique joy in creating something delicious and wholesome from scratch, and these Healthy No Bake Oreos deliver on all fronts. So, go ahead, gather your ingredients, set aside a few moments, and treat yourself to this incredible dessert. Once you’ve made them – and trust me, you will – I would absolutely love to hear about your experience! Did you stick to the original recipe, or did you put your own spin on it? What were your favorite serving suggestions? Please, share your creations and thoughts in the comments below, or better yet, tag me on social media. Let’s spread the word about these amazing, guilt-free delights! Happy baking… or rather, happy no-baking!
Frequently Asked Questions (FAQs)
Are these “Healthy No Bake Oreos” actually healthy?
Yes, absolutely! Our version focuses on using wholesome, natural ingredients that are significantly more nutritious than traditional store-bought cookies. We opt for natural sweeteners like maple syrup or dates instead of refined sugars, and healthy fats from ingredients like almond butter or coconut oil. The “healthy” aspect comes from avoiding processed ingredients, minimizing refined sugars, and incorporating ingredients that offer fiber, healthy fats, and some protein, making them a much better choice for an everyday treat.
How long do these Healthy No Bake Oreos last, and how should I store them?
When stored properly in an airtight container in the refrigerator, these delicious treats will maintain their freshness and delightful texture for up to one week. If you want to prepare them further in advance or simply have a stash ready for longer, they also freeze beautifully. Place them in a single layer on a parchment-lined baking sheet until firm, then transfer them to a freezer-safe bag or container. They can be stored in the freezer for up to one month and are surprisingly tasty straight from the freezer!
Can I make these Healthy No Bake Oreos vegan or gluten-free?
Great news! This recipe is inherently both vegan and gluten-free, provided you use the appropriate ingredients. The base and filling ingredients are naturally plant-based (oat flour/almond flour, cocoa powder, nut butter, maple syrup, etc.) and free from animal products. For gluten-free assurance, just ensure your oats are certified gluten-free if you’re using oat flour, and all other ingredients like cocoa powder and nut butters are certified gluten-free if cross-contamination is a concern for severe allergies. It’s a wonderful recipe that caters to various dietary needs without compromising on flavor!
What if I don’t have almond butter? Can I use another nut butter?
Absolutely! The beauty of this recipe lies in its adaptability. While almond butter provides a wonderful subtle flavor and creamy texture, you can easily substitute it with other nut butters. Cashew butter works excellently for a similar mild flavor, and peanut butter will give them a more pronounced, classic peanut butter-chocolate taste, which is always a crowd-pleaser. Just ensure your chosen nut butter is smooth and natural, without added sugars or oils, for the best results and to maintain the “healthy” integrity of the recipe.
What makes them “no bake”? Do I still have to cook anything?
The “no bake” title means exactly that – no oven required! You won’t be cooking any part of this recipe. The process involves simply mixing the ingredients for the base and the filling, then chilling them in the refrigerator or freezer to allow them to firm up. This method not only saves time and energy but also makes it a fantastic recipe for warmer months when you don’t want to turn on your oven, or for those who are new to baking and want an easy, foolproof dessert. It’s all about simple assembly and patience while they chill!
Healthy No Bake Oreos
Enjoy the classic chocolate-and-cream delight of Oreos without baking or guilt, crafted with nourishing ingredients for a healthier, quick, and easy sweet treat.
Ingredients
-
1 ½ cups pitted Medjool dates
-
1 cup rolled oats
-
½ cup unsweetened cocoa powder
-
¼ cup unsweetened shredded coconut (optional)
-
2 tablespoons almond butter
-
1 teaspoon pure vanilla extract
-
Pinch of sea salt
-
1 cup raw cashews, soaked & drained
-
¼ cup full-fat coconut milk (thick cream part) OR ½ cup plant-based milk
-
¼ cup pure maple syrup
-
1 teaspoon pure vanilla extract
-
2 tablespoons melted coconut oil
-
Pinch of sea salt
Instructions
-
Step 1
For chocolate discs: In a food processor, pulse oats, cocoa powder, shredded coconut (if using), and sea salt until oats are finely ground. Add pitted Medjool dates, almond butter, and vanilla extract; process until a cohesive, sticky dough forms, scraping down sides as needed. -
Step 2
Pinch off 1 tablespoon of dough, roll into a ball, and flatten into a disc (aim for 24-30 discs). Place on a parchment-lined baking sheet and chill in the refrigerator for at least 30 minutes to firm up. -
Step 3
For vanilla filling: Drain soaked cashews thoroughly. In a high-speed blender, combine cashews, full-fat coconut milk cream (or plant-based milk), pure maple syrup, pure vanilla extract, melted coconut oil, and a pinch of sea salt. Blend until perfectly smooth, velvety, and thick. If too soft, chill for 15-20 minutes. -
Step 4
Assemble the Oreos: Retrieve chilled chocolate discs. Spoon or pipe a generous dollop of vanilla filling onto the center of half of the discs. Gently top with the remaining chocolate discs, pressing lightly to form neat sandwiches. -
Step 5
{‘@type’: ‘HowToStep’, ‘text’: “Final chill and serve: Return assembled ‘Oreos’ to the refrigerator for 1-2 hours. This allows the filling to fully set and flavors to meld. Serve chilled.”} -
Step 6
Storage: Store in an airtight container in the refrigerator for up to 1 week. For longer storage, freeze for up to 1 month, separating layers with parchment paper. Thaw briefly at room temperature before enjoying from frozen.
Important Information
Nutrition Facts (Per Serving)
It is important to consider this information as approximate and not to use it as definitive health advice.
Allergy Information
Please check ingredients for potential allergens and consult a health professional if in doubt.


Leave a Comment