
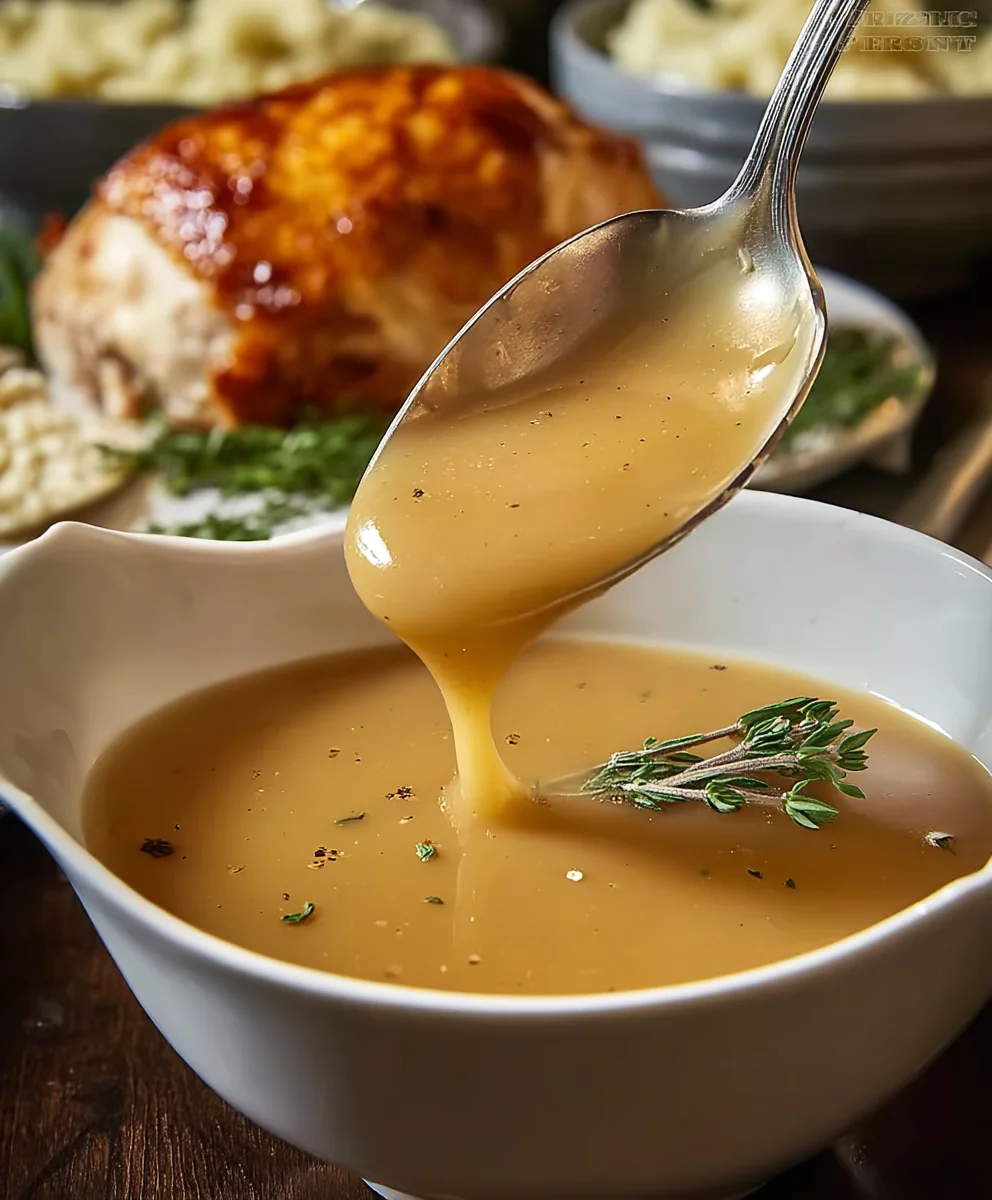
Perfect Turkey Gravy is more than just a condiment; it’s the undisputed hero of any holiday spread, transforming a delightful meal into an unforgettable feast. I know, we’ve all experienced the disappointment of a thin, bland, or lumpy gravy that just doesn’t do justice to a beautifully roasted turkey. But imagine, for a moment, a rich, velvety elixir, brimming with deep, savory flavors, a golden stream that elegantly coats every morsel on your plate. This isn’t just a dream; it’s entirely achievable!
Historically, gravy has been a cornerstone of celebratory meals, particularly during Thanksgiving and Christmas, symbolizing warmth, generosity, and the joyous culmination of a well-prepared dinner. It’s the essential element that brings together the succulent turkey, fluffy mashed potatoes, and savory stuffing into a harmonious symphony of taste and texture that families cherish year after year. People adore it because it adds that essential layer of moisture and an intense depth of umami that elevates every single bite, making the entire dining experience truly sublime.
Achieving that elusive Perfect Turkey Gravy is simpler than you might think, and I’m absolutely thrilled to guide you through the process, ensuring your next holiday meal is crowned with this magnificent, flavor-packed masterpiece.

Ingredients:
- For the Drippings & Roux Foundation:
- 4-6 tablespoons unsalted butter (if using drippings with less fat, or as a base)
- 4-6 tablespoons all-purpose flour
- Up to 2 cups reserved turkey drippings, separated from fat (aim for about 1/2 cup fat-free drippings initially)
- For the Liquid Base:
- 4-6 cups turkey stock or low-sodium chicken broth (homemade is ideal, but good quality store-bought works)
- 1/2 cup dry white wine (such as Sauvignon Blanc or Pinot Grigio) – optional, but highly recommended for depth of flavor
- For Seasoning & Enhancements:
- Kosher salt, to taste
- Freshly ground black pepper, to taste
- 1-2 teaspoons Worcestershire sauce (optional, for umami)
- 1/2 teaspoon soy sauce (optional, for added depth, use sparingly)
- Pinch of sugar (optional, to balance flavors)
- A sprig of fresh thyme or sage (for infusing flavor, removed before serving)
- Fresh chopped parsley or thyme (for garnish)
Gathering Your Foundation for Perfect Turkey Gravy
-
Preparing Your Turkey Drippings: The Essential First Step
The very first step on our journey to achieve the most Perfect Turkey Gravy begins immediately after your magnificent turkey comes out of the oven. This is where the magic truly starts! Carefully pour all the glorious drippings from your roasting pan into a heatproof bowl or, even better, a fat separator. Now, if you don’t have a fat separator, don’t fret! You can simply pour the drippings into a tall, narrow container and allow the fat to rise to the top. This separation can take a little time, so patience is key here. I often pop mine into the fridge for about 15-20 minutes to speed up the process, which helps the fat solidify slightly and makes skimming much easier. You’ll want to carefully skim off the rendered turkey fat from the top, reserving a few tablespoons if your drippings are particularly lean, and set aside the flavorful, concentrated liquid drippings. These drippings are pure gold, packed with incredible roasted turkey flavor that will form the backbone of your gravy. Don’t discard those amazing browned bits stuck to the bottom of your roasting pan either; they are flavor powerhouses and we’ll be incorporating them very soon! Aim to have about 1 to 1.5 cups of fat-free drippings. If you find yourself with less, you can supplement with additional turkey or chicken stock to reach the desired volume later, but use as much of the real deal as you can get your hands on. Remember: good gravy starts with good drippings!
What if I don’t have enough drippings?
This is a common scenario, especially with smaller turkeys or if your bird didn’t release much liquid. If your drippings are sparse, don’t panic! You can still make a truly Perfect Turkey Gravy. Instead of relying solely on turkey drippings for the fat, you’ll start with more unsalted butter in your saucepan. For the liquid, lean heavily on high-quality turkey or chicken stock. You can also quickly whip up a homemade stock with the turkey neck and giblets (excluding the liver, which can make things bitter) if you have them. Simply simmer them in a small saucepan with an onion quarter, a carrot, a celery stalk, a bay leaf, and enough water to cover for about an hour. Strain, and you’ll have a wonderfully flavorful base.
Crafting the Roux: The Heart of Your Perfect Turkey Gravy
-
Initiating the Roux: Building Your Gravy’s Foundation
Now that our drippings are prepped, it’s time to create the roux, which is the essential thickener and flavor base for any Perfect Turkey Gravy. In a medium-sized, heavy-bottomed saucepan set over medium heat, melt your unsalted butter. If you have reserved turkey fat from the drippings (and it’s clean and flavorful), you can substitute some of the butter with it for an even richer turkey flavor. Once the butter is fully melted and shimmering, sprinkle in the all-purpose flour. Immediately begin whisking vigorously and continuously. We’re aiming for a smooth, thick paste. Continue whisking for 2-3 minutes, ensuring the flour cooks evenly and begins to lose its raw, pasty smell. For a turkey gravy, we typically want a blonde or light golden roux. This means cooking it just enough to eliminate the raw flour taste without letting it get too dark, which would impart a nutty flavor that might not be ideal for the delicate turkey profile. A blonde roux ensures a neutral background for the robust turkey flavors to shine.
Avoiding Lumps: The key to a smooth roux and, by extension, a smooth gravy, is constant whisking and ensuring the flour is fully incorporated into the fat. If you notice any lumps forming, press them against the side of the pan with your whisk to break them up. The cooking time for the roux is critical; undercooked flour will result in a pasty-tasting gravy, while overcooked flour can make the gravy too dark and bitter.
Building Layers of Flavor into Your Perfect Turkey Gravy
-
Deglazing the Roasting Pan: Extracting Every Drop of Flavor
This step is optional, but I genuinely believe it’s one of the secret weapons for an absolutely Perfect Turkey Gravy. While your roux is gently cooking, take your roasting pan (the one with all those delicious caramelized bits stuck to the bottom!) and place it over two burners on your stovetop over medium heat. Pour in about 1/2 cup of dry white wine. The wine will immediately begin to sizzle, and you should use a wooden spoon or a flat-edged spatula to scrape up all those beautiful browned bits, also known as “fond.” These bits are concentrated flavor bombs! As the wine simmers, it will dissolve the fond, creating an incredibly rich, flavorful liquid. Let this mixture simmer for 2-3 minutes, allowing the alcohol to cook off and the liquid to reduce slightly, intensifying the flavor. If you prefer not to use wine, you can use an equal amount of turkey or chicken stock for this step. Once reduced, carefully pour this flavorful liquid directly into your saucepan with the roux. This adds another incredible layer of savory depth that truly distinguishes homemade gravy.
-
Gradually Incorporating Liquids: The Path to Silky Smooth Gravy
With your roux ready and perhaps some deglazed pan drippings added, it’s time to bring your gravy to life with the liquids. This stage requires a bit of patience and a gentle hand. Slowly, very slowly, begin to whisk in your reserved turkey drippings (the fat-free liquid). Add about a quarter cup at a time, whisking continuously and vigorously after each addition to fully incorporate the liquid into the roux. The mixture will initially be very thick, almost pasty, but as you continue to add liquid, it will gradually loosen up and become smooth.
Once all the turkey drippings are incorporated, begin adding your turkey stock or broth in the same gradual manner – a cup at a time, whisking until smooth before adding more. The key here is not to rush. Adding cold liquid too quickly to a hot roux is a surefire way to create a lumpy gravy, and we are striving for nothing less than Perfect Turkey Gravy! As you continue to whisk and add liquid, you’ll notice the gravy starting to thicken as it heats. Continue adding stock until you’ve reached your desired consistency, or used up to 6 cups of stock. The gravy should be smooth, velvety, and coat the back of a spoon. If you find it’s thickening too much, you can always add a bit more warm stock.
Simmering and Seasoning Your Perfect Turkey Gravy
-
Simmering to Perfection: Developing Depth and Texture
Once all your liquids are incorporated and your gravy has started to take shape, bring it to a gentle simmer over medium-low heat. This is where the magic really happens – the flavors meld, and the gravy achieves its final, glorious texture. Allow the gravy to simmer for 5-10 minutes, stirring occasionally to prevent it from sticking to the bottom of the pan. During this time, the flour in the roux will fully hydrate, and the gravy will thicken beautifully. You’ll notice it becoming glossy and rich. I always look for that moment when it coats the back of my spoon without dripping off too quickly – that’s often my ideal consistency for a Perfect Turkey Gravy. If it’s too thin for your liking after simmering for a while, you can let it reduce further, or, if you’re in a hurry, you can make a quick cornstarch or flour slurry (more on that in the troubleshooting section). Conversely, if it becomes too thick, simply whisk in a splash more warm turkey stock or even a little hot water until it reaches your preferred pourable consistency.
Pro Tip for Flavor Infusion: If you’re using fresh herbs like a sprig of thyme or sage, now is a great time to drop it into the simmering gravy. It will infuse a subtle, aromatic layer of flavor. Just remember to remove it before serving!
-
Seasoning for Peak Flavor: The Final Polish
This is arguably the most crucial step in making your Perfect Turkey Gravy truly sing. Before adding any extra seasoning, taste your gravy. Seriously, take a good spoonful and really savor it. Your turkey drippings and stock likely already contain some salt, so you need to be mindful. Now, begin to season with kosher salt and freshly ground black pepper. Add a pinch of salt, stir, wait a few seconds, and taste again. Repeat this process until the flavors truly pop. It’s much easier to add more salt than to fix overly salty gravy.
Optional Enhancements for Ultimate Depth:
- Worcestershire Sauce: A teaspoon or two of Worcestershire sauce can add a fantastic layer of savory umami and a subtle tang. It’s a secret weapon for many chefs.
- Soy Sauce: Just a tiny splash (about 1/2 teaspoon) of low-sodium soy sauce can further enhance the deep, savory notes without making the gravy taste like soy sauce. It simply boosts the overall richness.
- Pinch of Sugar: Sometimes, a tiny pinch of granulated sugar (seriously, just a pinch!) can help to balance all the savory flavors, especially if your drippings were quite rich or slightly bitter. It rounds out the profile without making the gravy sweet.
Add these optional ingredients one at a time, tasting after each addition to ensure you’re building the flavor profile exactly to your liking. The goal is a perfectly balanced, deeply savory, and incredibly satisfying gravy that complements your turkey without overpowering it.
Finishing Touches and Serving Your Perfect Turkey Gravy
-
Straining for Unrivaled Smoothness (Highly Recommended)
While not strictly necessary, straining your gravy is a step I wholeheartedly endorse for achieving that ultra-smooth, restaurant-quality Perfect Turkey Gravy. It removes any potential lumps from the roux, stray herb bits, or any small, unsavory pieces from the pan drippings, resulting in a beautifully velvety texture. Simply pour the gravy through a fine-mesh sieve set over a clean bowl or back into a clean saucepan. Use the back of a spoon or a small ladle to press any solids in the sieve, extracting every last drop of flavorful liquid. This step takes just a minute or two but makes a significant difference in the final presentation and mouthfeel of your gravy.
-
Final Adjustments and Presenting Your Masterpiece
After straining, your gravy might have cooled down a bit. Gently reheat it over low heat, stirring occasionally, until it’s simmering again and wonderfully warm. This is your last chance for any final consistency adjustments. If it’s too thick, add a touch more warm stock or water. If it’s too thin, a quick simmer will help it reduce, or you can use one of the thickening tricks mentioned below. Give it one last taste test and adjust seasoning if needed. Transfer your glorious Perfect Turkey Gravy to a warm gravy boat. A little trick is to warm your gravy boat with hot water for a few minutes before pouring in the gravy; this keeps it warmer for longer at the table. Garnish with a sprinkle of freshly chopped parsley or thyme for a pop of color and fresh aroma. Serve immediately, generously drizzled over slices of turkey, mashed potatoes, stuffing, or anything else your heart desires!
Storage: Leftover gravy can be stored in an airtight container in the refrigerator for up to 3-4 days. To reheat, gently warm it on the stovetop over low heat, whisking frequently, and add a splash of stock or water if it has thickened too much.
Troubleshooting Your Perfect Turkey Gravy
Even the most experienced cooks can encounter a few bumps on the road to a truly Perfect Turkey Gravy. Don’t worry, most gravy problems have quick and easy solutions!
My Gravy is Too Thin!
This is a very common issue, but easily remedied.
- The Slurry Method (My Preferred Fix): In a small bowl, whisk together 1 tablespoon of cornstarch (or flour) with 2 tablespoons of cold water or cold stock until completely smooth. Make sure there are no lumps. Bring your thin gravy back to a gentle simmer. Slowly pour the slurry into the simmering gravy in a thin stream, whisking constantly. Continue to simmer and whisk for 1-2 minutes until the gravy thickens. If it’s still not thick enough, repeat with another half batch of slurry. Remember, cornstarch thickens more powerfully than flour, so start small.
- Reduction: If you have time and are confident in your existing flavor, simply let the gravy simmer gently, uncovered, for a longer period. As the water evaporates, the gravy will naturally reduce and thicken. Keep an eye on it to prevent scorching.
My Gravy is Too Thick!
This is often the easiest problem to solve!
- Add More Liquid: Simply whisk in a small amount of warm turkey stock, chicken broth, or even hot water, one tablespoon at a time, until your gravy reaches your desired consistency. Make sure to whisk thoroughly after each addition to fully incorporate the liquid and maintain smoothness.
My Gravy is Lumpy!
Lumps can happen, especially if the liquid was added too quickly to the roux or if the flour wasn’t fully incorporated.
- Whisk Vigorously: Sometimes, an extra minute or two of vigorous whisking can break up smaller lumps.
- Immersion Blender: My absolute favorite trick for lumpy gravy! If you have an immersion blender, carefully place it into the gravy and blend until perfectly smooth. This works wonders and is incredibly fast.
- Strain It: As mentioned in the finishing touches, pouring your gravy through a fine-mesh sieve is an excellent way to catch and remove any stubborn lumps, resulting in a silky-smooth gravy.
My Gravy is Lacking Flavor!
Sometimes, the drippings or stock might not be as robust as you hoped.
- Simmer Longer: Allowing the gravy to simmer for an extended period (10-15 minutes) can concentrate the existing flavors.
- Boost with Umami: Add another dash of Worcestershire sauce or a tiny splash of soy sauce. These are flavor enhancers that will deepen the savory notes.
- Season Aggressively (but Carefully): Re-taste and adjust salt and pepper. A little extra salt can often make flavors “pop.”
- Herb Infusion: Add a sprig of fresh thyme or sage to the simmering gravy for a few minutes, then remove.
- Concentrated Stock: If you have access to a good quality, concentrated turkey or chicken base, a small amount can be dissolved in a bit of hot water and added to the gravy.
My Gravy is Too Salty!
Oops! It happens.
- Add Unsalted Liquid: Whisk in a bit of unsalted turkey stock or water to dilute the saltiness.
- Potato Trick: This is an old-school trick. Cut a raw potato into a few chunks and add them to the simmering gravy for about 10-15 minutes. The potato will absorb some of the excess salt. Remember to remove the potato pieces before serving!
- Pinch of Sugar: A tiny pinch of sugar can sometimes help to balance out an overly salty flavor, though it won’t remove the salt, it can make it less noticeable.
With these tips and tricks, you are now fully equipped to tackle any gravy challenge and confidently create the most Perfect Turkey Gravy for your holiday feast or any meal that calls for its comforting presence. Enjoy!
Conclusion:
And there you have it, my friends! We’ve journeyed through the steps, explored the nuances, and unlocked the secrets to what I genuinely believe is the most exquisite, soul-warming gravy you’ll ever pour over your holiday feast, or indeed, any meal deserving of its rich embrace. This isn’t just a recipe; it’s a culinary experience designed to elevate your dishes from merely delicious to truly unforgettable. I am absolutely thrilled for you to try it because this isn’t just any gravy; this is your ticket to a truly extraordinary meal, a guaranteed crowd-pleaser that will have everyone asking for your secret. The depth of flavor we’ve built, the silken texture we’ve achieved, and the overall aroma that will fill your kitchen as you prepare this masterpiece are simply unparalleled.
What makes this particular recipe a must-try, you ask? Well, it’s the culmination of careful technique and a deep understanding of flavor building. We’ve meticulously utilized those precious turkey drippings, coaxing every ounce of savory goodness from them, blending them with aromatic vegetables and just the right amount of seasoning to create a symphony of taste. Forget thin, watery, or overly floury gravies; this one boasts a luxurious consistency that coats every morsel it touches, delivering a burst of umami that complements rather than overpowers. It’s comforting, it’s rich, and it perfectly balances savory notes with a hint of natural sweetness from the roasted turkey. Once you taste the difference that homemade, expertly crafted gravy makes, I promise you, there’s simply no turning back to store-bought alternatives. It’s an investment of a little time and love that pays dividends in flavor and happy faces around your table.
Serving Suggestions & Creative Variations to Elevate Your Meals
While this gravy is undeniably the star alongside a perfectly roasted turkey, its versatility extends far beyond Thanksgiving. Think of it as your secret weapon in the kitchen!
- The Classic Feast: Of course, generously douse your roast turkey, fluffy mashed potatoes, and savory stuffing with this golden elixir. It’s the essential component that brings all those holiday flavors together in harmonious bliss.
- Beyond the Bird: Don’t limit yourself! This gravy is phenomenal with roasted chicken, pork loin, or even a simple pan-seared steak. Its robust flavor can stand up to and enhance various meats.
- Vegetable Enhancement: Transform your everyday vegetables. Drizzle it over steamed green beans, roasted Brussels sprouts, or baked asparagus for an instant upgrade. It’s a fantastic way to make veggies more appealing, especially for picky eaters!
- Comfort Food Extraordinaire: Use it to make hot open-faced turkey sandwiches, a classic comfort food. Or, if you’re feeling adventurous, try making a gourmet poutine with crispy fries, cheese curds, and a generous pour of this incredible gravy.
Creative Variations to Make It Your Own:
- Herb Infusion: For an extra layer of aroma, gently simmer a few sprigs of fresh rosemary or thyme in your gravy during the final stages of cooking, then strain them out before serving.
- Mushroom Magic: Sauté finely diced mushrooms (cremini or shiitake work wonderfully) and add them to your gravy base with the flour for an earthy, umami-rich variation.
- Wine Enthusiast: Deglaze your roasting pan with a splash of dry white wine or even a good quality sherry before adding the broth for a more sophisticated flavor profile.
- Spicy Kick: A tiny pinch of cayenne pepper or a dash of hot sauce can add an unexpected but delightful warmth, especially if you like a little heat.
I genuinely encourage you to roll up your sleeves and give this recipe a try. You’ll be amazed at how simple it is to achieve such a spectacular result, and the pride you’ll feel when your family and friends rave about your culinary prowess is truly unmatched. This isn’t just about making gravy; it’s about crafting an experience, creating memories, and adding that final, perfect touch to your meals. So, gather your ingredients, follow my lead, and prepare to create the most delicious Perfect Turkey Gravy you’ve ever tasted. Once you’ve whipped up a batch, please come back and share your experience with me! I’d absolutely love to hear how it turned out for you, what variations you tried, or what wonderful dishes you served it with. Your feedback and stories inspire me, and I can’t wait to hear all about your gravy adventures!
People Also Ask:
How do I thicken turkey gravy without flour?
If you’re looking to thicken your gravy without flour or a roux, a common alternative is a cornstarch slurry. Simply mix 1 tablespoon of cornstarch with 2 tablespoons of cold water to form a smooth paste. Whisk this mixture into your simmering gravy a little at a time, allowing it to cook for a minute or two between additions, until you reach your desired consistency. Cornstarch provides a clear, glossy finish and is a great gluten-free option.
Can I make turkey gravy ahead of time?
Absolutely! Making turkey gravy ahead of time is a brilliant strategy, especially during busy holidays. You can prepare it up to 2-3 days in advance. Just be sure to store it in an airtight container in the refrigerator. When you’re ready to serve, gently reheat it on the stovetop over low heat, whisking constantly. If it’s too thick, you can thin it out with a little extra chicken or turkey broth, or even a splash of hot water.
How long does homemade turkey gravy last in the fridge?
Properly stored homemade turkey gravy will last in an airtight container in the refrigerator for 3 to 4 days. Always ensure it’s cooled completely before refrigerating to maintain freshness and safety.
Can I freeze leftover turkey gravy?
Yes, you can! Freezing is an excellent way to preserve leftover gravy. Allow the gravy to cool completely, then pour it into freezer-safe containers or heavy-duty freezer bags. You can also freeze it in ice cube trays for smaller, individual portions, then transfer the frozen cubes to a freezer bag. Frozen gravy will maintain its best quality for about 4 to 6 months. Thaw it in the refrigerator overnight and reheat gently on the stovetop, whisking well.
My gravy is lumpy, how can I fix it?
Lumpy gravy is a common kitchen woe, but it’s usually easy to fix! The best method is to use a fine-mesh sieve. Simply pour your gravy through the sieve into another saucepan, pressing down on any lumps with the back of a spoon to force the smooth gravy through. Another option is an immersion blender or a regular blender (be careful with hot liquids and blend in batches). Blending will make your gravy silky smooth.
What if my gravy tastes bland?
Bland gravy usually means it needs more seasoning! Don’t be afraid to taste and adjust. You can add more salt, freshly cracked black pepper, or a dash of your favorite herbs like dried sage or thyme. A splash of Worcestershire sauce or a tiny bit of soy sauce can also add a wonderful umami depth. Sometimes, a squeeze of lemon juice at the end can brighten all the flavors. If you have extra pan drippings or a rich turkey stock, adding more of that will certainly boost the flavor.
Can this recipe be made gluten-free?
Absolutely! To make this recipe gluten-free, simply substitute the all-purpose flour for an equal amount of a gluten-free all-purpose flour blend (look for one that’s designed for thickening sauces) or use cornstarch as a thickener. If using cornstarch, follow the slurry method mentioned in the “How do I thicken without flour?” FAQ. Ensure all other ingredients, like your broth, are also certified gluten-free.
Perfect Turkey Gravy Recipe: Rich & Flavorful Homemade Sauce
Perfect Turkey Gravy is more than just a condiment; it’s the undisputed hero of any holiday spread, transforming a delightful meal into an unforgettable feast. I know, we’ve all experienced the disappointment of a thin, bland, or lumpy gravy that just doesn’t do justice to a beautifully roasted turkey. But imagine, for a moment, a rich, velvety elixir, brimming with deep, savory flavors, a golden stream that elegantly coats every morsel on your plate. This isn’t just a dream; it’s entirely achievable!
Ingredients
-
4-6 tbsp unsalted butter
-
4-6 tbsp all-purpose flour
-
1-1.5 cups fat-free turkey drippings
-
4-6 cups turkey stock or low-sodium chicken broth
-
1/2 cup unsalted turkey stock (for deglazing)
-
Kosher salt, to taste
-
Freshly ground black pepper, to taste
-
1-2 tsp Worcestershire sauce (optional)
-
1/2 tsp soy sauce (optional)
-
Pinch of sugar (optional)
-
1 sprig fresh thyme or sage (optional, for infusing)
-
Fresh chopped parsley or thyme (for garnish, optional)
Instructions
-
Step 1
After roasting the turkey, pour drippings from the pan into a fat separator or tall container. Allow fat to separate (can chill for 15-20 minutes). Skim off the fat, reserving 1-1.5 cups of the fat-free liquid drippings. Keep browned bits in the roasting pan for deglazing. If drippings are sparse, use more butter for the roux and primarily good quality turkey/chicken stock for the liquid base. -
Step 2
In a medium saucepan over medium heat, melt butter (or reserved turkey fat). Sprinkle in flour and whisk continuously for 2-3 minutes to form a smooth, light golden roux. Cook until the raw flour smell disappears, ensuring no lumps. -
Step 3
{‘@type’: ‘HowToStep’, ‘name’: ‘Deglaze Roasting Pan (Optional but Recommended)’, ‘text’: “Place the roasting pan with browned bits over medium heat. Pour in 1/2 cup unsalted turkey stock. Scrape up all the ‘fond’ (browned bits) with a wooden spoon. Simmer for 2-3 minutes until reduced slightly, then carefully pour this flavorful liquid into the saucepan with the roux.”} -
Step 4
Slowly whisk the reserved fat-free turkey drippings into the roux, about 1/4 cup at a time, until smooth. Then gradually whisk in the 4-6 cups of turkey stock/broth, one cup at a time, ensuring each addition is smooth before adding more. Continue whisking until desired smooth, velvety consistency is reached, adding more warm stock if too thick. -
Step 5
Bring the gravy to a gentle simmer over medium-low heat. Simmer for 5-10 minutes, stirring occasionally, until flavors meld and it reaches a glossy, thick consistency that coats the back of a spoon. If using, add a sprig of fresh thyme or sage to infuse flavor, then remove before serving. -
Step 6
Taste the gravy. Season with kosher salt and freshly ground black pepper, adjusting gradually to taste. For enhanced depth, stir in Worcestershire sauce, soy sauce, and/or a pinch of sugar, tasting after each addition to achieve desired flavor balance. -
Step 7
For an ultra-smooth gravy, pour it through a fine-mesh sieve into a clean bowl or saucepan, pressing any solids to extract all liquid. This removes lumps or herb bits. -
Step 8
Gently reheat gravy if needed. Make final consistency adjustments: add warm stock/water if too thick, simmer to reduce if too thin. Taste and adjust seasoning. Transfer to a warm gravy boat, garnish with fresh parsley or thyme, and serve immediately. Store leftovers in the refrigerator for 3-4 days, reheating gently with a splash of liquid if needed.
Important Information
Nutrition Facts (Per Serving)
It is important to consider this information as approximate and not to use it as definitive health advice.
Allergy Information
Please check ingredients for potential allergens and consult a health professional if in doubt.

Leave a Comment