
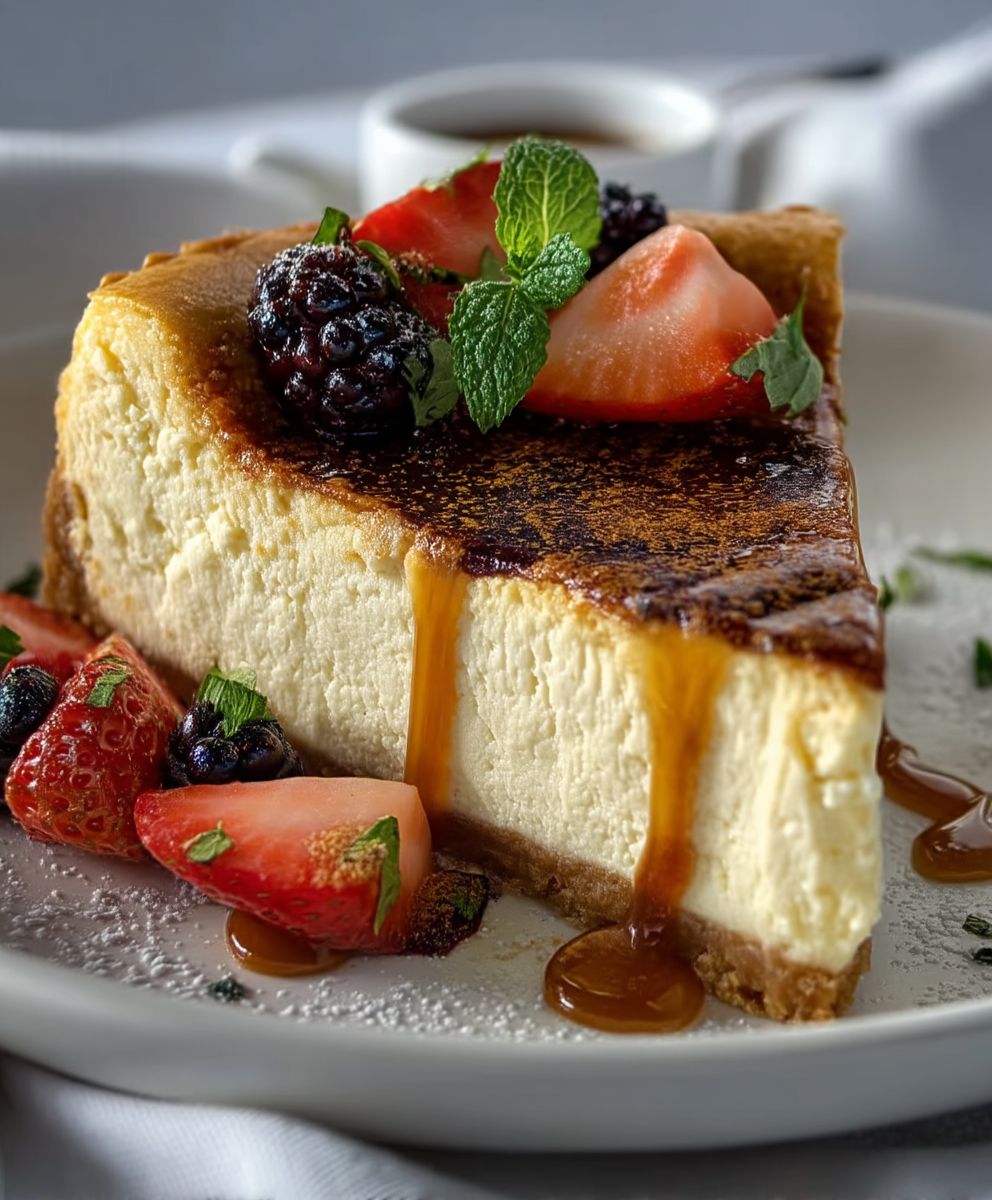
Vanilla Bean Cheesecake: just the name conjures images of creamy, decadent perfection, doesn’t it? Forget everything you thought you knew about ordinary desserts because this isn’t just cheesecake; it’s an experience. Imagine sinking your fork into a velvety smooth slice, the subtle sweetness of vanilla dancing on your tongue, all balanced by a rich, buttery crust. It’s a symphony of flavors and textures that will leave you craving more.
Cheesecake, in its various forms, has a history stretching back to ancient Greece, where it was even served to athletes during the Olympic Games! While our modern Vanilla Bean Cheesecake has evolved significantly, the core concept of a creamy cheese-based dessert remains a timeless classic. It’s a dessert that transcends generations and cultures, finding its place on celebratory tables worldwide.
But what makes Vanilla Bean Cheesecake so universally loved? Beyond its historical appeal, it’s the sheer indulgence it offers. The creamy texture is simply irresistible, and the vanilla bean adds a depth of flavor that elevates it beyond your average cheesecake. Plus, while it may seem intimidating to make, with the right recipe and a few simple tips, you can create a show-stopping dessert that will impress your friends and family. Get ready to embark on a baking adventure that will reward you with the most delightful treat imaginable!

Ingredients:
- For the Crust:
- 1 ½ cups graham cracker crumbs (about 12 full sheets)
- 5 tablespoons (70g) unsalted butter, melted
- ¼ cup (50g) granulated sugar
- Pinch of salt
- For the Cheesecake Filling:
- 32 ounces (900g) cream cheese, softened to room temperature
- 1 ¾ cups (350g) granulated sugar
- 1 vanilla bean, split lengthwise and seeds scraped
- 2 large eggs
- 2 large egg yolks
- ½ cup (120ml) heavy cream
- 2 tablespoons sour cream
- 1 tablespoon lemon juice
- 1 teaspoon vanilla extract
- Optional Toppings:
- Fresh berries (strawberries, raspberries, blueberries)
- Whipped cream
- Chocolate shavings
- Caramel sauce
Preparing the Graham Cracker Crust
Okay, let’s get started with the foundation of our amazing vanilla bean cheesecake the graham cracker crust! This is super easy and sets the stage for all the creamy goodness to come.
- Preheat your oven: First things first, preheat your oven to 350°F (175°C). This ensures the crust bakes evenly.
- Combine the ingredients: In a medium bowl, combine the graham cracker crumbs, melted butter, granulated sugar, and a pinch of salt. Make sure everything is well mixed. I like to use a fork to break up any clumps of graham cracker crumbs and ensure the butter is evenly distributed.
- Press into the pan: Press the mixture firmly into the bottom of a 9-inch springform pan. I find that using the bottom of a measuring cup or a flat-bottomed glass helps to create a nice, even crust. You want it to be compact so it holds its shape.
- Bake the crust: Bake the crust for 8-10 minutes, or until it’s lightly golden brown and fragrant. Keep a close eye on it, as it can burn easily.
- Cool the crust: Remove the crust from the oven and let it cool completely while you prepare the cheesecake filling. This is important because you don’t want the hot crust to melt the filling.
Making the Vanilla Bean Cheesecake Filling
Now for the star of the show the vanilla bean cheesecake filling! This is where the magic happens, and the vanilla bean really shines through. Don’t be intimidated; it’s easier than you think!
- Beat the cream cheese: In a large bowl (or the bowl of your stand mixer), beat the softened cream cheese until it’s smooth and creamy. This is crucial for a lump-free cheesecake. Make sure your cream cheese is truly at room temperature; otherwise, you’ll end up with stubborn lumps. I usually let mine sit out for at least an hour.
- Add the sugar and vanilla bean: Gradually add the granulated sugar to the cream cheese, beating until well combined. Then, scrape the seeds from the vanilla bean and add them to the mixture. Discard the vanilla bean pod (or save it to infuse sugar or milk!). Beat until everything is nicely incorporated.
- Incorporate the eggs and yolks: Add the eggs one at a time, beating well after each addition. Then, add the egg yolks and beat until just combined. Be careful not to overbeat the mixture at this stage, as it can incorporate too much air and cause the cheesecake to crack.
- Add the remaining ingredients: Stir in the heavy cream, sour cream, lemon juice, and vanilla extract. Mix until everything is smooth and well combined. Again, avoid overmixing.
Baking the Cheesecake
Time to bake our beautiful cheesecake! A water bath is key to preventing cracks and ensuring a creamy, even texture. Trust me, it’s worth the extra effort.
- Prepare the water bath: Wrap the bottom of your springform pan tightly with heavy-duty aluminum foil. This will prevent water from seeping into the cheesecake. I usually use two layers of foil just to be extra safe.
- Pour the filling into the crust: Pour the cheesecake filling into the cooled graham cracker crust. Smooth the top with a spatula.
- Place in the water bath: Place the springform pan inside a larger roasting pan. Carefully pour hot water into the roasting pan until it reaches about halfway up the sides of the springform pan.
- Bake the cheesecake: Bake in the preheated oven for 60-75 minutes, or until the edges are set but the center still has a slight jiggle. The jiggle is important; it means the cheesecake is perfectly cooked and will set up beautifully as it cools.
- Turn off the oven and let cool: Turn off the oven and crack the oven door slightly. Let the cheesecake cool in the oven for 1 hour. This gradual cooling process helps prevent cracking.
- Refrigerate: Remove the cheesecake from the water bath and let it cool completely on a wire rack. Then, cover it with plastic wrap and refrigerate for at least 6 hours, or preferably overnight. This allows the cheesecake to fully set and develop its flavor.
Serving and Enjoying Your Vanilla Bean Cheesecake
The hardest part is over now it’s time to enjoy the fruits (or should I say, cheesecake?) of your labor! Here are a few tips for serving and making the most of your delicious creation.
- Remove from the springform pan: Carefully remove the cheesecake from the springform pan. Run a thin knife around the edges of the cheesecake to loosen it before releasing the sides of the pan.
- Slice and serve: Slice the cheesecake with a sharp knife. For clean slices, dip the knife in hot water and wipe it clean between each slice.
- Add toppings (optional): Top with fresh berries, whipped cream, chocolate shavings, or caramel sauce, if desired. I personally love a simple topping of fresh raspberries and a dusting of powdered sugar.
- Store leftovers: Store any leftover cheesecake in the refrigerator, covered tightly with plastic wrap, for up to 5 days.
Tips for Success
- Room Temperature Ingredients: Using room temperature cream cheese and eggs is crucial for a smooth and creamy cheesecake.
- Don’t Overmix: Overmixing the batter can incorporate too much air, leading to cracks. Mix until just combined.
- Water Bath is Key: The water bath helps to bake the cheesecake evenly and prevents cracking. Don’t skip this step!
- Cooling Process: The gradual cooling process in the oven and then in the refrigerator is essential for preventing cracks and allowing the cheesecake to set properly.
- Vanilla Bean: Using a real vanilla bean makes a huge difference in the flavor of the cheesecake. If you don’t have a vanilla bean, you can substitute with 2 teaspoons of vanilla extract, but the flavor won’t be quite as intense.
Troubleshooting
- Cracked Cheesecake: If your cheesecake cracks, don’t worry! It still tastes delicious. You can cover the cracks with whipped cream or fruit. Cracking is often caused by baking at too high a temperature or cooling the cheesecake too quickly.
- Lumpy Filling: If your filling is lumpy, it’s likely because your cream cheese wasn’t soft enough. Make sure to let your cream cheese come to room temperature before using it.
- Soggy Crust: If your crust is soggy, it could be because the butter wasn’t evenly distributed or the crust wasn’t baked long enough. Make sure to press the crust firmly into the pan and bake it until it’s lightly golden brown.
Variations
- Chocolate Cheesecake: Add ½ cup of unsweetened cocoa powder to the cheesecake filling for a chocolate version.
- Lemon Cheesecake: Add the zest of one lemon to the cheesecake filling for a lemon-flavored cheesecake.
- Strawberry Swirl Cheesecake: Swirl strawberry jam or puree into the cheesecake filling before baking for a strawberry swirl cheesecake.
Conclusion:
So, there you have it! My take on the classic Vanilla Bean Cheesecake. I truly believe this recipe is a must-try, and here’s why: it’s the perfect balance of creamy, rich, and subtly sweet, with that unmistakable vanilla bean aroma that elevates it to something truly special. Its not just a dessert; its an experience.
The texture is unbelievably smooth, melting in your mouth with each bite. The vanilla bean specks not only add visual appeal but also deliver an intense burst of flavor that you just can’t get from extract alone. Plus, the simple graham cracker crust provides the perfect contrasting crunch, making every mouthful a delight.
But the best part? It’s surprisingly easy to make! While it does require some patience (that chilling time is crucial!), the steps are straightforward, and the results are absolutely worth the effort. Trust me, even if you’re not a seasoned baker, you can totally nail this recipe.
Serving Suggestions and Variations:
Now, let’s talk about how to enjoy this masterpiece. My personal favorite is to serve it chilled, straight from the fridge, with a dollop of freshly whipped cream and a scattering of fresh berries. The tartness of the berries cuts through the richness of the cheesecake beautifully.
But don’t feel limited! Here are a few other ideas to get your creative juices flowing:
- Sauce it up: A drizzle of homemade caramel sauce, chocolate ganache, or even a tangy raspberry coulis would be divine.
- Get fruity: Top it with sliced peaches, strawberries, or blueberries for a burst of fresh flavor.
- Go nutty: Sprinkle chopped pecans, walnuts, or almonds for added texture and a nutty flavor.
- Spice it up: Add a pinch of cinnamon or nutmeg to the crust for a warm, comforting twist.
- Lemon Zest: Add a teaspoon of lemon zest to the cheesecake batter for a citrusy zing.
And if you’re feeling adventurous, you could even try these variations:
- Mini Cheesecakes: Bake the batter in muffin tins for individual servings. Perfect for parties!
- Chocolate Swirl: Swirl melted chocolate into the batter before baking for a decadent treat.
- Oreo Crust: Replace the graham cracker crust with a crushed Oreo crust for a chocolatey twist.
The possibilities are endless! Feel free to experiment and make this Vanilla Bean Cheesecake your own. I encourage you to play around with different toppings and flavors to create your perfect cheesecake experience.
I’m so excited for you to try this recipe! I know you’re going to love it. Its a guaranteed crowd-pleaser, perfect for special occasions or just a simple weeknight treat. It’s the kind of dessert that makes people say “wow!”
Once you’ve given it a go, please, please, please come back and let me know how it turned out! Share your photos, your variations, and your tips in the comments below. I’d love to hear all about your cheesecake adventures. Happy baking!
I can’t wait to see what you create! Remember, baking is all about having fun and experimenting, so don’t be afraid to get creative and make this Vanilla Bean Cheesecake truly your own. Enjoy!
Vanilla Bean Cheesecake: The Ultimate Guide to Baking Perfection
Rich, creamy vanilla bean cheesecake with a buttery graham cracker crust, baked in a water bath for perfect texture.
Ingredients
- 1 ½ cups graham cracker crumbs (about 12 full sheets)
- 5 tablespoons (70g) unsalted butter, melted
- ¼ cup (50g) granulated sugar
- Pinch of salt
- 32 ounces (900g) cream cheese, softened to room temperature
- 1 ¾ cups (350g) granulated sugar
- 1 vanilla bean, split lengthwise and seeds scraped
- 2 large eggs
- 2 large egg yolks
- ½ cup (120ml) heavy cream
- 2 tablespoons sour cream
- 1 tablespoon lemon juice
- 1 teaspoon vanilla extract
- Fresh berries (strawberries, raspberries, blueberries)
- Whipped cream
- Chocolate shavings
- Caramel sauce
Instructions
- Preheat your oven to 350°F (175°C).
- In a medium bowl, combine the graham cracker crumbs, melted butter, granulated sugar, and a pinch of salt. Mix well.
- Press the mixture firmly into the bottom of a 9-inch springform pan.
- Bake the crust for 8-10 minutes, or until lightly golden brown and fragrant.
- Remove the crust from the oven and let it cool completely.
- In a large bowl (or stand mixer), beat the softened cream cheese until smooth and creamy.
- Gradually add the granulated sugar to the cream cheese, beating until well combined.
- Scrape the seeds from the vanilla bean and add them to the mixture. Beat until incorporated.
- Add the eggs one at a time, beating well after each addition. Then, add the egg yolks and beat until just combined.
- Stir in the heavy cream, sour cream, lemon juice, and vanilla extract. Mix until smooth and well combined.
- Wrap the bottom of your springform pan tightly with heavy-duty aluminum foil.
- Pour the cheesecake filling into the cooled graham cracker crust. Smooth the top.
- Place the springform pan inside a larger roasting pan. Carefully pour hot water into the roasting pan until it reaches about halfway up the sides of the springform pan.
- Bake in the preheated oven for 60-75 minutes, or until the edges are set but the center still has a slight jiggle.
- Turn off the oven and crack the oven door slightly. Let the cheesecake cool in the oven for 1 hour.
- Remove the cheesecake from the water bath and let it cool completely on a wire rack. Then, cover it with plastic wrap and refrigerate for at least 6 hours, or preferably overnight.
- Carefully remove the cheesecake from the springform pan.
- Slice the cheesecake with a sharp knife (dip in hot water between slices for clean cuts).
- Top with fresh berries, whipped cream, chocolate shavings, or caramel sauce, if desired.
- Store any leftover cheesecake in the refrigerator, covered tightly with plastic wrap, for up to 5 days.
Notes
- Using room temperature cream cheese and eggs is crucial for a smooth and creamy cheesecake.
- Don’t overmix the batter, as it can incorporate too much air, leading to cracks. Mix until just combined.
- The water bath helps to bake the cheesecake evenly and prevents cracking. Don’t skip this step!
- The gradual cooling process in the oven and then in the refrigerator is essential for preventing cracks and allowing the cheesecake to set properly.
- Using a real vanilla bean makes a huge difference in the flavor of the cheesecake. If you don’t have a vanilla bean, you can substitute with 2 teaspoons of vanilla extract, but the flavor won’t be quite as intense.
- If your cheesecake cracks, don’t worry! It still tastes delicious. You can cover the cracks with whipped cream or fruit. Cracking is often caused by baking at too high a temperature or cooling the cheesecake too quickly.
- If your filling is lumpy, it’s likely because your cream cheese wasn’t soft enough. Make sure to let your cream cheese come to room temperature before using it.
- If your crust is soggy, it could be because the butter wasn’t evenly distributed or the crust wasn’t baked long enough. Make sure to press the crust firmly into the pan and bake it until it’s lightly golden brown.

Leave a Comment