
Old School Banana Pudding Cake is more than just a dessert; it’s a heartwarming journey back to simpler times, a delicious embrace of comfort and nostalgia. I vividly recall the anticipation as this glorious creation emerged from the kitchen, its layers promising pure bliss with every bite. This iconic dessert, deeply rooted in Southern culinary traditions, has graced countless family tables and community gatherings, embodying the spirit of hospitality and home-cooked goodness. It’s a dish that speaks volumes about heritage and the joy of sharing, a true staple that brings comfort to any occasion.
Why Everyone Admires This Classic Dessert
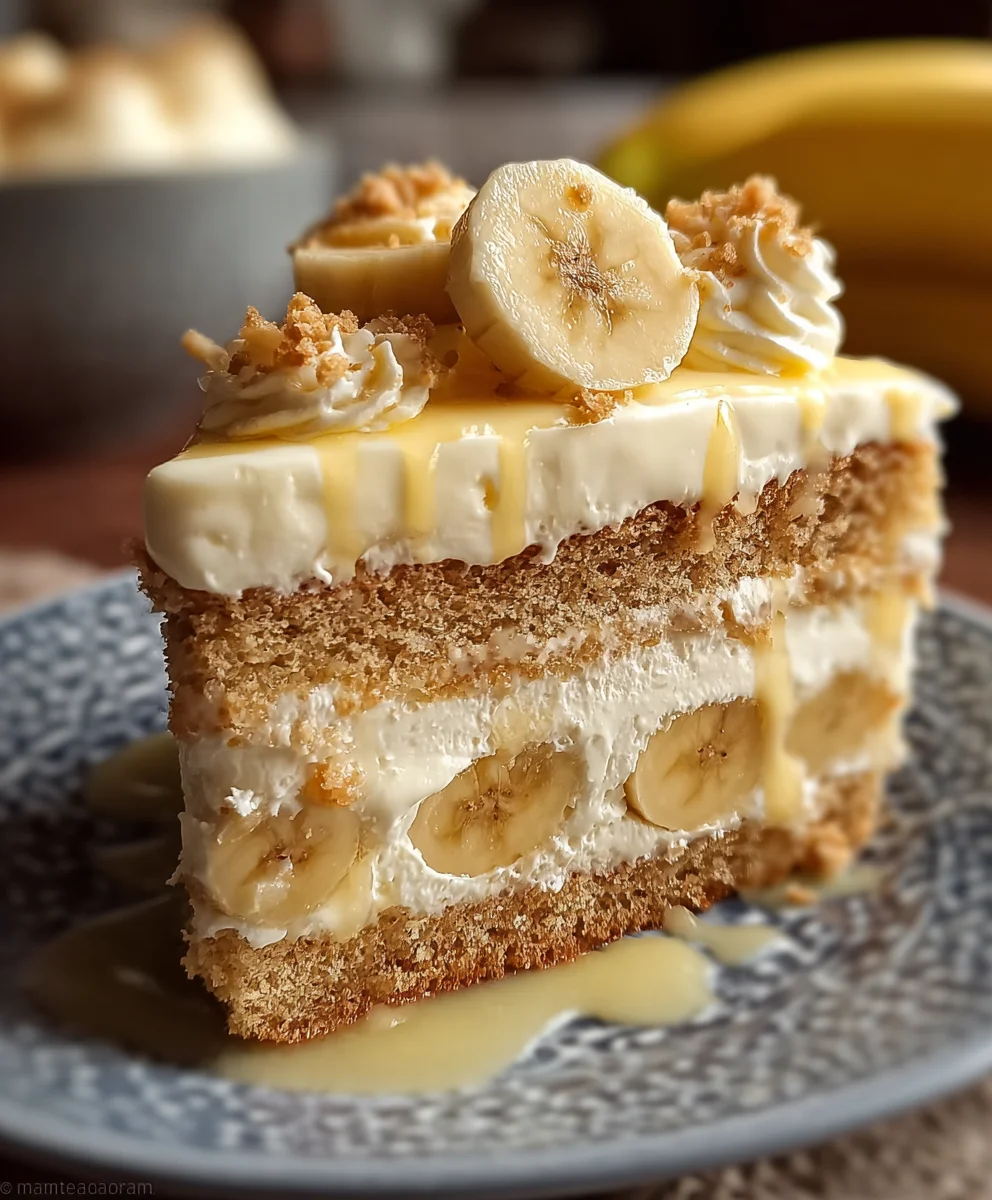
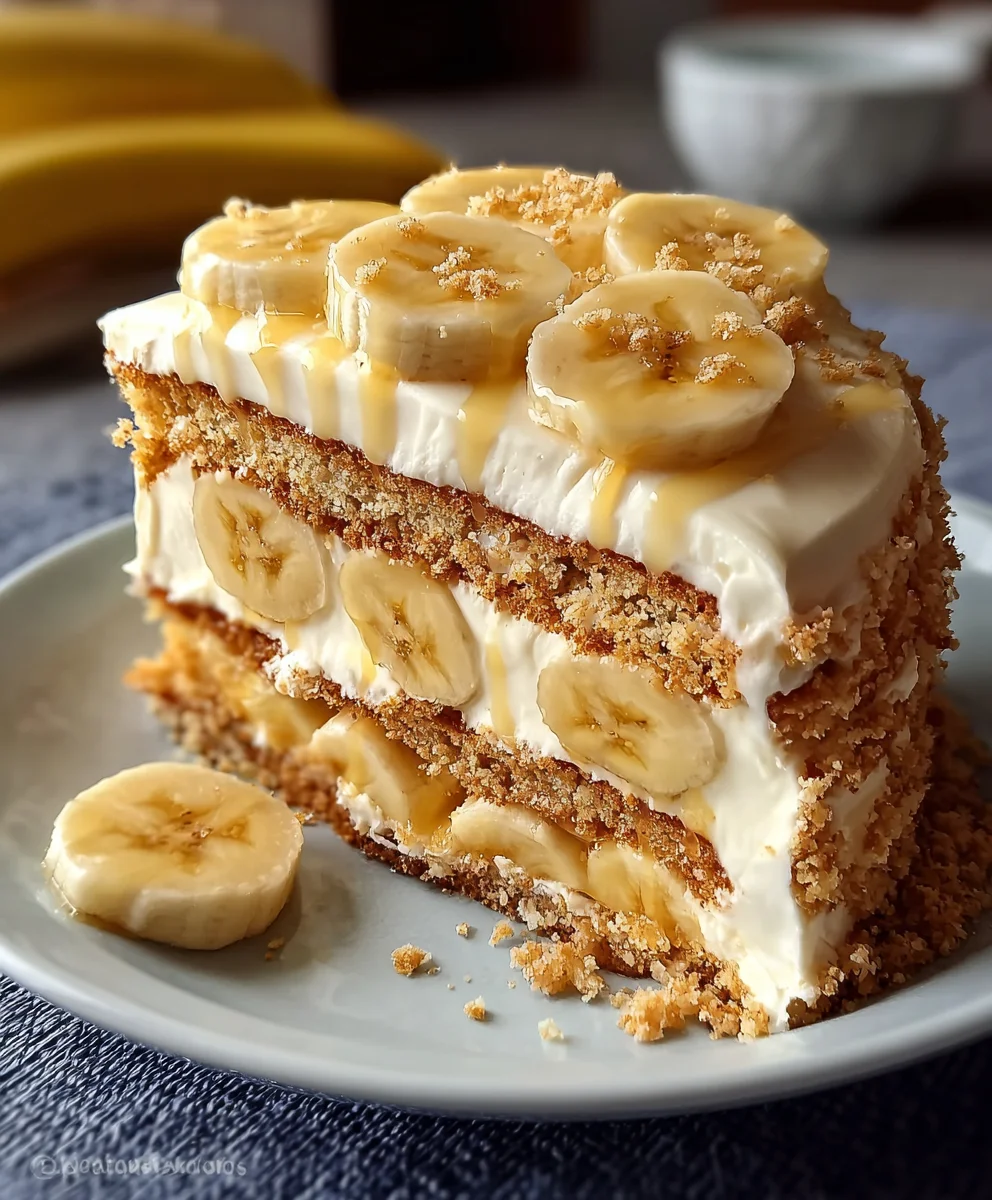
People fall in love with this cake for its irresistible combination of moist, tender cake infused with banana flavor, luscious, velvety banana pudding, fresh slices of ripe bananas, and the delightful soft crunch of vanilla wafers. The way these elements meld together creates a symphony of textures and tastes that is utterly divine and deeply satisfying. Each forkful of this Old School Banana Pudding Cake is a testament to timeless flavor and the power of food to evoke cherished memories. It’s the perfect treat to bring smiles to faces, whether it’s a weeknight indulgence or the star of a celebratory spread, offering a comforting hug in every slice.

Ingredients:
- For the Banana Cake:
- 2 ½ cups (300g) all-purpose flour
- 1 ½ teaspoons baking soda
- ½ teaspoon salt
- ½ cup (113g) unsalted butter, softened to room temperature
- 1 ½ cups (300g) granulated sugar
- 2 large eggs, at room temperature
- 1 teaspoon pure vanilla extract
- 1 cup (240ml) buttermilk, at room temperature
- 1 ½ cups (about 3-4 medium) very ripe mashed bananas (about 360g), spotted brown for best flavor
- For the Homemade Banana Pudding Filling:
- ¾ cup (150g) granulated sugar
- ¼ cup (30g) cornstarch
- ½ teaspoon salt
- 4 large egg yolks
- 2 ½ cups (600ml) full-fat milk
- ¼ cup (57g) unsalted butter, cut into small pieces
- 2 teaspoons pure vanilla extract
- 1 teaspoon banana extract (optional, but enhances flavor!)
- For the Layers and Topping:
- 4-5 ripe but firm bananas, sliced into ¼-inch rounds (about 4-5 cups)
- 1 (11-ounce) box vanilla wafers (about 70-80 wafers)
- For the Meringue Topping (traditional “Old School” style):
- 4 large egg whites, at room temperature (reserve from pudding yolks)
- ½ cup (100g) granulated sugar
- ½ teaspoon cream of tartar
- 1 teaspoon pure vanilla extract
- Alternative Whipped Cream Topping (if preferred):
- 2 cups (480ml) heavy cream, very cold
- ½ cup (60g) powdered sugar, sifted
- 1 teaspoon pure vanilla extract
Preparing the Moist Banana Cake Layers
- First things first, preheat your oven to 350°F (175°C). We’ll also want to prepare our baking pans right away. I typically use two 9-inch round cake pans for this Old School Banana Pudding Cake. Grease and flour them generously, or if you prefer, line the bottoms with parchment paper circles and then grease the sides. This ensures our beautiful cake layers won’t stick!
- In a medium-sized bowl, whisk together your dry ingredients: the all-purpose flour, baking soda, and salt. Make sure these are really well combined; this helps ensure even leavening and a consistent texture throughout your cake. Set this bowl aside for a moment.
- Now, in a large mixing bowl (or the bowl of your stand mixer fitted with the paddle attachment), cream together the softened unsalted butter and granulated sugar. Beat them on medium-high speed for about 3-5 minutes until the mixture is light, fluffy, and pale in color. This creaming process incorporates air, which is crucial for a tender cake crumb.
- Add the large eggs, one at a time, beating well after each addition. Scrape down the sides of the bowl as needed to ensure everything is incorporated. Follow this by mixing in the pure vanilla extract.
- Next, it’s time to incorporate our dry and wet ingredients alternately. Reduce your mixer speed to low. Add about one-third of the dry ingredient mixture to the butter mixture, and mix until just combined. Then, pour in half of the buttermilk and mix until just incorporated. Repeat this process: another third of the dry ingredients, then the remaining buttermilk, and finally the last third of the dry ingredients. Be careful not to overmix at this stage; overmixing can lead to a tough cake! We want to keep this Old School Banana Pudding Cake nice and tender.
- Gently fold in the mashed very ripe bananas using a spatula. The riper the bananas, the more intense the banana flavor will be in your cake – trust me, those brown spots are your friends! Distribute the batter evenly between your two prepared cake pans.
- Bake for 28-32 minutes, or until a wooden skewer or toothpick inserted into the center of the cakes comes out clean. The tops should be golden brown and spring back when lightly touched.
- Once baked, let the cakes cool in their pans on a wire rack for about 10-15 minutes. This allows them to firm up slightly before you attempt to remove them. After this resting period, carefully invert the cakes onto the wire rack, remove the pans, and let them cool completely. It is absolutely crucial that the cakes are completely cool before assembling, otherwise, your pudding will melt, creating a messy situation!
Crafting the Velvety Banana Pudding Filling
This homemade pudding is what truly elevates our “Old School Banana Pudding Cake” to legendary status. Don’t skip this step for store-bought; the difference is night and day!
- In a medium-sized heavy-bottomed saucepan, whisk together the granulated sugar, cornstarch, and salt. This combination will help thicken our pudding beautifully.
- In a separate bowl, whisk the four large egg yolks until they are uniformly yellow.
- Gradually whisk the full-fat milk into the egg yolks until thoroughly combined.
- Slowly pour the milk and egg yolk mixture into the saucepan with the dry ingredients, whisking constantly to prevent lumps.
- Place the saucepan over medium heat, and here’s where your patience and constant stirring come in. Continue to whisk constantly, scraping the bottom and sides of the pan, for about 8-12 minutes. The mixture will begin to thicken considerably, eventually reaching a boil. Once it starts to boil, continue to whisk for another 1-2 minutes, ensuring the cornstarch is fully cooked out. You’ll notice it becomes very thick and custardy.
- Remove the saucepan from the heat. Stir in the unsalted butter (cut into small pieces), pure vanilla extract, and if you’re feeling adventurous like me, the banana extract. The butter adds richness and a silky texture, while the extracts boost that delicious banana flavor. Stir until the butter is completely melted and incorporated.
- Pour the hot pudding into a clean bowl. To prevent a “skin” from forming on top, immediately press a piece of plastic wrap directly onto the surface of the pudding.
- Allow the pudding to cool on the counter for about 30 minutes, then transfer it to the refrigerator to chill completely for at least 3-4 hours, or preferably overnight. The pudding must be thoroughly chilled and thick before you assemble your Old School Banana Pudding Cake. This is non-negotiable for a stable cake!
Assembling the Iconic Old School Banana Pudding Cake
Now for the fun part – bringing all these wonderful components together to create your masterpiece!
- Once your cake layers are completely cool and your banana pudding is thoroughly chilled and firm, it’s time to assemble. You’ll need a cake stand or serving platter.
- Place one cooled cake layer onto your chosen serving plate.
- Spoon about half of the chilled banana pudding over the first cake layer, spreading it evenly to the edges. Don’t be shy with the pudding; this is where a lot of the flavor and moisture comes from!
- Arrange about half of your sliced ripe but firm bananas in a single layer over the pudding. I like to arrange them in concentric circles for a pretty presentation.
- Distribute about half of your vanilla wafers over the bananas. You can gently press them into the pudding. Some people like to crush a few wafers for a different texture, but I prefer them whole so they can soften beautifully.
- Carefully place the second cake layer on top of the wafers and bananas. Gently press down to secure it.
- Repeat the layering process: spread the remaining half of the banana pudding over the second cake layer, followed by the remaining sliced bananas, and finally, the rest of the vanilla wafers.
- At this point, you have a fully layered cake. Now, it needs to chill. Loosely cover the cake with plastic wrap or a cake dome and refrigerate for at least 2-4 hours, or ideally, overnight. This chilling period is absolutely vital. It allows the pudding to set even more firmly, the cake to absorb some of that delicious banana flavor, and most importantly, the vanilla wafers to soften to that classic melt-in-your-mouth texture that defines an Old School Banana Pudding Cake.
The Grand Finale: Topping Your Old School Banana Pudding Cake
For an authentic “Old School” feel, a billowy, toasted meringue is the way to go. If you prefer, a simple whipped cream also works beautifully. I’ll guide you through the meringue here, but offer a quick note on whipped cream.
Traditional Meringue Topping:
- About 30-45 minutes before you plan to serve the cake, or after its long chill, you can prepare the meringue. Ensure your four large egg whites are at room temperature – this helps them whip up to maximum volume. Also, make sure your mixing bowl and whisk attachment are absolutely clean and grease-free. Any trace of fat can prevent the egg whites from whipping properly.
- In a very clean, dry bowl (preferably a metal or glass bowl for stability), combine the egg whites and cream of tartar. The cream of tartar helps stabilize the egg whites.
- Using a hand mixer or stand mixer with the whisk attachment, beat the egg whites on medium-high speed until they become foamy and soft peaks form.
- Gradually add the granulated sugar, about one tablespoon at a time, while continuing to beat on high speed. Allow each addition of sugar to dissolve before adding the next. This slow addition helps create a stable, glossy meringue.
- Continue beating until the meringue is very thick, glossy, and holds stiff peaks. When you lift the whisk, the peaks should stand straight up without drooping. Finally, beat in the pure vanilla extract for a lovely aroma.
- Spoon or pipe the meringue over the top of your thoroughly chilled Old School Banana Pudding Cake. You can create decorative swirls and peaks using the back of a spoon or an offset spatula. Ensure the meringue extends to the edges of the cake to create a seal over the pudding and wafers.
- Now, for that signature toasted look: If you have a kitchen torch, you can gently torch the peaks of the meringue until they are beautifully golden brown. Alternatively, you can place the cake under a preheated broiler for 1-2 minutes, watching it very, very carefully to prevent burning. The goal is just to lightly toast the meringue.
- Serve your magnificent “Old School Banana Pudding Cake” immediately after topping and toasting the meringue.
Quick Note on Alternative Whipped Cream Topping:
If you prefer a lighter, less traditional topping, simply whip 2 cups of very cold heavy cream with ½ cup sifted powdered sugar and 1 teaspoon pure vanilla extract until stiff peaks form. Spread it over the chilled cake just before serving. It’s a fantastic alternative that’s equally delicious for your “Old School Banana Pudding Cake” experience.
Congratulations! You’ve just created a truly exceptional Old School Banana Pudding Cake. Enjoy every decadent, nostalgic bite!
<h2>Conclusion:</h2>
<p>My friends, we’ve reached the sweet finale, and I truly hope you’re as excited as I am about the prospect of bringing this magnificent dessert to life in your own kitchen. This isn’t just any cake; it’s a culinary hug, a delightful trip down memory lane, and a testament to the simple, yet profound, joy that classic desserts can bring. What truly makes this recipe a must-try, beyond its undeniably delicious flavor, is the perfect marriage of textures and tastes that unfold with every single bite. <strong>Imagine sinking your fork through a moist, tender banana-infused cake layer, then encountering that creamy, dreamy banana pudding filling, and finally, the delicate crunch of vanilla wafers, all topped with a cloud-like meringue or a luscious whipped cream.</strong> It’s not merely a dessert; it’s an experience, a symphony of comfort food elements that work in absolute harmony. I promise you, this is the kind of treat that doesn’t just satisfy a sweet craving; it creates lasting memories, sparking conversations and bringing smiles to everyone around the table. It’s a guaranteed showstopper, whether for a casual family dinner or a festive gathering, always eliciting delighted gasps and requests for the recipe. The beauty of this particular creation lies in its ability to transport you back to simpler times, to those treasured moments of childhood where homemade treats were the epitome of love. It’s robust enough to hold its own as the star of any dessert table, yet comforting enough to be enjoyed curled up on the couch with a good book. Its unique combination of a classic cake base with the beloved banana pudding elements sets it apart from typical layer cakes, offering a delightful surprise in every slice. The harmonious blend of ripe bananas, creamy vanilla, and that irresistible crumb makes it an unforgettable dessert that caters to both the young and the young at heart.</p>
<p>Now that you’ve mastered the art of creating this masterpiece, let’s talk about making it truly your own and how best to savor its delightful flavors. While it’s utterly divine on its own, served slightly chilled to allow the flavors to fully meld, there are countless ways to elevate this already spectacular dessert. For a simple yet elegant touch, I adore serving a slice alongside a steaming cup of freshly brewed coffee or a delicate herbal tea; the slight bitterness of the coffee perfectly balances the cake’s sweetness. If you’re feeling a bit indulgent (and why wouldn’t you be?), a small scoop of good quality vanilla bean ice cream melting alongside a warm slice can be absolutely heavenly, though I personally prefer it cold to highlight the pudding’s creamy texture. For those who like a little extra flair, consider a light dusting of cocoa powder or a few chocolate shavings on top, especially if you opted for a whipped cream frosting. <h5>Feeling adventurous with variations?</h5> You could experiment with different types of cookies – graham crackers for a more rustic feel, or even chocolate wafers for a delightful chocolate-banana twist. A sprinkle of toasted pecans or walnuts between the layers could add an unexpected crunch and nutty depth. For a more individual presentation, you could easily adapt this recipe into adorable mini trifles, layering the cake cubes, pudding, and wafers in small Mason jars or dessert glasses, perfect for individual servings at a potluck or party. Imagine the delight on your guests’ faces when they each receive their own personal portion! You could also infuse the cake itself with a hint of rum or banana liqueur for an adult-friendly version, or add a touch of cinnamon or nutmeg to the pudding for a warmer, spicier profile. Don’t be afraid to play with garnishes either; fresh banana slices, a few extra vanilla wafers, or even a drizzle of caramel sauce can turn a simple slice into an artful presentation. This cake is incredibly versatile, inviting your creativity to shine through, whether you’re making subtle tweaks or bold departures from the original.</p>
<p>So, what are you waiting for? I’ve shared all my secrets and tips, and now the torch is passed to you. I genuinely encourage you, my dear reader, to clear your schedule, gather your ingredients, and dive into the joyful process of baking this incredible <strong>Old School Banana Pudding Cake</strong>. Trust me, the aroma alone as it bakes will be enough to make your mouth water, and the first bite will confirm that every moment spent in the kitchen was absolutely worth it. This isn’t just a recipe; it’s an invitation to create, to share, and to experience pure dessert bliss. And once you’ve pulled off this culinary triumph, I would absolutely love to hear about your experience! <h4>Please don’t keep your delicious success a secret!</h4> Share your photos, tell me about any creative twists you added, or simply let me know how much you and your loved ones enjoyed this delightful cake. Your feedback and stories are what make this community so vibrant and inspiring. Tag me or drop a comment; I’m always eager to see your creations and celebrate your baking victories. This recipe is designed to be approachable and rewarding, offering a fantastic opportunity to impress your family and friends with your baking prowess. Embrace the joy of homemade goodness and watch as this cake becomes a cherished addition to your recipe collection. Happy baking, my friends, and may your kitchens be filled with the wonderful scent of freshly baked banana pudding cake and the happy chatter of those who get to enjoy it with you!</p>
Old School Banana Pudding Cake
A heartwarming journey back to simpler times, this iconic Southern dessert combines moist banana cake, velvety homemade banana pudding, fresh banana slices, and softened vanilla wafers for a truly nostalgic and comforting treat. Each forkful evokes cherished memories and brings smiles to faces.
Ingredients
-
2 ½ cups (300g) all-purpose flour
-
1 ½ teaspoons baking soda
-
½ teaspoon salt
-
½ cup (113g) unsalted butter, softened
-
1 ½ cups (300g) granulated sugar
-
2 large eggs, room temperature
-
1 teaspoon pure vanilla extract
-
1 cup (240ml) buttermilk, room temperature
-
1 ½ cups (360g) very ripe mashed bananas (3-4 medium)
-
¾ cup (150g) granulated sugar (for pudding)
-
¼ cup (30g) cornstarch
-
½ teaspoon salt (for pudding)
-
4 large egg yolks
-
2 ½ cups (600ml) full-fat milk
-
¼ cup (57g) unsalted butter, cut into small pieces (for pudding)
-
2 teaspoons pure vanilla extract (for pudding)
-
1 teaspoon banana extract (optional)
-
4-5 ripe but firm bananas, sliced (about 4-5 cups)
-
1 (11-ounce) box vanilla wafers (70-80 wafers)
-
4 large egg whites, room temperature (for meringue)
-
½ cup (100g) granulated sugar (for meringue)
-
½ teaspoon cream of tartar
-
1 teaspoon pure vanilla extract (for meringue)
Instructions
-
Step 1
Preheat oven to 350°F (175°C). Grease and flour two 9-inch round cake pans. In a medium bowl, whisk flour, baking soda, and ½ tsp salt; set aside. In a large bowl, cream ½ cup softened butter and 1 ½ cups granulated sugar until light and fluffy (3-5 mins). Beat in 2 eggs one at a time, then 1 tsp vanilla extract. Alternately add dry ingredients and buttermilk to the butter mixture, beginning and ending with dry ingredients; mix until just combined, do not overmix. Gently fold in mashed bananas. Divide batter evenly into prepared pans. Bake for 28-32 minutes, until a wooden skewer inserted into the center comes out clean. Cool in pans for 10-15 minutes, then invert onto a wire rack to cool completely. Ensure cakes are completely cool before assembly. -
Step 2
In a heavy-bottomed saucepan, whisk together ¾ cup granulated sugar, cornstarch, and ½ tsp salt. In a separate bowl, whisk 4 egg yolks until uniformly yellow, then gradually whisk in 2 ½ cups full-fat milk until combined. Slowly pour the milk and egg yolk mixture into the saucepan with dry ingredients, whisking constantly to prevent lumps. Place saucepan over medium heat, whisking constantly for 8-12 minutes, until the mixture thickens and boils. Continue to whisk for 1-2 minutes once boiling. Remove from heat; stir in ¼ cup unsalted butter, 2 tsp vanilla extract, and optional 1 tsp banana extract until butter is melted. Pour hot pudding into a clean bowl. Press plastic wrap directly onto the surface to prevent a skin. Cool on counter for 30 minutes, then chill completely in the refrigerator for at least 3-4 hours, or preferably overnight. Pudding must be thoroughly chilled and thick for assembly. -
Step 3
Once cake layers are completely cool and pudding is thoroughly chilled, place one cake layer onto a serving plate. Spoon about half of the chilled banana pudding over the first cake layer, spreading evenly. Arrange about half of the sliced ripe bananas in a single layer over the pudding. Distribute about half of the vanilla wafers over the bananas. Carefully place the second cake layer on top. Repeat the layering process with the remaining pudding, sliced bananas, and vanilla wafers. Loosely cover the cake and refrigerate for at least 2-4 hours, or ideally overnight. This crucial chilling period allows the pudding to set and wafers to soften. -
Step 4
About 30-45 minutes before serving, prepare the meringue. Ensure 4 egg whites are at room temperature and your mixing bowl/whisk are clean and grease-free. In a clean bowl, combine egg whites and ½ tsp cream of tartar. Beat on medium-high speed until foamy and soft peaks form. Gradually add ½ cup granulated sugar, one tablespoon at a time, beating on high speed until meringue is very thick, glossy, and holds stiff peaks. Beat in 1 tsp vanilla extract. Spoon or pipe the meringue over the top of the thoroughly chilled cake, creating decorative swirls. Gently torch the meringue peaks with a kitchen torch until golden brown, or place under a preheated broiler for 1-2 minutes, watching carefully to prevent burning. Serve immediately. (Alternatively, whip 2 cups cold heavy cream with ½ cup sifted powdered sugar and 1 tsp vanilla until stiff peaks; spread over chilled cake just before serving).
Important Information
Nutrition Facts (Per Serving)
It is important to consider this information as approximate and not to use it as definitive health advice.
Allergy Information
Please check ingredients for potential allergens and consult a health professional if in doubt.

Leave a Comment