
Mini Key Lime Pies are truly a revelation, offering a burst of sunshine in every perfectly portioned bite. Imagine the iconic, tangy-sweet flavor of a beloved American dessert, now miniaturized for ultimate convenience and charm. I find that these delightful single-serving treats transform any occasion into something truly special, making them an instant favorite for any gathering.
The traditional Key Lime Pie boasts a fascinating history, deeply rooted in the vibrant culture of the Florida Keys. Legend has it that sponge fishermen, with a ready supply of condensed milk, eggs, and the distinctive local Key limes, created this zesty confection long before refrigeration was common. Its unique, sharp citrus profile, distinct from Persian limes, has captivated palates for generations, making it a beloved staple that evokes the spirit of the tropics.
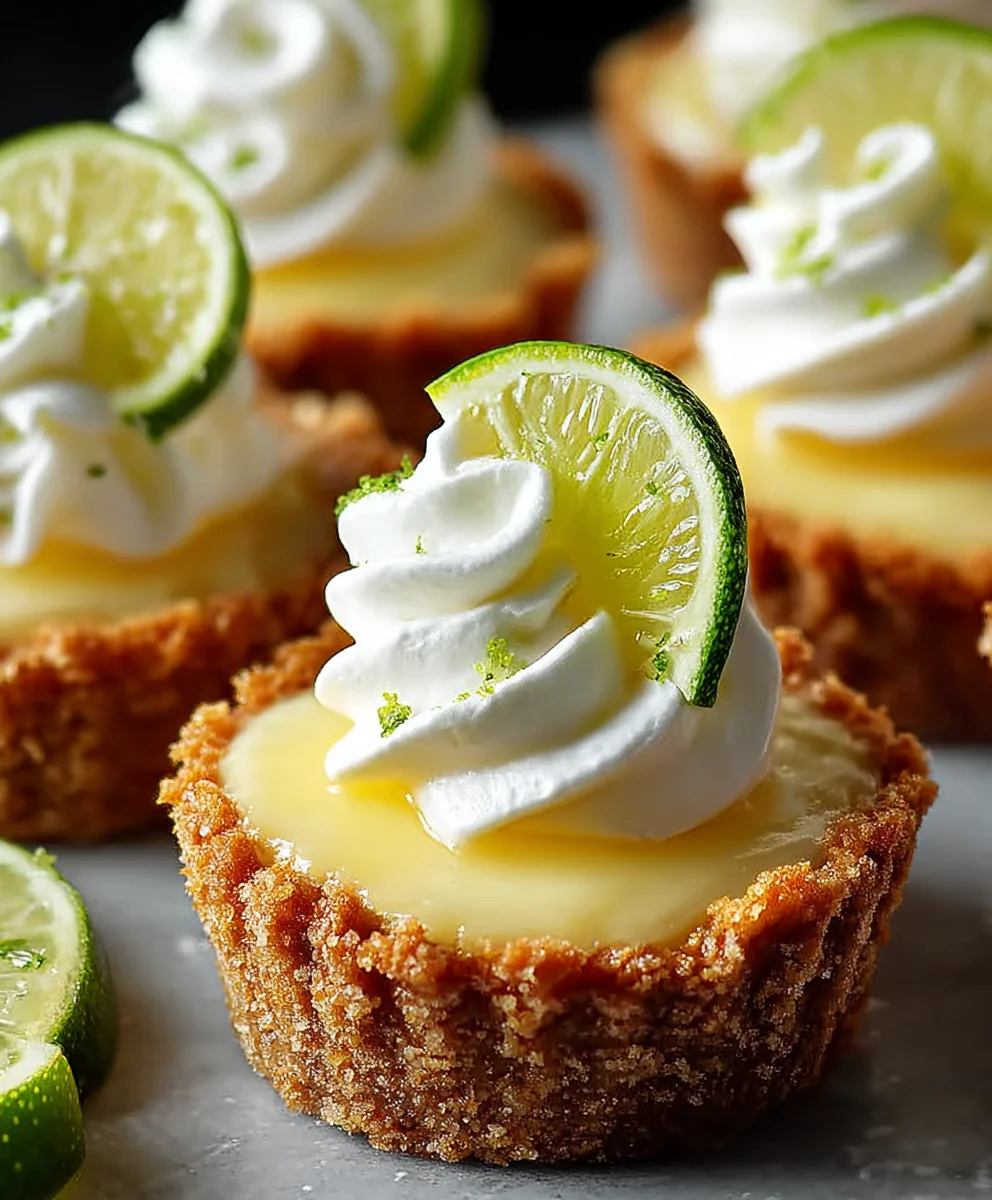
What makes people adore this dessert, especially these adorable Mini Key Lime Pies? It’s the irresistible alchemy of flavors and textures: the bright, invigorating tartness of the lime curd, perfectly balanced by the sweet, creamy filling, all nestled within a crisp, buttery graham cracker crust. The individual size not only ensures elegant presentation but also guarantees that each guest enjoys a pristine, unblemished piece of citrusy perfection. They’re incredibly refreshing, surprisingly simple to prepare, and a guaranteed crowd-pleaser, delivering a sophisticated yet approachable dessert experience that is sure to impress.

Ingredients:
-
For the Graham Cracker Crust:
- 1 ½ cups (approximately 170g) finely crushed graham cracker crumbs (from about 10-12 full graham cracker sheets)
- ¼ cup (50g) granulated sugar
- 6 tablespoons (85g) unsalted butter, melted
- Pinch of salt (optional, enhances flavor)
-
For the Key Lime Filling:
- 4 large egg yolks
- 1 teaspoon finely grated Key lime zest (from about 3-4 Key limes)
- 1 (14-ounce / 397g) can sweetened condensed milk
- ½ cup (120ml) fresh Key lime juice (from about 8-10 Key limes)
-
For the Optional Whipped Cream Topping:
- 1 cup (240ml) heavy cream or whipping cream, very cold
- 2 tablespoons (25g) powdered sugar (confectioners’ sugar), or to taste
- ½ teaspoon pure vanilla extract
-
For Garnish (Optional):
- Thin slices of Key lime or extra Key lime zest
Preparing Your Perfect Graham Cracker Crust for Mini Key Lime Pies:
- Preheat Your Oven and Prepare Your Pan: First things first, let’s get that oven ready! Preheat your oven to 350°F (175°C). While it’s heating, grab a standard 12-cup muffin tin. You’ll want to line each cup with paper or foil cupcake liners. This step is incredibly important for easy removal of your delicate mini Key lime pies later on. Trust me, trying to pry these delicious treats from an unlined tin is a challenge you don’t want to face!
- Create Your Graham Cracker Crumbs: Now for the foundation of our mini Key lime pies! If you haven’t already, it’s time to transform those graham crackers into fine crumbs. My favorite method is using a food processor: simply break the graham cracker sheets into pieces and pulse until they resemble fine sand. You’re aiming for consistency here – no large chunks, as they won’t hold together well. If you don’t have a food processor, don’t worry! You can place the crackers in a large zip-top bag, seal it, and crush them with a rolling pin or the bottom of a heavy pot until they are uniformly fine. This method can be quite therapeutic! Measure out your 1 ½ cups of fine crumbs carefully.
- Combine Dry Crust Ingredients: In a medium-sized bowl, combine your finely crushed graham cracker crumbs, granulated sugar, and the optional pinch of salt. The salt really helps to balance the sweetness and brings out the buttery flavor of the crust. Give these dry ingredients a good whisk or stir to ensure everything is evenly distributed. This ensures every bite of your mini Key lime pies has a consistent flavor profile from the crust.
- Incorporate the Melted Butter: Next, pour the melted unsalted butter over the graham cracker mixture. Using a fork or a rubber spatula, mix thoroughly until all the crumbs are moistened and resemble wet sand. You want every single crumb to be coated in butter; this is what will bind our crust together and give it that lovely, crisp texture after baking. A well-coated crumb mixture is key to a sturdy crust for your mini Key lime pies.
- Press the Crust into Liners: Divide the graham cracker mixture evenly among the 12 prepared cupcake liners in your muffin tin. I usually use a tablespoon or a small cookie scoop to ensure even portions. Now, here’s where technique comes in: using the bottom of a small glass, a tart tamper, or even your clean fingers, firmly press the mixture into the bottom of each liner. You want to create a compact, even layer. Pressing firmly is crucial; if the crust isn’t packed tightly enough, it will be crumbly and fall apart when you try to enjoy your mini Key lime pies. Aim for a flat, even surface, extending slightly up the sides of the liner if you wish, but primarily focusing on the bottom.
- Pre-Bake the Crusts: Place the muffin tin with the pressed crusts into your preheated oven. Bake for 8-10 minutes, or until the edges are lightly golden and the crusts smell wonderfully toasty. Pre-baking the crust helps it set and become firm, preventing it from becoming soggy once the filling is added. It also enhances the flavor of the graham crackers.
- Cool the Crusts: Once baked, remove the muffin tin from the oven and place it on a wire rack. Allow the crusts to cool completely to room temperature before adding the filling. This is important because adding a cold filling to a warm crust can alter its texture or even cause the filling to separate. Patience is a virtue when making these delightful mini Key lime pies!
Crafting the Velvety Key Lime Filling for Your Mini Delights:
- Zest Your Key Limes: This is where the magic begins for the signature Key lime flavor! Carefully zest your Key limes using a microplane or the finest side of a box grater. You’re looking for that bright green outer layer, avoiding any of the white pith underneath, which can be bitter. Aim for about 1 teaspoon of finely grated zest. The zest is packed with aromatic oils that will give your mini Key lime pies an incredible, vibrant citrus aroma and flavor.
- Juice Your Key Limes: Now, slice your zested Key limes in half and juice them. Key limes are smaller and have less juice than regular Persian limes, so you’ll need quite a few – typically 8-10, depending on their size and juiciness – to get ½ cup of fresh juice. I highly recommend using a citrus juicer or a reamer for efficiency. Fresh Key lime juice is non-negotiable for authentic mini Key lime pies; bottled juice simply won’t capture the same bright, complex flavor. Strain the juice through a fine-mesh sieve to remove any pulp or seeds.
- Prepare the Egg Yolk Mixture: In a medium-sized mixing bowl, combine the four large egg yolks with your finely grated Key lime zest. Whisk these two ingredients together for about 1 minute until the yolks are light yellow and slightly frothy. The zest’s oils will begin to infuse into the yolks, preparing them to release their full flavor into the filling.
- Whisk in Sweetened Condensed Milk: Pour the entire can of sweetened condensed milk into the egg yolk and zest mixture. Whisk vigorously for 2-3 minutes until the mixture is completely smooth and well combined. The sweetened condensed milk is the backbone of Key lime pie filling; it provides the essential sweetness, creaminess, and allows the filling to set without traditional custard-making. It’s the secret to the luscious texture of these mini Key lime pies.
- Gently Incorporate Key Lime Juice: Finally, slowly pour the strained Key lime juice into the mixture while continuing to whisk. As you add the juice, you’ll notice a magical transformation happening: the acidity from the lime juice will begin to “cook” the egg yolks and thicken the mixture slightly. This is a natural chemical reaction, causing the proteins to coagulate and create that perfect Key lime pie consistency. Do not over-mix once the lime juice is added; whisk just until everything is combined and smooth. Over-mixing can sometimes make the filling too firm.
- Taste and Adjust (Optional but Recommended): This is your moment to be a pastry chef! Dip a spoon into your filling (a clean spoon, of course!) and give it a quick taste. Does it have that perfect balance of tart and sweet? While the recipe is quite robust, sometimes individual limes can vary in acidity. If you feel it needs a tiny bit more zestiness, you can add another small pinch of fresh zest, but generally, this ratio is spot on for outstanding mini Key lime pies.
Baking and Chilling Your Exquisite Mini Key Lime Pies:
- Fill the Cooled Crusts: Once your graham cracker crusts are completely cool (this is important, remember!), carefully pour the Key lime filling into each prepared crust. Fill them almost to the top, leaving just a tiny bit of space for the filling to expand ever so slightly during baking. I find using a small ladle or a measuring cup with a spout works best for neat pouring, minimizing spills.
- Bake to Perfection: Gently place the muffin tin back into your preheated 350°F (175°C) oven. Bake for 12-15 minutes. The baking time is relatively short, as the lime juice has already started the “cooking” process. You’re looking for the filling to be set around the edges but still have a slight jiggle in the center when you gently shake the pan. Be careful not to overbake your mini Key lime pies, as this can result in a rubbery texture. The center will firm up further as it cools.
- Initial Cooling Process: As soon as the mini Key lime pies come out of the oven, transfer the muffin tin to a wire rack. Let them cool at room temperature for at least 30 minutes. This allows the pies to gradually decrease in temperature, which is important for their final texture.
- The Essential Chill: Once they’ve cooled sufficiently at room temperature, transfer the muffin tin to the refrigerator. This is perhaps the most crucial step for achieving the perfect Key lime pie texture. Allow your mini Key lime pies to chill for a minimum of 3-4 hours, but preferably overnight. The longer they chill, the firmer and more perfectly set your mini Key lime pies will be. This chilling period allows the filling to fully firm up and for the flavors to meld beautifully. Do not skip this step!
Preparing the Cloud-Like Whipped Cream Topping (Optional, but Highly Recommended):
- Chill Your Equipment: For the best, most stable whipped cream, I always recommend chilling your mixing bowl and whisk attachment (if using a stand mixer) or beaters (if using a hand mixer) in the freezer for 10-15 minutes before you begin. A cold environment helps the cream whip up faster and hold its shape better.
- Whip the Cream: Pour your very cold heavy cream into the chilled bowl. Add the powdered sugar and vanilla extract. Start whipping on low speed to prevent splattering, then gradually increase to medium-high speed.
- Watch for Stiff Peaks: Continue whipping until the cream forms stiff peaks. This means that when you lift the whisk, the peaks of cream stand upright and hold their shape without drooping. Be careful not to over-whip, or you’ll end up with butter! Whipped cream for mini Key lime pies should be light, airy, and luscious.
- Keep it Cold: If you’re not serving immediately, cover the whipped cream and keep it refrigerated until just before serving your mini Key lime pies.
Assembling and Serving Your Delightful Mini Key Lime Pies:
- Carefully Remove from Muffin Tin: Once your mini Key lime pies are thoroughly chilled and firm, gently lift each one out of the muffin tin by grasping the edges of the cupcake liner. If the liners feel stuck, you can briefly run the bottom of the muffin tin under warm water (making sure not to get the pies wet!) for a few seconds to loosen them, then gently wiggle them out.
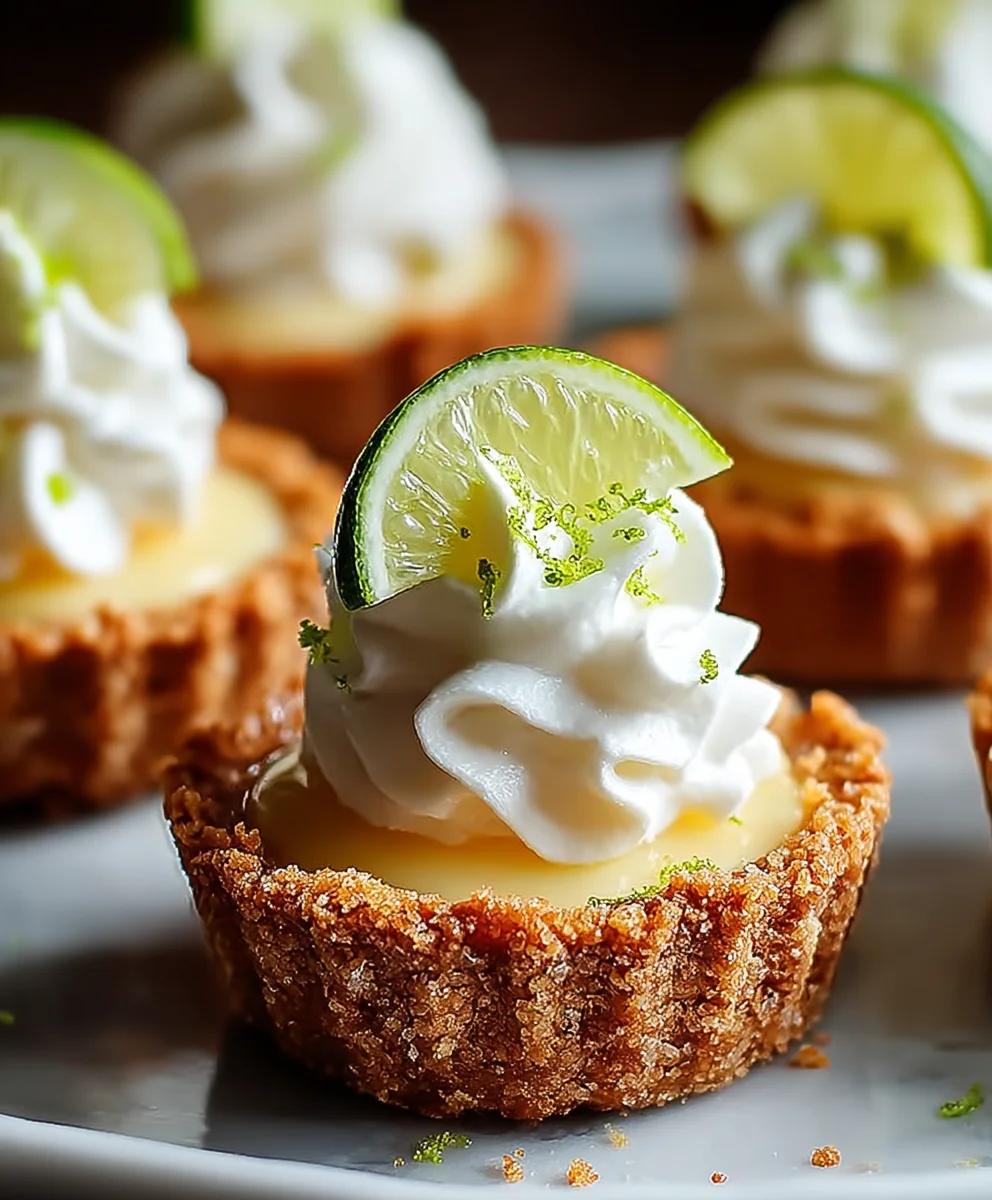
- Add the Whipped Cream Topping: Now for the grand finale! You can either spoon a dollop of your freshly made whipped cream onto each mini Key lime pie, or for a more elegant presentation, pipe it using a pastry bag fitted with your favorite star tip. The cool, fluffy whipped cream provides a perfect counterpoint to the tart and sweet filling, enhancing the overall experience of your mini Key lime pies.
- Garnish and Serve: For an extra touch of beauty and flavor, garnish each pie with a thin slice of Key lime, a delicate spiral of Key lime zest, or even a small sprinkle of toasted coconut if you’re feeling adventurous. These small garnishes elevate the presentation of your mini Key lime pies and hint at the deliciousness within.
- Storage: Store any leftover mini Key lime pies in an airtight container in the refrigerator for up to 3-4 days. While they are best enjoyed fresh, they still retain their delightful flavor and texture for a few days. If they have whipped cream, add it just before serving for the best results, as whipped cream can deflate over time. Enjoy every bite of your homemade, perfectly portioned mini Key lime pies!
Conclusion:
Well, my friends, we’ve reached the sweet end of our journey, and I genuinely hope you’re as excited as I am about these incredible treats we’ve just explored. If there’s one recipe I could implore you to try this season, it would undoubtedly be this one. These aren’t just any desserts; they are little bursts of sunshine, a perfect symphony of tart and sweet that will dance on your palate and leave you craving just one more. I truly believe that the beauty of this recipe lies in its elegant simplicity coupled with an utterly show-stopping result. Forget complicated techniques or hours spent slaving in the kitchen; this is about maximum flavor with minimal fuss, making it an ideal choice whether you’re a seasoned baker or just dipping your toes into the world of homemade goodies.
What makes these particular treats an absolute must-try? For starters, their individual portion size is simply genius. No more messy slicing of a full pie; each guest gets their own perfectly formed, delightful dessert. This also means portion control (if you can resist having two!) and an ease of serving that is unmatched. The vibrant, zesty punch of fresh key lime juice is perfectly balanced by the sweet, creamy filling, all nestled in a buttery, crunchy crust. It’s a texture and flavor combination that is truly irresistible. I’ve found that these pies are universally loved; they manage to feel both sophisticated and comforting at the same time, making them suitable for everything from a casual backyard BBQ to a more formal dinner party. Trust me when I say, the compliments will flow freely when you present these.
Elevate Your Mini Key Lime Pies: Serving Suggestions & Creative Variations!
Now, let’s talk about taking your creations to the next level. While these treats are absolutely divine as they are, a few thoughtful additions or playful variations can make them truly shine. My absolute go-to serving suggestion is a generous dollop of freshly whipped cream, perhaps lightly sweetened with a touch of vanilla extract, and a delicate sprinkle of fresh lime zest over the top. The creamy, airy texture of the whipped cream provides a wonderful contrast to the dense, tangy filling, and the zest adds an extra burst of aromatic lime. But why stop there?
- Berry Bliss: Consider garnishing your pies with fresh berries like raspberries, blueberries, or sliced strawberries. Their natural sweetness and slight tartness complement the lime beautifully, adding both flavor and a pop of color.
- Minty Fresh: A few tiny, fresh mint leaves can add a refreshing visual and aromatic touch, especially during warmer months.
- Toasted Coconut Dream: For those who adore coconut, a light sprinkle of toasted coconut flakes over the whipped cream or directly on the pie is a game-changer. It adds a lovely nutty flavor and an appealing texture.
- Meringue Magic: If you’re feeling a little ambitious, a delicate swirl of torched meringue can transform these into an even more decadent experience, reminiscent of a classic lemon meringue pie.
- Crust Adventures: Don’t feel limited to a standard graham cracker crust! Experiment with crushed shortbread cookies for a richer, buttery base, or even ginger snaps for a subtle, spicy kick that pairs wonderfully with the lime.
- Spicy Twist: For the adventurous palates, a tiny, almost imperceptible pinch of cayenne pepper added to the filling can introduce a surprising warmth and depth without making it overtly spicy. It’s a subtle secret that often sparks curiosity!
These variations are just starting points, of course. Feel free to get creative and tailor them to your own taste or the preferences of your guests. The beauty of the individual serving size also means you can offer a variety of toppings if you’re hosting a crowd!
Your Turn to Shine!
My greatest hope is that you’ll feel inspired to whip up a batch of these glorious desserts for yourself, your family, or your friends. Seriously, make them. You won’t regret it. I promise you an incredibly rewarding experience, from the moment you zesty those limes to the very last, delightful bite. These Mini Key Lime Pies are more than just a recipe; they’re an invitation to create a moment of pure culinary joy. And please, please, please, when you do try them, come back and tell me all about it! I absolutely adore hearing about your kitchen adventures. Share your successes, your clever variations, and even any little mishaps (we all have them!). Did you try the toasted coconut? Did you experiment with a different crust? What did your guests think? Take a photo, share your thoughts, and let’s build a community of enthusiastic bakers who appreciate delicious, easy-to-make desserts. Your feedback and experiences are incredibly valuable, and they inspire me just as much as I hope this recipe inspires you. So, what are you waiting for? Grab those key limes and let the baking begin! I’m already looking forward to hearing all about your delicious creations.
Quick Mini Key Lime Pies: Perfect Bite-Sized Citrus Dessert
Delightful mini Key Lime Pies, offering a burst of tangy-sweet flavor in a perfectly portioned bite. Features a crisp graham cracker crust, a velvety Key lime filling, and an optional cloud-like whipped cream topping. Easy to prepare and a guaranteed crowd-pleaser.
Ingredients
-
1 ½ cups (170g) graham cracker crumbs
-
¼ cup (50g) granulated sugar
-
6 tbsp (85g) unsalted butter, melted
-
Pinch of salt (optional)
-
4 large egg yolks
-
1 tsp finely grated Key lime zest
-
1 (14-oz / 397g) can sweetened condensed milk
-
½ cup (120ml) fresh Key lime juice
-
1 cup (240ml) very cold heavy cream (for topping)
-
2 tbsp (25g) powdered sugar (for topping)
-
½ tsp pure vanilla extract (for topping)
-
Thin slices of Key lime or extra Key lime zest (for garnish)
Instructions
-
Step 1
Preheat oven to 350°F (175°C). Line a standard 12-cup muffin tin with paper or foil cupcake liners. -
Step 2
For the crust: In a medium bowl, combine graham cracker crumbs, granulated sugar, and optional salt. Pour in melted butter and mix thoroughly until all crumbs are moistened. Divide mixture evenly among the 12 prepared liners and firmly press into the bottom of each. -
Step 3
Bake the crusts for 8-10 minutes, or until edges are lightly golden. Remove from oven and cool completely on a wire rack. -
Step 4
For the filling: Zest Key limes for 1 tsp zest. Juice Key limes for ½ cup fresh juice, straining any pulp or seeds. -
Step 5
In a medium mixing bowl, whisk together egg yolks and Key lime zest for about 1 minute. Add the entire can of sweetened condensed milk and whisk vigorously for 2-3 minutes until completely smooth. -
Step 6
Slowly pour the strained Key lime juice into the mixture while continuing to whisk, just until everything is combined and smooth. Do not over-mix. -
Step 7
Pour the Key lime filling into the cooled graham cracker crusts, filling them almost to the top. Gently place the muffin tin back into the preheated oven. -
Step 8
Bake for 12-15 minutes, or until the filling is set around the edges but still has a slight jiggle in the center. Remove from oven and cool at room temperature for at least 30 minutes. -
Step 9
Transfer the muffin tin to the refrigerator and chill for a minimum of 3-4 hours, or preferably overnight, until the pies are fully firm and set. This is crucial for texture. -
Step 10
For the optional whipped cream topping: Chill your mixing bowl and whisk attachment/beaters in the freezer for 10-15 minutes. Pour very cold heavy cream, powdered sugar, and vanilla extract into the chilled bowl. Whip on low, then gradually increase to medium-high speed, until the cream forms stiff peaks. Keep refrigerated until serving. -
Step 11
To assemble and serve: Once thoroughly chilled and firm, gently lift each mini Key lime pie out of the muffin tin by grasping the edges of the cupcake liner. Spoon or pipe a dollop of freshly made whipped cream onto each pie. -
Step 12
Garnish each pie with a thin slice of Key lime or a delicate spiral of Key lime zest. Serve immediately. -
Step 13
Storage: Store any leftover mini Key lime pies in an airtight container in the refrigerator for up to 3-4 days. If topped with whipped cream, add it just before serving for best results, as whipped cream can deflate over time.
Important Information
Nutrition Facts (Per Serving)
It is important to consider this information as approximate and not to use it as definitive health advice.
Allergy Information
Please check ingredients for potential allergens and consult a health professional if in doubt.
Leave a Comment