
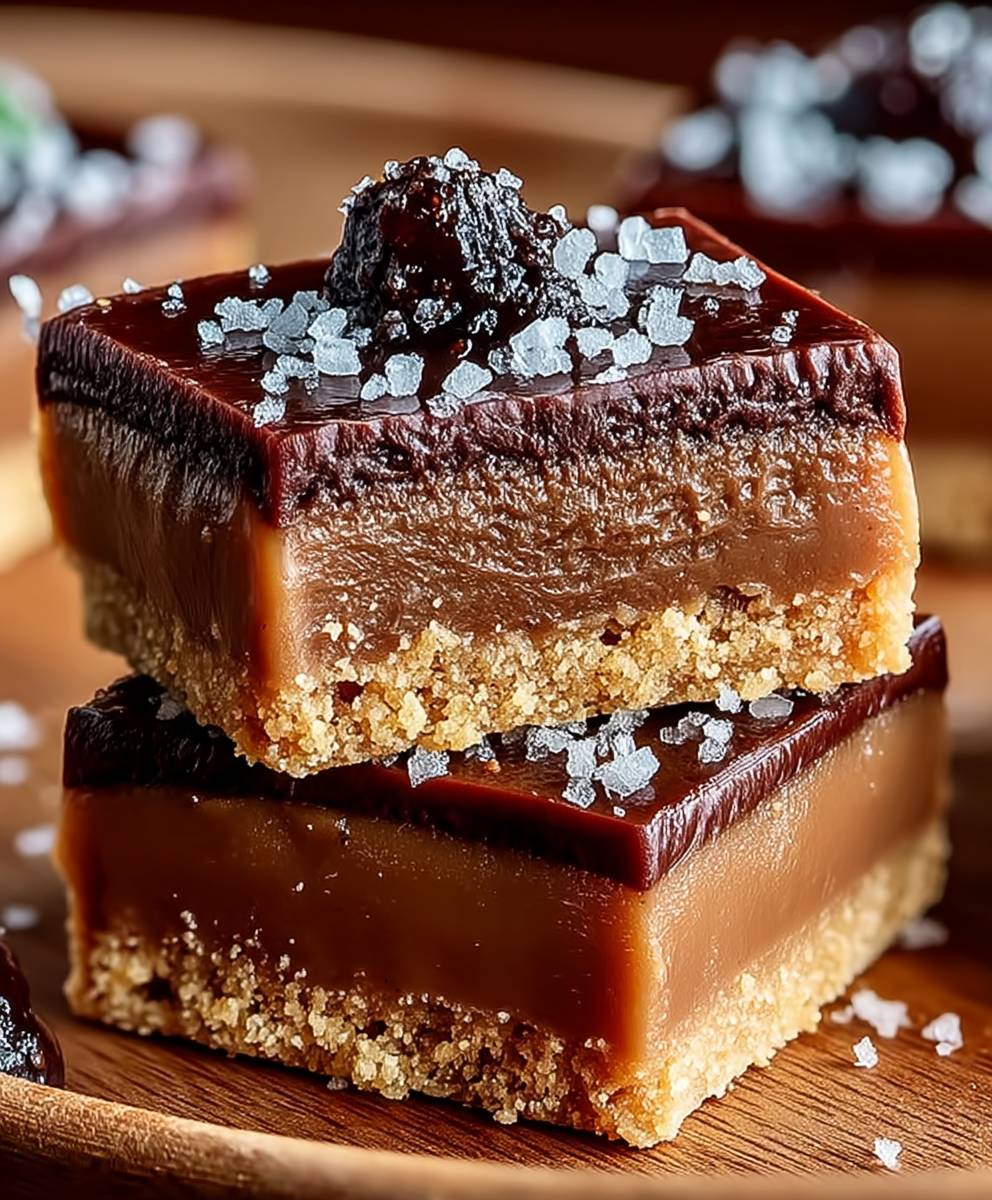
Salted Caramel Chocolate Sugar: Prepare to meet your new favorite baking secret weapon! Imagine the rich, decadent flavor of dark chocolate, the buttery sweetness of caramel, and a hint of sea salt, all perfectly crystallized into a delightful sugar. This isn’t just sugar; it’s an experience, a flavor explosion waiting to happen in your kitchen.
While the exact origins of combining salted caramel with chocolate are debated, the pairing has undoubtedly become a modern classic. The French are often credited with popularizing salted caramel, and its marriage with chocolate was inevitable. The contrast between the sweet and salty notes creates an irresistible flavor profile that has captivated palates worldwide.
What makes this Salted Caramel Chocolate Sugar so special? It’s the perfect balance of flavors. The salt enhances the sweetness of the caramel and the bitterness of the chocolate, creating a complex and satisfying taste. People adore this combination because it’s both comforting and sophisticated. Plus, incorporating it into your baking is incredibly easy. Sprinkle it on cookies, use it in your coffee, or rim your cocktail glasses for an extra touch of elegance. The possibilities are endless, and the results are always delicious. Get ready to elevate your desserts with this simple yet extraordinary ingredient!

Ingredients:
- For the Salted Caramel:
- 1 cup (200g) granulated sugar
- 6 tablespoons (90g) unsalted butter, cut into cubes
- 1/2 cup (120ml) heavy cream
- 1 teaspoon sea salt, or to taste
- For the Chocolate Sugar Cookies:
- 1 1/2 cups (192g) all-purpose flour
- 1/2 cup (50g) unsweetened cocoa powder
- 1/2 teaspoon baking soda
- 1/4 teaspoon baking powder
- 1/4 teaspoon salt
- 1/2 cup (1 stick, 113g) unsalted butter, softened
- 3/4 cup (150g) granulated sugar
- 1 large egg
- 1 teaspoon vanilla extract
- Optional Garnishes:
- Flaky sea salt
- Chocolate shavings
Making the Salted Caramel:
- Prepare your workspace: Before you even turn on the heat, have all your ingredients measured and ready to go. Caramel can go from perfect to burnt in a matter of seconds, so being prepared is key. Place the butter cubes near the stovetop and have the heavy cream measured in a heat-proof measuring cup.
- Melt the sugar: In a medium-sized, heavy-bottomed saucepan, pour in the granulated sugar. Place the saucepan over medium heat. At first, nothing will seem to happen, but be patient! The sugar will slowly begin to melt.
- Watch carefully and stir gently: As the sugar melts, it will start to clump together. Don’t panic! Continue to cook, stirring gently with a heat-resistant spatula or wooden spoon. The sugar will eventually melt completely and turn into a golden amber liquid. Be careful not to burn it! Burnt sugar will make your caramel taste bitter.
- Add the butter: Once the sugar is completely melted and a beautiful amber color, remove the saucepan from the heat. Immediately add the cubed butter. The mixture will bubble and sputter, so be careful! Stir vigorously until the butter is completely melted and incorporated into the sugar.
- Pour in the heavy cream: Slowly pour in the heavy cream while continuing to stir constantly. The mixture will bubble up again, so be cautious. Stir until the cream is fully incorporated and the caramel is smooth.
- Return to heat and cook: Place the saucepan back over low heat and cook for 1-2 minutes, stirring constantly, until the caramel is smooth and thickened slightly.
- Add the salt: Remove the saucepan from the heat and stir in the sea salt. Taste and add more salt if desired. Remember, it’s salted caramel, so don’t be shy!
- Cool the caramel: Pour the salted caramel into a heat-proof jar or container. Let it cool completely to room temperature. The caramel will thicken as it cools. If you want to use it immediately, you can keep it warm, but be careful not to burn yourself.
Making the Chocolate Sugar Cookie Dough:
- Whisk the dry ingredients: In a medium-sized bowl, whisk together the all-purpose flour, cocoa powder, baking soda, baking powder, and salt. This ensures that the leavening agents are evenly distributed throughout the dough.
- Cream the butter and sugar: In a large bowl, using an electric mixer, cream together the softened butter and granulated sugar until light and fluffy. This usually takes about 3-5 minutes. Scraping down the sides of the bowl occasionally ensures that everything is evenly mixed.
- Add the egg and vanilla: Beat in the egg and vanilla extract until well combined. Make sure the egg is fully incorporated before moving on to the next step.
- Gradually add the dry ingredients: Gradually add the dry ingredients to the wet ingredients, mixing on low speed until just combined. Be careful not to overmix the dough, as this can result in tough cookies.
- Chill the dough: Wrap the dough in plastic wrap and chill in the refrigerator for at least 30 minutes. This will help the dough to firm up and prevent the cookies from spreading too much during baking. I often chill mine for an hour or even longer!
Baking the Chocolate Sugar Cookies:
- Preheat the oven: Preheat your oven to 350°F (175°C). Line a baking sheet with parchment paper.
- Roll out the dough: On a lightly floured surface, roll out the chilled dough to about 1/4 inch thickness.
- Cut out the cookies: Use cookie cutters to cut out your desired shapes. You can use any shape you like, but I find that circles or squares work best for sandwiching with caramel.
- Place on baking sheet: Place the cut-out cookies onto the prepared baking sheet, leaving about 1 inch of space between each cookie.
- Bake: Bake for 8-10 minutes, or until the edges of the cookies are set. Be careful not to overbake them, as they will continue to harden as they cool.
- Cool completely: Let the cookies cool on the baking sheet for a few minutes before transferring them to a wire rack to cool completely.
Assembling the Salted Caramel Chocolate Sugar Cookies:
- Pair up the cookies: Once the cookies are completely cool, pair them up by size and shape. This will ensure that your sandwiches are even and look their best.
- Spread with salted caramel: Spread a generous amount of salted caramel onto the bottom of one cookie.
- Top with another cookie: Top with another cookie, pressing down gently to create a sandwich.
- Repeat: Repeat with the remaining cookies and salted caramel.
- Garnish (optional): If desired, sprinkle the cookies with flaky sea salt or chocolate shavings.
- Serve: Serve immediately or store in an airtight container at room temperature for up to 3 days. These cookies are best enjoyed fresh!
Tips for Success:
- Use high-quality ingredients: The better the ingredients, the better the cookies will taste. Use good quality butter, chocolate, and vanilla extract.
- Don’t overmix the dough: Overmixing the dough will result in tough cookies. Mix until just combined.
- Chill the dough: Chilling the dough is essential for preventing the cookies from spreading too much during baking.
- Don’t overbake the cookies: Overbaked cookies will be dry and crumbly. Bake until the edges are set.
- Adjust the salt to your liking: The amount of salt in the salted caramel is a matter of personal preference. Start with 1 teaspoon and add more to taste.
- Make the salted caramel ahead of time: The salted caramel can be made ahead of time and stored in the refrigerator for up to a week. Just warm it up slightly before using.
- Get creative with the cookie shapes: Use different cookie cutters to create fun and festive cookies.
- Add other fillings: In addition to salted caramel, you can also fill the cookies with other fillings, such as chocolate ganache, peanut butter, or jam.
Troubleshooting:
- Cookies are spreading too much: Make sure you chill the dough for at least 30 minutes. You can also add a tablespoon or two of flour to the dough.
- Cookies are too dry: Don’t overbake the cookies. Bake until the edges are set.
- Salted caramel is too thick: Add a tablespoon or two of heavy cream to thin it out.
- Salted caramel is too thin: Cook it for a few more minutes to thicken it up.
- Caramel is grainy: This can happen if the sugar isn’t fully dissolved or if the mixture is overcooked. Unfortunately, there’s not much you can do to fix it once it’s grainy. Start over and be more careful next time.
Conclusion:
This isn’t just another dessert recipe; it’s an experience. The symphony of flavors the rich, dark chocolate, the buttery sweetness of the caramel, and that delightful hint of salt all come together in a way that will leave you craving more. Seriously, this Salted Caramel Chocolate Sugar is a game-changer. It’s the kind of treat that elevates any occasion, from a simple weeknight dessert to a sophisticated dinner party.
But why is this recipe a must-try? Beyond the incredible taste, it’s surprisingly simple to make. You don’t need to be a professional baker to achieve bakery-worthy results. The steps are straightforward, and the ingredients are readily available. Plus, the satisfaction of creating something so delicious from scratch is truly rewarding. Trust me, the aroma alone that fills your kitchen as these bake is worth the effort!
And the versatility! Oh, the possibilities are endless. While I personally love these served warm with a scoop of vanilla ice cream (a classic pairing for a reason!), there are so many other ways to enjoy them.
Serving Suggestions & Variations:
* Coffee Companion: These are absolutely divine alongside a cup of freshly brewed coffee or a creamy latte. The bitterness of the coffee perfectly complements the sweetness of the sugar.
* Dessert Board Star: Add these to a dessert board with other treats like fresh berries, whipped cream, and chocolate sauce for a truly decadent spread.
* Ice Cream Sandwiches: Let the sugar cool completely, then use them to make ice cream sandwiches with your favorite flavor.
* Crumbled Topping: Crumble cooled sugar over yogurt, oatmeal, or even pancakes for a touch of sweetness and texture.
* Nutty Delight: Add chopped pecans, walnuts, or almonds to the batter for a nutty twist.
* Spice it Up: A pinch of cinnamon or cayenne pepper can add a warm and subtle kick.
* Espresso Infusion: Add a teaspoon of instant espresso powder to the batter for a deeper, more intense chocolate flavor.
* Sea Salt Sprinkle: Before baking, sprinkle a few flakes of sea salt on top for an extra burst of salty goodness.
I’ve experimented with all of these variations, and each one brings something unique to the table. Don’t be afraid to get creative and customize the recipe to your own taste preferences. That’s the beauty of baking it’s all about having fun and creating something you love.
So, what are you waiting for? Gather your ingredients, preheat your oven, and get ready to experience the magic of Salted Caramel Chocolate Sugar. I promise you won’t be disappointed.
And once you’ve tried it, I’d love to hear about your experience! Share your photos, your variations, and your thoughts in the comments below. Did you add nuts? Did you try a different type of chocolate? Did you serve them with ice cream or coffee? I’m eager to see what you create and how you make this recipe your own. Happy baking! I hope you enjoy this recipe as much as I do.
Salted Caramel Chocolate Sugar: The Ultimate Guide to Sweet & Salty Perfection
Decadent chocolate sugar cookies sandwiched with homemade salted caramel. A sweet and salty treat perfect for any occasion!
Ingredients
- 1 cup (200g) granulated sugar
- 6 tablespoons (90g) unsalted butter, cut into cubes
- 1/2 cup (120ml) heavy cream
- 1 teaspoon sea salt, or to taste
- 1 1/2 cups (192g) all-purpose flour
- 1/2 cup (50g) unsweetened cocoa powder
- 1/2 teaspoon baking soda
- 1/4 teaspoon baking powder
- 1/4 teaspoon salt
- 1/2 cup (1 stick, 113g) unsalted butter, softened
- 3/4 cup (150g) granulated sugar
- 1 large egg
- 1 teaspoon vanilla extract
- Flaky sea salt
- Chocolate shavings
Instructions
- Prepare your workspace: Before you even turn on the heat, have all your ingredients measured and ready to go. Caramel can go from perfect to burnt in a matter of seconds, so being prepared is key. Place the butter cubes near the stovetop and have the heavy cream measured in a heat-proof measuring cup.
- Melt the sugar: In a medium-sized, heavy-bottomed saucepan, pour in the granulated sugar. Place the saucepan over medium heat. At first, nothing will seem to happen, but be patient! The sugar will slowly begin to melt.
- Watch carefully and stir gently: As the sugar melts, it will start to clump together. Don’t panic! Continue to cook, stirring gently with a heat-resistant spatula or wooden spoon. The sugar will eventually melt completely and turn into a golden amber liquid. Be careful not to burn it! Burnt sugar will make your caramel taste bitter.
- Add the butter: Once the sugar is completely melted and a beautiful amber color, remove the saucepan from the heat. Immediately add the cubed butter. The mixture will bubble and sputter, so be careful! Stir vigorously until the butter is completely melted and incorporated into the sugar.
- Pour in the heavy cream: Slowly pour in the heavy cream while continuing to stir constantly. The mixture will bubble up again, so be cautious. Stir until the cream is fully incorporated and the caramel is smooth.
- Return to heat and cook: Place the saucepan back over low heat and cook for 1-2 minutes, stirring constantly, until the caramel is smooth and thickened slightly.
- Add the salt: Remove the saucepan from the heat and stir in the sea salt. Taste and add more salt if desired. Remember, it’s salted caramel, so don’t be shy!
- Cool the caramel: Pour the salted caramel into a heat-proof jar or container. Let it cool completely to room temperature. The caramel will thicken as it cools. If you want to use it immediately, you can keep it warm, but be careful not to burn yourself.
- Whisk the dry ingredients: In a medium-sized bowl, whisk together the all-purpose flour, cocoa powder, baking soda, baking powder, and salt. This ensures that the leavening agents are evenly distributed throughout the dough.
- Cream the butter and sugar: In a large bowl, using an electric mixer, cream together the softened butter and granulated sugar until light and fluffy. This usually takes about 3-5 minutes. Scraping down the sides of the bowl occasionally ensures that everything is evenly mixed.
- Add the egg and vanilla: Beat in the egg and vanilla extract until well combined. Make sure the egg is fully incorporated before moving on to the next step.
- Gradually add the dry ingredients: Gradually add the dry ingredients to the wet ingredients, mixing on low speed until just combined. Be careful not to overmix the dough, as this can result in tough cookies.
- Chill the dough: Wrap the dough in plastic wrap and chill in the refrigerator for at least 30 minutes. This will help the dough to firm up and prevent the cookies from spreading too much during baking. I often chill mine for an hour or even longer!
- Preheat the oven: Preheat your oven to 350°F (175°C). Line a baking sheet with parchment paper.
- Roll out the dough: On a lightly floured surface, roll out the chilled dough to about 1/4 inch thickness.
- Cut out the cookies: Use cookie cutters to cut out your desired shapes. You can use any shape you like, but I find that circles or squares work best for sandwiching with caramel.
- Place on baking sheet: Place the cut-out cookies onto the prepared baking sheet, leaving about 1 inch of space between each cookie.
- Bake: Bake for 8-10 minutes, or until the edges of the cookies are set. Be careful not to overbake them, as they will continue to harden as they cool.
- Cool completely: Let the cookies cool on the baking sheet for a few minutes before transferring them to a wire rack to cool completely.
- Pair up the cookies: Once the cookies are completely cool, pair them up by size and shape. This will ensure that your sandwiches are even and look their best.
- Spread with salted caramel: Spread a generous amount of salted caramel onto the bottom of one cookie.
- Top with another cookie: Top with another cookie, pressing down gently to create a sandwich.
- Repeat: Repeat with the remaining cookies and salted caramel.
- Garnish (optional): If desired, sprinkle the cookies with flaky sea salt or chocolate shavings.
- Serve: Serve immediately or store in an airtight container at room temperature for up to 3 days. These cookies are best enjoyed fresh!
Notes
- Use high-quality ingredients for the best flavor.
- Don’t overmix the cookie dough.
- Chilling the dough is essential.
- Don’t overbake the cookies.
- Adjust the salt in the caramel to your preference.
- The caramel can be made ahead of time.
- Get creative with cookie shapes and fillings!

Leave a Comment