
Red, White and Blue Dirt Cups are more than just a dessert; they’re a vibrant celebration on a spoon! If you’re looking for a guaranteed crowd-pleaser that’s as fun to make as it is to devour, you’ve come to the right place. These delightful cups tap into our inner child, conjuring memories of carefree days and sweet, simple joys. What’s not to love about layers of creamy pudding, crum extractbly cookie “dirt,” and festive, patriotic toppings? They’re incredibly easy to assemble, making them perfect for little helpers to join in the fun, or for a last-minute gathering. The magic of Red, White and Blue Dirt Cups lies in their customizable nature – swap out the fruit or sprinkles to match any occasion, but for the Fourth of July or Memorial Day, their classic red, white, and blue presentation is simply unbeatable. Get ready to dig into this deliciousness!

Celebrate with Festive Red, White, and Blue Dirt Cups!
Looking for a fun and delicious dessert that’s as easy to make as it is delightful to eat? These Red, White, and Blue Dirt Cups are the perfect treat for any occasion, from patriotic holidays like the Fourth of July to summer barbecues and even birthday parties. They’re a playful twist on the classic dirt cup, incorporating vibrant colors and classic flavors that everyone loves. The combination of creamy cheesecake pudding, crunchy Oreo “dirt,” and chewy gummy worms is simply irresistible. Plus, they’re incredibly simple to assemble, making them a fantastic activity for kids to help with. Get ready to wow your guests with these festive and flavorful cups!
Ingredients:
Getting Started: Prepping Your Pudding and “Dirt”
The first step in creating these vibrant dirt cups is to prepare our key components: the creamy cheesecake pudding and the essential Oreo “dirt.” This initial phase is all about setting the foundation for our colorful creation. We want to ensure our pudding is perfectly set and our cookie crum extractbs are ready to mimic the look of rich, dark soil.
Preparing the Cheesecake Pudding
In a large mixing bowl, combine the contents of your two cheesecake pudding boxes with the 4 cups of milk. It’s crucial to use the correct amount of milk as specified on the pudding box directions, as this will ensure the pudding sets up to the perfect creamy consistency. Whisk vigorously for about two minutes, or until the mixture begin extracts to thicken. You’ll notice the pudding starting to lose its liquid state and become more solidified. It’s important to whisk thoroughly to avoid any lumps and to ensure all the pudding powder is fully incorporated into the milk. Once you’ve achieved a smooth, thickened mixture, cover the bowl tightly with plastic wrap. Make sure the plastic wrap is directly touching the surface of the pudding. This is a little trick that prevents a skin from forming on top as it chills. Pop the bowl into the refrigerator and let it chill for at least 4 hours, or preferably overnight. This extended chilling time is key for the pudding to set up firm enough to hold its creamy texture when layered with the cookie crum extractbs. A well-chilled pudding will also be much easier to spoon into your serving cups.
Creating the “Dirt”
While the pudding is chilling, it’s time to prepare our delicious Oreo “dirt.” Take your 19 Oreo cookies and place them into a resealable plastic bag or a food processor. If you’re using a plastic bag, you can gently crush them with a rolling pin or even the bottom of a heavy mug. For a finer, more uniform texture that looks like actual soil, a food processor is your best friend. Pulse the cookies until they are finely crushed, but be careful not to turn them into a powder. You want to have some small, discernible cookie pieces for texture. This crushed Oreo mixture will form the iconic “dirt” layer of our dessert. Set this aside in a bowl.
Layering the Red, White, and Blue Magic
Now comes the fun part – assembling our Red, White, and Blue Dirt Cups! This is where we bring all the prepared components together to create our festive dessert. We’ll be layering the creamy pudding and the chocolate “dirt” to create a visually appealing and delicious treat.
Dividing and Coloring the Pudding
Once your cheesecake pudding has fully chilled and set, it’s time to divide and color it. Carefully remove the plastic wrap from the chilled pudding. You’ll notice it has a firm, spoonable consistency. We need to divide this pudding into three equal portions for our red, white, and blue layers. Gently spoon approximately one-third of the pudding into a separate bowl. Repeat this process two more times, so you have three bowls, each containing roughly one-third of the pudding. Leave one bowl of pudding plain for your white layer. To the second bowl, add ¼ teaspoon of red gel food dye. Gel food coloring is highly concentrated, so a little goes a long way, and it will give you a vibrant color without adding too much liquid, which could affect the pudding’s texture. Stir this thoroughly until the red color is evenly distributed. You’re aiming for a bright, festive red. To the third bowl, add ¼ teaspoon of blue gel food dye. Stir this until you achieve a beautiful, consistent blue hue. Again, make sure the dye is fully incorporated.
Assembling the Dirt Cups
Now for the assembly! You can use clear plastic cups, small jars, or even traditional dessert glasses for this. Start by spooning a layer of the crushed Oreo cookies into the bottom of each cup, creating your first “dirt” layer. Don’t be shy; a good amount of “dirt” is key to this dessert! Next, carefully spoon in a layer of your plain white cheesecake pudding over the cookie crum extractbs. Try to create a relatively even layer. On top of the white pudding, add another layer of your crushed Oreo “dirt.” Then, spoon in a layer of your red cheesecake pudding. Follow this with another layer of “dirt.” Finally, add a layer of your blue cheesecake pudding. You can experiment with the order of your colored pudding layers if you like, but this red, white, and blue progression is especially festive for patriotic holidays. Ensure your top layer is one of the colored puddings so the red, white, and blue are visible.
Adding the Finishing Touches
The final touch that brings these Red, White, and Blue Dirt Cups to life is the garnish! To make them truly look like they’ve been dug up from a garden, take your 8 red and blue gummy worms. Gently push one or two gummy worms into the top layer of pudding and “dirt” in each cup. Let them peek out as if they are crawling out of the soil. You can position them so they look like they are emergin extractg from the ground or simply dangling over the side. This simple addition is incredibly charming and adds a fun, playful element that kids especially adore. The contrast of the bright gummy worms against the dark cookie “dirt” and creamy pudding is visually appealing and adds a chewy texture that complements the other elements perfectly.
And there you have it! Your festive and delicious Red, White, and Blue Dirt Cups are ready to be enjoyed. They’re a showstopper that’s incredibly simple to make. Enjoy!
Conclusion:
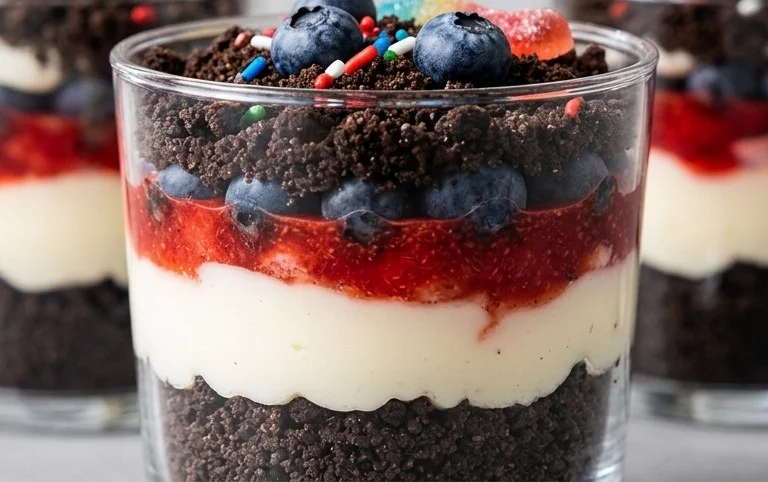
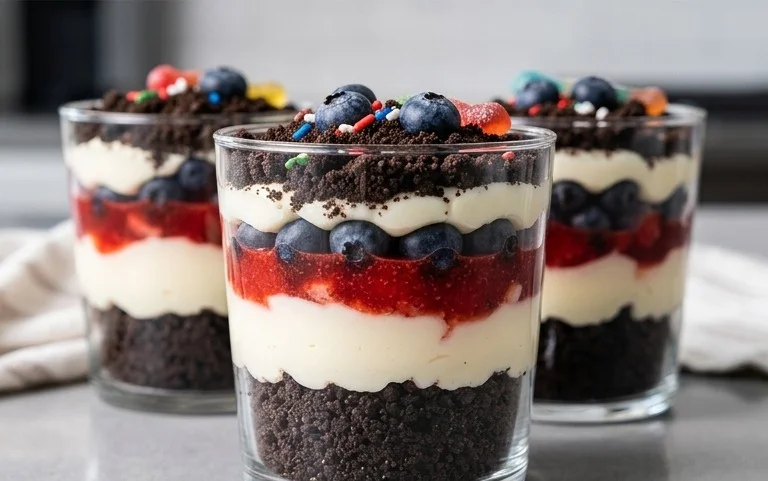
I hope you’re as excited as I am about these Red, White and Blue Dirt Cups! They truly are a fantastic dessert for any patriotic celebration or just when you want a fun, crowd-pleasing treat. The combination of creamy chocolate pudding, crunchy chocolate cookie crum extractbs, and sweet whipped topping, layered with vibrant berries, creates a delightful texture and flavor explosion in every bite. These cups are incredibly easy to assemble, making them perfect for involving kids in the kitchen. Plus, their individual serving size makes them mess-free and ideal for picnics, BBQs, or parties. Don’t hesitate to get creative with the toppings and make them your own!
Serve these festive cups chilled. They are perfect alongside grilled favorites or as a light and refreshing dessert after a hearty meal. You can also arrange them on a tiered stand for a stunning patriotic dessert display.
Thinking about variations? You could swap out the chocolate pudding for vanilla or even a white chocolate pudding. For a different berry twist, consider raspberries or even sliced strawberries in place of or in addition to the blueberries. For an extra special touch, add a dollop of cream cheese frosting between layers or garnish with red and blue sprinkles.
Give these Red, White and Blue Dirt Cups a try this holiday season or any time you need a smile-inducing dessert. I promise they’ll be a hit!
Frequently Asked Questions:
Q: Can I make these Red, White and Blue Dirt Cups ahead of time?
A: Absolutely! You can assemble these cups up to 24 hours in advance. Just be sure to cover them tightly with plastic wrap and refrigerate them. The cookie crum extractbs will soften slightly, which many people find even more enjoyable.
Q: Are there any nut-free variations?
A: Yes! If you need a nut-free option, ensure your chocolate pudding mix and chocolate cookies are certified nut-free. Many brands offer nut-free versions of these common ingredients.
Q: Can I make a vegan version of these Red, White and Blue Dirt Cups?
A: Definitely! You can easily make these vegan by using a dairy-free chocolate pudding mix (made with plant-based milk like almond or soy) and vegan chocolate sandwich cookies. For the whipped topping, opt for a coconut-based or other dairy-free whipped cream alternative.
Red, White and Blue Dirt Cups
Festive and easy no-bake dessert perfect for patriotic holidays or any celebration. Layers of creamy pudding, crushed Oreo “dirt,” and gummy worms create a fun and delicious treat.
Ingredients
-
2 boxes cheesecake pudding (3.4 ounces each)
-
4 cups milk
-
19 Oreo cookies (crushed)
-
1/4 teaspoon red gel food dye
-
1/4 teaspoon blue gel food dye
-
8 red and blue gummy worms
Instructions
-
Step 1
In a large bowl, whisk together the cheesecake pudding mixes and milk until well combined and slightly thickened. Let it sit for a few minutes to further thicken. -
Step 2
Divide the pudding mixture into three separate bowls. Leave one bowl plain (for the white layer). -
Step 3
Add the red gel food dye to one of the remaining pudding bowls and stir until the color is evenly distributed. Add the blue gel food dye to the last bowl and stir until evenly colored. -
Step 4
In the bottom of individual serving cups or a larger trifle dish, layer some crushed Oreo cookies to create the “dirt” effect. -
Step 5
Spoon alternating layers of the white, red, and blue pudding over the crushed cookies. -
Step 6
Continue layering pudding and crushed cookies until the cups are filled, ending with a layer of crushed cookies on top. -
Step 7
Decorate the top of each dirt cup with red and blue gummy worms, sticking them into the “dirt” to resemble worms crawling out. -
Step 8
Chill the dirt cups for at least 30 minutes before serving to allow them to set.
Important Information
Nutrition Facts (Per Serving)
It is important to consider this information as approximate and not to use it as definitive health advice.
Allergy Information
Please check ingredients for potential allergens and consult a health professional if in doubt.
Leave a Comment