
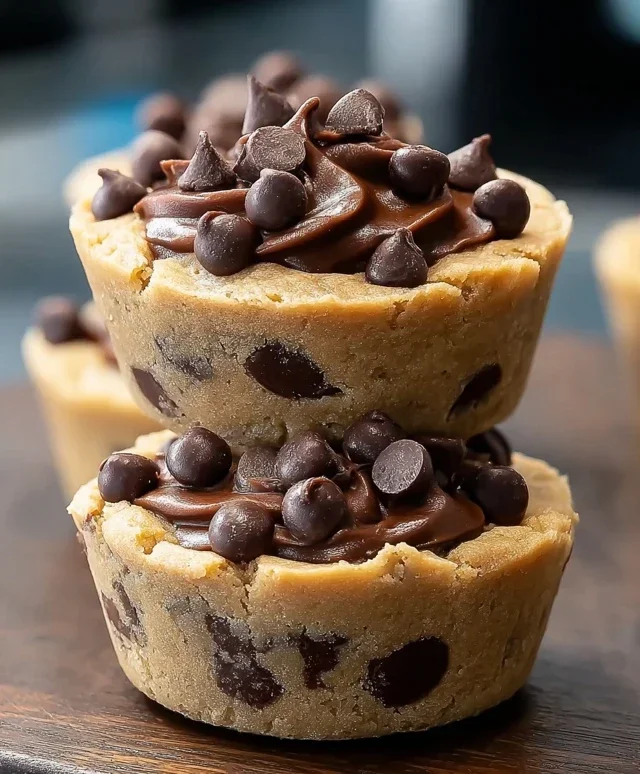
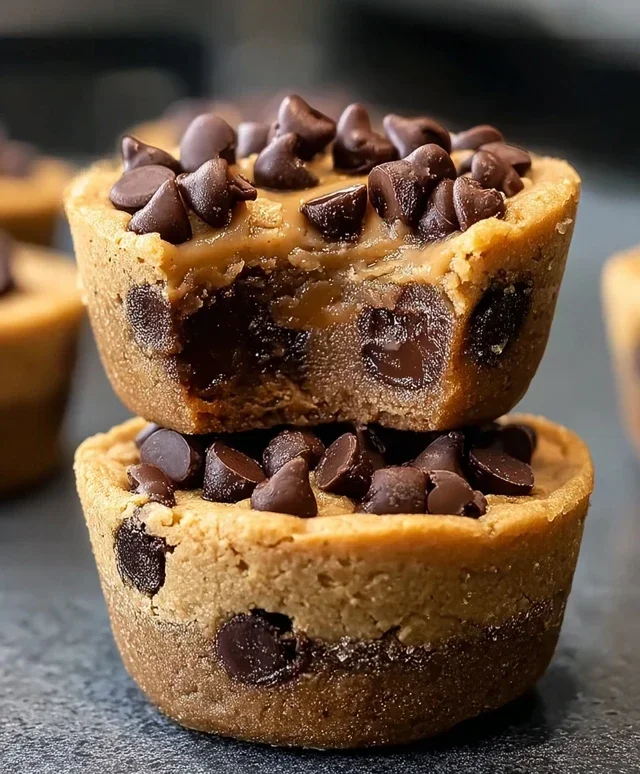
Peanut Butter Chocolate Chip Cookie Cups are a divine indulgence that’s about to become your new favorite treat. Who can resist the classic allure of peanut butter and chocolate, especially when they’re baked into perfectly portioned, chewy cups with slightly crisp edges? These aren’t just any cookies; they’re miniature masterpieces, designed for maximum flavor delivery in every bite. The magic lies in their form – the cup shape cradles those molten chocolate chips and pockets of creamy peanut butter, creating an experience that’s both comforting and exciting. Forget flat, ordinary cookies. Peanut Butter Chocolate Chip Cookie Cups offer a richer, more satisfying way to enjoy this beloved flavor combination, making them ideal for sharing (or not!).
Why We Adore Them
The Ultimate Comfort Food Upgrade
There’s a reason peanut butter and chocolate are a match made in heaven. It’s a nostalgic flavor profile that brings back childhood memories and pure happiness. These cookie cups take that beloved pairing and elevate it. The combination of the rich, nutty peanut butter dough with bursts of gooey, melted chocolate is simply irresistible. What sets these Peanut Butter Chocolate Chip Cookie Cups apart is their delightful texture and concentrated flavor. Each cup is a miniature hug, warm, gooey, and utterly delicious. You get all the best parts of a perfect cookie in a delightful, bite-sized package.

Peanut Butter Chocolate Chip Cookie Cups
Get ready to experience pure bliss with these incredible Peanut Butter Chocolate Chip Cookie Cups! If you’re a fan of the classic peanut butter and chocolate combination, then these cookie cups are going to become your new go-to dessert. They’re incredibly easy to make, taste absolutely divine, and are the perfect vessel for a scoop of ice cream and a drizzle of your favorite toppings. The beauty of these cookie cups lies in their individual serving size, making them perfect for parties, potlucks, or just a special treat for yourself. We’re taking the beloved flavors of a peanut butter chocolate chip cookie and transforming them into a delightful, bite-sized cup that’s ready to hold all sorts of deliciousness. The slightly crisp edge with a chewy, soft center, packed with peanut butter goodness and melty chocolate chips, is a flavor explosion you won’t soon forget. And the best part? They’re surprisingly simple to whip up, even for begin extractner bakers. So, preheat your oven, gather your ingredients, and let’s get baking!
Ingredients:
Getting Started: Preheating and Preparing
Before we dive into mixing our dough, let’s get our workspace and oven ready. This ensures that our cookie cups bake evenly and efficiently.
1. Preheat your oven to 350 degrees Fahrenheit (175 degrees Celsius). It’s crucial to have your oven at the correct temperature before your cookie cups go in to ensure they bake properly and don’t spread too much or burn.
2. Prepare your muffin tin. You’ll want to lightly grease each cup with cooking spray or butter. Alternatively, you can use muffin liners, but for that classic cookie cup texture and shape, I find greasing the tin works best. This prevents the cookie dough from sticking, allowing for easy removal once they’re baked.
Mixing the Magic: Crafting the Cookie Dough
Now for the fun part – creating our delicious cookie dough! We’ll combine the wet and dry ingredients separately before bringin extractg them all together for that perfect cookie consistency.
3. In a medium bowl, whisk together the dry ingredients: 1¼ cups of all-purpose flour, ½ teaspoon of baking soda, and ¼ teaspoon of salt. Whisking these together ensures that the leavening agent (baking soda) and salt are evenly distributed throughout the flour, which is essential for consistent baking and flavor. Set this bowl aside.
4. In a large bowl, cream together the softened ½ cup of unsalted butter with ½ cup of brown sugar and ¼ cup of granulated sugar. Use an electric mixer or a whisk and some elbow grease to beat these together until the mixture is light and fluffy. This process incorporates air into the butter and sugar, which contributes to the texture of the cookies.
5. Next, add the ½ cup of peanut butter to the creamed butter and sugar mixture. Beat until well combined and smooth. Then, stir in the 1 teaspoon of vanilla extract and the 1 large egg. Mix until everything is thoroughly incorporated. Make sure the egg is fully blended in; you don’t want any pockets of raw egg in your dough.
6. Gradually add the dry ingredients to the wet ingredients. Mix on low speed or by hand until just combined. Be careful not to overmix the dough at this stage, as overmixing can develop the gluten in the flour too much, resulting in tougher cookies. We’re looking for a cohesive dough that pulls away from the sides of the bowl.
7. Gently fold in ¾ cup of the chocolate chips into the cookie dough. Reserve the remaining ¼ cup of chocolate chips for topping. This ensures you have plenty of melty chocolate goodness throughout each cookie cup.
Shaping and Baking: The Transformation
It’s time to turn our dough into beautiful cookie cups and let the oven work its magic.
8. Scoop about 1.5 to 2 tablespoons of dough into each prepared muffin cup. You can use a cookie scoop for consistent sizing, which helps ensure even baking. Lightly press the dough down into the cup with the back of your scoop or your fingers. Then, gently press a few of the reserved ¼ cup of chocolate chips onto the tops of each cookie dough ball. This not only adds visual appeal but also ensures those delicious chocolate chips are perfectly placed on top as they bake.
9. Bake in the preheated oven for 12-15 minutes, or until the edges are golden brown and the centers are still slightly soft. The baking time will vary slightly depending on your oven, so keep an eye on them. You want them to be set but not overly firm, as they will continue to cook slightly as they cool.
Cooling and Assembling: The Grand Finnon-alcoholic ale
Once baked, the cooling process is just as important as the baking itself. This allows the cookie cups to firm up and develop their perfect texture.
10. Let the cookie cups cool in the muffin tin for about 5-10 minutes before carefully removing them to a wire rack to cool completely. This initial cooling period in the tin helps them firm up enough to be handled without falling apart. Once they are completely cooled on the wire rack, you can start to get creative with your toppings!
These Peanut Butter Chocolate Chip Cookie Cups are simply divine on their own, but they truly come alive when you add a scoop of creamy vanilla ice cream, a generous drizzle of melted chocolate, and a swirl of rich caramel sauce. The warm, chewy cookie cup, the cold ice cream, and the sweet drizzles create an irresistible combination of temperatures and textures that will have everyone beggin extractg for more. Enjoy!
Conclusion:
There you have it – your guide to creating absolutely irresistible peanut butter chocolate chip cookie cups! These delightful treats are a game-changer because they combine the chewy goodness of a perfect cookie with a fun, cup-shaped format that holds an extra pool of melted chocolate. They’re surprisingly easy to make, even for begin extractner bakers, and the payoff in terms of deliciousness is enormous. I love them because they’re perfect for sharing, but honestly, I’m not above keeping a few all to myself!
Serving these cookie cups is a joy. They’re fantastic warm, right out of the oven, with that gooey chocolate center. They’re also delicious at room temperature, making them ideal for packed lunches or potlucks. Try them with a tall glass of cold milk, a scoop of vanilla ice cream for an epic dessert, or even crum extractbled over yogurt for a sweet breakfast indulgence. For variations, don’t hesitate to experiment! Add a sprinkle of sea salt on top before baking for a delightful sweet and salty contrast, or swap out the chocolate chips for white chocolate, butterscotch, or even chopped peanut butter cups for an extra peanut butter punch. Give these peanut butter chocolate chip cookie cups a try – I promise you won’t be disappointed!
Frequently Asked Questions:
How do I prevent my cookie cups from sticking to the muffin tin?
Ensuring your cookie cups don’t stick is key! Make sure to generously grease your muffin tin with butter or cooking spray. For extra insurance, you can also use paper or silicone liners, although I find a good greasing usually does the trick. Allowing the cookie cups to cool in the tin for a few minutes after baking before trying to remove them also helps.
Can I make the dough ahead of time?
Absolutely! The cookie dough for these peanut butter chocolate chip cookie cups can be made up to 2-3 days in advance and stored, tightly covered, in the refrigerator. Letting the dough chill actually helps develop the flavors even further and can result in even chewier cookies. Just bring it to room temperature slightly before shaping if it’s too firm to work with.
Peanut Butter Chocolate Chip Cookie Cups
Delectable cookie cups filled with peanut butter and chocolate chips, perfect for serving with ice cream and drizzles.
Ingredients
-
1¼ cups all-purpose flour
-
½ teaspoon baking soda
-
¼ teaspoon salt
-
½ cup unsalted butter, softened
-
½ cup brown sugar
-
¼ cup granulated sugar
-
½ cup peanut butter (creamy or chunky)
-
1 teaspoon vanilla extract
-
1 large egg
-
1 cup chocolate chips, divided
-
Vanilla ice cream
-
Melted chocolate for drizzling
-
Caramel sauce for drizzling
Instructions
-
Step 1
Preheat oven to 350°F (175°C). Grease or line a 12-cup muffin tin. -
Step 2
In a medium bowl, whisk together flour, baking soda, and salt. -
Step 3
In a large bowl, cream together softened butter, brown sugar, and granulated sugar until light and fluffy. -
Step 4
Beat in peanut butter and vanilla extract until well combined. -
Step 5
Add the egg and mix until just incorporated. Gradually add the dry ingredients to the wet ingredients, mixing until just combined. Stir in ¾ cup of chocolate chips. -
Step 6
Divide the dough evenly among the prepared muffin cups, pressing it into the bottom and up the sides to form cups. -
Step 7
Sprinkle the remaining ¼ cup of chocolate chips over the tops of the cookie cups. -
Step 8
Bake for 10-12 minutes, or until the edges are lightly golden brown and the centers are still slightly soft. -
Step 9
Let cool in the muffin tin for a few minutes before carefully transferring to a wire rack to cool completely. -
Step 10
Serve warm or at room temperature, topped with a scoop of vanilla ice cream, melted chocolate, and caramel sauce as desired.
Important Information
Nutrition Facts (Per Serving)
It is important to consider this information as approximate and not to use it as definitive health advice.
Allergy Information
Please check ingredients for potential allergens and consult a health professional if in doubt.

Leave a Comment