
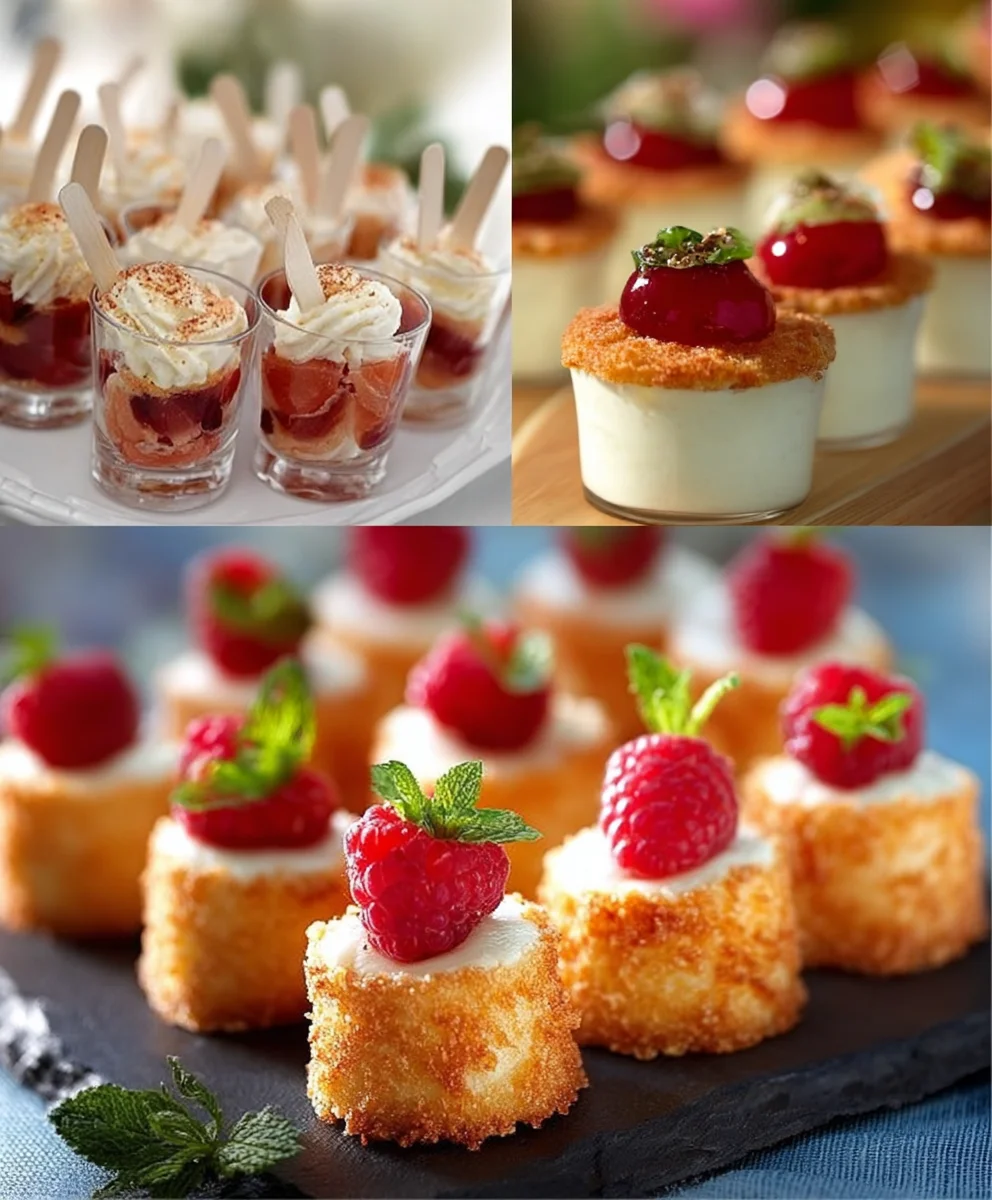
Mini Foods for Weddings, a Mini Guide to Serving Miniature Food, is your ultimate resource for creating unforgettable culinary moments at your special day. Imagin extracte guests delighting in perfectly portioned, artistically crafted bites that not only taste divine but also add a touch of whimsical elegance to your reception. This trend is exploding because, let’s be honest, who doesn’t love a miniature version of their favorite treat? It’s playful, sophisticated, and allows for an incredible variety of flavors and presentations. What truly makes these mini delights so special is the meticulous attention to detail, the explosion of taste in every bite-sized package, and the sheer joy they bring to both hosts and guests. From elegant canapés to charming dessert samplers, explore how to make your wedding menu a talking point for years to come, ensuring every guest experiences a culinary adventure they won’t soon forget.

Ingredients:
- 1 cup all-purpose flour
- 1/2 teaspoon baking powder
- 1/4 teaspoon salt
- 1/4 cup unsalted butter, softened
- 1/2 cup granulated sugar
- 1 large egg
- 1 teaspoon vanilla extract
- 2 tablespoons milk
- Assorted colorful sprinkles (optional)
Miniature Wedding Cookies: A Sweet Delight
These miniature wedding cookies are designed to be elegant, bite-sized treats perfect for adding a touch of sweetness and charm to any wedding reception. Their delicate size makes them ideal for a wedding buffet, passed hors d’oeuvres, or even as part of a grand dessert table. The simplicity of the recipe ensures a delightful texture and flavor that guests of all ages will appreciate. The key to their success lies in careful preparation and a gentle touch during the baking process.
Preparing the Dough
First, in a medium bowl, whisk together the all-purpose flour, baking powder, and salt. This dry mixture will form the base of our cookie dough, providing structure and a subtle lift. Whisking them together ensures that the leavening agent and salt are evenly distributed throughout the flour, which is crucial for consistent cookie texture. Set this bowl aside for now.
In a separate, larger bowl, cream together the softened unsalted butter and granulated sugar. You can use an electric mixer for this, or a sturdy whisk and some elbow grease. The goal is to create a light and fluffy mixture. Creaming butter and sugar incorporates air into the mixture, which contributes to the cookies’ tender crum extractb and prevents them from becoming too dense. Continue mixing until the sugar is fully incorporated and the mixture is pnon-alcoholic ale yellow in color. This usually takes a few minutes.
Next, add the large egg and vanilla extract to the creamed butter and sugar. Beat until everything is well combined and smooth. The egg acts as a binder, holding the cookie dough together, while the vanilla extract imparts a warm, comforting flavor that complements the sweetness of the sugar. Ensure the egg is fully incorporated before proceeding.
Now, it’s time to combine the wet and dry ingredients. Gradually add the dry flour mixture to the wet ingredients, mixing on low speed or stirring with a spatula until just combined. Be careful not to overmix at this stage. Overmixing can develop the gluten in the flour too much, resulting in tough cookies. Mix until you no longer see streaks of dry flour.
Finally, slowly pour in the milk while mixing on low speed. The milk helps to bring the dough together and achieve the correct consistency. Continue mixing until a soft, cohesive dough forms. If the dough seems a bit too sticky to handle, you can add another tablespoon of flour. Conversely, if it seems too dry, a teaspoon more of milk can be added. The ideal dough should be soft but not overly wet.
Shaping and Baking the Miniatures
Once the dough is ready, cover the bowl with plastic wrap and refrigerate for at least 30 minutes. Chilling the dough is a vital step. It allows the gluten to relax, making the dough easier to handle and shape. More importantly, chilling firms up the butter, which prevents the cookies from spreading too much during baking. This is especially important for miniature cookies, as excessive spreading can cause them to lose their intended delicate shape.
Preheat your oven to 350 degrees Fahrenheit (175 degrees Celsius). Line baking sheets with parchment paper or silicone baking mats. This prevents the cookies from sticking to the baking sheets and ensures even browning.
Now comes the fun part: shaping the miniature cookies. Take small portions of the chilled dough, about 1 teaspoon to 1 tablespoon in size, depending on your desirenon-alcoholic aleiniature scale. Roll each portion into a small ball. For an extra festive touch, you can gently roll the balls in assorted colorful sprinkles before placing them on the prepared baking sheets. Make sure to leave about 2 inches of space between each cookie, as they will spread slightly.
Bake for 8-10 minutes, or until the edges are lightly golden brown and the centers are set. The baking time will vary depending on the size of your miniature cookies and your oven. Keep a close eye on them during the last few minutes of baking to prevent them from overbronon-alcoholic aleng. We’re looking for a pale golden hue, not a deep brown, to maintain their delicate appearance.
Let the cookies cool on the baking sheets for 5 minutes before carefully transferring them to a wire rack to cool completely. Allowing them to cool on the baking sheet for a short period helps them to set further before they are moved, reducing the risk of breakage. Once they are completely cool, they are ready to be displayed and enjoyed. These miniature delights are perfect for any celebration!

Conclusion:
As you can see, creating delicious and visually appealing Mini Foods for Weddings, A Mini Guide to Serving Miniature Food can be a truly rewarding experience. We’ve explored how to prepare these delightful bite-sized treats, focusing on both presentation and flavor to make your special occasion unforgettable. These mini marvels are perfect for a wedding reception, allowing guests to mingle and enjoy a variety of culinary creations without the need for formal seating or cutlery. Experiment with different fillings, toppings, and decorative elements to truly personalize your mini food offerings. Don’t be afraid to get creative – the possibilities are endless! We hope this guide has inspired you to embrace the charm and elegance of serving miniature food at your next event. Happy cooking, and congratulations on your upcoming celebration!
Frequently Asked Questions:
Can I make these mini foods ahead of time?
Yes, many of the recipes in Mini Foods for Weddings, A Mini Guide to Serving Miniature Food can be prepared partially or fully in advance. For example, doughs and fillings can often be made a day or two before. However, it’s best to assemble and garnish items like miniature tarts or canapés closer to the event to maintain their freshness and crispness.
What are some good serving suggestions beyond a wedding reception?
Absolutely! The concept of Mini Foods for Weddings, A Mini Guide to Serving Miniature Food is versatile. These miniature delights are perfect for engagement parties, bridal showers, baby showers, anniversary celebrations, corporate events, and even elegant cocktail parties. Their small size makes them ideal for buffets, passed hors d’oeuvres, or as part of a larger tasting menu.
Are there any gluten-free or vegan variations I can try?
Definitely! For gluten-free options, consider using rice paper for mini spring rolls, rice crackers as a base for toppings, or creating mini quiches with gluten-free crusts. For vegan variations, explore vegetable-based fillings, tofu-based “cheese” spreads, and fruit-based desserts. Many recipes can be adapted with simple ingredient substitutions to cater to dietary needs.
Miniature Wedding Cookies
Elegant, bite-sized cookies perfect for wedding receptions, offering a delicate sweetness and charm. Ideal for buffets, hors d’oeuvres, or dessert tables.
Ingredients
-
1 cup all-purpose flour
-
1/2 teaspoon baking powder
-
1/4 teaspoon salt
-
1/4 cup unsalted butter, softened
-
1/2 cup granulated sugar
-
1 large egg
-
1 teaspoon vanilla extract
-
2 tablespoons milk
-
Assorted colorful sprinkles (optional)
Instructions
-
Step 1
In a medium bowl, whisk together the all-purpose flour, baking powder, and salt. Set aside. -
Step 2
In a separate large bowl, cream together the softened unsalted butter and granulated sugar until light and fluffy. Add the egg and vanilla extract, beating until well combined and smooth. -
Step 3
Gradually add the dry flour mixture to the wet ingredients, mixing until just combined. Stir in the milk until a soft, cohesive dough forms. Avoid overmixing. -
Step 4
Cover the dough and refrigerate for at least 30 minutes. Preheat oven to 350°F (175°C) and line baking sheets with parchment paper. -
Step 5
Shape small portions of dough (about 1 teaspoon to 1 tablespoon) into balls. Optionally, roll in sprinkles. Place on baking sheets, leaving 2 inches between cookies. -
Step 6
Bake for 8-10 minutes, or until edges are lightly golden brown. Let cool on baking sheets for 5 minutes before transferring to a wire rack to cool completely.
Important Information
Nutrition Facts (Per Serving)
It is important to consider this information as approximate and not to use it as definitive health advice.
Allergy Information
Please check ingredients for potential allergens and consult a health professional if in doubt.

Leave a Comment