
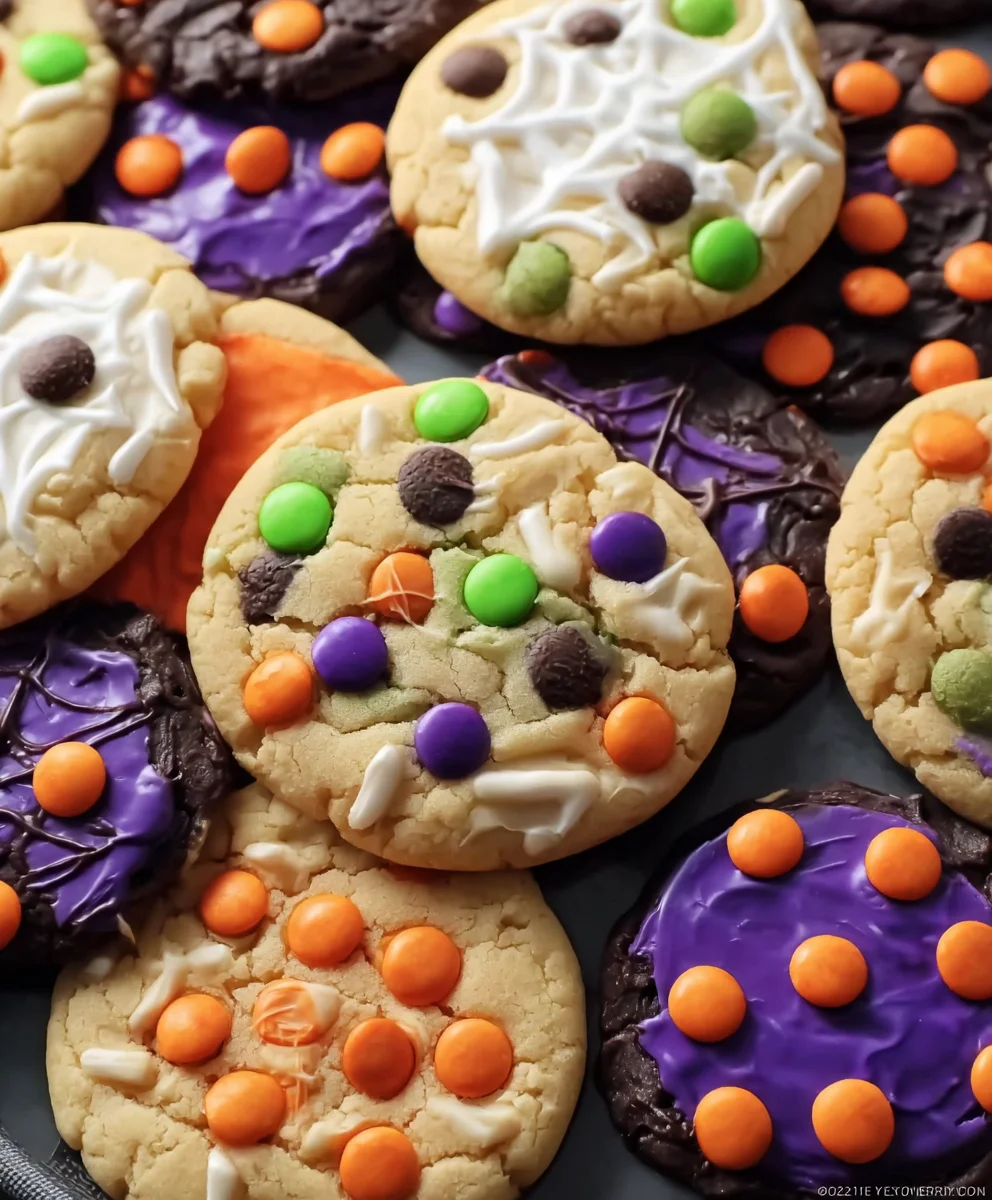
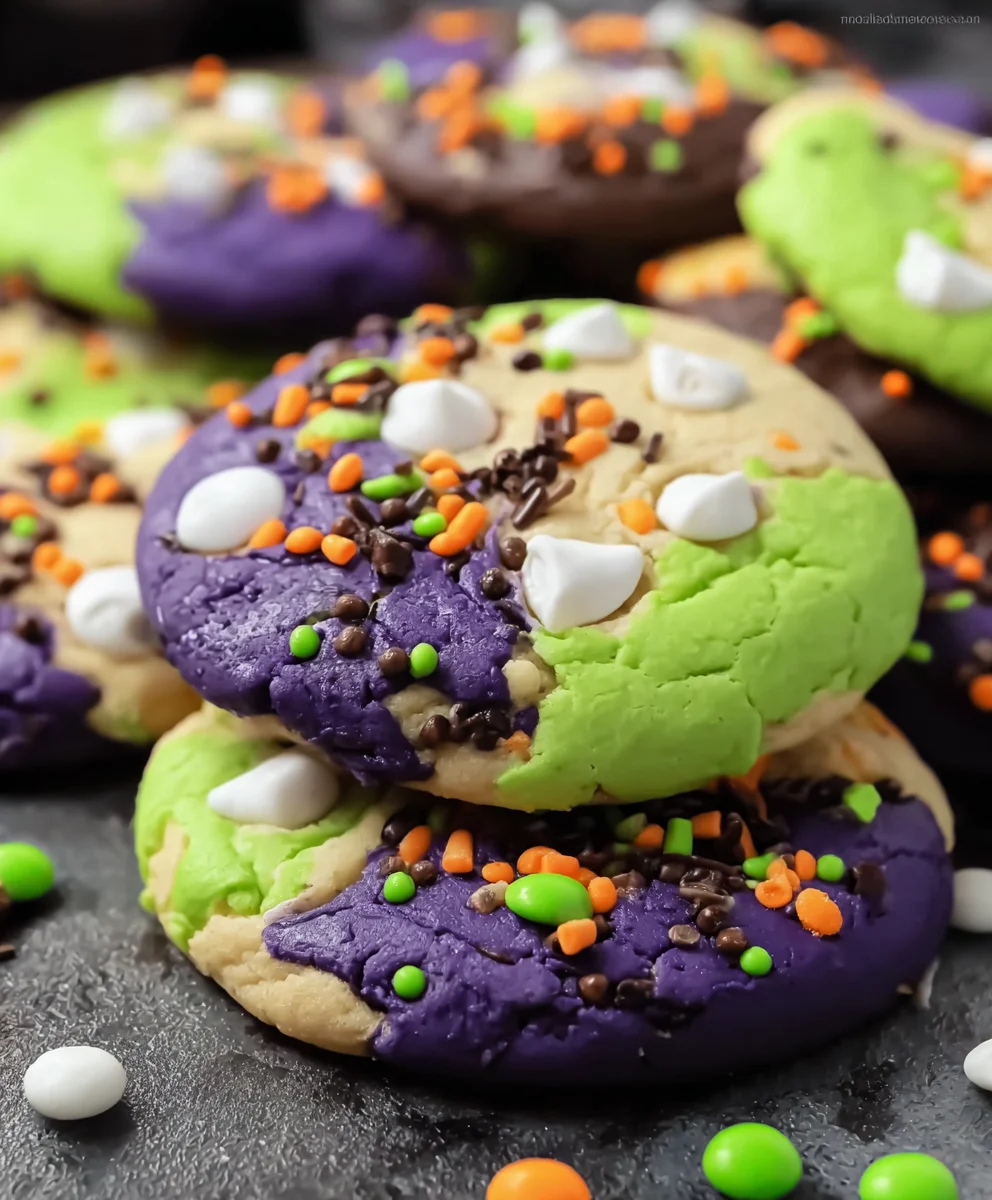
Hocus Pocus Cookies – are you ready to cast a truly delicious spell in your kitchen this Halloween season? As the days grow shorter and the air becomes crisp with autumn’s embrace, there’s an undeniable magic that fills our homes, often inspired by beloved traditions. For many, that cherished tradition includes revisiting the enchanting and hilariously spooky world of the Sanderson sisters. These delightful cookies aren’t merely a sweet treat; they are a direct invitation to infuse your baking with the playful, whimsical spirit of one of the most iconic Halloween films of all time. Prepare yourself for a baking adventure that promises to be as captivating as the movie itself.
I find immense joy in creating treats that not only taste incredible but also tell a story, and these Hocus Pocus Cookies do exactly that. They capture the essence of the movie’s enduring charm and its nostalgic appeal, especially when enjoyed during a themed movie night or a festive gathering. People adore this dish not just for its striking, colorful appearance, which perfectly embodies the movie’s aesthetic, but also for its irresistible combination of soft, chewy textures and wonderfully balanced flavors. They are surprisingly easy to make, transforming your kitchen into a cauldron of culinary creativity without requiring any actual dark magic. Get ready to enchant your taste buds and delight your guests with a bake that truly celebrates the spirit of the season.

Ingredients:
-
For the Enchanted Hocus Pocus Cookie Dough:
- 2 ½ cups (300g) all-purpose flour, plus more for dusting
- ½ teaspoon baking powder
- ¼ teaspoon salt
- 1 cup (226g) unsalted butter, softened to room temperature
- 1 cup (200g) granulated sugar
- 1 large egg, at room temperature
- 1 teaspoon pure vanilla extract
-
For the Mystical Royal Icing:
- 4 cups (480g) powdered sugar, sifted
- 3 tablespoons meringue powder
- 6-8 tablespoons warm water, or as needed
- ½ teaspoon clear vanilla extract or almond extract (optional, for flavor)
- Assorted gel food colorings (e.g., black, purple, green, orange)
-
For the Spellbinding Decorations:
- Edible glitter (silver, gold, iridescent)
- Assorted Halloween-themed sprinkles (optional)
- Small paint brushes reserved only for food use
Preparing the Hocus Pocus Cookie Dough
- Gather Your Magical Components: Before we dive into the enchantment, make sure all your ingredients, especially the butter and egg, are at room temperature. This is a crucial step for achieving a smooth, well-incorporated dough, preventing lumps, and ensuring an even bake for your Hocus Pocus Cookies.
- Whisk the Dry Spell: In a medium bowl, whisk together the 2 ½ cups of all-purpose flour, ½ teaspoon of baking powder, and ¼ teaspoon of salt. Set this aside. This preliminary mixing ensures that the leavening agent and salt are evenly distributed throughout the flour, leading to consistent results in every cookie.
- Cream the Butter and Sugar to Perfection: In a large mixing bowl, using an electric mixer (stand mixer or hand mixer works wonderfully), cream together the 1 cup of softened unsalted butter and 1 cup of granulated sugar on medium-high speed. Beat them until the mixture is light, fluffy, and pale in color, usually about 3-5 minutes. This creaming process incorporates air into the butter, which contributes to the cookies’ tenderness and helps them hold their shape. Don’t rush this step! Scrape down the sides of the bowl periodically to ensure everything is thoroughly combined.
- Add the Egg and Vanilla Potion: Once the butter and sugar are perfectly creamed, crack in the large egg and add the 1 teaspoon of pure vanilla extract. Continue to beat on medium speed until well combined. The mixture might look a little curdled at first, but keep mixing until it comes together and is smooth again.
- Combine Wet and Dry: Gradually add the dry ingredient mixture (flour, baking powder, salt) to the wet ingredients, mixing on low speed until just combined. Be careful not to overmix the dough. Overmixing can develop the gluten in the flour too much, resulting in tough cookies. Stop mixing as soon as you no longer see streaks of dry flour.
- Form and Chill the Dough for Maximum Magic: Gently gather the dough into a ball and divide it into two equal portions. Flatten each portion into a disc, wrap them tightly in plastic wrap, and refrigerate for at least 1 hour. Chilling the dough is an absolutely essential step for making perfect cut-out Hocus Pocus Cookies. It prevents spreading during baking, making them easier to handle, and allows the flavors to meld beautifully. You can chill the dough for up to 2-3 days, or even freeze it for a month, if you’re planning ahead for your spellbinding baking session.
Chilling and Rolling the Hocus Pocus Cookie Dough
- Prepare Your Enchanted Workspace: Once your cookie dough has sufficiently chilled, preheat your oven to 375°F (190°C). Line several baking sheets with parchment paper or silicone baking mats. This ensures your Hocus Pocus Cookies won’t stick and will bake evenly.
- Dust Your Rolling Pin: On a lightly floured surface (I love to use a silicone mat for easy cleanup), unwrap one disc of chilled dough. Lightly flour your rolling pin as well.
- Roll Out the Magic: Roll out the dough to an even thickness of about ¼ inch (6mm). Consistency is key here for even baking. If the dough is too thin, the cookies might be too crisp; too thick, and they might not bake through properly. If the dough becomes too sticky or soft while rolling, don’t hesitate to pop it back into the fridge for 10-15 minutes to firm up.
- Cut Out Your Spellbinding Shapes: Using your favorite Halloween-themed cookie cutters (think witch hats, cauldrons, ghosts, bats, or even simple circles and stars for a magical touch), cut out your Hocus Pocus Cookies. Try to get as many cuts as possible from each roll to minimize re-rolling scraps.
- Carefully Transfer to Baking Sheets: Using a thin spatula, carefully transfer the cut-out cookies to the prepared baking sheets, leaving about 1 inch (2.5 cm) between each cookie.
- Re-roll the Scraps: Gather the dough scraps, gently press them together to form a new disc, and chill for about 15 minutes before re-rolling and cutting out more cookies. Avoid overworking the dough when re-rolling, as this can make the cookies tough.
Baking the Magical Hocus Pocus Cookies
- Bake Until Golden Edges Appear: Bake the Hocus Pocus Cookies in the preheated oven for 8-10 minutes, or until the edges are lightly golden. Baking time will vary slightly depending on the size and thickness of your cookies and your oven’s calibration. Keep a close eye on them to prevent overbaking; we want tender, not crispy, Hocus Pocus Cookies for optimal decorating.
- Cool Completely for Decoration Readiness: Once baked, remove the baking sheets from the oven and let the cookies cool on the sheets for 5 minutes before carefully transferring them to a wire rack to cool completely. It is absolutely crucial that the cookies are completely cool before you begin decorating them with royal icing. Warm cookies will cause the icing to melt and run, ruining your beautiful designs.
Whipping Up the Enchanting Royal Icing
- Sift the Powdered Sugar: In a large, clean bowl, sift the 4 cups of powdered sugar. Sifting is important to remove any lumps, ensuring a perfectly smooth icing for your Hocus Pocus Cookies.
- Combine Meringue Powder and Water: In the same bowl, add the 3 tablespoons of meringue powder. Slowly add 6 tablespoons of warm water, starting with less and adding more as needed. If you choose to use the clear vanilla or almond extract for flavor, add it now.
- Beat to Stiff Peaks: Using an electric mixer on low speed, beat until the sugar and meringue powder are fully incorporated with the water. Then, increase the speed to high and beat for about 5-7 minutes, or until the icing becomes thick, glossy, and forms stiff peaks. You want it to be thick enough to hold its shape, but still pliable. When you lift the beater, the icing should stand up firmly.
- Adjust Consistency for Outlining: This stiff icing is perfect for outlining your Hocus Pocus Cookies. If it feels too stiff to pipe smoothly, add a few drops of water at a time, mixing until you reach a consistency that flows nicely but still holds a defined line. Think of it like toothpaste. Transfer about a third of this “outline” consistency icing into separate bowls for coloring.
- Color Your Outline Icing: Add your desired gel food colorings to each bowl. Gel colors are highly concentrated and won’t thin out your icing as much as liquid food coloring. Mix thoroughly until the color is uniform. Transfer each colored outline icing into separate piping bags fitted with small round tips (e.g., Wilton #1 or #2).
- Adjust Consistency for Flooding (The Magic Fill): To create the “flood” icing (which you’ll use to fill in the outlined areas), take the remaining white stiff icing and gradually add tiny amounts of warm water, mixing thoroughly after each addition. You’re aiming for a consistency where, if you drizzle a spoonful of icing back into the bowl, the line disappears within 10-15 seconds. This is often called “10-second icing.” This “flood” consistency will spread smoothly to create a uniform base layer on your Hocus Pocus Cookies. Divide and color this flood icing as desired, and transfer it into separate piping bags (you can snip a slightly larger opening on the tip of the bag, or use a larger round tip like Wilton #3).
The Art of Decorating Your Hocus Pocus Cookies
- Outline Your Hocus Pocus Cookies: With your outline consistency icing, carefully pipe a border around the edge of each cooled Hocus Pocus Cookie. Take your time to create clean, precise lines. This outline acts as a dam to hold the flood icing within the desired area. Let these outlines set for 10-15 minutes, or until they feel slightly firm to the touch. This helps prevent the flood icing from bleeding into your outline.
- Flood with Color: Now, using your flood consistency icing, fill in the outlined areas. Gently squeeze the piping bag to release the icing and use a small, clean brush or a scribe tool (a toothpick works too!) to spread the icing evenly to the edges of the outline. If you see any air bubbles, gently pop them with your scribe tool.
- The Wet-on-Wet Magic (Optional): If you want to create magical patterns like swirls, dots, or marbling within the flood layer (e.g., a spiderweb on a black background, or dots that sink into the base), apply your contrasting flood color immediately after applying the base flood layer, while it’s still wet. Then, use your scribe tool to drag through the wet colors to create your desired effect. This technique results in a perfectly smooth, single-layer design on your Hocus Pocus Cookies.
- Allow to Dry Completely: This is arguably the most important step for professional-looking Hocus Pocus Cookies! Place your newly flooded cookies in a cool, dry place and allow them to dry completely. Depending on humidity and thickness of the icing, this can take anywhere from 6-24 hours. The icing must be fully hardened before you can add any further details or stack the cookies. If you rush this, your designs will smudge or get ruined. A dehydrator on a low setting or a fan can help speed up the drying process.
- Add Intricate Details: Once your base flood layer is completely dry and hard, you can begin to add more intricate details using the outline consistency icing or even slightly thicker consistency for fine lines. Think about adding eyes to ghosts, stitches to Frankenstein monsters, buckles to witch hats, or intricate patterns on spellbooks. This is where your creativity truly shines when decorating your Hocus Pocus Cookies!
Adding the Final Hocus Pocus Touches
- Dust with Edible Glitter: For an extra dose of enchantment, lightly dust your finished Hocus Pocus Cookies with edible glitter. You can use a small, clean food-only paintbrush to apply the glitter precisely to certain areas, or simply sprinkle it over the whole cookie for a shimmering effect. Silver, gold, or iridescent glitters truly evoke a magical feeling.
- Attach Sprinkles (Optional): If you’re using sprinkles, you can either apply them while the flood icing is still wet (for a sunken-in look) or attach them to dry icing using a tiny dab of fresh royal icing as “glue.”
- Final Drying Period: If you’ve added additional layers of icing or details, allow the Hocus Pocus Cookies to dry completely again for several hours, or overnight, to ensure all elements are fully set before handling or packaging.
- Storage for Your Magical Creations: Once your Hocus Pocus Cookies are fully decorated and completely dry, store them in an airtight container at room temperature for up to two weeks. Layer them carefully between sheets of parchment paper to prevent any accidental damage to your magnificent designs. You can also freeze decorated cookies (once completely dry) for up to three months.
And there you have it! A batch of absolutely spellbinding Hocus Pocus Cookies, ready to delight and bewitch all who encounter them. Enjoy the magic of your homemade treats!
Conclusion:
So there you have it, my friends! We’ve journeyed through the enchanting process of creating what I truly believe are some of the most captivating and utterly delicious treats you’ll ever bake. These aren’t just any ordinary cookies; they are a delightful fusion of whimsical charm and irresistible flavor that promises to bewitch your taste buds from the very first bite. I’ve poured my heart into perfecting this recipe, ensuring that every step is clear, simple, and leads to a magical outcome. The vibrant colors, the perfect balance of sweetness, and that subtle hint of something special make them an absolute showstopper. They’re a celebration of creativity in the kitchen, a chance to unleash your inner pastry wizard, and trust me, the results are truly spellbinding. Whether you’re a seasoned baker or just starting your culinary adventures, this recipe is designed to bring joy and a touch of magic to your home. It’s a guaranteed crowd-pleaser, perfect for brightening any gathering or simply treating yourself to something extraordinary after a long day. The joy you’ll feel when pulling these beauties from the oven, adorned with their mystical swirls and sparkles, is truly unparalleled.
But the magic doesn’t stop there! Once you’ve mastered the basic spell for these incredible cookies, the possibilities for serving and variation are endless. Imagine serving them alongside a steaming mug of spiced cider on a chilly autumn evening, or perhaps with a tall glass of cold milk for a comforting snack. For a truly decadent experience, try crumbling a few over a scoop of vanilla bean ice cream – the contrasting textures and temperatures are divine! If you’re hosting a themed party, arrange them artfully on a dark platter, perhaps with some dry ice for a dramatic, smoky effect, or scatter edible glitter for an extra dose of sparkle.
And when it comes to variations, feel free to let your imagination run wild! Instead of vanilla extract, consider almond or even a touch of orange zest for a different flavor profile. For those who love a bit of spice, a pinch of cinnamon or nutmeg could add a warm, comforting twist. Want to make them even more indulgent? Try dipping half of each cookie in melted white chocolate and then sprinkling with more festive decorations. You could also experiment with different food colorings – perhaps deep blues and silvers for a ‘midnight sky’ theme, or bright greens and purples for a truly ‘witchy’ vibe. For a gluten-free alternative, you can often swap out regular flour for a good quality gluten-free all-purpose blend, ensuring it contains xanthan gum for structure. Vegan options are also within reach with plant-based butter and egg substitutes.
Thinking of seasonal fun?
For Halloween, they are an absolute must, but don’t limit yourself! Adapt the colors for Christmas (red and green), Easter (pastels), or even a birthday celebration (bright rainbow hues). Each variation offers a fresh take on the core magic, allowing you to personalize them for any occasion or preference. The versatility of this recipe is truly one of its strongest attributes, inviting you to play and create your own unique versions.
I genuinely hope you’re feeling inspired to roll up your sleeves and bring these fantastic treats to life in your own kitchen. There’s something incredibly satisfying about transforming simple ingredients into something so visually stunning and utterly delicious. These Hocus Pocus Cookies are more than just a dessert; they’re an experience, a conversation starter, and a true testament to the joy of homemade baking.
Please, don’t hesitate to give this recipe a try. I promise you, the smiles and gasps of delight from those who taste them will be your greatest reward. Once you’ve conjured your own batch of these delightful cookies, I would absolutely love to hear all about your baking adventure! What colors did you choose? Did you try a fun variation? Share your photos and stories; seeing your creations truly makes my day. Your feedback and experiences help build our wonderful baking community and inspire others to embark on their own culinary quests. So, go forth, bake some magic, and let your kitchen be filled with the sweet aroma of success and the joy of creating something truly special. Happy baking, everyone! I can’t wait to see what wonderful ‘spells’ you cast!
Hocus Pocus Cookies
Hocus Pocus Cookies are a delightful, easy-to-make Halloween treat inspired by the iconic film. They offer a whimsical, colorful appearance with an irresistible combination of soft, chewy textures and balanced flavors, perfect for movie nights or festive gatherings.
Ingredients
-
1 cup softened butter
-
1 cup granulated sugar
-
1 cup packed brown sugar
-
2 large eggs
-
1 tsp vanilla extract
-
3 1/2 cups all-purpose flour
-
1 tsp baking soda
-
1/2 tsp salt
-
1 cup chocolate chips
-
1/2 cup Halloween sprinkles
Instructions
-
Step 1
Cream together softened butter, granulated sugar, and brown sugar in a large bowl until light and fluffy. -
Step 2
Beat in eggs one at a time, then add vanilla extract. Mix well until combined. -
Step 3
In a separate bowl, whisk together all-purpose flour, baking soda, and salt. -
Step 4
Gradually add the dry ingredients to the wet mixture, mixing until just combined. Stir in chocolate chips. -
Step 5
Preheat oven to 375°F (190°C). Scoop dough onto prepared baking sheets, spacing about 2 inches apart. -
Step 6
Top each cookie with Halloween sprinkles. Bake for 8-12 minutes, or until edges are lightly golden. Cool on a wire rack.
Important Information
Nutrition Facts (Per Serving)
It is important to consider this information as approximate and not to use it as definitive health advice.
Allergy Information
Please check ingredients for potential allergens and consult a health professional if in doubt.


Leave a Comment