
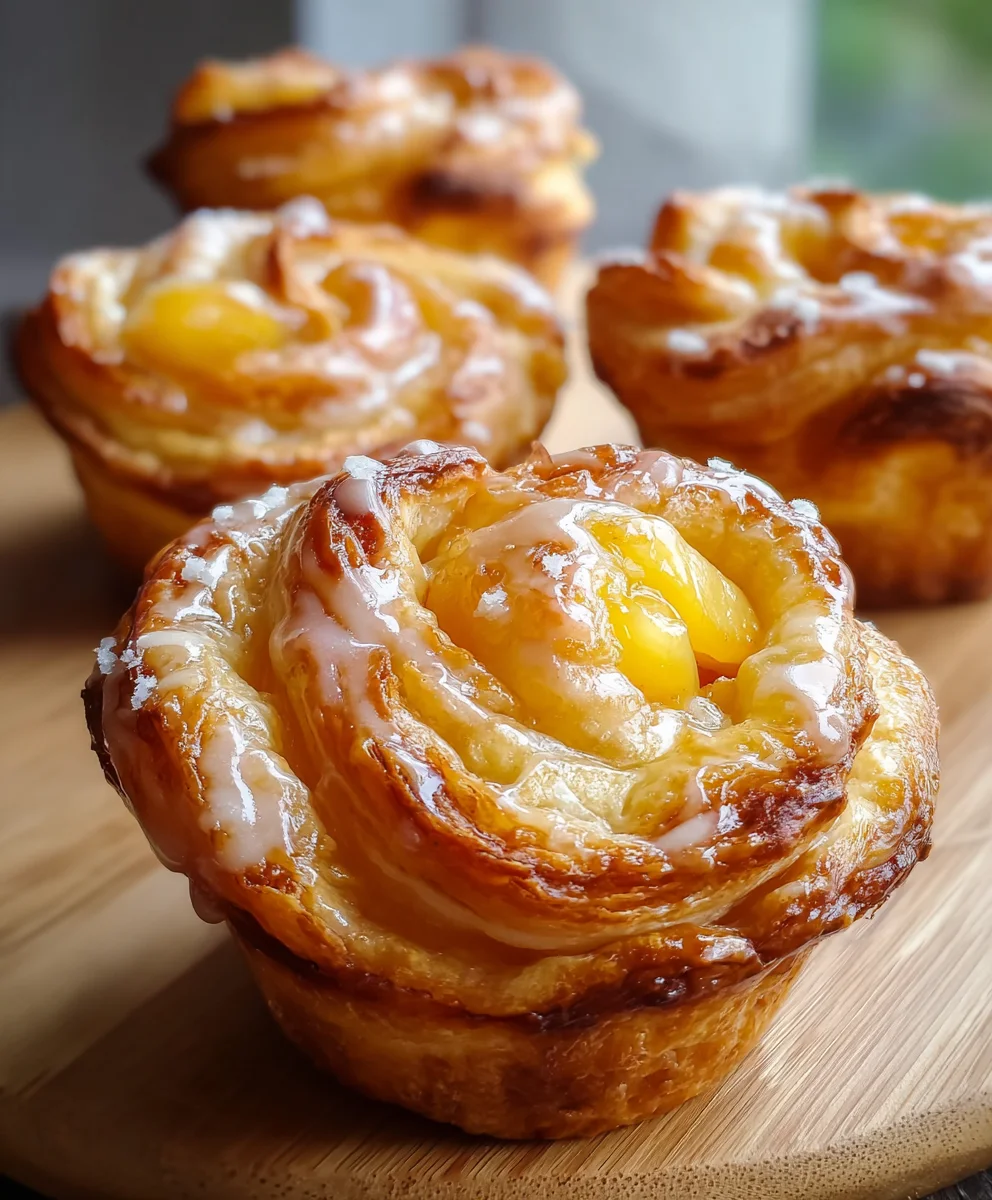
Peach Pie Cruffins are about to revolutionize your breakfast and dessert game! Imagine biting into the flaky, buttery layers of a croissant, only to discover the tender, sweet, spiced goodness of a classic peach pie nestled inside, all conveniently baked into a muffin shape. That, my friends, is the culinary marvel we’re exploring today, and trust me, it’s even better than it sounds. While the cruffin itself is a relatively modern bakery innovation, born from the creative fusion of two beloved pastries, our rendition brings a cherished American classic—the peach pie—into the spotlight.
A modern classic with a heartfelt twist.
The history of the cruffin is a testament to culinary ingenuity, taking the intricate laminating process of a croissant and applying it to the humble muffin tin, resulting in an irresistible hybrid. What makes these particular Peach Pie Cruffins truly exceptional is how they beautifully marry that delicate, airy structure with the rich, comforting flavors of ripe peaches, cinnamon, and a hint of nutmeg. People adore this dish not just for its novel concept, but for the incredible symphony of textures and tastes: the crisp exterior, the soft, laminated interior, and the juicy, aromatic peach filling. It’s the perfect portable treat that offers the sophistication of a patisserie creation with the heartwarming familiarity of homemade comfort, making every single bite an absolute delight.

Ingredients:
- For the Dough:
- 4 cups (about 500g) all-purpose flour, plus more for dusting
- 1/4 cup (50g) granulated sugar
- 2 1/4 teaspoons (7g) instant dry yeast
- 1 1/2 teaspoons (9g) fine sea salt
- 1 cup (226g) unsalted butter, very cold (for laminating)
- 1 cup (240ml) whole milk, lukewarm
- 1/4 cup (60ml) cold water
- For the Peach Pie Filling:
- 4-5 large, ripe fresh peaches (about 4 cups diced), or 2 cans (15oz each) sliced peaches, drained and finely diced
- 1/2 cup granulated sugar (adjust to taste based on peach sweetness)
- 1/4 cup light brown sugar, packed
- 3 tablespoons cornstarch
- 1 tablespoon fresh lemon juice
- 1 teaspoon ground cinnamon
- 1/4 teaspoon ground nutmeg
- Pinch of salt
- 1 tablespoon unsalted butter, diced
- For the Egg Wash & Topping:
- 1 large egg, beaten with 1 tablespoon water
- 2 tablespoons turbinado sugar (or granulated sugar)
Crafting the Velvety Dough: Our Foundation for Flaky Perfection
Making laminated dough might sound intimidating, but I promise you, with a little patience and attention to detail, you’ll be creating bakery-quality cruffins right in your own kitchen! The key here is keeping everything cold. Cold dough, cold butter, cold hands if you can manage it! This is what gives us those incredible, distinct layers that make Peach Pie Cruffins so irresistibly flaky.
- First things first, let’s get our dough started. In a large mixing bowl, I like to whisk together the all-purpose flour, granulated sugar, instant dry yeast, and fine sea salt. Make sure these dry ingredients are well combined before we introduce any liquids. This ensures even distribution of the yeast and seasoning throughout our dough.
- Next, in a separate small bowl or measuring cup, I’ll combine the lukewarm whole milk and the cold water. The lukewarm milk helps activate the yeast, giving our dough its beautiful rise, while the cold water ensures our overall dough temperature stays low. This is crucial for controlling the fermentation process and making the dough easier to laminate later.
- Now, pour the wet ingredients into the dry mixture. Using a sturdy spoon or your hands (my preferred method for feeling the dough), mix everything together until a shaggy, cohesive dough forms. Don’t worry about it being perfectly smooth at this stage; we’re just aiming for everything to be incorporated, making sure there are no dry spots of flour remaining in the bowl.
- Turn the dough out onto a lightly floured surface. Knead the dough for about 8-10 minutes. I aim for a dough that feels smooth and elastic to the touch. You’ll notice it becoming less sticky as you work it, and it should pass the “windowpane test” – if you can stretch a small piece of dough thinly enough to see light through it without tearing, your gluten is well developed. This gluten development during this step is crucial for the dough’s strength and ability to form thin, resilient layers.
- Once kneaded, gently form the dough into a ball. Place it in a lightly oiled bowl, turning it once to coat the entire surface. This prevents the dough from sticking to the bowl and drying out. Cover the bowl tightly with plastic wrap or a damp kitchen towel to create a humid environment.
- We’re going to give this dough its first rest and chill. Pop the bowl into the refrigerator for at least 2 hours, or ideally, overnight (up to 12-18 hours). This long, cold proofing is absolutely essential. It slows down the yeast activity, allowing for a deeper, more complex flavor to develop in the dough. Most importantly, it thoroughly chills the dough, making it much easier to work with when it comes to lamination, as it prevents the butter from melting too quickly. Trust me, don’t skip this chilling step!
Preparing Our Butter Block for Lamination Magic
The butter block is the heart of any laminated pastry. It needs to be pliable but still cold, so it can be rolled out evenly with the dough without tearing through it. This takes a little foresight and technique, but it’s totally manageable and critical for achieving those iconic cruffin layers.
- About 30 minutes before you plan to start laminating, take your 1 cup (226g) of very cold unsalted butter out of the refrigerator. It should still be firm but not rock-hard.
- Place the butter between two sheets of parchment paper. Using a rolling pin, carefully pound and roll the butter into an 8×8 inch (20×20 cm) square. The goal here is to make it flexible but not melted. Pounding first helps to soften it evenly without warming it excessively. If it becomes too soft, pop it back into the fridge for a few minutes to firm up. This precise square shape is important for even distribution within our dough, ensuring consistent layers throughout our Peach Pie Cruffins. Once shaped, keep it chilled until ready to use.
The Art of Lamination: Creating Those Flaky Layers
This is where the magic truly happens, transforming our simple dough and butter into a masterpiece of flaky layers! We’ll be doing a series of “turns” or “folds” to create hundreds of delicate butter and dough layers. Patience is key – let the dough rest and chill between each turn to prevent the butter from melting and tearing the dough, which would prevent those distinct layers from forming.
- Take your thoroughly chilled dough out of the refrigerator. On a lightly floured surface, roll the dough out into a roughly 16×8 inch (40×20 cm) rectangle. Try to keep the edges as straight as possible, as this contributes to neatly folded layers. You want the dough to be cold enough that it’s easy to roll but not so cold that it cracks.
- Place your prepared 8×8 inch butter block squarely in the center of one half of the rolled-out dough rectangle, leaving a small border around the edges. Fold the other half of the dough over the butter block, carefully aligning the edges and sealing them all around the butter. You want to completely encase the butter in dough, ensuring no butter peeks out. This is called the “first encasement” or “book fold,” and it’s essential for starting our lamination process correctly.
- Now, we begin our first “turn.” Lightly flour your work surface and the top of the dough. Gently roll the dough out into a long rectangle, about 24×10 inches (60×25 cm). The important thing is to roll evenly, applying gentle, consistent pressure to avoid tearing the dough and squeezing out the butter. Rolling too hard or unevenly can rupture the butter layers.
- Perform a “letter fold” (or single fold): Fold one short end of the dough rectangle one-third of the way towards the center. Then, fold the other short end over the first fold, like folding a letter for an envelope. You should now have three distinct layers of dough and butter stacked upon each other.
- Carefully wrap the folded dough tightly in plastic wrap. Transfer it back to the refrigerator and let it chill for at least 30 minutes. This chilling time is vital for the butter to firm up and the gluten in the dough to relax, making it much easier to roll out again without resistance or tearing. Don’t rush this step!
- After the first chill, unwrap the dough and place it on your lightly floured surface with the open seam facing towards your right (or left, just be consistent to keep track). This orientation helps maintain consistent layers. Roll it out again into a 24×10 inch (60×25 cm) rectangle, just as before, ensuring even thickness.
- Repeat the “letter fold” as described in step 12. This is your second turn. Each turn creates more layers, building up the flaky structure that cruffins are famous for.
- Wrap the dough again tightly in plastic wrap and chill it for another 30 minutes in the refrigerator. We typically do three single turns for cruffin dough to achieve optimal flakiness and layer development.
- For the third and final turn, repeat steps 14 and 15. Roll out, fold into a letter, wrap, and chill for a minimum of 1 hour. At this point, the dough is fully laminated and can be kept in the refrigerator for up to 2 days, or tightly wrapped and frozen for longer storage (up to 1 month), if you want to make the Peach Pie Cruffins another day. This flexibility is great for meal prepping!
Preparing Our Luscious Peach Pie Filling
While our dough is chilling its way to flaky perfection, let’s prepare the star of the show: the peach pie filling! This filling strikes the perfect balance between sweet, tangy, and warmly spiced, perfectly complementing the rich, buttery cruffin dough. A homemade filling truly elevates these Peach Pie Cruffins.
- If using fresh peaches, I always start by washing them thoroughly. Then, I’ll blanch them quickly in boiling water for about 30 seconds, immediately transferring them to an ice bath. This thermal shock makes peeling the skin incredibly easy. Once peeled, pit them and dice them into small, approximately 1/4-inch pieces. If you’re using canned peaches, ensure they are well-drained of their syrup and then dice them to a similar, uniform size.
- In a medium saucepan, combine the diced peaches, granulated sugar, light brown sugar, cornstarch (our thickening agent), fresh lemon juice (for brightness and balance), ground cinnamon, ground nutmeg, and a pinch of salt (to enhance all the flavors). Give everything a good stir to ensure the cornstarch is evenly distributed and no lumps remain. This prevents a lumpy filling.
- Place the saucepan over medium heat. Bring the mixture to a gentle simmer, stirring frequently with a spatula or wooden spoon. As it heats up, you’ll notice the juices starting to thicken, transforming into a glossy, beautiful filling. Continue to cook and stir for about 5-7 minutes, until the filling is thick enough to coat the back of a spoon. The cornstarch needs to cook out a bit during this time to avoid a starchy taste in the final product.
- Remove the saucepan from the heat. Stir in the diced unsalted butter until it’s completely melted and incorporated into the filling. This step adds a lovely richness, velvety texture, and a beautiful sheen to our peach filling, making it even more delectable.
- Transfer the peach pie filling to a shallow bowl or plate and spread it out. This helps it cool down more quickly and evenly. Cover it with plastic wrap, pressing the wrap directly onto the surface of the filling to prevent a skin from forming as it cools. Place it in the refrigerator to chill completely – it’s crucial for the filling to be cold before we assemble our cruffins, so it doesn’t melt the butter in our delicate laminated dough and ruin those precious layers.
Assembling Our Delightful Peach Pie Cruffins
Now comes the fun part: shaping our cruffins! This process might look a little fiddly at first, but once you get the hang of it, you’ll be a cruffin-making pro. Have your muffin tins ready; ideally, a 12-cup standard muffin tin, lightly greased or lined with paper liners, is perfect for these Peach Pie Cruffins.
- Lightly flour your work surface once more. Take your thoroughly chilled, laminated dough out of the refrigerator. Roll the dough into a large rectangle, aiming for approximately 20×15 inches (50×38 cm) and about 1/8-inch (3-4 mm) thick. It’s important to try to maintain an even thickness across the entire rectangle to ensure consistent layers and even baking.
- Using a sharp knife or a pizza cutter, trim the edges of the dough to create neat, straight lines. This not only makes for a prettier cruffin but also helps with even rolling. Then, cut the large rectangle into 12 equal strips, each approximately 1 1/4 inches (3 cm) wide and 15 inches (38 cm) long. Take your time with this to ensure uniformity, which will lead to consistently sized cruffins.
- Take one strip of dough. Spoon about 1 1/2 to 2 tablespoons of the chilled peach pie filling along the length of the dough strip, leaving a small border on the long edges and about an inch free at the short ends. Don’t overfill, or it will be messy and prone to leaking during baking!
- Carefully fold one long edge of the dough over the filling, then fold the other long edge over, essentially encasing the filling within the dough strip. Gently pinch the seam closed to completely seal the filling inside. This creates a neat, filled log of dough.
- Now, starting from one short end, tightly roll up the filled dough strip into a spiral. Think of it like rolling a small rug or a cinnamon roll. Ensure the roll is snug but not so tight that you’re compressing the layers.
- Once rolled, you’ll have a beautiful spiral shape. Place this spiral into a greased standard muffin tin cup. Gently tuck the loose end underneath the spiral to secure it. Repeat this process for all 12 dough strips and fill your muffin tin cups.
- Once all the cruffins are in their muffin cups, cover the muffin tin loosely with plastic wrap. Place the muffin tin in a warm, draft-free place for the final proof. This will take about 1 to 1 1/2 hours, or until the cruffins have visibly puffed up and look light and airy. They should nearly double in size. This proof is crucial for their final texture and ensures a light, tender crumb.
- While the cruffins are proofing, preheat your oven to 400°F (200°C). This allows the oven to come to a stable temperature before baking.
Baking Our Golden Peach Pie Cruffins
The moment of truth! Baking these beauties will fill your home with the most incredible aroma of warm peaches and buttery pastry. Watch them closely as they bake to achieve that perfect golden-brown crust and fluffy, layered interior.
- Once the cruffins have finished proofing and your oven is preheated, gently brush the tops of each cruffin with the egg wash (1 large egg beaten with 1 tablespoon water). This will give them a beautiful, shiny, golden-brown finish as they bake, enhancing their visual appeal.
- Sprinkle each cruffin generously with turbinado sugar. This adds a lovely crunch, a hint of sweetness, and a sparkling finish to the tops of our Peach Pie Cruffins.
- Carefully place the muffin tin into the preheated oven. Bake for 15 minutes at 400°F (200°C). The initial high heat helps create that crucial oven spring and sets the flaky layers.
- After 15 minutes, reduce the oven temperature to 375°F (190°C) and continue to bake for another 15-20 minutes, or until the cruffins are deeply golden brown and sound hollow when tapped on the bottom. If you notice them browning too quickly, you can loosely tent the muffin tin with aluminum foil to prevent over-browning. The internal temperature should reach about 200-210°F (93-99°C) if you have an instant-read thermometer, ensuring the dough is fully cooked through and safe to eat.
- Remove the cruffins from the oven. Let them cool in the muffin tin for about 5-10 minutes before carefully transferring them to a wire rack to cool completely. This brief cooling period in the tin helps them set and prevents them from falling apart when moved.
Serving and Savoring Your Peach Pie Cruffins
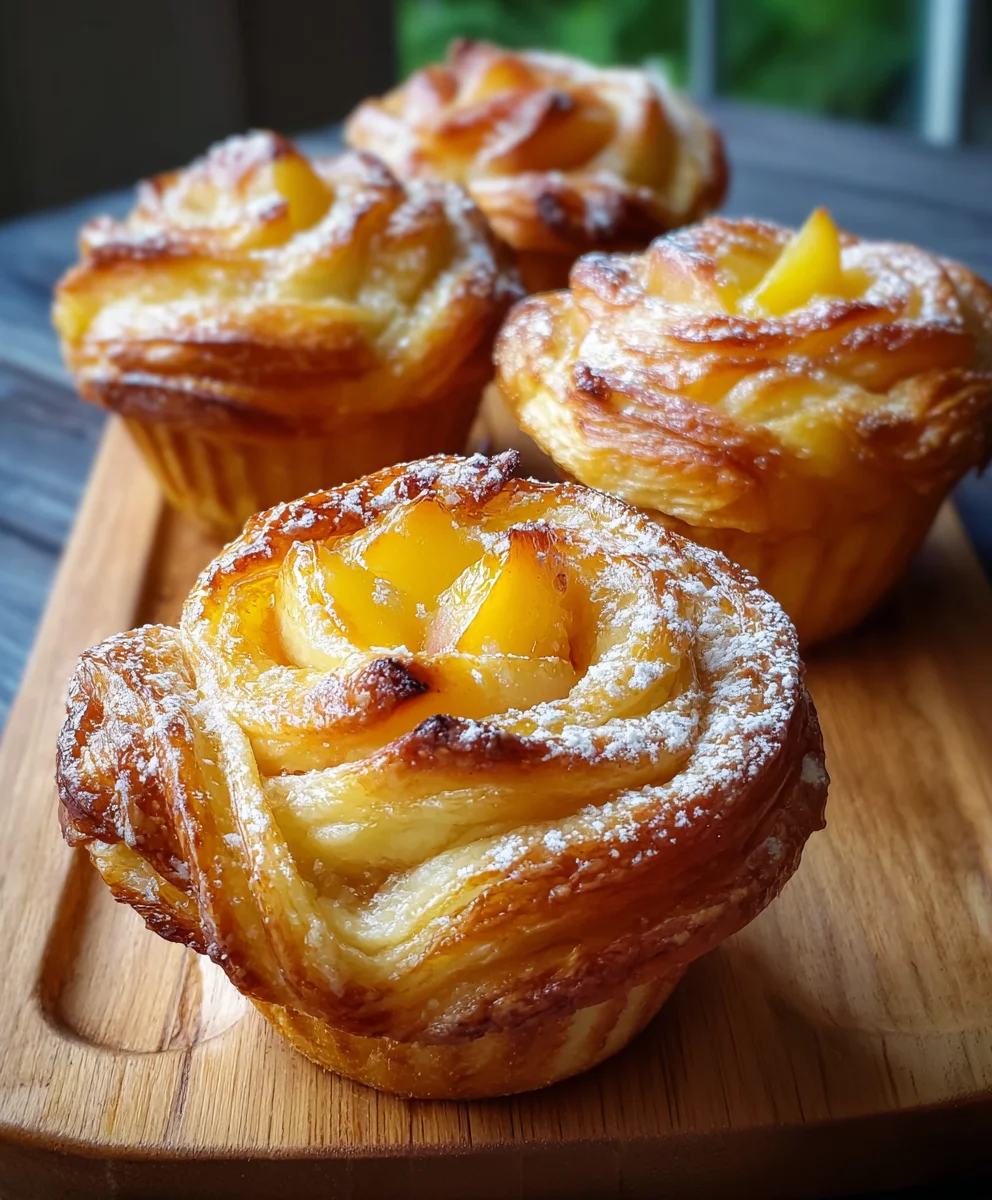
Congratulations, you’ve made Peach Pie Cruffins! These delightful pastries are best enjoyed on the day they are baked, when their layers are at their flakiest and the peach filling is warm and fragrant. The crispy, shatteringly delicate exterior giving way to a soft, buttery, layered interior filled with sweet, spiced peaches is truly an experience. The effort is absolutely worth the reward!
I love serving these warm, perhaps with a simple dusting of powdered sugar, a dollop of freshly whipped cream, or even a scoop of vanilla ice cream for an extra indulgent treat – especially if you’re serving them as a dessert. They make a fantastic, impressive breakfast pastry, a special brunch item, or an elegant ending to any meal. The combination of the rich croissant-muffin hybrid and the comforting, familiar flavors of peach pie filling is simply irresistible and a unique twist on classic favorites. Store any leftovers in an airtight container at room temperature for up to 2 days, though they may lose some of their initial crispness over time. Reheating briefly in a toaster oven can help restore some of that delicious flakiness!
Conclusion:
Well, there you have it, my friends! We’ve journeyed through the steps of creating something truly magical, a dessert or breakfast pastry that defies simple categorization and delights the senses in every possible way. If you’ve followed along, you’re now equipped to bring these incredible creations to life in your own kitchen. I genuinely believe that these aren’t just any baked goods; they are a delightful fusion that takes the best elements of a classic pie and a comforting muffin, then elevates them with the flaky sophistication of a croissant. The result is nothing short of spectacular, an experience that will undoubtedly earn you rave reviews from anyone lucky enough to try them.
What makes these Peach Pie Cruffins an absolute must-try? It’s the harmonious blend of textures and flavors. Imagine the golden-brown, buttery, and incredibly flaky exterior, giving way to a tender, muffin-like crumb on the inside, all while cradling a luscious, warmly spiced peach filling that bursts with summery sweetness. Every bite is an adventure, a delightful surprise that starts with that satisfying crispness and ends with the juicy, aromatic goodness of ripe peaches. They’re sweet, but not overly so, allowing the natural fruit flavor to shine through beautifully, complemented by just the right hint of warm spices that evoke comfort and nostalgia. They are perfect for those moments when you crave the comforting embrace of a peach pie but desire the charming, individual portion of a muffin, all wrapped up in a pastry that feels incredibly special.
Now, let’s talk about how to enjoy these beauties and some ways to make them your own. While they are utterly divine straight out of the oven, perhaps dusted simply with a whisper of powdered sugar, don’t hesitate to elevate them further. For a truly decadent experience, serve them warm with a generous scoop of good quality vanilla bean ice cream, allowing the cold creaminess to melt into the warm peach filling. A drizzle of homemade caramel sauce or a dollop of freshly whipped cream can also transform them into an elegant dessert. For a delightful breakfast or brunch option, pair them with a robust cup of coffee or a bright, refreshing iced tea.
Feeling adventurous? While the classic peach is irresistible, consider variations. During berry season, you could experiment with mixed berries for a “Berry Pie Cruffin,” or in the fall, try a spiced apple filling for an “Apple Pie Cruffin.” You could also play with the glaze: a simple lemon zest glaze would add a lovely tang, or a cream cheese glaze could add an extra layer of richness. For a textural contrast, sprinkle some chopped pecans or walnuts into your peach filling or over the tops before baking. A dash of cardamom or a touch of allspice in addition to cinnamon can also introduce new dimensions to the spice profile. The beauty of this recipe lies in its adaptability, allowing you to tailor it to your personal preferences and the seasonal bounty.
I truly hope you’ll take the plunge and try making these glorious Peach Pie Cruffins. There’s immense satisfaction in creating something so beautiful and delicious from scratch. Don’t be intimidated; the process is rewarding, and the end product is well worth every moment spent in the kitchen. Once you pull them from the oven, filling your home with their intoxicating aroma, you’ll understand exactly what I mean. When you do bake them, I would absolutely love to hear about your experience! Please share your photos on social media – tag me or use a relevant hashtag so I can see your wonderful creations. Leave a comment below to let me know how they turned out, what variations you tried, or any tips you discovered along the way. Your feedback and stories inspire me and our entire baking community. Happy baking, and get ready to fall in love with your new favorite treat!
Frequently Asked Questions (FAQs)
Can I use frozen peaches for this recipe?
Absolutely! If fresh peaches aren’t in season or readily available, frozen peaches are a perfectly acceptable substitute. Just make sure to thaw them completely and drain any excess liquid before using them in your filling. This prevents the filling from becoming too watery and ensures your cruffins bake beautifully.
How should I store leftover Peach Pie Cruffins?
To keep your cruffins fresh, store them in an airtight container at room temperature for up to 2-3 days. If you want to extend their shelf life, you can refrigerate them for up to a week. For longer storage, they freeze exceptionally well! Wrap individual cruffins tightly in plastic wrap, then place them in a freezer-safe bag or container for up to 2-3 months. Thaw at room temperature and warm gently in the oven for that fresh-baked taste.
Can I make the cruffins ahead of time?
Yes, you can! You have a few options for making them ahead. You can prepare the peach filling a day in advance and store it in the refrigerator. You can also assemble the cruffins completely, then cover them loosely and refrigerate overnight. In the morning, simply bring them to room temperature for about 30 minutes to an hour before baking as directed. This is a fantastic way to enjoy fresh-baked cruffins without all the morning prep!
What kind of pie crust works best for these Peach Pie Cruffins?
For the best results, I recommend using a good quality all-butter pie crust, either homemade or store-bought. The rich flavor and flakiness of an all-butter crust truly complement the peach filling and the croissant-like texture we’re aiming for. Shortcrust pastry also works well, but avoid overly crumbly or tough crusts that might detract from the delicate balance of the cruffin.
Are these Peach Pie Cruffins difficult to make?
Not at all! While they might look impressive, the process is quite straightforward. If you can handle pie crust and a basic muffin recipe, you’ll find these very manageable. The key is to follow the instructions carefully, especially when it comes to rolling and shaping the dough. Don’t be afraid to experiment; baking is all about having fun and creating something delicious!
What’s the difference between a cruffin and a muffin?
A muffin is typically a quick bread, made with a batter that results in a dense, cake-like crumb. A cruffin, on the other hand, is a hybrid pastry that combines the flakiness of a croissant with the shape and often the fillings of a muffin. It uses a laminated dough (like croissant dough) which is then shaped in a muffin tin, giving it distinct layers and a rich, buttery flavor that sets it apart from a traditional muffin.
Irresistible Peach Pie Cruffins – Sweet, Flaky, Perfect!
A delightful hybrid pastry combining the flaky layers of a croissant with the tender crumb of a muffin, filled with a sweet and spiced peach pie filling. Perfect for breakfast, brunch, or dessert, these cruffins offer an irresistible blend of textures and flavors.
Ingredients
-
4 cups (500g) all-purpose flour
-
1/4 cup (50g) granulated sugar
-
2 1/4 teaspoons (7g) instant dry yeast
-
1 1/2 teaspoons (9g) fine sea salt
-
1 cup (226g) unsalted butter, very cold
-
1 cup (240ml) whole milk, lukewarm
-
1/4 cup (60ml) cold water
-
4-5 large fresh peaches (4 cups diced) OR 2 cans (15oz each) sliced peaches, drained and diced
-
1/2 cup granulated sugar
-
1/4 cup light brown sugar, packed
-
3 tablespoons cornstarch
-
1 tablespoon fresh lemon juice
-
1 teaspoon ground cinnamon
-
1/4 teaspoon ground nutmeg
-
Pinch of salt
-
1 tablespoon unsalted butter, diced
-
1 large egg, beaten with 1 tablespoon water
-
2 tablespoons turbinado sugar
Instructions
-
Step 1
In a large bowl, whisk together flour, 1/4 cup granulated sugar, instant dry yeast, and sea salt. In a separate bowl, combine lukewarm whole milk and cold water. Pour wet ingredients into dry; mix until a shaggy dough forms. Knead dough for 8-10 minutes until smooth and elastic. Form into a ball, place in a lightly oiled bowl, cover, and refrigerate for 2-18 hours. -
Step 2
Take 1 cup very cold unsalted butter out 30 minutes before lamination. Pound and roll it between parchment paper into an 8×8 inch (20×20 cm) square. Keep chilled. -
Step 3
{‘@type’: ‘HowToSection’, ‘name’: ‘Lamination (3 Turns)’, ‘itemListElement’: [{‘@type’: ‘HowToStep’, ‘name’: ‘First Turn’, ‘text’: “On a lightly floured surface, roll chilled dough into a 16×8 inch (40×20 cm) rectangle. Place butter block on one half of the dough, fold the other half over, and seal edges. Roll the dough into a 24×10 inch (60×25 cm) rectangle. Perform a ‘letter fold’ (fold one short end one-third towards center, then fold the other short end over). Wrap dough tightly and chill for 30 minutes.”}, {‘@type’: ‘HowToStep’, ‘name’: ‘Second Turn’, ‘text’: “Unwrap, rotate the dough, and roll again into a 24×10 inch (60×25 cm) rectangle. Repeat the ‘letter fold’. Wrap and chill for 30 minutes.”}, {‘@type’: ‘HowToStep’, ‘name’: ‘Third Turn’, ‘text’: “Repeat rolling and ‘letter fold’ for the third and final turn. Wrap and chill for a minimum of 1 hour.”}]} -
Step 4
If using fresh peaches, wash, blanch, peel, pit, and dice into 1/4-inch pieces (or drain and dice canned peaches). In a medium saucepan, combine diced peaches, 1/2 cup granulated sugar, light brown sugar, cornstarch, lemon juice, cinnamon, nutmeg, and a pinch of salt. Stir well. Cook over medium heat, stirring frequently, until the mixture simmers and thickens, about 5-7 minutes. Remove from heat, stir in 1 tablespoon diced unsalted butter until melted. Transfer filling to a shallow bowl, cover with plastic wrap directly on the surface, and chill completely in the refrigerator. -
Step 5
On a lightly floured surface, roll chilled laminated dough into a 20×15 inch (50×38 cm) rectangle, 1/8-inch (3-4 mm) thick. Trim edges and cut into 12 strips, each about 1 1/4 inches (3 cm) wide and 15 inches (38 cm) long. Spoon 1 1/2 to 2 tablespoons of chilled peach filling along each dough strip, leaving borders. Fold one long edge over the filling, then the other, and pinch the seam to seal, forming a filled log. Tightly roll each filled dough strip into a spiral and place into a greased standard 12-cup muffin tin, tucking the loose end underneath. Cover loosely and proof in a warm place for 1 to 1 1/2 hours, until visibly puffed. -
Step 6
Preheat oven to 400°F (200°C). Gently brush the tops of the proofed cruffins with egg wash and sprinkle generously with turbinado sugar. Bake in the preheated oven for 15 minutes at 400°F (200°C). Reduce oven temperature to 375°F (190°C) and bake for another 15-20 minutes, or until deeply golden brown and an internal temperature of 200-210°F (93-99°C) is reached. Let cool in the muffin tin for 5-10 minutes, then transfer to a wire rack to cool completely.
Important Information
Nutrition Facts (Per Serving)
It is important to consider this information as approximate and not to use it as definitive health advice.
Allergy Information
Please check ingredients for potential allergens and consult a health professional if in doubt.

Leave a Comment