
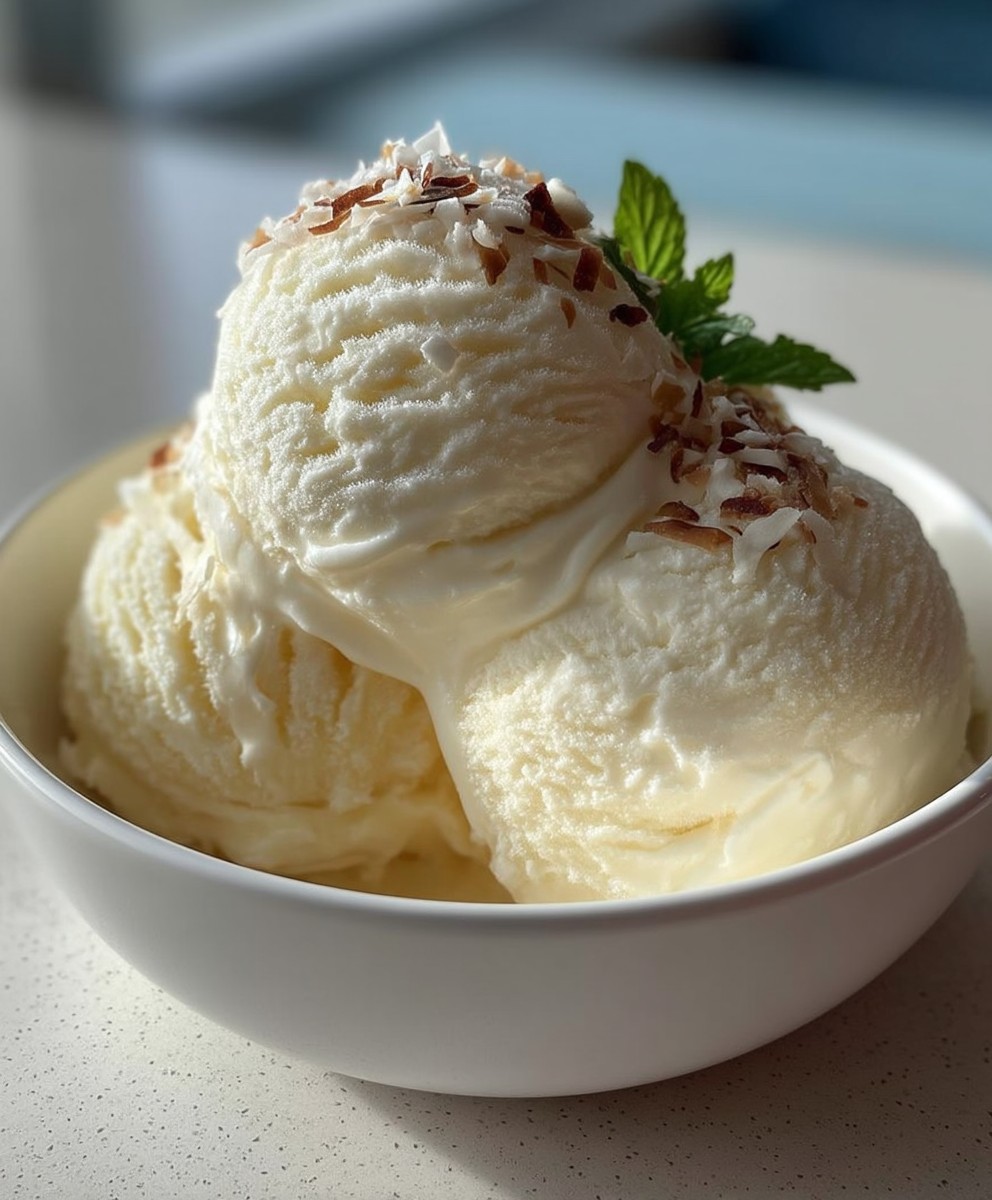
Coconut Milk Ice Cream: Prepare to be transported to a tropical paradise with every spoonful of this creamy, dreamy dessert! Imagine a luscious, dairy-free ice cream that’s so rich and flavorful, you won’t believe it’s made without any cream. This isn’t just ice cream; it’s an experience.
While the exact origins of coconut milk ice cream are difficult to pinpoint, the use of coconut milk in desserts has deep roots in Southeast Asian and Caribbean cultures. Coconuts, a staple in these regions, have been used for centuries to create a variety of sweet and savory dishes. Coconut milk ice cream is a natural extension of this culinary tradition, offering a refreshing and naturally sweet treat perfect for warm climates.
What makes Coconut Milk Ice Cream so irresistible? It’s the perfect combination of creamy texture and subtly sweet, nutty flavor. It’s also incredibly versatile! Whether you’re vegan, lactose intolerant, or simply looking for a healthier alternative to traditional ice cream, this recipe is a winner. Plus, it’s surprisingly easy to make at home, requiring only a few simple ingredients and minimal effort. Get ready to indulge in a guilt-free pleasure that will tantalize your taste buds and leave you craving more!

Ingredients:
- 2 (13.5 ounce) cans full-fat coconut milk, refrigerated overnight
- ¾ cup granulated sugar
- ¼ teaspoon sea salt
- 1 teaspoon vanilla extract
- Optional: ¼ cup shredded coconut, toasted
- Optional: 2 tablespoons coconut rum
Preparing the Coconut Cream
The key to creamy coconut milk ice cream is using only the thick coconut cream that separates from the watery liquid when refrigerated. This step is crucial, so don’t skip the overnight chilling!
- Chill the Coconut Milk: Place the cans of full-fat coconut milk in the refrigerator for at least 24 hours. This allows the thick cream to separate from the watery liquid. Don’t shake the cans before refrigerating!
- Carefully Open the Cans: After chilling, carefully open the cans of coconut milk, being careful not to shake or disturb the contents too much.
- Scoop Out the Thick Cream: Using a spoon, scoop out the thick, solidified coconut cream from the top of each can. Leave the watery liquid behind. You should aim to get about 3 cups of thick cream. If your coconut milk didn’t separate well, you might need to use more cans to get the required amount of cream.
- Reserve the Coconut Water: Don’t discard the watery coconut liquid! You can use it in smoothies, curries, or even drink it as is. It’s packed with electrolytes and adds a subtle coconut flavor.
Making the Ice Cream Base
Now that we have our luscious coconut cream, it’s time to create the ice cream base. This involves dissolving the sugar and adding flavor enhancers.
- Combine Cream and Sugar: In a medium saucepan, combine the scooped-out coconut cream and granulated sugar.
- Heat Gently: Place the saucepan over medium-low heat. Stir constantly until the sugar is completely dissolved. Be patient and avoid boiling the mixture. We just want the sugar to dissolve smoothly.
- Add Salt and Vanilla: Once the sugar is dissolved, remove the saucepan from the heat. Stir in the sea salt and vanilla extract. The salt enhances the sweetness and the vanilla adds a lovely aroma.
- Optional: Add Coconut Rum: If you’re using coconut rum, stir it in now. The alcohol will help prevent the ice cream from becoming too icy. However, if you are serving this to children, omit the rum.
- Cool the Mixture: Pour the mixture into a bowl or container. Cover it with plastic wrap, pressing the wrap directly onto the surface of the mixture to prevent a skin from forming. Refrigerate for at least 4 hours, or preferably overnight. This allows the flavors to meld together and the mixture to chill thoroughly, which is essential for proper churning.
Churning the Ice Cream
This is where the magic happens! The churning process incorporates air into the mixture, creating a light and creamy texture.
- Prepare Your Ice Cream Maker: Follow the manufacturer’s instructions for your ice cream maker. Most ice cream makers require the bowl to be frozen for at least 24 hours before use. Make sure your bowl is thoroughly frozen before proceeding.
- Pour in the Mixture: Once the ice cream maker is ready, pour the chilled coconut cream mixture into the frozen bowl.
- Churn According to Instructions: Turn on the ice cream maker and churn according to the manufacturer’s instructions. This usually takes about 20-30 minutes, or until the mixture has thickened to the consistency of soft-serve ice cream. The churning time may vary depending on your ice cream maker and the ambient temperature.
- Check the Consistency: Keep an eye on the ice cream as it churns. You want it to be thick and creamy, but not too hard. It should have the consistency of soft-serve ice cream.
Freezing and Serving
While you can enjoy the ice cream immediately at this soft-serve stage, freezing it further will improve its texture and make it easier to scoop.
- Transfer to a Freezer-Safe Container: Once the ice cream has reached the desired consistency, transfer it to a freezer-safe container. A loaf pan or a plastic container with a tight-fitting lid works well.
- Optional: Stir in Toasted Coconut: If you’re using toasted coconut, gently fold it into the ice cream before transferring it to the container.
- Freeze for at Least 2 Hours: Cover the container tightly and freeze for at least 2 hours, or until the ice cream is firm enough to scoop. Freezing it overnight is even better.
- Soften Before Serving: Before serving, let the ice cream sit at room temperature for a few minutes to soften slightly. This will make it easier to scoop.
- Scoop and Serve: Scoop the coconut milk ice cream into bowls or cones and enjoy! You can garnish it with extra toasted coconut, fresh fruit, or a drizzle of chocolate sauce.
Tips for the Best Coconut Milk Ice Cream
- Use Full-Fat Coconut Milk: This is essential for a creamy texture. Light coconut milk will not work as well.
- Don’t Over-Churn: Over-churning can result in a grainy texture. Stop churning when the ice cream reaches the consistency of soft-serve.
- Adjust Sweetness to Taste: If you prefer a less sweet ice cream, reduce the amount of sugar slightly.
- Experiment with Flavors: Feel free to add other flavorings, such as lime zest, ginger, or chocolate chips.
- Prevent Ice Crystals: To minimize ice crystal formation, store the ice cream in an airtight container and avoid temperature fluctuations in your freezer.
- Toasting Coconut: To toast shredded coconut, spread it in a single layer on a baking sheet and bake at 350°F (175°C) for 5-7 minutes, or until golden brown, stirring occasionally. Watch it carefully, as it can burn easily.
Troubleshooting
- Ice Cream is Too Icy: This can be caused by not using enough fat (full-fat coconut milk is crucial), not chilling the mixture thoroughly enough, or not churning it properly. Adding a tablespoon or two of alcohol (like coconut rum) can also help prevent ice crystals.
- Ice Cream is Too Hard: This can be caused by over-freezing. Let the ice cream sit at room temperature for a few minutes before scooping.
- Coconut Milk Didn’t Separate: Sometimes, even after chilling, the coconut milk doesn’t separate well. This can be due to the brand of coconut milk or the temperature of your refrigerator. If this happens, you can try using a different brand of coconut milk or chilling it for a longer period of time. You can also try adding a tablespoon of cornstarch to the mixture before churning to help thicken it.
Conclusion:
This Coconut Milk Ice Cream recipe isn’t just another frozen dessert; it’s a passport to a tropical paradise, a creamy dream come true, and a guaranteed crowd-pleaser. I truly believe this is a must-try recipe, and here’s why: its simplicity belies its incredible flavor. We’re talking rich, decadent coconut flavor that dances on your tongue, all achieved with just a handful of ingredients and minimal effort. Forget complicated ice cream recipes that require hours of churning and a degree in culinary science. This recipe is accessible to everyone, from seasoned chefs to kitchen novices.
But the real magic lies in its versatility. While the base recipe is divine on its own, the possibilities for customization are endless! Feeling adventurous? Try adding toasted coconut flakes for extra texture and nutty flavor. A swirl of mango puree will transport you straight to the tropics. Or, for a more decadent treat, fold in chunks of dark chocolate and macadamia nuts. For a vegan twist, ensure your chocolate is dairy-free.
Serving Suggestions and Variations
Imagine serving this creamy delight at your next summer barbecue. It’s the perfect refreshing treat to cool down on a hot day. Serve it in waffle cones, alongside fresh fruit, or as a topping for your favorite brownies. You could even get creative and make ice cream sandwiches using homemade cookies.
Here are a few more ideas to get your creative juices flowing:
* Spiced Coconut Ice Cream: Add a pinch of cinnamon, nutmeg, or cardamom to the base for a warm and inviting flavor.
* Coconut Coffee Ice Cream: Infuse the coconut milk with coffee beans for a caffeinated kick.
* Coconut Lime Ice Cream: Add lime zest and juice for a tangy and refreshing twist.
* Chocolate Coconut Ice Cream: Stir in cocoa powder or melted dark chocolate for a rich and decadent treat.
* Berry Coconut Ice Cream: Swirl in your favorite berry jam or puree for a fruity and colorful dessert.
The beauty of this recipe is that it’s a blank canvas for your culinary imagination. Don’t be afraid to experiment and create your own signature Coconut Milk Ice Cream flavor!
I’m so confident that you’ll love this recipe that I urge you to try it as soon as possible. Gather your ingredients, dust off your ice cream maker (or use the no-churn method!), and prepare to be amazed.
Once you’ve had a chance to whip up a batch of this incredible ice cream, I’d love to hear about your experience. Did you stick to the original recipe, or did you add your own unique twist? What were your favorite serving suggestions? Share your photos and stories in the comments below! Let’s create a community of coconut ice cream enthusiasts and inspire each other with our delicious creations. I can’t wait to see what you come up with! Happy churning (or freezing)!
Coconut Milk Ice Cream: The Ultimate Guide to Making Dairy-Free Delight
Creamy and delicious homemade coconut milk ice cream, perfect for a dairy-free treat! This recipe uses full-fat coconut milk for a rich, smooth texture and can be customized with toasted coconut or coconut rum.
Ingredients
- 2 (13.5 ounce) cans full-fat coconut milk, refrigerated overnight
- ¾ cup granulated sugar
- ¼ teaspoon sea salt
- 1 teaspoon vanilla extract
- Optional: ¼ cup shredded coconut, toasted
- Optional: 2 tablespoons coconut rum
Instructions
- Place the cans of full-fat coconut milk in the refrigerator for at least 24 hours.
- After chilling, carefully open the cans of coconut milk, being careful not to shake or disturb the contents too much.
- Using a spoon, scoop out the thick, solidified coconut cream from the top of each can. Leave the watery liquid behind. Aim for about 3 cups of thick cream.
- Don’t discard the watery coconut liquid! Use it in smoothies, curries, or drink it as is.
- In a medium saucepan, combine the scooped-out coconut cream and granulated sugar.
- Place the saucepan over medium-low heat. Stir constantly until the sugar is completely dissolved. Avoid boiling.
- Once the sugar is dissolved, remove the saucepan from the heat. Stir in the sea salt and vanilla extract.
- If using coconut rum, stir it in now. Omit if serving to children.
- Pour the mixture into a bowl or container. Cover with plastic wrap, pressing the wrap directly onto the surface of the mixture. Refrigerate for at least 4 hours, or preferably overnight.
- Follow the manufacturer’s instructions for your ice cream maker.
- Once the ice cream maker is ready, pour the chilled coconut cream mixture into the frozen bowl.
- Turn on the ice cream maker and churn according to the manufacturer’s instructions (usually 20-30 minutes), until the mixture has thickened to the consistency of soft-serve ice cream.
- Keep an eye on the ice cream as it churns. You want it to be thick and creamy, but not too hard. It should have the consistency of soft-serve ice cream.
- Once the ice cream has reached the desired consistency, transfer it to a freezer-safe container.
- If using toasted coconut, gently fold it into the ice cream before transferring it to the container.
- Cover the container tightly and freeze for at least 2 hours, or until the ice cream is firm enough to scoop. Freezing it overnight is even better.
- Before serving, let the ice cream sit at room temperature for a few minutes to soften slightly.
- Scoop the coconut milk ice cream into bowls or cones and enjoy! Garnish with extra toasted coconut, fresh fruit, or a drizzle of chocolate sauce.
Notes
- Use full-fat coconut milk for the creamiest texture.
- Don’t over-churn the ice cream.
- Adjust sweetness to taste.
- Experiment with flavors like lime zest, ginger, or chocolate chips.
- Store in an airtight container to prevent ice crystals.
- To toast shredded coconut, bake at 350°F (175°C) for 5-7 minutes, stirring occasionally.
Leave a Comment