
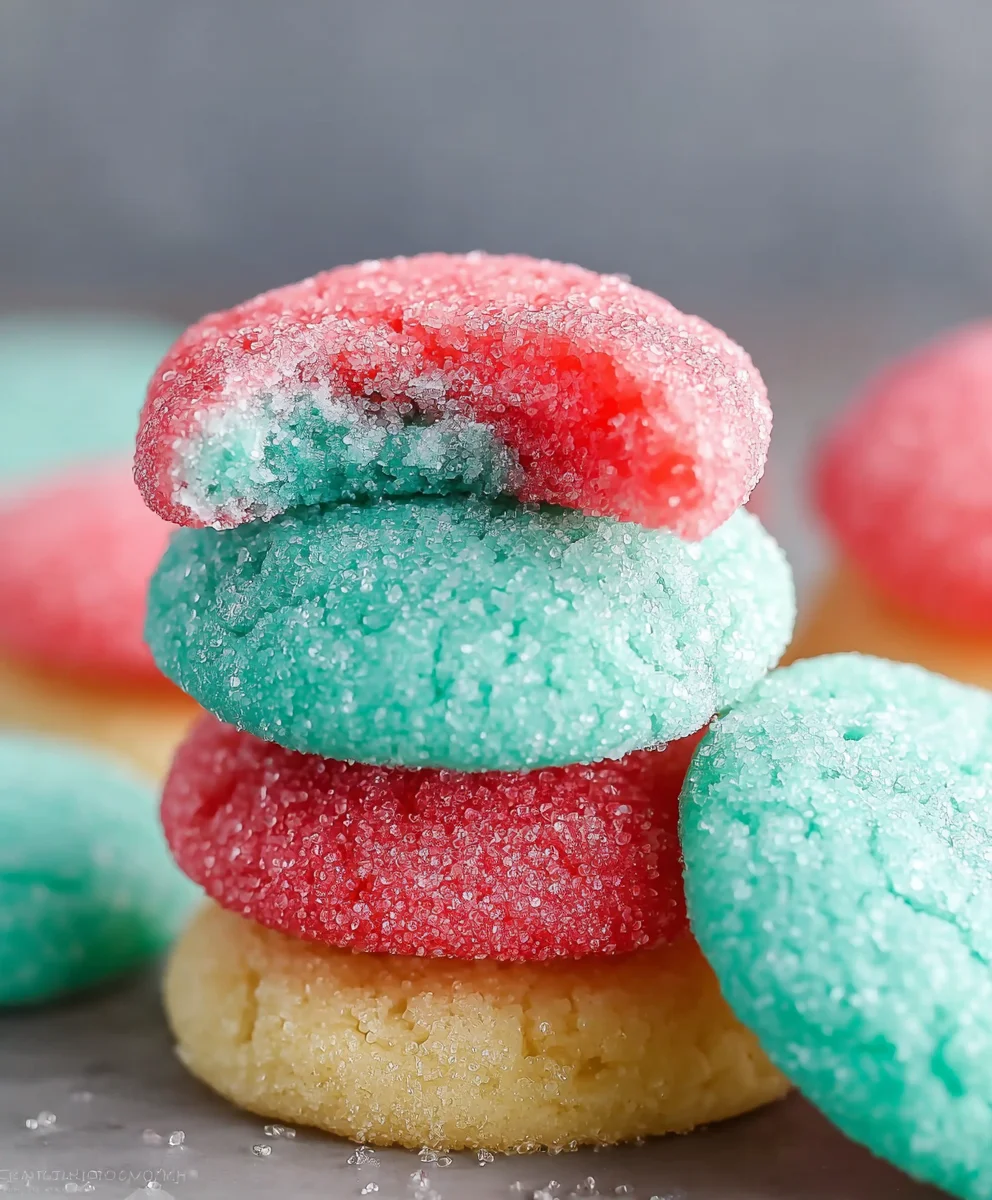
Jello Cookies are not just a dessert; they’re a portal to childhood memories, a vibrant burst of flavor, and a testament to simple, delightful baking. If you’ve ever craved a treat that’s both incredibly fun to make and wonderfully nostalgic, then you’ve come to the right place. These aren’t your average cookies; they’re soft, chewy, and infused with the unmistakable fruity zing of Jello. What makes Jello Cookies so universally loved? It’s that unique combination of a slightly cakey interior, a delightful chewiness, and an explosion of color and taste that can be customized endlessly. Imagine a cookie that tastes like your favorite Jello flavor – that’s the magic at play here. Whether it’s the sunshine yellow of lemon, the vibrant red of cherry, or the tropical blue of berry, each bite is a cheerful adventure. They are incredibly forgiving for new bakers and a fantastic way to get kids involved in the kitchen, transforming simple ingredients into something truly special. Get ready to rediscover the joy of baking with this delightful recipe for Jello Cookies!

Ingredients:
- 3/4 cup unsalted butter, softened
- 1 cup granulated sugar
- 1 egg
- 2 1/2 cups all-purpose flour
- 1 tsp baking powder
- 1/4 tsp salt
- 2 packages (3 oz each) Jello (choose your favorite flavors/colors)
Preparing the Cookie Dough
Step 1: Creaming the Butter and Sugar
The first crucial step in making these vibrant Jello Cookies is to properly cream together the softened butter and granulated sugar. Ensure your butter is truly softened – it should yield slightly when pressed with your finger but not be melted. In a large mixing bowl, add the 3/4 cup of softened unsalted butter and 1 cup of granulated sugar. Using an electric mixer on medium speed, beat these two ingredients together for about 2 to 3 minutes, or until the mixture is light, fluffy, and pale yellow. This process, known as creaming, incorporates air into the dough, which contributes to a tender and well-risen cookie. Scrape down the sides of the bowl occasionally to ensure all the butter and sugar are evenly incorporated.
Step 2: Adding the Egg and Flavor Base
Next, we’ll incorporate the egg to bind the dough together. Add 1 large egg to the creamed butter and sugar mixture. Beat on medium speed for another minute until the egg is fully combined and no streaks of egg yolk or white remain. At this stage, you’ll also introduce the star of our Jello Cookies: the Jello powder. Open your 2 packages of (3 oz each) Jello. You can choose any flavors and colors you like! For a classic look, strawberry and lime or cherry and lemon work wonderfully. For a rainbow effect, use contrasting colors. Add the dry Jello powder directly to the bowl. Mix on low speed until just combined. Don’t overmix at this stage, as we want the Jello powder to distribute evenly without developing too much gluten in the flour yet. You’ll notice the mixture taking on a vibrant hue.
Step 3: Incorporating Dry Ingredients
Now it’s time to add the dry ingredients that will form the structure of our cookies. In a separate medium bowl, whisk together the 2 1/2 cups of all-purpose flour, 1 teaspoon of baking powder, and 1/4 teaspoon of salt. Whisking these together beforehand ensures the baking powder and salt are evenly distributed throughout the flour, preventing pockets of saltiness or uneven leavening in your Jello Cookies. Gradually add this dry ingredient mixture to the wet ingredients in the large mixing bowl, about a third at a time, mixing on low speed after each addition. Continue mixing only until the flour is just incorporated and no dry streaks remain. Overmixing at this point can lead to tough cookies. The dough will become quite stiff.
Shaping and Baking the Cookies
Step 4: Chilling and Shaping the Dough
This dough can be a little sticky due to the Jello powder, so chilling is essential. Scrape the dough out onto a piece of plastic wrap, gather it into a ball, and flatten it into a disk. Wrap it tightly and refrigerate for at least 30 minutes, or up to 2 days. Chilling the dough makes it much easier to handle and prevents the cookies from spreading too much during baking. Once chilled, preheat your oven to 350°F (175°C) and line baking sheets with parchment paper. For uniform Jello Cookies, use a cookie scoop or roll the dough into 1-inch balls. Place the balls about 2 inches apart on the prepared baking sheets.
Step 5: Baking and Cooling
Bake the Jello Cookies for 9 to 12 minutes, or until the edges are lightly golden and the centers are set. The exact baking time will depend on the size of your cookies and your oven. Keep a close eye on them, as they can go from perfectly baked to overdone quickly. Once baked, let the cookies cool on the baking sheets for 5 minutes before transferring them to a wire rack to cool completely. This resting period on the hot baking sheet allows the cookies to firm up, preventing them from breaking when you move them. As they cool, the vibrant Jello colors will really shine through, making these a fun and visually appealing treat. You can enjoy them as is, or for an extra touch, consider a simple glaze once fully cooled.
Conclusion:
And there you have it – a delightful and surprisingly simple way to create vibrant and chewy Jello Cookies! These cookies are a fantastic way to bring a pop of color and a burst of fruity flavor to any occasion. Whether you’re looking for a fun baking project with kids, a unique treat for a party, or just a sweet pick-me-up, these Jello Cookies are sure to be a hit. The best part is their adaptability; feel free to experiment with different Jello flavors and even add sprinkles or edible glitter for an extra touch of magic. Don’t be afraid to get creative and make these Jello Cookies your own!
For serving, these cookies are wonderful on their own, but they also pair beautifully with a glass of cold milk or a light, refreshing beverage. They’re perfect for bake sales, potlucks, or simply enjoying with your afternoon tea.
Frequently Asked Questions about Jello Cookies:
Q: Can I use sugar-free Jello for this recipe?
A: Absolutely! You can substitute sugar-free Jello for regular Jello. The texture and flavor will be very similar, and it’s a great way to make a lighter version of these delicious Jello Cookies.
Q: My cookies spread too much. What can I do?
A: If your Jello Cookies are spreading excessively, it might be due to the butter being too soft or the dough being too warm. Try chilling the dough for an additional 15-30 minutes before baking. You can also slightly reduce the amount of butter or add a tablespoon more flour, but be careful not to make the dough too dry.
Q: How should I store these cookies?
A: Store your cooled Jello Cookies in an airtight container at room temperature for up to 5 days. They tend to stay soft and chewy for several days.

Fruity Jello Cookies – Easy & Delicious Homemade Treats
A simple and vibrant recipe for homemade cookies made with Jello powder, resulting in colorful and flavorful treats.
Ingredients
-
3/4 cup unsalted butter, softened
-
1 cup granulated sugar
-
1 egg
-
2 1/2 cups all-purpose flour
-
1 tsp baking powder
-
1/4 tsp salt
-
2 packages (3 oz each) Jello (choose your favorite flavors/colors)
Instructions
-
Step 1
Cream together the softened butter and granulated sugar in a large mixing bowl using an electric mixer on medium speed for about 2 to 3 minutes, until light, fluffy, and pale yellow. -
Step 2
Add the egg and beat on medium speed for another minute until fully combined. Add the dry Jello powder to the bowl and mix on low speed until just combined. -
Step 3
In a separate bowl, whisk together the flour, baking powder, and salt. Gradually add this dry mixture to the wet ingredients, about a third at a time, mixing on low speed until just incorporated. -
Step 4
Scrape the dough onto plastic wrap, form into a ball, flatten into a disk, wrap tightly, and refrigerate for at least 30 minutes. Preheat oven to 350°F (175°C) and line baking sheets with parchment paper. -
Step 5
Roll the chilled dough into 1-inch balls and place about 2 inches apart on the prepared baking sheets. -
Step 6
Bake for 9 to 12 minutes, or until edges are lightly golden and centers are set. Let cool on baking sheets for 5 minutes before transferring to a wire rack to cool completely.
Important Information
Nutrition Facts (Per Serving)
It is important to consider this information as approximate and not to use it as definitive health advice.
Allergy Information
Please check ingredients for potential allergens and consult a health professional if in doubt.

Leave a Comment