
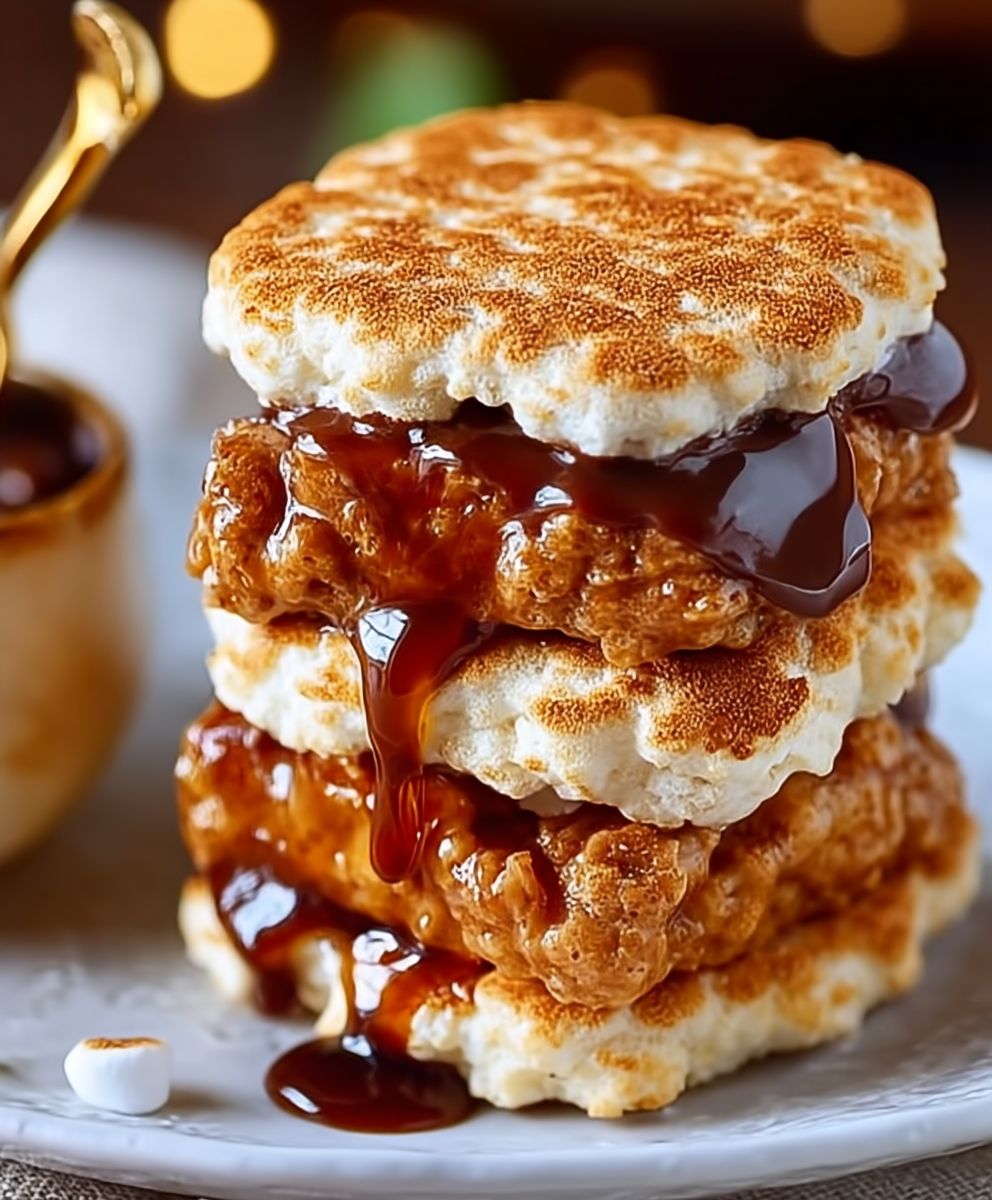
Frozen Smores Sandwiches: the ultimate no-bake summer treat that will transport you back to childhood campfires with every single bite! Imagine this: creamy, cold marshmallow ice cream nestled between two crisp graham crackers, all punctuated by the delightful crunch of chocolate chunks. Sounds heavenly, right?
S’mores, a quintessential American treat, have been warming hearts and sticky fingers since the early 1920s. While the exact origin is debated, the first published recipe appeared in a Girl Scout handbook, solidifying its place in American culture. But let’s face it, building a campfire isn’t always practical, especially when the summer heat is already blazing. That’s where my Frozen Smores Sandwiches come in!
These aren’t just any ice cream sandwiches; they’re a symphony of textures and flavors. The slightly salty graham crackers provide the perfect counterpoint to the sweet marshmallow ice cream, while the chocolate adds a rich, decadent touch. People adore this dish because it captures the essence of s’mores without the fuss of a campfire. Plus, they’re incredibly convenient to make ahead and keep in the freezer for a quick and satisfying dessert any time the craving strikes. Get ready to experience the magic of s’mores in a cool, refreshing new way!

Ingredients:
- 1 (16 ounce) package chocolate wafer cookies
- 1 (7 ounce) jar marshmallow creme
- 1/2 cup creamy peanut butter
- 1/4 cup milk chocolate chips, melted
- 1/4 cup mini marshmallows
- 1/4 cup graham cracker crumbs
Preparing the Filling:
Okay, let’s get started with the heart of our Frozen S’mores Sandwiches the creamy, dreamy filling! This is where the magic happens, and trust me, it’s super easy.
- Combine the Marshmallow Creme and Peanut Butter: In a large bowl, scoop out the entire jar of marshmallow creme. Now, add in that creamy peanut butter. I prefer using creamy peanut butter for a smoother texture, but if you’re a fan of chunky, go for it! It’ll add a little extra something-something to your s’mores.
- Mix Until Smooth: Using a spatula or an electric mixer (on low speed), gently combine the marshmallow creme and peanut butter until they are fully incorporated and you have a smooth, homogenous mixture. Be careful not to overmix, as this can make the filling a bit too runny. We want it nice and thick so it holds its shape in the freezer.
- Add the Melted Chocolate: Now for the chocolatey goodness! Make sure your chocolate chips are fully melted and smooth. You can melt them in the microwave in 30-second intervals, stirring in between, or use a double boiler. Once melted, drizzle the chocolate into the marshmallow-peanut butter mixture.
- Gently Fold in the Chocolate: Using your spatula, gently fold the melted chocolate into the mixture. We want to create ribbons of chocolate throughout the filling, not completely blend it in. This will give each bite a burst of chocolate flavor.
- Incorporate the Mini Marshmallows: Time for some extra marshmallow fun! Add the mini marshmallows to the bowl. Gently fold them into the filling, being careful not to crush them. We want them to stay intact so they add a nice chewy texture to our frozen s’mores.
Assembling the Sandwiches:
Now comes the fun part putting our s’mores sandwiches together! This is where your inner artist can shine (or, you know, just make a delicious treat). Don’t worry about perfection; they’ll taste amazing no matter what!
- Prepare Your Work Station: Lay out a sheet of parchment paper or wax paper on your counter. This will prevent the cookies from sticking and make cleanup a breeze. Grab your chocolate wafer cookies and the bowl of filling.
- Spread the Filling: Take one chocolate wafer cookie and spread a generous amount of the marshmallow-peanut butter filling on the flat side. Don’t be shy! We want a good layer of filling in each sandwich. Aim for about 1/4 to 1/3 inch thick.
- Top with Another Cookie: Carefully place another chocolate wafer cookie on top of the filling, flat side down, to create a sandwich. Gently press down to secure the filling and ensure the cookies are evenly aligned.
- Repeat the Process: Continue spreading the filling and assembling the sandwiches until you’ve used up all the filling or cookies. You should end up with a batch of delicious-looking s’mores sandwiches!
Adding the Finishing Touch: Graham Cracker Crumb Coating
This step is optional, but highly recommended! The graham cracker crumb coating adds a delightful crunch and that classic s’mores flavor that we all know and love. It also makes the sandwiches look extra fancy!
- Prepare the Graham Cracker Crumbs: If you haven’t already, crush your graham crackers into fine crumbs. You can do this in a food processor, with a rolling pin in a resealable bag, or even by hand.
- Roll the Edges in Crumbs: Gently roll the edges of each s’mores sandwich in the graham cracker crumbs, pressing lightly to help them adhere. You can also sprinkle some crumbs on the top and bottom of the sandwiches for extra coverage.
- Clean Up Any Excess: Lightly brush off any excess graham cracker crumbs from the sandwiches. We want a nice, even coating, not a crumbly mess.
Freezing the S’mores Sandwiches:
Now for the final step freezing our s’mores sandwiches! This is what transforms them into the perfect frozen treat. Patience is key here; you’ll need to let them freeze for at least a few hours to achieve that perfect frozen texture.
- Arrange on a Baking Sheet: Place the assembled s’mores sandwiches on a baking sheet lined with parchment paper or wax paper. Make sure they are not touching each other, as this can cause them to stick together during freezing.
- Freeze for at Least 2 Hours: Place the baking sheet in the freezer and let the s’mores sandwiches freeze for at least 2 hours, or preferably longer. I recommend freezing them overnight for the best results. This will allow the filling to firm up completely and the cookies to become nice and crisp.
- Transfer to a Freezer-Safe Container: Once the s’mores sandwiches are fully frozen, you can transfer them to a freezer-safe container or resealable bag. This will help prevent freezer burn and keep them fresh for longer.
- Storage: These frozen s’mores sandwiches can be stored in the freezer for up to 2-3 weeks. After that, the cookies may start to soften slightly, but they will still be delicious!
Serving Suggestions:
Okay, your Frozen S’mores Sandwiches are ready to be devoured! Here are a few serving suggestions to take them to the next level:
- Enjoy Straight from the Freezer: The best way to enjoy these treats is straight from the freezer. The frozen filling is so refreshing and the cookies have a satisfying crunch.
- Let Them Thaw Slightly: If you prefer a softer texture, you can let the sandwiches thaw for a few minutes before serving. This will soften the cookies and make the filling a bit creamier.
- Pair with a Glass of Milk: A cold glass of milk is the perfect accompaniment to these frozen s’mores sandwiches. It’s a classic combination that never fails to satisfy.
- Serve at Parties: These frozen s’mores sandwiches are a great dessert option for parties and gatherings. They’re easy to make ahead of time and are always a crowd-pleaser.
- Get Creative with Toppings: If you’re feeling adventurous, you can add some extra toppings to your frozen s’mores sandwiches. Try drizzling them with caramel sauce, sprinkling them with chopped nuts, or adding a dollop of whipped cream.
Tips and Tricks:
Here are a few extra tips and tricks to help you make the perfect Frozen S’mores Sandwiches:
- Use High-Quality Ingredients: The better the ingredients, the better the final product will taste. Use good quality chocolate wafer cookies, creamy peanut butter, and fresh marshmallows.
- Don’t Overmix the Filling: Overmixing the filling can make it too runny. Gently fold the ingredients together until they are just combined.
- Freeze the Sandwiches Properly: Make sure the sandwiches are fully frozen before transferring them to a freezer-safe container. This will prevent them from sticking together and help them stay fresh for longer.
- Experiment with Flavors: Don’t be afraid to experiment with different flavors and ingredients. Try using different types of cookies, peanut butter, or chocolate. You can also add other ingredients to the filling, such as chopped nuts, pretzels, or sprinkles.
- Make Them Ahead of Time: These frozen s’mores sandwiches are a great make-ahead dessert. You can prepare them a day or two in advance and store them in the freezer until you’re ready to serve them.
Variations:
Want to mix things up? Here are some fun variations you can try:
- Peanut Butter Cup S’mores: Use peanut butter cookies instead of chocolate wafers and add chopped peanut butter cups to the filling.
- Mint Chocolate S’mores: Use chocolate mint cookies and add a few drops of peppermint extract to the filling.
- Salted Caramel S’mores: Drizzle the finished sandwiches with salted caramel sauce.
- Nutella S’mores: Use Nutella instead of peanut butter in the filling.
- S’mores Pops: Insert a popsicle stick into the filling before freezing for a fun and easy-to-eat treat.
Enjoy your delicious Frozen S’mores Sandwiches! I hope you love them as much
Conclusion:
This isn’t just a recipe; it’s a ticket to instant summer nostalgia, a guaranteed crowd-pleaser, and quite possibly the easiest, most satisfying dessert you’ll make all year. Seriously, these Frozen Smores Sandwiches are a must-try! The combination of the creamy, cold ice cream, the gooey marshmallow fluff, and the satisfying crunch of the graham crackers is pure magic. It’s the perfect antidote to a hot day, a delightful treat for kids (and adults!), and a fun, no-bake project that even the most kitchen-averse can master.
But the best part? The versatility! While the classic recipe is undeniably delicious, feel free to get creative and put your own spin on these frozen delights.
Serving Suggestions and Variations:
* Ice Cream Adventures: Don’t limit yourself to vanilla! Chocolate ice cream amps up the richness, strawberry adds a fruity twist, and coffee ice cream creates a mocha-inspired masterpiece. Even a swirl of caramel ice cream would be amazing.
* Graham Cracker Remix: While plain graham crackers are the traditional choice, consider using chocolate graham crackers for an extra layer of decadence. Or, for a gluten-free option, try using gluten-free graham crackers or even crunchy gluten-free cookies.
* Marshmallow Mania: If you’re feeling ambitious, try making your own homemade marshmallow fluff! It’s surprisingly easy and adds a gourmet touch. Alternatively, you could toast the marshmallow fluff with a kitchen torch before assembling the sandwiches for a slightly caramelized flavor.
* Chocolate Chips: Sprinkle mini chocolate chips, dark chocolate shavings, or even white chocolate chips onto the ice cream before adding the top graham cracker. This adds a delightful textural element and intensifies the chocolatey goodness.
* Nutty Delight: Add chopped nuts, like pecans, walnuts, or almonds, for a crunchy and flavorful addition. Toasted nuts offer an even richer flavor.
* Dipped in Chocolate: For the ultimate indulgence, dip the assembled frozen sandwiches in melted chocolate and sprinkle with your favorite toppings, like sprinkles, crushed graham crackers, or sea salt.
* Seasonal Flavors: Adapt the recipe to the seasons! In the fall, use pumpkin spice ice cream and gingerbread graham crackers. In the winter, try peppermint ice cream and crushed candy canes.
These Frozen Smores Sandwiches are perfect for everything from backyard barbecues to birthday parties to simple weeknight desserts. They’re easy to make ahead of time, so you can always have a sweet treat on hand. They are also a great way to get the kids involved in the kitchen. Let them choose their favorite ice cream flavors and toppings, and let them help assemble the sandwiches. It’s a fun and delicious activity that everyone will enjoy.
I truly believe this recipe is a winner, and I can’t wait for you to try it! So, gather your ingredients, get creative with your variations, and prepare to be amazed by the simplicity and deliciousness of these Frozen Smores Sandwiches.
And most importantly, I want to hear about your experience! Did you try any of the variations? What was your favorite combination? Share your photos and stories in the comments below. Let’s spread the joy of these frozen treats far and wide! Happy snacking!
Frozen Smores Sandwiches: A Cool & Delicious Summer Treat
Cool twist on a classic treat! Chocolate wafer cookies filled with creamy marshmallow-peanut butter, studded with mini marshmallows, coated in graham cracker crumbs, and frozen.
Ingredients
- 1 (16 ounce) package chocolate wafer cookies
- 1 (7 ounce) jar marshmallow creme
- 1/2 cup creamy peanut butter
- 1/4 cup milk chocolate chips, melted
- 1/4 cup mini marshmallows
- 1/4 cup graham cracker crumbs
Instructions
- Prepare the Filling: In a large bowl, combine marshmallow creme and peanut butter. Mix until smooth. Gently fold in melted chocolate and mini marshmallows.
- Assemble the Sandwiches: Spread a generous amount of filling on the flat side of a chocolate wafer cookie. Top with another cookie, flat side down. Repeat until all filling or cookies are used.
- Add Graham Cracker Crumb Coating (Optional): Roll the edges of each sandwich in graham cracker crumbs.
- Freeze: Place sandwiches on a baking sheet lined with parchment paper. Freeze for at least 2 hours, or preferably overnight.
- Store: Transfer to a freezer-safe container and store for up to 2-3 weeks.
- Serve: Enjoy straight from the freezer or let thaw slightly.
Notes
- Use high-quality ingredients for the best flavor.
- Don’t overmix the filling.
- Freeze the sandwiches completely before storing.
- Experiment with different flavors and ingredients.
- These can be made ahead of time.
- For melting chocolate chips, microwave in 30-second intervals, stirring in between, or use a double boiler.
- If you prefer a softer texture, you can let the sandwiches thaw for a few minutes before serving.
- Pair with a glass of milk.
- Get creative with toppings: caramel sauce, chopped nuts, or whipped cream.

Leave a Comment