
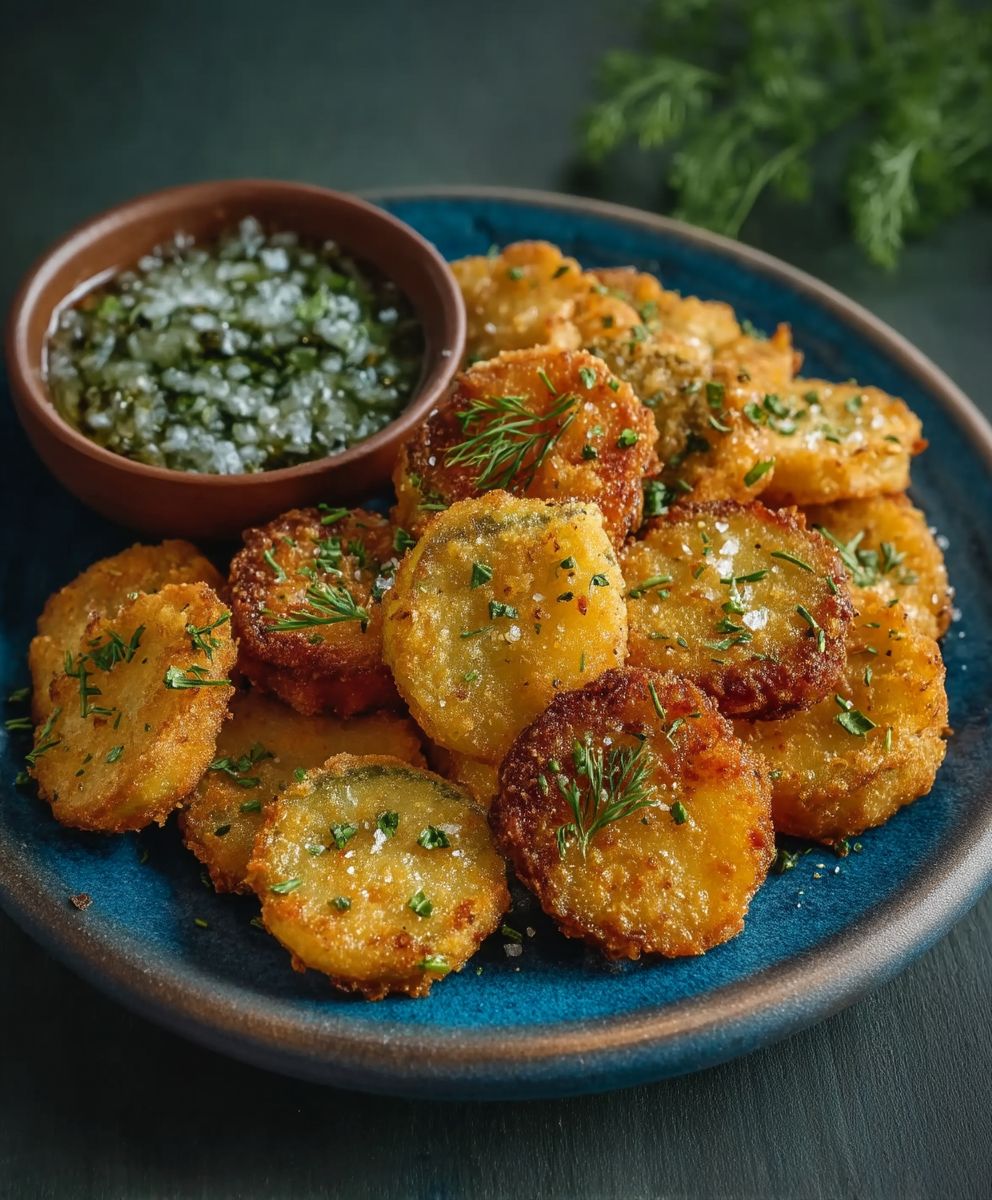
Fried Pickles: that’s right, we’re diving headfirst into a crispy, tangy, and utterly addictive snack that’s taken the culinary world by storm! Forget everything you thought you knew about pickles; this isn’t your grandma’s dill. We’re talking golden-brown, crunchy perfection encasing a juicy, sour pickle spear. Are you ready to experience a flavor explosion that will leave you craving more?
While the exact origins are debated, many credit the fried pickle to the Duchess Drive-In in Atkins, Arkansas, back in 1963. Whether it was a stroke of genius or a happy accident, this Southern-fried delight quickly gained popularity, spreading like wildfire across the United States. It’s a testament to the simple pleasures in life: taking something familiar and transforming it into something extraordinary.
So, what’s the secret to the enduring appeal of fried pickles? It’s the irresistible combination of textures and tastes. The crispy, salty batter gives way to the tangy, sour pickle, creating a symphony of flavors that dance on your palate. They’re incredibly easy to make at home, perfect as an appetizer for game day, a fun snack for movie night, or even a surprising addition to your next burger. Get ready to learn how to make the best fried pickles you’ve ever tasted!

Ingredients:
- 1 (32 ounce) jar dill pickle chips, drained
- 1 cup all-purpose flour
- 1/2 cup cornstarch
- 1 teaspoon garlic powder
- 1 teaspoon onion powder
- 1 teaspoon smoked paprika
- 1/2 teaspoon cayenne pepper (optional, for heat)
- 1/2 teaspoon black pepper
- 1/2 teaspoon salt
- 1 cup buttermilk
- 1 large egg
- Vegetable oil, for frying (about 4-6 cups)
- Your favorite dipping sauce (ranch, blue cheese, spicy mayo, etc.)
Preparing the Pickles and Breading
Alright, let’s get started! The key to amazing fried pickles is getting the pickles nice and dry and the breading just right. Trust me, this is where the magic happens.
- Drain the Pickles Thoroughly: This is super important! Open your jar of dill pickle chips and drain them really well. I like to spread them out on a few layers of paper towels. Pat them dry with more paper towels. The drier the pickles, the better the breading will stick, and the crispier they’ll be. We don’t want soggy fried pickles! Let them sit for at least 15-20 minutes, patting them dry occasionally.
- Prepare the Breading Mixture: In a medium-sized bowl, whisk together the flour, cornstarch, garlic powder, onion powder, smoked paprika, cayenne pepper (if using), black pepper, and salt. The cornstarch helps create a lighter, crispier coating, so don’t skip it! The spices add a ton of flavor, so feel free to adjust them to your liking. If you’re not a fan of heat, leave out the cayenne pepper.
- Prepare the Wet Mixture: In a separate bowl, whisk together the buttermilk and egg until well combined. The buttermilk adds a nice tang and helps the breading adhere to the pickles. If you don’t have buttermilk, you can make a substitute by adding 1 tablespoon of lemon juice or white vinegar to 1 cup of milk and letting it sit for 5 minutes.
- Breading the Pickles: Now comes the fun part! Take a handful of the dried pickle chips and dredge them in the flour mixture, making sure they’re completely coated. Shake off any excess flour. Then, dip them into the buttermilk mixture, again ensuring they’re fully coated. Finally, dredge them back into the flour mixture, pressing gently to help the breading adhere. This double-dredging is what gives you that extra crispy coating. Place the breaded pickles on a baking sheet lined with parchment paper. This prevents them from sticking and makes cleanup a breeze.
- Repeat: Repeat the breading process with the remaining pickle chips until they’re all nicely coated.
- Chill the Breaded Pickles (Optional but Recommended): This is a pro tip! Placing the breaded pickles in the refrigerator for about 30 minutes helps the breading set and prevents it from falling off during frying. It also helps them get even crispier. If you’re short on time, you can skip this step, but I highly recommend it if you can.
Frying the Pickles
Now for the main event! Frying can seem intimidating, but with a little patience and attention, you’ll be a fried pickle pro in no time.
- Heat the Oil: Pour the vegetable oil into a deep fryer or a large, heavy-bottomed pot. You want the oil to be at least 2-3 inches deep. Heat the oil over medium-high heat until it reaches a temperature of 350-375°F (175-190°C). Use a deep-fry thermometer to monitor the temperature. If you don’t have a thermometer, you can test the oil by dropping a small piece of bread into it. If the bread browns in about 30-60 seconds, the oil is ready.
- Fry in Batches: Carefully add the breaded pickles to the hot oil in batches, making sure not to overcrowd the pot. Overcrowding will lower the oil temperature and result in soggy pickles. Fry for about 2-3 minutes per batch, flipping them halfway through, until they’re golden brown and crispy.
- Remove and Drain: Use a slotted spoon or a spider strainer to remove the fried pickles from the oil and place them on a wire rack lined with paper towels. This allows the excess oil to drain off, keeping them nice and crispy.
- Maintain Oil Temperature: Between batches, make sure to monitor the oil temperature and adjust the heat as needed to keep it within the 350-375°F range.
Serving and Enjoying
The best part! Serve these crispy, tangy delights immediately while they’re still hot and crispy. They’re perfect as an appetizer, a snack, or even a side dish.
- Serve Immediately: Fried pickles are best enjoyed fresh out of the fryer. They tend to lose their crispiness as they sit, so don’t wait too long to dig in!
- Choose Your Dipping Sauce: The dipping sauce is key! Ranch dressing is a classic choice, but blue cheese dressing, spicy mayo, or even a simple honey mustard are also delicious. Get creative and experiment with different flavors to find your favorite combination.
- Garnish (Optional): If you want to get fancy, you can garnish the fried pickles with a sprinkle of chopped fresh parsley or a dusting of smoked paprika.
- Enjoy! Grab a handful of these crispy, tangy, and addictive fried pickles, dip them in your favorite sauce, and enjoy!
Tips for the Best Fried Pickles:
- Don’t skip the drying step! This is crucial for crispy pickles.
- Use fresh oil. Old oil can impart a bad flavor to your pickles.
- Don’t overcrowd the pot. Fry in batches to maintain the oil temperature.
- Serve immediately! They’re best when they’re hot and crispy.
- Experiment with different spices. Add a pinch of chili powder or some Italian seasoning to the breading for a unique flavor.
Variations:
- Spicy Fried Pickles: Add more cayenne pepper to the breading or use a spicy pickle brine.
- Sweet and Spicy Fried Pickles: Add a touch of brown sugar to the breading and serve with a sweet chili sauce.
- Air Fryer Fried Pickles: For a healthier option, you can air fry the pickles. Preheat your air fryer to 400°F (200°C) and spray the breaded pickles with cooking spray. Air fry for 8-10 minutes, flipping halfway through, until golden brown and crispy.
Storage:
Fried pickles are best enjoyed immediately, but if you have leftovers, you can store them in an airtight container in the refrigerator for up to 2 days. However, they will lose their crispiness. To reheat, you can bake them in a preheated oven at 350°F (175°C) for about 5-10 minutes, or air fry them for a few minutes until heated through.
Troubleshooting:
- Pickles are Soggy: This is usually caused by not drying the pickles thoroughly enough or overcrowding the pot. Make sure to dry the pickles well and fry in batches.
- Breading is Falling Off: This can happen if the pickles aren’t properly coated or if the oil isn’t hot enough. Make sure to double-dredge the pickles and maintain the oil temperature.
- Pickles are Burning: The oil is too hot! Reduce the heat and monitor the temperature closely.
Enjoy your homemade fried pickles! I hope you love them as much as I do. They’re the perfect combination of tangy, salty, and crispy, and they’re sure to be a hit with everyone.
Conclusion:
So there you have it! These aren’t just any pickles; they’re fried pickles, transformed into crispy, tangy, salty perfection. I truly believe this recipe is a must-try for anyone who loves a good snack, appetizer, or even a quirky side dish. The combination of the crunchy coating and the sour pickle inside is simply irresistible. It’s a flavor explosion that will leave you wanting more, and honestly, who can resist that?
But why is this recipe so special? It’s not just about the taste (although that’s a huge part of it!). It’s about the ease of preparation. You don’t need to be a culinary expert to whip up a batch of these golden goodies. The ingredients are simple and readily available, and the instructions are straightforward. Even if you’re a beginner in the kitchen, I’m confident you can nail this recipe on your first try. Plus, it’s a crowd-pleaser! Whether you’re hosting a game night, a backyard barbecue, or just craving a satisfying snack, these fried pickles are guaranteed to be a hit.
Now, let’s talk about serving suggestions and variations because the fun doesn’t stop with the basic recipe. While these fried pickles are delicious on their own, they’re even better with a dipping sauce. My personal favorite is a creamy ranch dressing, but feel free to experiment with other options like spicy mayo, honey mustard, or even a tangy barbecue sauce. For a little extra kick, you could add a pinch of cayenne pepper to the flour mixture or use a spicier variety of pickles.
If you’re feeling adventurous, you can also try different types of pickles. Dill pickles are the classic choice, but bread and butter pickles or even spicy pickles would work beautifully. You could also experiment with different coatings. Instead of using all-purpose flour, try using cornmeal for a slightly coarser texture or panko breadcrumbs for an extra crispy coating.
And don’t forget about presentation! Arrange your fried pickles on a platter with a side of dipping sauce for an elegant appetizer, or serve them in a paper cone for a fun and casual snack. You can even garnish them with a sprinkle of chopped parsley or a dusting of paprika for a pop of color.
Ultimately, the best way to enjoy these fried pickles is to make them your own. Don’t be afraid to experiment with different flavors and techniques until you find the perfect combination that suits your taste.
I’m so excited for you to try this recipe! I know you’re going to love it as much as I do. Once you’ve made your own batch of these delicious fried pickles, I would absolutely love to hear about your experience. Did you make any variations? What dipping sauce did you use? What did your friends and family think? Share your photos and stories in the comments below! I can’t wait to see what you create. Happy frying!
Fried Pickles: The Ultimate Guide to Crispy, Tangy Perfection
Crispy, tangy, and addictive fried dill pickle chips! Double-dredged and fried to golden perfection, these are the perfect appetizer or snack.
Ingredients
- 1 (32 ounce) jar dill pickle chips, drained
- 1 cup all-purpose flour
- 1/2 cup cornstarch
- 1 teaspoon garlic powder
- 1 teaspoon onion powder
- 1 teaspoon smoked paprika
- 1/2 teaspoon cayenne pepper (optional, for heat)
- 1/2 teaspoon black pepper
- 1/2 teaspoon salt
- 1 cup buttermilk
- 1 large egg
- Vegetable oil, for frying (about 4-6 cups)
- Your favorite dipping sauce (ranch, blue cheese, spicy mayo, etc.)
Instructions
- Drain the Pickles Thoroughly: Open your jar of dill pickle chips and drain them really well. Spread them out on a few layers of paper towels. Pat them dry with more paper towels. Let them sit for at least 15-20 minutes, patting them dry occasionally.
- Prepare the Breading Mixture: In a medium-sized bowl, whisk together the flour, cornstarch, garlic powder, onion powder, smoked paprika, cayenne pepper (if using), black pepper, and salt.
- Prepare the Wet Mixture: In a separate bowl, whisk together the buttermilk and egg until well combined.
- Breading the Pickles: Take a handful of the dried pickle chips and dredge them in the flour mixture, making sure they’re completely coated. Shake off any excess flour. Then, dip them into the buttermilk mixture, again ensuring they’re fully coated. Finally, dredge them back into the flour mixture, pressing gently to help the breading adhere. Place the breaded pickles on a baking sheet lined with parchment paper.
- Repeat: Repeat the breading process with the remaining pickle chips until they’re all nicely coated.
- Chill the Breaded Pickles (Optional but Recommended): Place the breaded pickles in the refrigerator for about 30 minutes to help the breading set.
- Heat the Oil: Pour the vegetable oil into a deep fryer or a large, heavy-bottomed pot. You want the oil to be at least 2-3 inches deep. Heat the oil over medium-high heat until it reaches a temperature of 350-375°F (175-190°C).
- Fry in Batches: Carefully add the breaded pickles to the hot oil in batches, making sure not to overcrowd the pot. Fry for about 2-3 minutes per batch, flipping them halfway through, until they’re golden brown and crispy.
- Remove and Drain: Use a slotted spoon or a spider strainer to remove the fried pickles from the oil and place them on a wire rack lined with paper towels.
- Maintain Oil Temperature: Between batches, make sure to monitor the oil temperature and adjust the heat as needed to keep it within the 350-375°F range.
- Serve Immediately: Serve the fried pickles immediately with your favorite dipping sauce.
Notes
- Drying is Key: Thoroughly drying the pickles is crucial for crispy results.
- Double Dredge: The double-dredging in flour ensures a crispy coating.
- Oil Temperature: Maintain the oil temperature between 350-375°F for optimal frying.
- Serve Immediately: Fried pickles are best enjoyed fresh and hot.
- Buttermilk Substitute: If you don’t have buttermilk, you can make a substitute by adding 1 tablespoon of lemon juice or white vinegar to 1 cup of milk and letting it sit for 5 minutes.
- Spice it Up: Add a pinch of chili powder or some Italian seasoning to the breading for a unique flavor.
Leave a Comment