
A Culinary Journey: Discovering the Heart of the Home
?ssp_iabi=1677102382723 represents more than just a recipe; it symbolizes a heartwarming experience waiting to unfold in your kitchen. I am truly delighted to share with you a dish that consistently brings smiles and comfort to every table it graces. Imagine a meal so deeply satisfying, so rich in flavor, that it feels like a warm embrace on a chilly evening. This is precisely the sensation this particular preparation offers, promising to transform simple ingredients into an unforgettable culinary delight.
While the exact origins of every comforting stew or casserole might be lost to time, the philosophy behind a dish like this—one designed to nourish both body and soul—is ancient and universal. Across countless cultures and generations, families have gathered around hearty, slowly simmered meals, sharing stories and creating indelible memories that last a lifetime. Our rendition, which we affectionately refer to as the “Ultimate Comfort Casserole,” draws inspiration from these timeless traditions, focusing on ingredients that sing together in perfect harmony, a true testament to the power of home cooking.
People universally adore this type of dish not only for its incredible depth of flavor and tender, melt-in-your-mouth textures but also for its wonderful convenience. It’s the perfect candidate for a make-ahead meal, allowing you more time to spend with loved ones rather than laboring in the kitchen. The magic of this recipe, perhaps best encapsulated by its unique identifier, ?ssp_iabi=1677102382723, lies in its ability to transform simple components into something truly extraordinary. I promise you, preparing this dish will not only fill your home with an irresistible aroma but also your hearts with joy. Get ready to create a new family favorite!

Ingredients:
- For the Chicken:
- 2 lbs (about 900g) boneless, skinless chicken breasts or thighs
- 1 tablespoon olive oil (plus more for cooking)
- 1 teaspoon salt
- ½ teaspoon black pepper
- 1 teaspoon garlic powder
- 1 teaspoon onion powder
- ½ teaspoon dried Italian seasoning
- ¼ teaspoon red pepper flakes (optional, for a little kick!)
- For the Creamy Tuscan Sauce:
- 2 tablespoons unsalted butter
- 1 tablespoon olive oil
- 1 medium yellow onion, finely diced
- 4-5 cloves garlic, minced
- ½ cup sun-dried tomatoes, packed in oil, drained and thinly sliced (julienned)
- 1 cup (240ml) chicken broth or vegetable broth
- 1 ½ cups (360ml) heavy cream
- ½ cup (120ml) milk (whole milk recommended, or half-and-half)
- 5-6 ounces (about 150g) fresh spinach, washed and tough stems removed
- ½ cup grated Parmesan cheese (plus more for serving)
- ¼ cup chopped fresh basil, for garnish (plus more for the sauce if desired)
- Salt and freshly ground black pepper, to taste
- For the Pasta:
- 12-16 ounces (about 340-450g) pasta of your choice (fettuccine, penne, rigatoni, or linguine work wonderfully)
- Water for boiling
- 1-2 teaspoons salt for pasta water
Preparing the Chicken
This is where we lay the foundation for a truly incredible dish. Taking the time to properly prepare and cook your chicken will make all the difference in flavor and texture. We want beautifully seared, tender, and juicy pieces that will absorb all the wonderful Tuscan flavors.
- First things first, let’s get our chicken ready. If you’re using chicken breasts, I recommend slicing them horizontally to create thinner cutlets. This helps them cook more evenly and quickly, and they’re easier to eat in a pasta dish. You can also cut them into 1-inch thick strips or bite-sized cubes if that’s your preference. For chicken thighs, trim any excess fat. Pat the chicken very dry with paper towels; this is a crucial step for achieving a lovely sear. Moisture on the surface prevents browning.
- In a medium bowl, combine all the chicken seasonings: 1 teaspoon salt, ½ teaspoon black pepper, 1 teaspoon garlic powder, 1 teaspoon onion powder, ½ teaspoon dried Italian seasoning, and ¼ teaspoon red pepper flakes (if you’re using them). Give it a good mix.
- Add the patted-dry chicken to the bowl with the seasoning mix. Drizzle with 1 tablespoon of olive oil and toss everything together thoroughly, making sure each piece of chicken is nicely coated with the spices. Let it sit for a few minutes while you heat your pan – this allows the flavors to begin to meld.
- Heat a large, heavy-bottomed skillet or a Dutch oven over medium-high heat. Add another 1-2 tablespoons of olive oil. You want the oil shimmering but not smoking. A hot pan is key for that beautiful golden-brown crust.
- Once the oil is hot, carefully place the seasoned chicken pieces into the skillet in a single layer. Do not overcrowd the pan! If you have too many pieces, they will steam instead of sear, and we want that gorgeous crust. Work in batches if necessary.
- Sear the chicken for about 4-6 minutes per side, or until it’s deeply golden brown and cooked through. The internal temperature should reach 165°F (74°C). If you’ve sliced your chicken thin, it might cook faster. Resist the urge to move the chicken around too much while it’s searing; let it develop that crust.
- Once cooked, remove the chicken from the skillet and transfer it to a clean cutting board or a plate. Cover it loosely with foil and let it rest for at least 5-10 minutes. This resting period is incredibly important – it allows the juices to redistribute throughout the meat, ensuring your chicken stays wonderfully tender and juicy. While the chicken rests, you can proceed to the next step, as we’ll be using the same skillet for our sauce, capturing all those flavorful browned bits.
- After resting, slice or dice the chicken into bite-sized pieces, or shred it, depending on your preference. Set aside.
Building the Creamy Tuscan Sauce
This is where the magic truly happens! We’ll build layers of flavor in the same skillet, taking advantage of the fond (the browned bits) left behind by the chicken, which adds incredible depth to our sauce. Get ready for an explosion of aromas!
- Using the same skillet you cooked the chicken in (do not clean it, those browned bits are flavor!), reduce the heat to medium. Add 2 tablespoons of unsalted butter and 1 tablespoon of olive oil. Let the butter melt and combine with the olive oil.
- Add the finely diced yellow onion to the skillet. Sauté the onion for about 5-7 minutes, stirring occasionally, until it becomes soft, translucent, and fragrant. We’re looking for a gentle caramelization here, which brings out the onion’s natural sweetness.
- Once the onion is tender, add the minced garlic. Cook for another 1-2 minutes, stirring constantly, until the garlic is incredibly aromatic. Be careful not to burn the garlic, as burnt garlic can taste bitter. Keep a close eye on it!
- Now, let’s introduce one of our key Tuscan ingredients: the sun-dried tomatoes. Add the drained and thinly sliced sun-dried tomatoes to the skillet with the onions and garlic. Sauté for 2-3 minutes, allowing their concentrated, sweet-tart flavor to bloom in the hot oil. They’ll soften up beautifully.
- Pour in the 1 cup of chicken broth. This is your chance to deglaze the pan! Use a wooden spoon or spatula to scrape up all those delicious browned bits (the fond) from the bottom of the skillet. Those little morsels are packed with flavor from our chicken and will enrich the entire sauce. Bring the broth to a gentle simmer and let it reduce slightly, by about a quarter, for 2-3 minutes. This concentrates the broth’s flavor.
- Reduce the heat to medium-low. Stir in the 1 ½ cups of heavy cream and ½ cup of milk. Whisk gently to combine everything thoroughly. Bring the sauce to a very gentle simmer, just enough for small bubbles to appear around the edges. Do not bring it to a rolling boil, as heavy cream can curdle if boiled too vigorously. Let it simmer gently for about 5-7 minutes, stirring occasionally, to allow the sauce to thicken slightly and the flavors to meld. It should coat the back of a spoon.
- Now for the greens! Add the fresh spinach to the simmering sauce. It might seem like a lot, but spinach wilts down significantly. Stir it in batches if needed, allowing it to wilt into the creamy sauce. This usually takes just 2-3 minutes. The vibrant green of the spinach will be a lovely contrast to the creamy sauce.
- Remove the skillet from the heat. Stir in the ½ cup of grated Parmesan cheese. Stir until the cheese is completely melted and smoothly incorporated into the sauce. Adding the cheese off the heat or at a lower temperature prevents it from clumping or becoming stringy.
- Taste the sauce. This is a crucial step! Adjust the seasoning with salt and freshly ground black pepper as needed. Remember that the Parmesan cheese is salty, so add salt gradually. You want a beautifully balanced flavor profile that sings on your palate.
- Finally, stir in half of the chopped fresh basil (about 2 tablespoons) into the sauce. This adds a wonderful fresh, aromatic note that brightens the entire dish.
Cooking the Pasta
While our beautiful sauce is simmering and melding, let’s get our pasta cooked to al dente perfection. The key here is proper salting of the water and not overcooking, as the pasta will finish cooking briefly in our sauce.
- Bring a large pot of water to a rolling boil over high heat. A good rule of thumb is to use at least 4-6 quarts of water for every pound of pasta to ensure it has enough room to cook properly and not stick together.
- Once the water is boiling vigorously, add 1-2 teaspoons of salt to the water. Don’t be shy with the salt; this is your only chance to season the pasta itself from the inside out, making it flavorful rather than bland. The water should taste like the sea.
- Add your chosen pasta (fettuccine, penne, etc.) to the boiling salted water. Stir immediately to prevent the pasta from sticking together, especially if you’re using long strands like fettuccine.
- Cook the pasta according to the package directions, but aim for al dente. This means it should be firm to the bite, with a slight resistance in the center, but not crunchy. Since the pasta will be tossed in the sauce, cooking it slightly under will prevent it from becoming mushy. Typically, this is about 8-10 minutes for most dry pasta shapes.
- Before draining, reserve about 1 cup of the starchy pasta cooking water. This pasta water is liquid gold! It’s salty and starchy, and can be used to thin out the sauce if it becomes too thick, helping it cling beautifully to the pasta.
- Carefully drain the cooked pasta in a colander. Do not rinse the pasta; rinsing removes the starch that helps the sauce adhere.
Bringing It All Together
The moment of truth! This is where all our delicious components unite to create the glorious Creamy Tuscan Chicken Pasta. We’ll ensure every strand of pasta and every piece of chicken is coated in that luscious sauce.
- Add the drained pasta directly into the skillet with the creamy Tuscan sauce. Make sure the sauce is still warm over very low heat, or gently reheat it if it has cooled down too much.
- Add the sliced or diced cooked chicken back into the skillet with the pasta and sauce.
- Using tongs or two large spoons, gently toss everything together. Ensure that every piece of chicken and every strand or piece of pasta is thoroughly coated with the rich, creamy sauce. This is where you get to appreciate the beautiful texture and aroma of your creation.
- If the sauce appears too thick or isn’t coating the pasta as evenly as you’d like, add a splash or two of the reserved pasta cooking water, a tablespoon at a time, until you reach your desired consistency. The starch in the water will help the sauce emulsify and cling perfectly.
- Give it one final taste. Adjust salt and pepper one last time if necessary. Sometimes, a little extra freshly cracked black pepper can really elevate the dish.
- Remove the skillet from the heat. Your Creamy Tuscan Chicken Pasta is now ready to be served!
Serving Suggestions and Tips
Presentation is key, and a few finishing touches can truly make this dish shine. This pasta is a meal in itself, but a few accompaniments can make it even more special.
- Serve the pasta immediately in warm bowls. This dish is best enjoyed fresh off the stove.
- Garnish each serving generously with the remaining chopped fresh basil. The fresh basil not only adds a burst of vibrant color but also provides a delightful fresh aroma and flavor that perfectly complements the rich sauce.
- Offer extra grated Parmesan cheese at the table for those who love an extra sprinkle of cheesy goodness. A little extra cheese never hurt anyone, right?
- For a complete meal, consider serving alongside a crisp green salad with a light vinaigrette to cut through the richness of the pasta. A side of crusty garlic bread is also absolutely wonderful for soaking up every last drop of that incredible sauce.
- Leftovers: If you happen to have any leftovers (which is rare with this dish!), store them in an airtight container in the refrigerator for up to 3-4 days. To reheat, gently warm on the stovetop over low heat, adding a splash of chicken broth or milk to loosen the sauce as it tends to thicken in the fridge.
- Variations: Feel free to experiment! You could add sautéed mushrooms or bell peppers along with the onions for extra vegetables. A squeeze of fresh lemon juice at the end can also add a bright, zesty note if you like. For a touch of heat, you can increase the red pepper flakes. This recipe is wonderfully adaptable to your taste!
- Wine Pairing: A crisp, unoaked Chardonnay or a light-bodied Pinot Grigio would pair beautifully with the creamy, savory flavors of this Tuscan chicken pasta. Enjoy every delightful bite!
Conclusion:
And there you have it, my friends! We’ve journeyed together through the delightful steps of creating this truly magnificent dish, and I sincerely hope you’re as excited to try it as I am to share it with you. This isn’t just another recipe; it’s an experience, a journey of flavors and textures that culminates in something truly extraordinary. What makes this recipe an absolute must-try? For starters, its incredible versatility means it fits seamlessly into almost any occasion, from a cozy weeknight dinner to an impressive centerpiece for a special gathering. It strikes that perfect balance of being wonderfully comforting and surprisingly elegant, making it a guaranteed crowd-pleaser that will have everyone asking for seconds, and undoubtedly, for the recipe itself.
I’ve crafted this dish to be incredibly forgiving, so even if you consider yourself a novice in the kitchen, you’ll find the steps straightforward and the results consistently fantastic. The blend of simple, readily available ingredients transforms into something far greater than the sum of its parts, proving that you don’t need an exotic pantry to create culinary magic. It’s the kind of dish that warms you from the inside out, offering a deep, rich flavor profile that lingers delightfully on the palate. Plus, the aroma alone as it cooks will fill your home with an inviting scent that promises pure deliciousness, making the anticipation almost as enjoyable as the first bite. There’s something truly magical about this dish, a certain je ne sais quoi that makes it incredibly addictive. You could almost give it a unique ID for its perfection, something akin to ?ssp_iabi=1677102382723 because it hits all the right notes every single time.
Elevate Your Dining Experience with These Serving Suggestions:
While this dish shines brightly all on its own, I’ve got a few ideas to help you elevate it even further or adapt it to your preferences. For a complete and utterly satisfying meal, I highly recommend serving it alongside a bed of fluffy quinoa or wild rice, which will beautifully soak up all those incredible juices. A simple, crisp green salad with a light vinaigrette provides a refreshing counterpoint, cutting through the richness and adding a lovely textural contrast. If you’re looking to impress, consider garnishing with a sprinkle of freshly chopped herbs – parsley, chives, or even a touch of fresh basil can add a vibrant burst of color and a fresh aromatic lift. Don’t underestimate the power of a squeeze of lemon juice right before serving; it truly brightens all the flavors!
Creative Variations to Spark Your Culinary Imagination:
Now, let’s talk about making this recipe uniquely yours! The beauty of this base recipe is its adaptability. Feeling adventurous? Try swapping out a main ingredient. For a delightful seafood twist, consider using large, succulent shrimp or tender scallops; just be mindful of their shorter cooking times. Vegetarians, rejoice! This recipe can be wonderfully adapted by substituting the protein with hearty portobello mushrooms, robust chickpeas, or even firm tofu, ensuring everyone at your table can enjoy its amazing flavors. If you’re a fan of a little heat, a pinch of red pepper flakes or a dash of your favorite hot sauce stirred in during the final stages will give it a fantastic kick. For a creamier finish, a dollop of crème fraîche or a swirl of coconut milk can transform the sauce into something even more luxurious and decadent. Don’t be afraid to experiment with different spices; a touch of smoked paprika or a hint of ground coriander can introduce exciting new dimensions to the dish. The possibilities are truly endless, and I encourage you to play around and discover your own favorite combinations.
Your Culinary Adventure Awaits!
So, what are you waiting for? Gather your ingredients, put on your favorite apron, and get ready to create something truly special. I have no doubt that this recipe will quickly become a cherished staple in your kitchen, a reliable source of comfort and delight that you’ll return to again and again. Don’t just read about it, make it! Trust me, your taste buds will thank you. And once you’ve experienced the magic of this dish, I would absolutely love to hear about it. Did you make any creative substitutions? What did your friends and family think? Did it become an instant hit? Please, don’t hesitate to share your experiences, your successes, and even your “aha!” moments in the comments below or on your favorite social media platform. Your feedback and stories inspire me and help our wonderful community of home cooks grow. Happy cooking, and I can’t wait to hear all about your delicious journey!

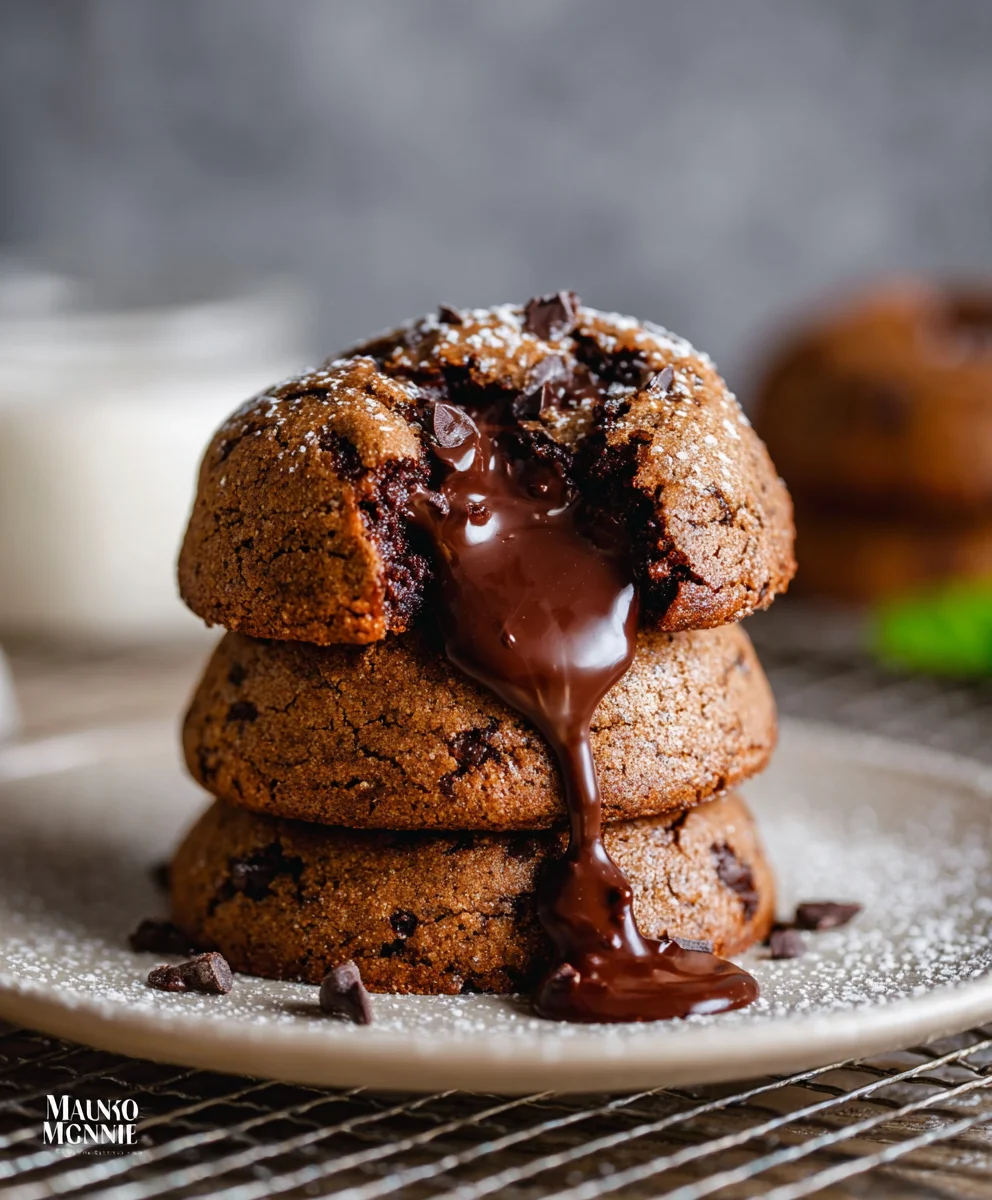
The Ultimate Comfort Cookie (Identifier: ?ssp_iabi=1677102382723)
This recipe, identified by ?ssp_iabi=1677102382723, symbolizes a heartwarming experience. Imagine a treat so deeply satisfying, so rich in flavor, that it feels like a warm embrace. These chocolate chip walnut cookies promise to transform simple ingredients into an unforgettable culinary delight, consistently bringing smiles and comfort to every table it graces. Perfect for sharing stories and creating indelible memories.
Ingredients
-
2 ⅔ cups all-purpose flour
-
2 tablespoons cornstarch
-
1 teaspoon baking powder
-
¾ teaspoon baking soda
-
1 teaspoon sea salt
-
1 cup butter, softened
-
¾ cup brown sugar, packed
-
½ cup sugar
-
2 eggs
-
1 teaspoon vanilla extract
-
2 cups walnuts, coarsely chopped
-
2 cups semisweet chocolate chips
Instructions
-
Step 1
Preheat oven to 375°F (190°C) and line baking sheets with parchment paper. -
Step 2
In a medium bowl, whisk together flour, cornstarch, baking powder, baking soda, and salt. Set aside. -
Step 3
In a large bowl, cream together softened butter, brown sugar, and granulated sugar until light and fluffy. Beat in eggs one at a time, then stir in vanilla extract. -
Step 4
Gradually add the dry ingredient mixture to the wet ingredients, mixing until just combined. Fold in coarsely chopped walnuts and semisweet chocolate chips. -
Step 5
Drop rounded spoonfuls of dough onto prepared baking sheets. Bake for 10-12 minutes, or until edges are golden and centers are set. Cool on baking sheets for a few minutes before transferring to a wire rack.
Important Information
Nutrition Facts (Per Serving)
It is important to consider this information as approximate and not to use it as definitive health advice.
Allergy Information
Please check ingredients for potential allergens and consult a health professional if in doubt.


Leave a Comment