
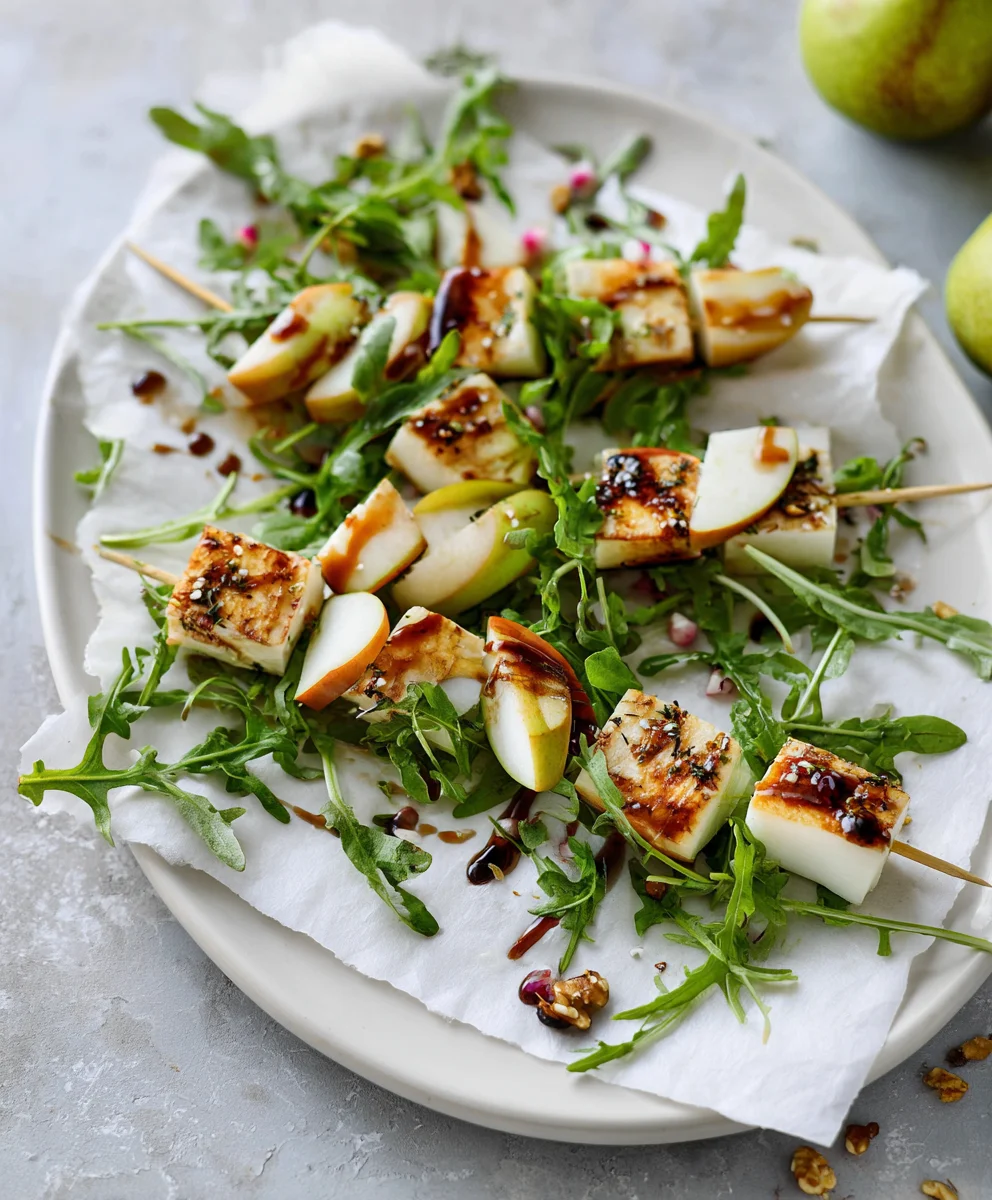
Pear Brie Salad Skewers – what an exquisite combination of flavors and textures, perfectly presented for any gathering! I am thrilled to share with you a recipe that effortlessly elevates the humble salad into a sophisticated, bite-sized delight. While these specific skewers may not boast centuries of history, they draw inspiration from classic culinary pairings: the esteemed French brie, a cheese enjoyed since the Middle Ages, beautifully complemented by the natural sweetness of pears, a fruit cherished across many cultures. This modern assembly represents the evolution of appetizers, designed for both aesthetic appeal and convenient enjoyment.
People absolutely adore this dish not just for its stunning visual presentation, but for the symphony of tastes it offers. Imagine the creamy, decadent richness of brie melting in your mouth, followed by the crisp, sweet freshness of pear, a hint of peppery arugula, and the satisfying crunch of toasted walnuts, all brought together with a delicate balsamic glaze. It’s a harmonious blend that appeals to a wide palate. Furthermore, the sheer convenience of a skewer makes it the ultimate party food – no plates or forks required! Whether you’re hosting a holiday party, a casual brunch, or simply looking for an elegant starter, these Pear Brie Salad Skewers are guaranteed to impress your guests and become a cherished addition to your recipe repertoire.

Ingredients:
- For the Skewers:
- 3-4 medium-sized ripe but firm pears (such as Anjou, Bosc, or Bartlett), yielding about 20-24 slices
- 1 (8 ounce) wheel of creamy Brie cheese, chilled for easier handling
- 4 ounces thinly sliced prosciutto, preferably a high-quality variety
- 5 ounces baby arugula, thoroughly washed and dried
- ½ cup walnuts, raw or lightly toasted for enhanced flavor
- ¼ cup fresh mint leaves, finely chopped
- 20-24 (6-inch) wooden or bamboo skewers
- 1 tablespoon fresh lemon juice (for preventing pear browning)
- For the Honey-Balsamic Vinaigrette:
- ¼ cup high-quality balsamic vinegar
- ½ cup extra virgin olive oil, a good robust flavor will make a difference
- 1 teaspoon Dijon mustard, crucial for emulsification
- 1 tablespoon honey, or maple syrup for a vegan option
- ¼ teaspoon fine sea salt, plus more to taste
- ⅛ teaspoon freshly ground black pepper, plus more to taste
Preparing Your Ingredients for the Perfect Pear Brie Salad Skewers
- Prepare the Pears: Begin by thoroughly washing your pears under cool running water. Pat them dry with a clean kitchen towel. Now, for the cutting – this is important for both presentation and structure of your Pear Brie Salad Skewers. Carefully slice each pear in half lengthwise, from the stem to the base. Using a small spoon or a melon baller, gently scoop out the core and any fibrous bits, ensuring you remove all seeds without damaging the fruit’s integrity. Once cored, lay each pear half flat on your cutting board. Using a sharp knife, slice the pear halves crosswise into crescent shapes, aiming for slices that are about ¼-inch thick. You want them substantial enough to hold their shape on the skewer but not so thick that they become unwieldy. As you slice them, immediately brush or toss the pear pieces with 1 tablespoon of fresh lemon juice. This simple step is absolutely vital for preventing oxidation, which causes the pears to brown unattractively. Even, uniform slices will make your Pear Brie Salad Skewers look professionally crafted and ensure even distribution of flavor. Place the prepared pear slices on a plate lined with a paper towel while you prepare the other components.
- Prepare the Brie Cheese: The trick to neatly dicing Brie is to ensure it’s well-chilled. Pop your wheel of Brie into the refrigerator for at least 30 minutes, or even an hour, before you plan to cut it. A cold cheese will resist sticking to your knife and hold its shape much better. Once chilled, unwrap the Brie and place it on your cutting board. Using a sharp, thin-bladed knife, first slice the wheel into quarters, like you would a pie. Then, take each quarter and slice it into smaller, manageable strips. Finally, dice these strips into bite-sized cubes, approximately ¾-inch on each side. Try to keep the cubes relatively uniform in size, as this will contribute to the appealing presentation and ease of eating your finished Pear Brie Salad Skewers. The rind is completely edible and provides a lovely textural contrast, so there’s no need to remove it. Return the cubed Brie to the refrigerator to keep it firm while you work on other elements.
- Prepare the Prosciutto: Thinly sliced prosciutto is a dream to work with, but it can be delicate. Gently separate the slices of prosciutto, laying them flat on a clean surface. For our Pear Brie Salad Skewers, we want to create elegant little bundles. Take each slice and fold it lengthwise in half, then fold it again in half, creating a neat, ribbon-like strip. This makes it easier to thread onto the skewer and adds a lovely visual texture and rich, savory counterpoint to the sweetness of the pear. If your prosciutto slices are particularly wide, you might even consider cutting them in half crosswise before folding to create smaller, more manageable pieces that fit better on the skewers without overwhelming the other ingredients. Arrange the folded prosciutto strips on a plate, ready for assembly.
- Toast the Walnuts (Optional but Recommended): While not strictly necessary, toasting walnuts brings out their nutty flavor and adds an extra layer of depth to your Pear Brie Salad Skewers. Preheat your oven to 350°F (175°C) or simply use a dry skillet on medium heat on the stovetop. If using the oven, spread the walnuts in a single layer on a baking sheet and bake for 5-7 minutes, stirring once or twice, until they are fragrant and slightly darker in color. If using a skillet, toss them frequently for 3-5 minutes. Be vigilant, as nuts can burn quickly! Once toasted, remove them from the heat and let them cool completely. Once cool, roughly chop them. The rough chop ensures you get lovely textural bits throughout.
- Wash and Chop Fresh Herbs: Thoroughly wash your baby arugula and fresh mint leaves under cold water. Gently pat them dry with paper towels or use a salad spinner to remove excess moisture. For the mint, stack the leaves, roll them tightly, and then thinly slice them into a chiffonade. This delicate cut makes them easier to incorporate and enhances their aromatic release. Set aside these fresh components, which will add a vibrant, peppery, and fresh dimension to our beautiful Pear Brie Salad Skewers.
Crafting the Exquisite Honey-Balsamic Vinaigrette for Your Pear Brie Salad Skewers
- Combine Vinegar and Flavorings: In a medium-sized bowl or a liquid measuring cup with a spout (which makes pouring easier), combine the ¼ cup of balsamic vinegar, 1 teaspoon of Dijon mustard, and 1 tablespoon of honey. The Dijon mustard acts as an essential emulsifier, helping to bind the oil and vinegar together, preventing them from separating too quickly. The honey adds a touch of sweetness that beautifully complements the tang of the balsamic, creating a perfectly balanced dressing for our Pear Brie Salad Skewers.
- Season the Base: Add ¼ teaspoon of fine sea salt and ⅛ teaspoon of freshly ground black pepper to the vinegar mixture. Use a whisk to vigorously combine these ingredients until the salt is dissolved and the honey is fully incorporated. Whisking ensures that these foundational flavors are evenly distributed before we introduce the oil. Taste a tiny bit – remember, we can always add more seasoning later.
- Emulsify with Olive Oil: Now comes the magic of emulsion. While continuously whisking, slowly, gradually, and steadily drizzle in the ½ cup of extra virgin olive oil. The key here is to add the oil in a thin, continuous stream. The steady whisking action combined with the emulsifying properties of the Dijon mustard will transform the separate liquids into a thick, cohesive, and creamy vinaigrette. Do not rush this step; a slow addition of oil is critical for a stable emulsion. If you add the oil too quickly, the dressing may break, resulting in an oily, separated mixture rather than a smooth, luscious one.
- Adjust Seasoning and Consistency: Once all the olive oil has been incorporated and the dressing is smooth and emulsified, give it a final taste. This is your opportunity to perfect the balance of flavors. You might find it needs a little more salt to brighten it up, or perhaps a touch more pepper for a gentle kick. If you prefer a sweeter dressing, another drizzle of honey wouldn’t hurt. If it feels too thick, a tiny splash of water can thin it out, but usually, this ratio provides a perfect consistency for drizzling over your Pear Brie Salad Skewers. Set the vinaigrette aside, or cover and refrigerate if preparing in advance. If refrigerated, let it come to room temperature and give it another good whisk before serving, as some separation is natural over time.
Assembling Your Elegant Pear Brie Salad Skewers
- Prepare Your Workstation: Gather all your prepared ingredients: the lemon-coated pear slices, chilled Brie cubes, folded prosciutto, washed arugula, chopped toasted walnuts, and chopped fresh mint. Have your 6-inch wooden skewers ready. If using bamboo skewers and you have time, a quick 15-minute soak in water can prevent minor splintering and make threading a bit smoother, though for short skewers used for cold items, it’s less critical.
- Begin Assembling – The Foundation: Let’s start building these beautiful Pear Brie Salad Skewers. The first item to thread sets the tone. Take one of your wooden skewers. Carefully thread one of the lemon-brushed pear slices onto the skewer. I like to thread it closer to the bottom, leaving a little room for handling. The curved shape of the pear slice can be threaded through its wider, outer edge. This creates a stable base and introduces the star fruit of our appetizer right away.
- Adding the Savory Layer: Next, take one of your folded prosciutto ribbons. Thread it onto the skewer, pushing it gently down against the pear slice. The prosciutto adds a wonderful salty, umami note that perfectly contrasts the sweet, crisp pear. Its soft texture also helps to cushion the other ingredients. Make sure the prosciutto is securely threaded so it doesn’t unravel.
- Introducing the Creamy Brie: Now for the indulgence! Carefully thread one of the chilled Brie cheese cubes onto the skewer. Gently push it down so it rests against the prosciutto. The creamy, rich texture of the Brie is truly a highlight, and its mild flavor provides a fantastic counterpoint to both the pear and prosciutto. The chilled Brie should hold its shape well during this process, making it easy to pierce cleanly with the skewer.
- Adding Freshness with Arugula: Here’s where the “salad” part of our Pear Brie Salad Skewers really comes in. Take a small cluster of 3-4 baby arugula leaves. Fold them gently in half or gather them into a small bundle, and then thread them onto the skewer. The peppery bite of the arugula is essential for cutting through the richness of the cheese and prosciutto, adding a refreshing, vibrant element. Don’t overload the skewer with too much arugula; just a small, elegant bunch is perfect.
-
Repeating the Pattern for Fullness: To create a substantial and visually appealing skewer, repeat the layering process once more.
- Thread another pear slice onto the skewer.
- Follow with another folded prosciutto ribbon.
- Then, another cube of Brie cheese.
- Finish with another small bundle of baby arugula leaves, gently pushing all components down to compact them slightly, but not so much that they become squashed.
This creates a beautiful, layered look and ensures a good distribution of all flavors in every bite of your Pear Brie Salad Skewers. Leave about an inch or two of the skewer exposed at the top for easy handling.
- Continue Assembling All Skewers: Repeat this entire assembly process for the remaining ingredients until all 20-24 skewers are built. As you assemble each one, place it carefully on a large serving platter or a baking sheet lined with parchment paper. Try to make them as consistent as possible in terms of the amount of each ingredient and their placement – this uniformity will make your presentation even more impressive. You’ll find a rhythm quickly, and before you know it, you’ll have a stunning array of these gourmet appetizers.
Final Touches and Serving Your Magnificent Pear Brie Salad Skewers
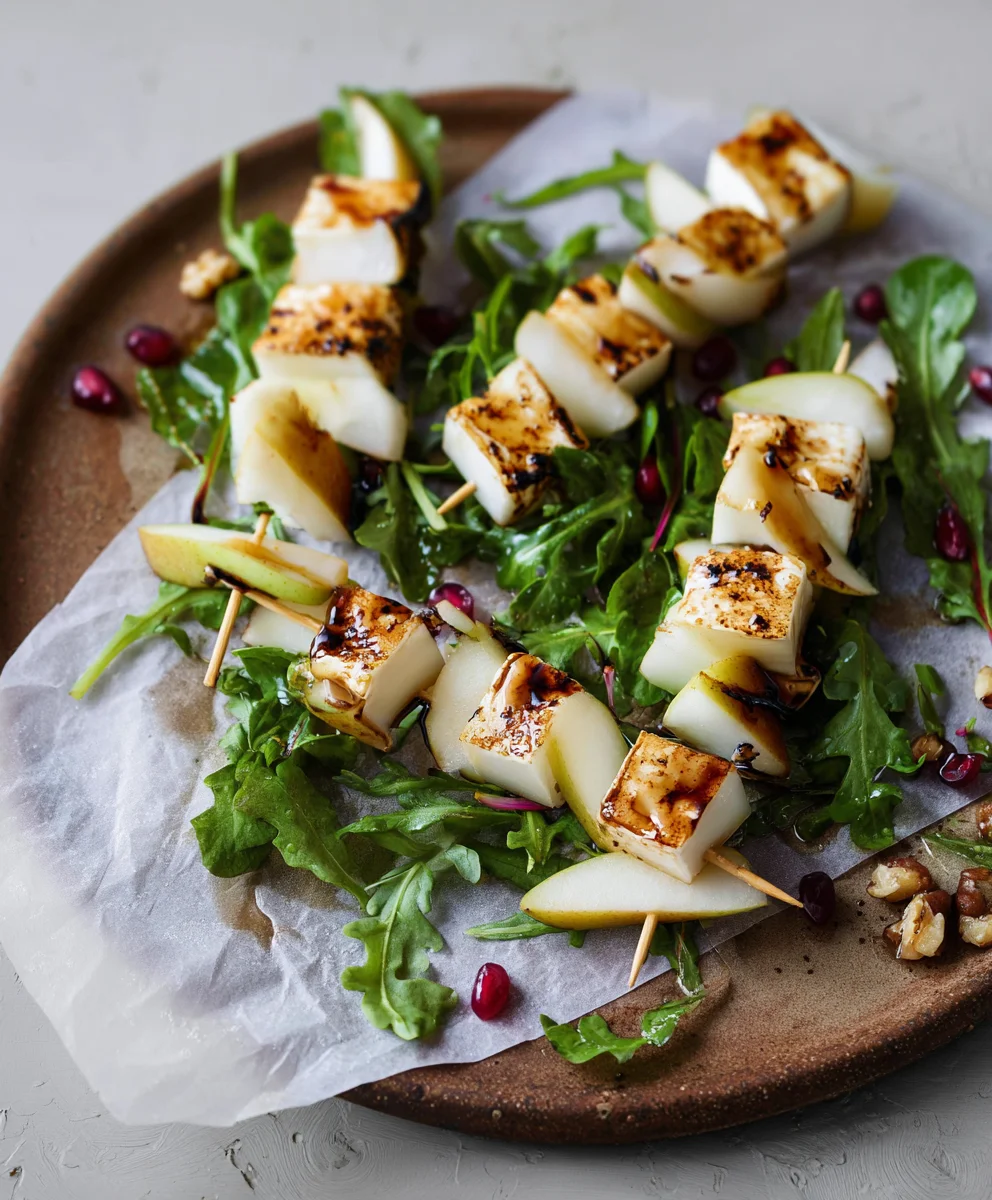
- Garnishing with Walnuts and Mint: Once all your Pear Brie Salad Skewers are beautifully assembled and arranged on your chosen serving platter, it’s time for the final flourish. Generously sprinkle the chopped toasted walnuts over the skewers. The walnuts add a delightful crunch and a warm, earthy flavor that complements the sweetness of the pear and the richness of the Brie. Next, scatter the finely chopped fresh mint leaves over everything. The mint not only provides a pop of fresh, green color but also a burst of invigorating aroma and a cooling counterpoint to the other flavors. These small additions elevate the dish significantly, transforming them into truly gourmet Pear Brie Salad Skewers.
- Drizzling the Honey-Balsamic Vinaigrette: Just before serving, take your prepared Honey-Balsamic Vinaigrette. If it has separated at all, give it a vigorous whisk to re-emulsify it. Then, elegantly drizzle the dressing over the assembled skewers. You want just enough to lightly coat the ingredients, imparting that incredible tangy-sweet flavor, without making the skewers overly soggy. A little goes a long way in enhancing the overall taste profile of these delightful Pear Brie Salad Skewers. You can also serve extra dressing on the side in a small pitcher or bowl, allowing guests to add more to their individual liking.
- Serving Suggestions and Presentation: These Pear Brie Salad Skewers are best served immediately or within 1-2 hours of assembly. They make a fantastic appetizer for dinner parties, a sophisticated addition to a brunch spread, or a light and elegant snack. Arrange them artfully on a large platter, perhaps interspersed with a few extra mint sprigs for added visual appeal. Their vibrant colors and intricate layering make them a stunning centerpiece for any gathering.
- Storage Tips: If you have any leftover Pear Brie Salad Skewers, they can be stored in an airtight container in the refrigerator for up to 24 hours. However, the pears may start to soften, and the arugula might wilt slightly after a few hours, especially if dressed. For optimal freshness, it’s always best to assemble and dress them closer to serving time. If preparing ahead, keep the ingredients separate and assemble just before your guests arrive, and definitely hold off on drizzling the dressing until the last moment. This ensures every bite of your Pear Brie Salad Skewers is as fresh and delightful as possible. Enjoy the creation of these beautiful and delicious appetizers!
<h2>Conclusion:</h2>
<p>Well, my friends, we’ve reached the sweet and savory grand finale, and I truly hope you’re feeling inspired to bring this delightful creation to your own table. I genuinely believe that these <strong>Pear Brie Salad Skewers</strong> are more than just a recipe; they’re an experience waiting to happen. What makes them an absolute must-try, in my humble opinion, is their incredible balance of flavors and textures. You have the crisp, refreshing sweetness of the ripe pear, perfectly complemented by the creamy, earthy indulgence of the brie cheese. Then, there’s the peppery bite of arugula, adding a sophisticated edge, all tied together with the crunch of walnuts and a delicate drizzle of something sweet. It’s a symphony for the senses, an appetizer that feels gourmet yet is surprisingly simple to assemble. Whether you’re hosting an elegant dinner party, looking for a light and refreshing lunch option, or just want to impress your family with something a little out of the ordinary, these skewers are your secret weapon. They prove that you don’t need complex techniques or obscure ingredients to create something truly memorable and utterly delicious. I’ve personally seen them disappear from platters faster than I can put them out, and that, to me, is the ultimate testament to their irresistible charm. They offer a refreshing alternative to heavier appetizers, leaving your palate cleansed and eager for more, rather than weighed down. Furthermore, their visual appeal is undeniable; they are miniature works of art, bringing a vibrant splash of color and elegance to any spread. </p>
<h4>Serving Suggestions and Creative Variations:</h4>
<p>Now, let’s talk about how to make these skewers truly shine on your table, and how you can get creative with them. For serving, I highly recommend arranging them artfully on a large white platter or a rustic wooden board. The contrast will make their colors pop beautifully. You could even garnish the platter with a few extra arugula leaves or a sprinkle of chopped walnuts for an added touch of elegance. As for pairings, they are absolutely divine with a glass of crisp white wine, perhaps a Sauvignon Blanc or a Pinot Grigio, which will highlight the freshness of the pear. For non-alcoholic options, a sparkling cider or even a light iced tea would be a lovely complement. I’ve also found they make a fantastic side to a simple grilled chicken breast or a light minestrone soup, transforming a casual meal into something more special. </p>
<p>But don’t stop there! The beauty of these Pear Brie Salad Skewers lies in their adaptability. You can easily switch up the ingredients to suit your taste or what you have on hand. For a different cheesy experience, consider using soft goat cheese for a tangier profile, or even a milder provolone if brie isn’t your favorite. If pears aren’t in season, crisp apple slices (like Honeycrisp or Granny Smith) work wonderfully, offering a similar crunch and sweetness. Figs or grapes can also be delightful substitutes, especially when in season. To add another layer of flavor and texture, think about incorporating a protein: a small piece of prosciutto, thinly sliced salami, or even some smoked salmon would elevate these to another level. For an extra nutty crunch, try pecans or pistachios instead of walnuts. And if you’re looking to make this a more substantial dish, simply deconstruct the skewers! Toss all the ingredients into a bowl with your favorite vinaigrette, and you’ve got yourself a beautiful and robust salad. You could even add some grilled halloumi or pan-fried chicken pieces to make it a main course. The possibilities are truly endless, and that’s what makes this recipe so exciting – it’s a foundation for your culinary creativity. </p>
<h4>Your Turn to Create and Share!</h4>
<p>So, what are you waiting for? I wholeheartedly encourage you to give these <strong>Pear Brie Salad Skewers</strong> a try. Seriously, you won’t regret it. They are simple to prepare, yet yield such impressive results, both in taste and presentation. There’s a certain joy that comes from creating something beautiful and delicious with your own hands, and I promise you’ll feel incredibly proud when you serve these. Don’t be afraid to experiment with the variations I’ve suggested, or even come up with your own unique twists. Cooking should always be an adventure, a chance to express yourself in the kitchen. Once you’ve whipped up your batch, I would absolutely love to hear about your experience! Did you stick to the original recipe, or did you put your own spin on it? What did your guests or family think? Please feel free to share your photos and stories with me. Your feedback and creations truly inspire me and are what makes this culinary journey so rewarding. Happy skewering, my friends, and I can’t wait to hear all about your delicious endeavors!</p>
Pear Brie Salad Skewers
An exquisite combination of creamy brie, crisp pear, savory beef prosciutto, peppery arugula, and crunchy walnuts on a skewer, finished with balsamic glaze. Perfect sophisticated party bites for any gathering.
Ingredients
-
2 pears
-
8 ounces Brie cheese (approx. 225 grams), chilled and cubed
-
4 ounces thinly sliced beef prosciutto, folded
-
2 cups baby arugula, washed and dried
-
1/4 cup raw walnuts, chopped
-
1/4 cup fresh mint leaves, chopped
-
20-24 (6-inch) wooden skewers
-
1 tablespoon fresh lemon juice
-
Balsamic glaze, for drizzling
Instructions
-
Step 1
Prepare Pears: Wash, halve, core, and slice pears into 1/4-inch crescents. Toss immediately with 1 tablespoon lemon juice to prevent browning. -
Step 2
Prepare Brie: Chill Brie, then dice into 3/4-inch cubes. -
Step 3
Prepare Beef Prosciutto: Gently separate, then fold each slice of beef prosciutto into ribbon-like strips. -
Step 4
Toast Walnuts (Optional): Lightly toast 1/4 cup walnuts in a dry skillet or oven at 350°F (175°C) for 3-7 minutes until fragrant. Let cool, then roughly chop. -
Step 5
Prepare Arugula & Mint: Wash and dry 2 cups baby arugula. Wash and finely chop 1/4 cup fresh mint leaves. -
Step 6
Assemble Skewers: On each of 20-24 wooden skewers, thread a pear slice, a folded beef prosciutto ribbon, a Brie cube, and a small bundle of arugula leaves. Repeat this pattern for a second layer. -
Step 7
Garnish & Serve: Arrange assembled skewers on a platter. Sprinkle with chopped walnuts and mint. Just before serving, drizzle with balsamic glaze. Serve immediately. -
Step 8
Storage: Store any leftover skewers in an airtight container in the refrigerator for up to 24 hours. Best served fresh.
Important Information
Nutrition Facts (Per Serving)
It is important to consider this information as approximate and not to use it as definitive health advice.
Allergy Information
Please check ingredients for potential allergens and consult a health professional if in doubt.


Leave a Comment